The option to print the results of a quality inspection of a material optimizes the business processes of a company by integrating supply chain activities. Learn how to set up the quality management (QM) master data needed to create an outgoing quality certificate.
Key Concept
An outgoing quality certificate is a company’s official document to confirm that its product has complied with the quality specifications. It is one of the integral dispatch or shipment documents.
It may be a company’s business need or practice to accompany every delivery of a customer’s order with an outgoing quality certificate to share quality results for inter-company communication. It is far easier than many believe to implement outgoing quality certificates in the quality management (QM) module. The only area for which development work or ABAP programming is involved is in the design of the layouts or forms that are used as quality certificates. Most of the groundwork that you need to implement outgoing quality certificates can be successfully undertaken by an SAP ERP functional consultant or a core team member with sufficient exposure to an SAP ERP system.
I cover the requisite QM master data that you need for outgoing quality certificates and then you can follow an end-to-end process in which I show the actual output of the outgoing quality certificate.
Because you can implement outgoing quality certificates even after completion of an SAP ERP implementation in your company, a practical approach would be to thoroughly assess the areas and processes in which you can implement diverse uses of quality certificates. Once this activity is complete and insight is gained on the series of activities involved, you can consider implementing an outgoing quality certificate as a mini-project or as part of ongoing business process improvement effort.
I now begin with the necessary master data that you need in SAP ERP for outgoing certificates.
Master Data for Outgoing Quality Certificates
There are four required steps to configure the master data:
- Activate an inspection type in the QM view in the material master
- Create an inspection plan
- Create a certificate profile
- Assign a certificate profile
You need to activate the relevant inspection type of the material in the system as well as create its inspection plan before you can use it for creation of outgoing quality certificate. Further, you also need to create a certificate profile and assign it to all the relevant materials to enable the system to automatically generate outgoing certificates.
Step 1. Activate an Inspection Type in the QM View in the Material Master
To get to the QM view of the material master, execute transaction code MM02. This action opens the screen shown in
Figure 1 in which you enter 1675 in the Material field and 1000 in the Plant field. Click the Quality management tab to see the Quality Management view of material 1675. Click the Insp. setup button.
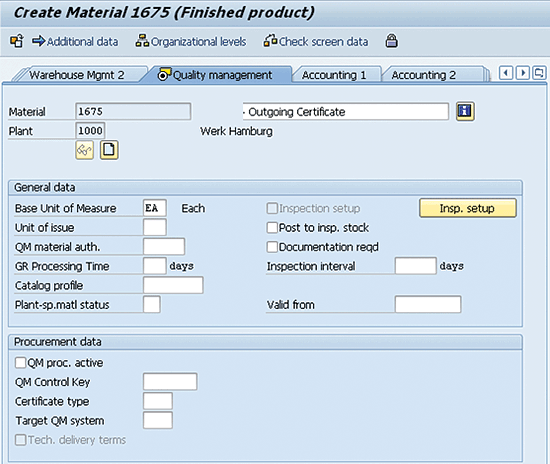
Figure 1
QM view of material master for inspection setup
In the next screen (
Figure 2), the available standard inspection type 89 is available to select. This inspection type is used for manual inspection. Make sure to select the check box under the Active column so that inspection type 89 is active. Click the inspection type detail icon

to bring up the detailed information on the inspection type section seen at the bottom of
Figure 2.
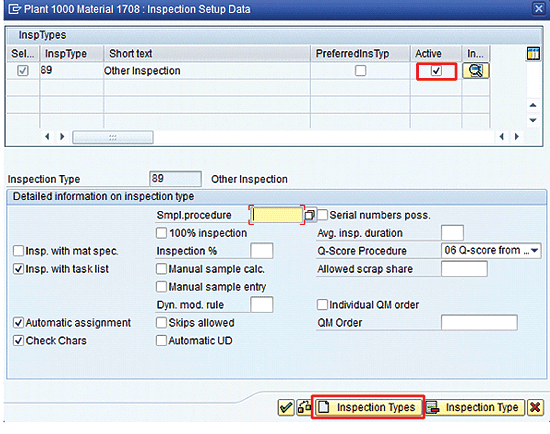
Figure 2
Detailed screen for inspection setup data
Additional important settings in
Figure 2 include:
- The Insp. with task list check box means that you need to define plant-dependent task lists (inspection plan) as QM master data.
- The Automatic assignment check box ensures that the system automatically assigns the relevant inspection plan (task list) on inspection lot creation.
- The Check Chars check box checks the validity and other details of the master inspection characteristic (MIC). An MIC is the physical or the chemical attribute of material that the company wants to inspect to ensure it complies with the predefined quality standards before you use it.
Save the material master by clicking the save icon (not shown) or pressing Ctrl+S.
Step 2. Create an Inspection Plan
The system refers to an inspection plan as the task list during the creation of an inspection lot. An inspection plan can have different uses such as a separate inspection plan for during-production quality checks in which you perform extensive quality checks and results recording, or finished goods inspection that may have a different set of specifications (MICs) to check. An inspection plan consists of previously created MICs.
To create an inspection plan follow menu path Logistics > Quality Management > Quality Planning > Inspection Planning > Inspection Plan > Create or use transaction code QP01. In
Figure 3, I define the Material as 1675 and Plant as 1000 for the creation of an inspection plan. Click the header icon. This action opens the screen shown in
Figure 4.

Figure 3
The initial screen for creating an inspection plan

Figure 4
Header details of the inspection plan
In
Figure 4, I enter the Usage as 3, which is for universal, and the status of the inspection plan is set to 4, which is released. Whenever the system creates an inspection lot of a manual inspection type 89, it searches for an inspection plan in which the usage is defined as 3. A usage specifies the purpose for using a specific inspection plan. A material can have different inspection plans for different usages – for example, for goods receipt-specific usage or for a universal usage. A universal usage can be for all the different inspections or for a goods issuance usage that is used in a sales order-related quality check before goods are sent to the customer against a sales order.
Click the Operations button in
Figure 4 to view the Operations Overview screen as shown in
Figure 5. I assign the work center 1111, on which the quality inspector is expected to carry out the inspection. A work center is a production or assembly line or a quality control laboratory setup, and an inspection is carried out by taking a sample and recording results and taking decisions.
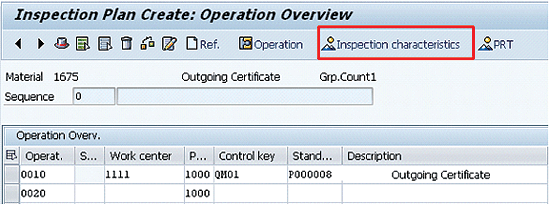
Figure 5
The Operations view of the inspection plan
Select the line item 0010 and click the Inspection characteristics button in
Figure 5. This action displays the screen shown in
Figure 6 in which you assign the previously created MICs QM01 and QM02. All other details are automatically copied from the MICs, such as the upper and lower limits and the target value.

Figure 6
The characteristics overview of the inspection plan
You can now save the inspection plan by pressing Ctrl and S or clicking the save icon
. A message appears informing you that the inspection plan for material 1675 for plant 1000 has been saved. A group is the internal number given to every inspection plan as identification.
Step 3. Create a Certificate Profile
The next step in QM master data is the creation of a certificate profile. A certificate profile holds extensive information on what the system needs to print as an output on the outgoing quality certificate. For example, there may be five different MICs for which you perform results recording, but in the outgoing quality certificate, you only want to print two MICs. Similarly, you can also group several materials having the same MICs in one certificate profile, thereby reducing the time and effort you need to maintain the QM master data.
To create a new certificate profile follow SAP menu path Logistics > Quality Management > Quality Certificates > Outgoing > Certificate Profile > Create or use transaction code QC01. This path takes you to the initial screen for the creation of the certificate profile in (
Figure 7).
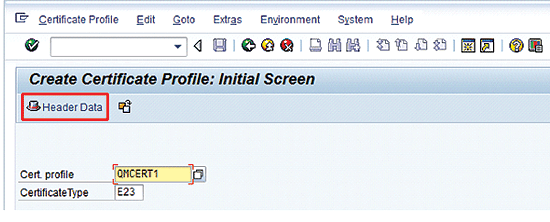
Figure 7
The initial screen for creation of the certificate profile
In
Figure 7 enter the certificate profile as QMCERT1. The preconfigured certificate type given is E23. A certificate type is an identification of the outgoing quality certificate and can be a certificate of compliance or simply a quality certificate. Press Enter or click the Header Data button in
Figure 7 to go to the screen shown in
Figure 8.

Figure 8
Header data of the certificate profile
Figure 8 is the header data of the certificate profile. After you enter a short description of the certificate profile in the Short text field, it is important to assign an SAP Script Form that you use as an output layout. You need to involve an ABAP team member for company-specific development of the final script. The final script may contain the company’s logo as well as the official address along with specific text that you want to print on the certificate.
In my example, use standard script QM_QCERT_01, which is available in the SAP ERP system. Enter QM_QCERT_01 in the Name field of
Figure 8.
You also select the Accepted lots only check box, which ensures that the system only considers inspection lots for which the usage decision is recorded as accepted. It then uses the results of the accepted inspection lots in creating outgoing the quality certificate. This ensures that the system does not take rejected inspection lots into consideration for printing and onward circulation to customers. In my example, restrict the certificate profile to inspection lot origin to 89 only.
Next click the Materials… button in
Figure 8 to go to the screen shown in
Figure 9.
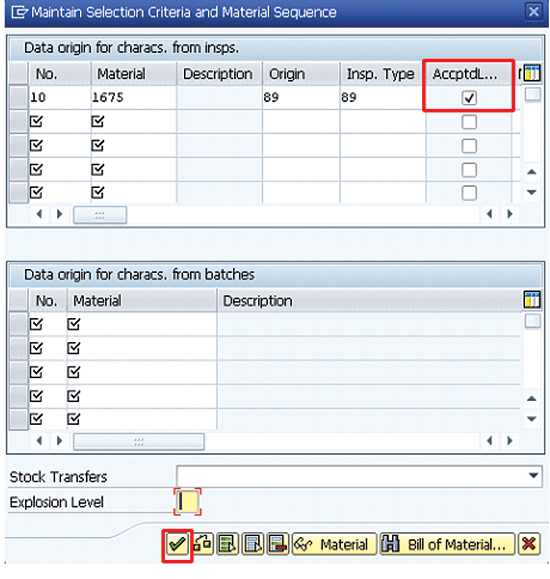
Figure 9
Material assignment to the certificate profile
In
Figure 9, you can assign the material (or materials) with the respective inspection origin and inspection types, which makes use of the certificate profile QMCERT1.
In my example, assign material 1675 with an inspection origin of 89 and an inspection type of 89. Select the AccptdL… check box. Selecting this box ensures that the system only allows accepted inspection lots of materials from usage decisions to make use of the certificate profile. Click the green check mark icon in
Figure 9. This action returns you to
Figure 8.
In
Figure 8, click the Characteristics button to go to the screen shown in
Figure 10.

Figure 10
Characteristics data of the certificate profile
Figure 10 is the characteristic overview of the certificate profile. At this stage, you can assign all the MICs that you want to print on the outgoing certificate. In my example, you assign previously created MICs, QM01 and QM02, and make additional selections. You make these selections so that the results on the outgoing quality certificate are summarized.
Further, you also have the option to output the actual value of the results based on the upper or lower ranges or even on the average. After you enter the MICs with requisite details, click the release icon in
Figure 10 and save the certificate profile.
Step 4. Assign a Certificate Profile
After creating the certificate profile, you can assign it either to a material or group of materials or to a material-customer combination. To create a new assignment of the certificate profile, follow menu path Logistics > Quality Management > Quality Certificates > Outgoing > Certificate Profile > Assignment > Create or use transaction code QC15.
Figure 11 is the initial screen for the assignment of certificate profile. The assignment type QCA1 is standard. Select QCA1 and then click the Key… button to go to the screen shown in
Figure 12.
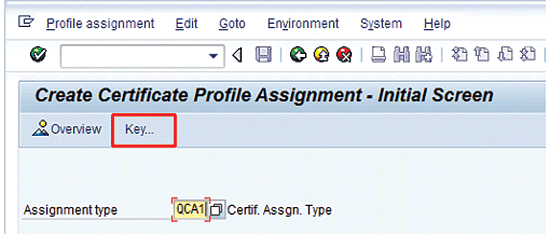
Figure 11
Assignment of the certificate profile

Figure 12
The key combination of certificate profile assignment
In
Figure 12, select the key combination. In my example, select Material and press Enter. This action displays the screen shown in
Figure 13.
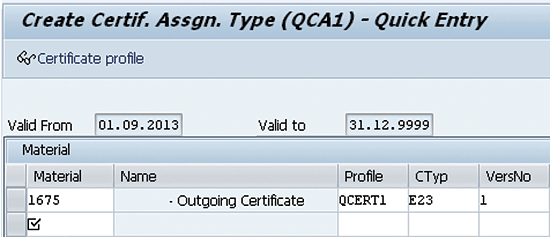
Figure 13
The initial screen to define certificate types
In
Figure 13, define the material, the previously created certificate profile QMCERT1, the name of the certificate type (Outgoing Certificate), the certificate type E23, and the certificate profile version, which is 1. Click the save icon (not shown) to save your entries.
You now have configured all the QM master data that you need to maintain for outgoing quality certificates.
End-to-End Process Flow
To explain the actual use of all the QM master data created so far and how to create the outgoing quality certificate, I now cover the end-to-end process flow. It consists of four steps:
- Create a manual inspection lot
- Record the results of the inspection lot
- Perform a usage decision of the inspection lot
- Create outgoing quality certificate
Step 1. Create a Manual Inspection Lot
To create a manual inspection lot, follow menu path Logistics > Quality Management > Quality Inspection > Inspection Lot > Processing > Create or use transaction code QA01.
Figure 14 is the initial screen to create a manual inspection lot. Enter the material, the plant, and the inspection type, which is 89. Press Enter, which takes you to
Figure 15.
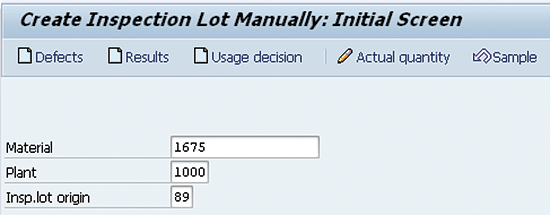
Figure 14
The initial screen for the creation of the inspection lot

Figure 15
The detailed screen for manual inspection lot creation
Figure 15 is the detailed screen for manual inspection lot creation in which the inspection quantity is the mandatory field. Enter an inspection lot quantity of 100. Notice that at the time of creation of a manual inspection lot, the system already assigns an inspection lot number. The system also automatically calculates the sample size of the inspection lot. Save the manual inspection lot by pressing Ctrl+S.
Step 2. Record the Results of the Inspection Lot
You now can proceed to record the results of the inspection lot. Follow menu path Logistics > Quality Management > Quality Inspection > Worklist > Inspection > Change Data or use transaction code QA32. Enter the initial parameters on the selection screen as shown in Figure 16.
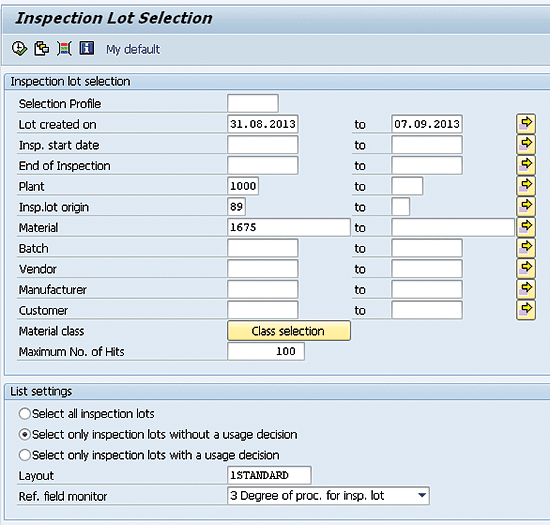
Figure 16
The inspection lot worklist
Press F8 or click the execute icon. This leads to the screen shown in Figure 17.

Figure 17
Manual inspection lot awaiting results recording
Figure 17 is the worklist of all the inspection lots for which the results recording or usage decision has not been taken. Select the inspection lot and click the Results button. This action takes you to the results recording screen in Figure 18 in which the individual specifications of a material and its corresponding MICs are available for reference.
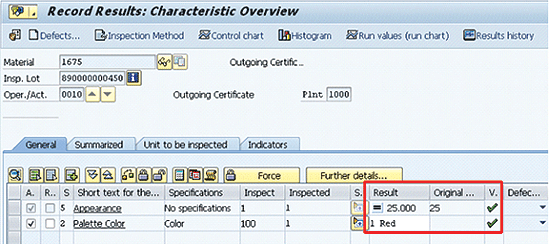
Figure 18
Results recording of the inspection lot
In Figure 18 record the results and save them. Once saved, click the back icon to go to Figure 17.
Step 3. Perform a Usage Decision of the Inspection Lot
The next step is to perform a usage decision of the inspection lot.
Figure 19 is again the worklist for which the results are recorded, but the usage decision is awaited. Notice that the system assigns an inspection lot for which the results are already recorded with the status RREC, which is for results recorded, as shown in
Figure 19.

Figure 19
Inspection lot awaiting usage decision
In
Figure 19, select the relevant inspection lot and click the Usage decision (UD) button. This action opens the screen shown in
Figure 20. In
Figure 20, perform the usage decision by assigning the UD code A for acceptance. Click the save icon (not shown) to save your data.
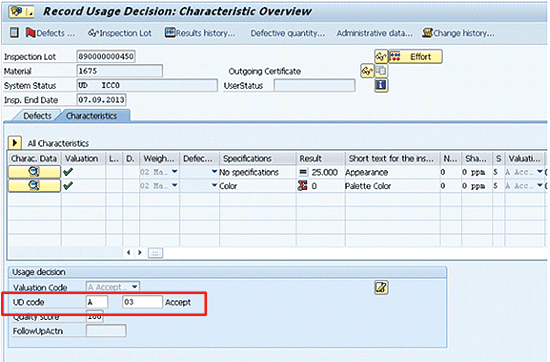
Figure 20
Usage decision of the inspection lot
Step 4. Create an Outgoing Quality Certificate
You can create an outgoing quality certificate with reference to delivery, batch number, or simply an inspection lot. In my example, create the outgoing quality certificate with reference to the inspection lot.
To create a quality inspection certificate for the inspection lot, follow menu path Logistics > Quality Management > Quality Certificates > Outgoing > Certificate Creation > For Inspection Lot or use transaction code QC21. Figure 21 is the initial screen in which you can enter the relevant parameters. Enter the manual inspection lot number for which the results were already recorded and the usage decision taken previously.
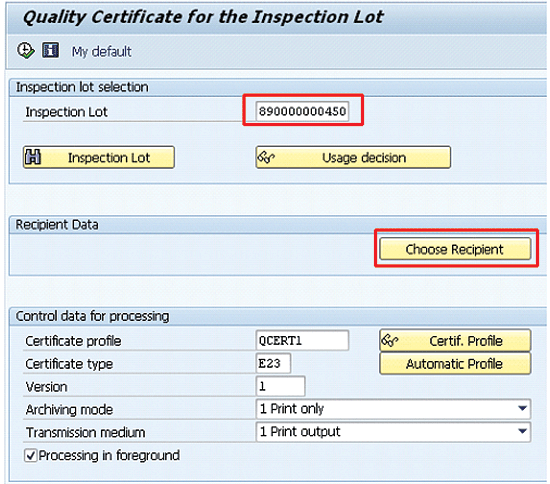
Figure 21
The initial screen for outgoing quality certificate creation
Next, click the Choose Recipient button in Figure 21. This action displays the available options shown in Figure 22.
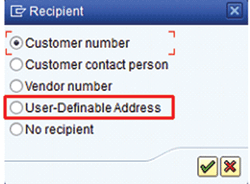
Figure 22
Recipient selection of outgoing quality certificate
Figure 22 allows you to create the outgoing quality certificate for a Customer number, Customer contact person, User-Definable Address (in case you need to send it to an address that does not exists in the SAP ERP system), and finally to a recipient for which you don’t have any address.
In my example in Figure 22, select User-Definable Address and click the green check mark icon, which leads to Figure 23.
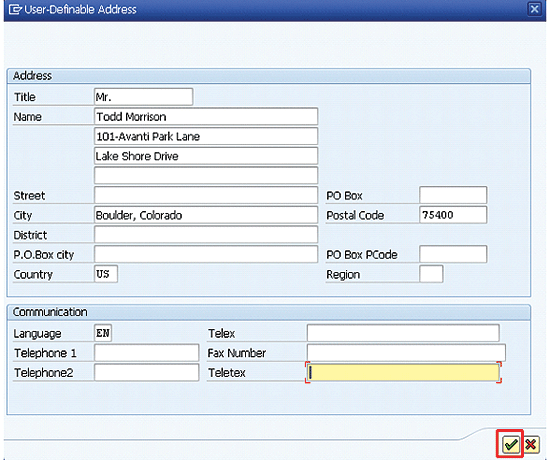
Figure 23
Manual address entry option for outgoing quality certificate
Figure 23 is a pop-up window in which you can manually enter all the details that would print on the outgoing quality inspection certificate. Click the green check mark icon to go to the screen shown in Figure 24.

Figure 24
The print output option for outgoing quality certificate
Figure 24 is the print output option, in which after the relevant printer is given (in my example, it is LP01). Click the Print Preview button in Figure 24, which takes you to Figure 25.
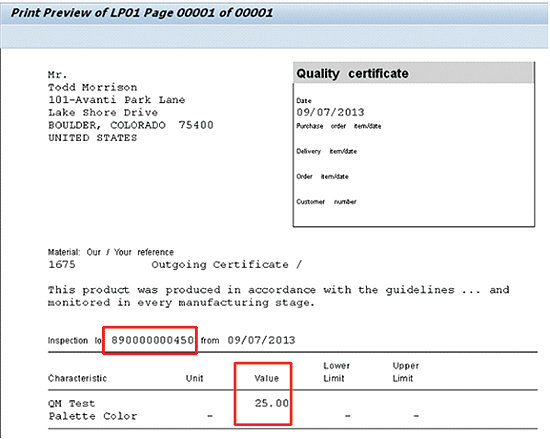
Figure 25
Print preview of outgoing quality certificate
Figure 25 is the print preview of outgoing quality certificate in which the relevant details are available. It contains not only the manually entered address (user-definable address) but also the material number, its description, the inspection lot number, and the results of the MICs.
Note
Separate transaction codes exist for printing outgoing certificates for a customer’s delivery or for batch-managed materials.

Jawad Akhtar
Jawad Akhtar earned his chemical engineering degree from Missouri University of Science and Technology. He has 17 years of professional experience, of which nine years are in SAP. He has completed eight end-to-end SAP project implementation lifecycles in the areas of PP, QM, MM, PM, and DMS in the steel, automobile, chemical, fertilizer, FMCG, and building products industries. He also has worked as an SAP integration manager and an SAP project manager. He has been proactively involved in a business development and solution architect role for seven years. He is the author of
Production Planning and Control with SAP ERP, it's filled with in-depth infomation on discrete, process, and repetitive manufacturing types. His profile on LinkedIn is at
https://pk.linkedin.com/in/jawadakhtar. You may follow Jawad on Twitter @jawadahl. Currently, he is associated with AbacusConsulting as Head of SAP Delivery.
You may contact the author at
jawad.akhtar@live.com.
If you have comments about this article or publication, or would like to submit an article idea, please contact the
editor.


