Discover how SAP system functionality can assist businesses in research and development (R&D) and product improvements. In certain sectors such as pharmaceuticals and the food industry, it is a legal requirement to document and maintain the data related to various tests carried over in the R&D phase for product approvals. Learn step-by-step configuration to realize a real-life business requirement related to the stability test of a product under different physical conditions during product development.
Key Concept
An SAP stability study (also known as a shelf life study at times) is functionality in SAP ERP Central Component (ECC) under the Quality Management (QM) module. QM notification is the prime business object in a stability study. The entire process is managed through notifications.
As a part of its endeavor to address business requirements across industry sectors, SAP released the stability study feature to help in the product development and improvement phase. A stability study enables you to streamline the documentation required for product authorizations in the pharmaceutical, food, and beverage industries.
Before I cover the details of configuring an SAP stability study, I list the following advantages of managing it with SAP ERP:
- Most of the master data required for the stability study is already available in the SAP ERP Central Component (ECC) Quality Management (QM) module.
- Instead of using other third-party applications, businesses already using the QM module for other quality management issues can introduce ECC with minimal end-user training, especially for a stability study.
- An end-to-end stability study can be performed and documented in the same application.
- An accelerated business go-live and a minimal IT project investment are not needed as baseline configuration related to the QM module is already completed.
First, I discuss the design of a stability study in the SAP system, and then I elaborate on the functionality and configuration in detail. In a standard SAP system, there are three notification types available to support different types of stability study business requirements:
- Stability study without material (QR)
- Stability study with material (QS)
- Stability study for a trial (QT)
As the name suggests, stability study without material (QR) is used to conduct stability studies where components or ingredients are referenced, whereas in the stability study with material (QS), the components or ingredients of the stability sample are defined in the bill of materials and mentioned in the stability study. Stability study for a trial (QT) is used to conduct the stability study during the trial phase of the product research and development.
These three notification types are like any other notification types in that you can configure them using transaction code SPRO and also copy these standard notification types and further customize them as required. Notification is the central gateway to trigger and trace most of the business transactions related to a stability study. The stability study process is diagrammed in Figure 1.
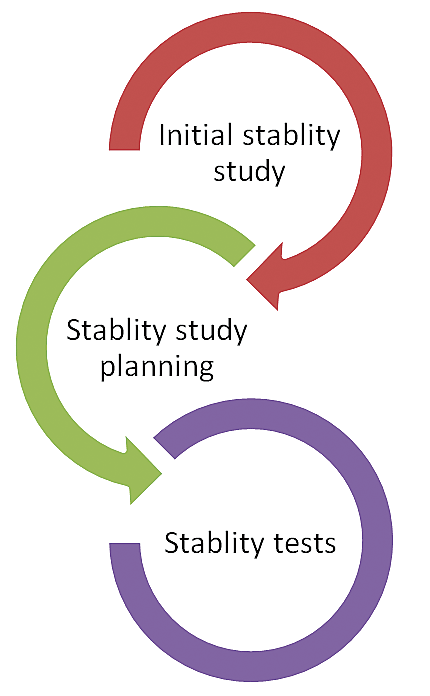
Figure 1
The stability study process
As shown in Figure 1, during the initial stability study phase, a sample is tested to ascertain whether to continue the stability study. Generally, a stability study is conducted over a long period of time, sometimes even for years. Therefore, it is prudent to decide up front, based on the initial sample test result, whether to proceed for the full stability study.
In the stability planning stage, storage conditions under which samples will be stored are specified, the frequency in which these samples will be inspected is defined, and samples are stored in a lab as per the storage condition defined. In the stability tests phase, samples are tested as per the defined test dates or frequency in the planning stage and results from these tests are recorded.
SAP provides the option to have different inspection schedules and characteristics to be inspected for each stability sample maintained under different physical conditions (Table 1).
Sample physical condition
|
Inspection plan for a stability study
|
Inspection frequency
|
Initial sample
|
Inspection plan 1
|
One time
|
Stability study sample 1 - temperature 20 °C 14.7 PSI pressure and away from direct sunlight
|
Inspection plan 2
|
Every 15 days
|
Stability study sample 2 - temperature 20 °C, 14.7 PSI pressure and in direct sunlight
|
Inspection plan 2
|
Every 30 days
|
Stability study sample 3 - temperature 28 °C, 13.66 PSI pressure and away from direct sunlight
|
Inspection plan 3
|
Every 15 days
|
| Stability study sample 4 - temperature 28 °C 13.66 PSI pressure and in direct sunlight |
Inspection plan 4 |
Every 45 days |
Table 1
Stability sample inspection plan and frequency
SAP business objects, especially ones from the QM module such as an inspection lot, physical sample, and batch, are highly leveraged in an SAP stability study design.
Note
In a stability study you use inspection lot, physical sample, and batch, all of which are also used on the wider QM module. If QM is already implemented in the system, then baseline configuration related to these objects already exists and stability study configuration is done on top of it.
Business Case Study
Consider a scenario in which a new drug’s optimum storage condition to retain maximum potency and expiry date needs to be ascertained. Additionally, the process and test results are required to be documented for approval by a regulator authority. I discuss the configurations you need perform for the system to work and then I take you through the end-to-end business process.
Note
Only the instructions for additional SAP configuration required for a stability study are mentioned below. Configuration steps related to other objects, such as notifications, inspection lots, and samples, are beyond the scope of this article.
Define the container/package in which samples need to be handled by following menu path SPRO > Quality Management > Stability Study > Basic Data > Define Primary Packaging. In the screen the system displays (Figure 2), click the New Entries button.
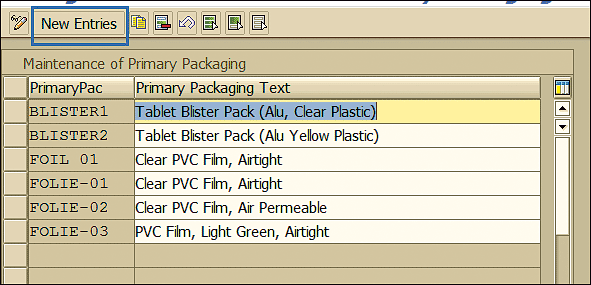
Figure 2
Maintenance of primary packaging
This action displays the screen shown in Figure 3. In the field in the PrimPac (primary package) column, enter a code for the primary package and enter a description in the field under the Primary Packaging Text column. Click the save icon to save the new primary packaging.
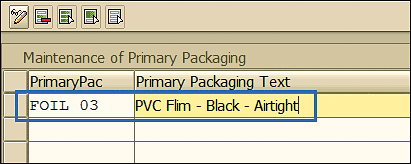
Figure 3
New primary packaging
The next step is to maintain the container type in which samples need to be stored if it is not maintained in the SAP system. To maintain this information, navigate to menu path SPRO > Quality Management > Quality Inspection > Sample Management > Define Physical Sample Containers. In the screen the system displays, click the New Entries button (Figure 4).
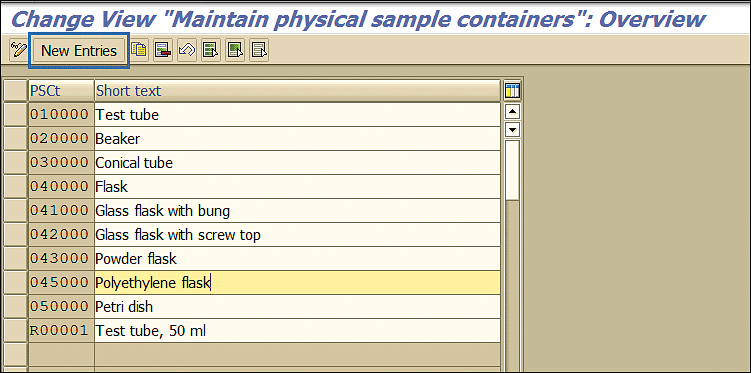
Figure 4
Physical sample container maintenance
This action opens the screen in Figure 5. In the field under the PSCt (physical container) column, enter the sample container code and a description in the field under Short text. Click the save icon to save the new physical sample container.

Figure 5
New physical sample container
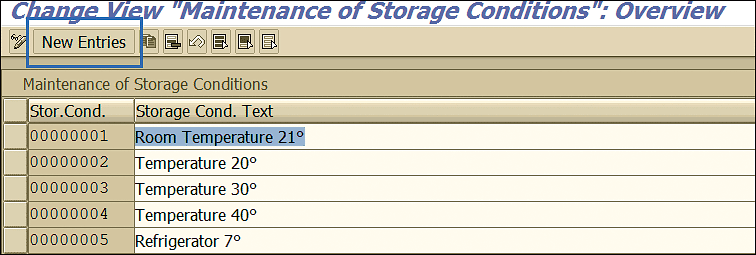
Figure 6
Sample storage conditions maintenance
This action opens the screen in Figure 7. In the field under Stor Cond (storage condition), enter the storage condition code and a description in the field under Storage Cont Text (storage condition text). Click the save icon to save the new storage condition.

Figure 7
New sample storage conditions
To maintain the physical location where samples are stored, follow menu path SPRO > Quality Management > Quality Inspection > Sample Management > Define physical sample locations. In the screen the system displays, specify the plant code in which the stability study is performed (Figure 8) and click the green X icon
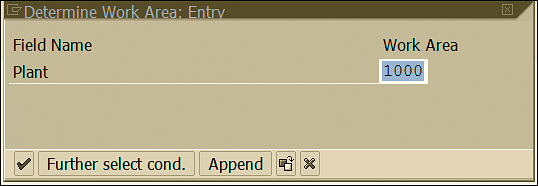
Figure 8
Plant for stability study
In the next screen, click the New Entries button (Figure 9) to maintain the new location in which samples related to the stability study are kept.
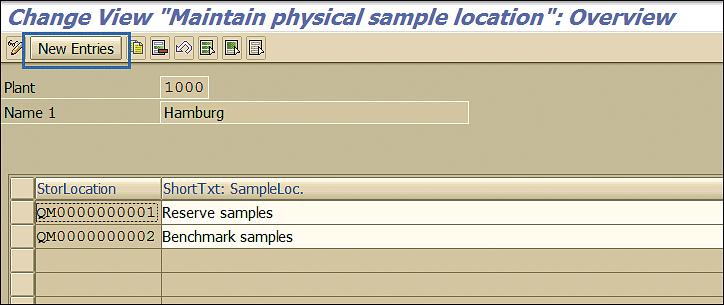
Figure 9
Sample location maintenance
This action opens the screen in Figure 10. In the field under StorLocation (storage location), enter the location code and enter a description in the field under ShortTxt: SampleLoc.
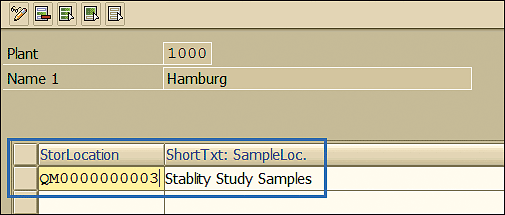
Figure 10
Sample storage new location maintenance
SAP has provided a separate sample type of a stability study (i.e., sample type 09). Sample type configuration can be accessed by following menu path SPRO > Quality Management > Quality Inspection > Sample Management > Define Physical- Sample Types. This path takes you to Figure 11.
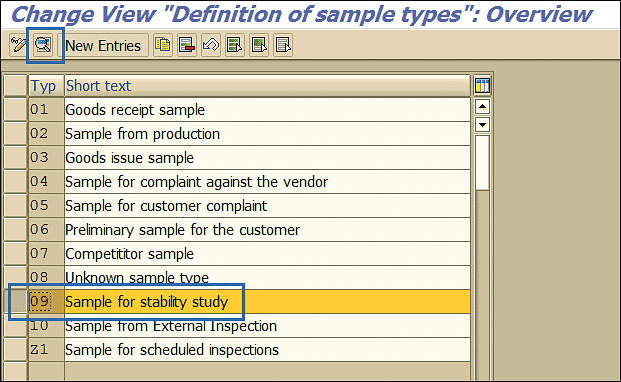
Figure 11
Sample type
Details of the sample type can be viewed or changed by selecting the sample type (e.g., 09 Sample for stability study) and clicking the display details icon (the magnifying glass).
Note
Generally, companies have custom label forms with organization logo and fields. You can specify these forms in the field shown in Figure 12.
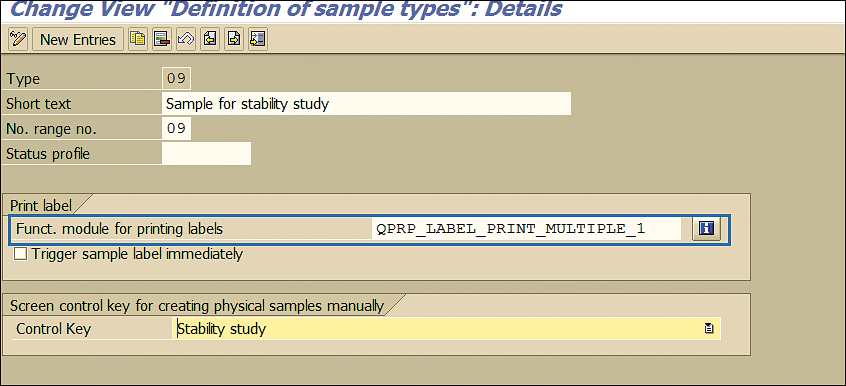
Figure 12
Sample type setting
The next step is to maintain the testing strategy where you define the interval in which you need to perform the stability study and other related information. Execute transaction code IP11, and in the screen the system displays, click the New Entries button to maintain a new strategy (Figure 13).
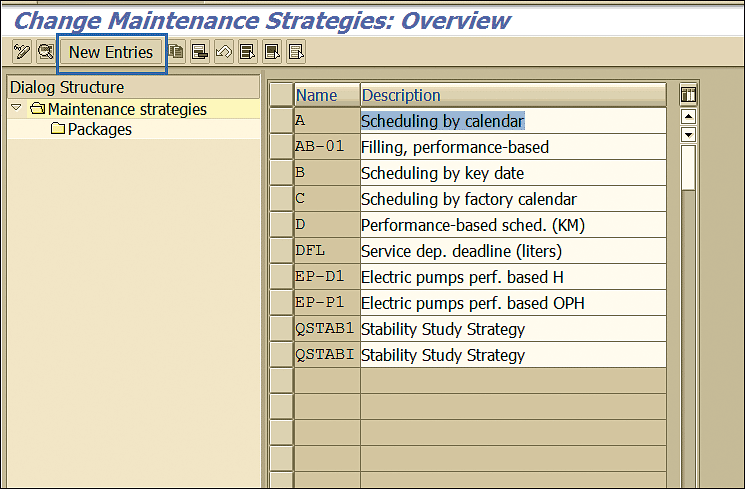
Figure 13
Stability strategy maintenance
This action opens the screen in Figure 14 in which the Scheduling indicator field suggests whether it is a time-based strategy in which tasks need to be performed after a certain fixed time is passed based on the calendar, on a particular date, or after a certain time based on a factory calendar. The Strategy unit field indicates the unit of time used for the scheduling calculation.

Figure 14
Stability strategy detail
In the Dialog Structure section, expand the Maintenance strategies folder and click the Packages folder to define the time after which a maintenance package is due.
The offset strategy maintained as an example in Figure 15 instructs the system to create an inspection lot for a stability study for four consecutive days.

Figure 15
Maintenance package
Click the Pack seq. (package sequence) button shown in Figure 15 to view the frequency and sequence in which the stability study inspection lot is created by the system (Figure 16).
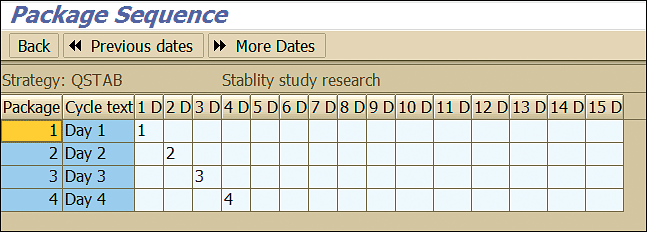
Figure 16
Maintenance package sequence
I discuss one more strategy maintenance package example as it is quite important to understand the way it needs to be configured to realize the desired frequency in which a stability study inspection should be proposed by the SAP system.
In the Offset column (Figure 17) odd days are maintained to instruct the system that a stability inspection needs to be carried out on alternate days. Also, the cycle length value indicates that package 2 needs to be triggered in a gap of two days.

Figure 17
Maintenance package example
To view the frequency and sequence for this setting click the Pack seq. button. This action displays the screen shown in Figure 18.
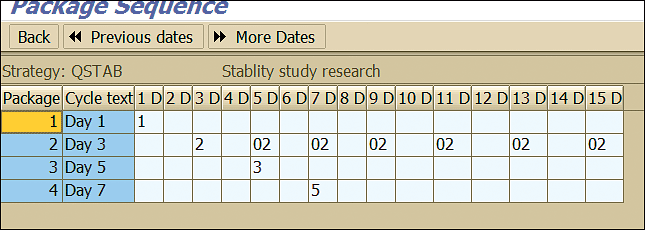
Figure 18
Maintenance package sequence example
The maintenance strategy defined in an earlier step needs to be assigned to the inspection plan. To assign the strategy to the inspection plan execute transaction code CWBQM. This action displays the screen in Figure 19 in which you specify the Current Working Area. Click the enter icon (the green checkmark).
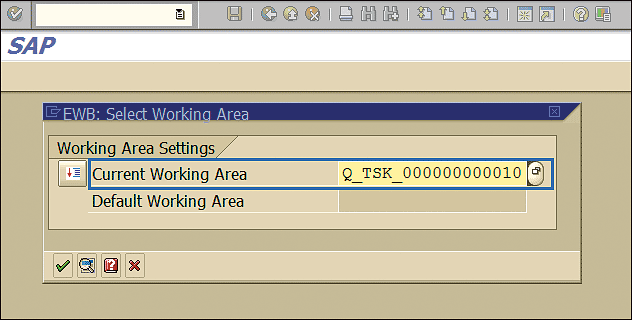
Figure 19
Engineering workbench working area
In the next screen, enter values for the appropriate inspection plan and click the Load Task Lists button (Figure 20).
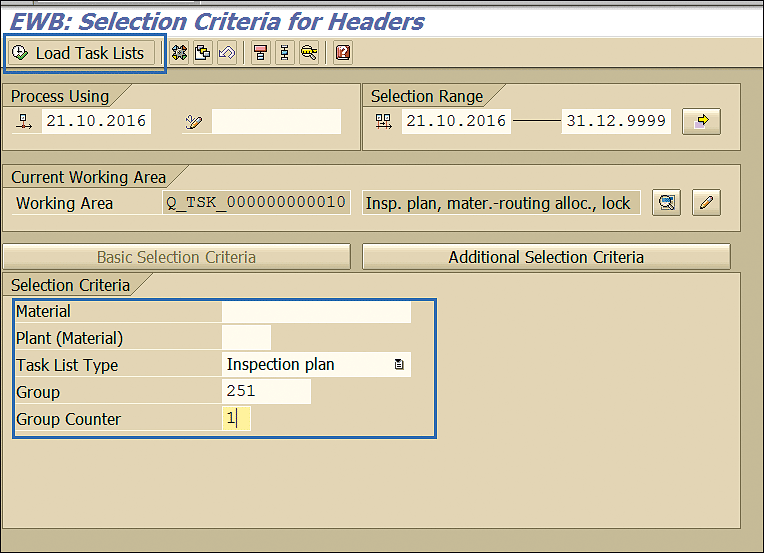
Figure 20
Inspection plan selection
This action opens the screen in Figure 21.

Figure 21
Maintenance strategy assignment to inspection plan
Assign the strategy to the inspection plan by placing your cursor in the strategy field and pressing the F4 key. This action opens a pop-up screen with all the predefined strategies. You can select a strategy by moving the cursor over it and clicking your mouse. After you select the strategy, you then assign the maintenance package as shown in Figure 22.
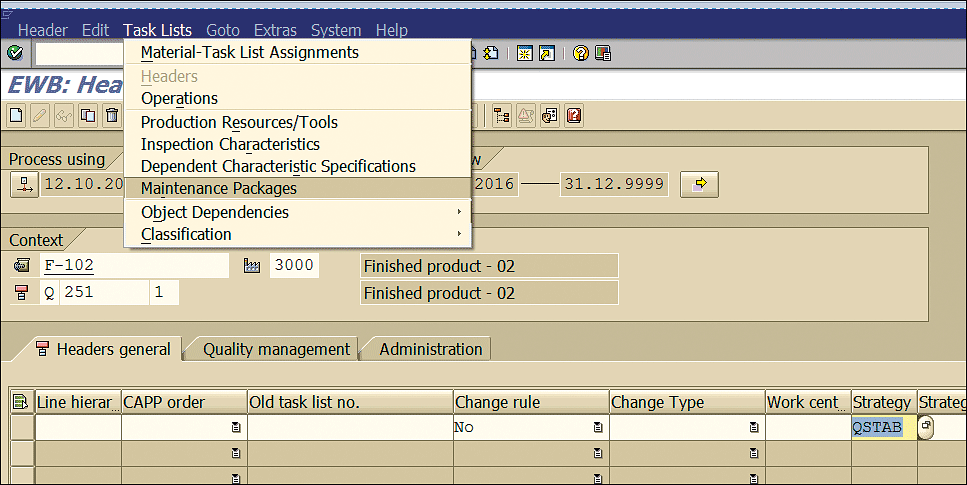
Figure 22
Maintenance package assignment
Further assign the maintenance package by selecting Task Lists > Maintenance Packages as shown in Figure 22.
This action opens a screen that displays all the packages defined for the maintenance strategy and enables you to select the packages that are appropriate as per the business requirement (Figure 23). Click the save icon to save the data.
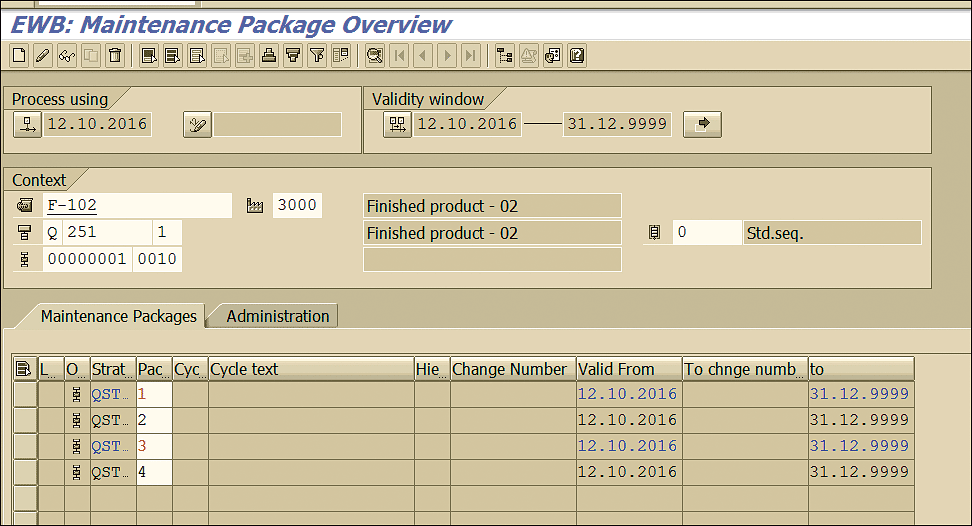
Figure 23
Package assignment
Finally, the inspection types for the stability study need to be activated in the material master. In the Material field of the Change Material (Initial Screen), specify the material number for which the stability study needs to be performed and press Enter. In the Select View(s) list that appears on the right side of the screen, select the Quality Management view as shown in Figure 24 and press Enter.
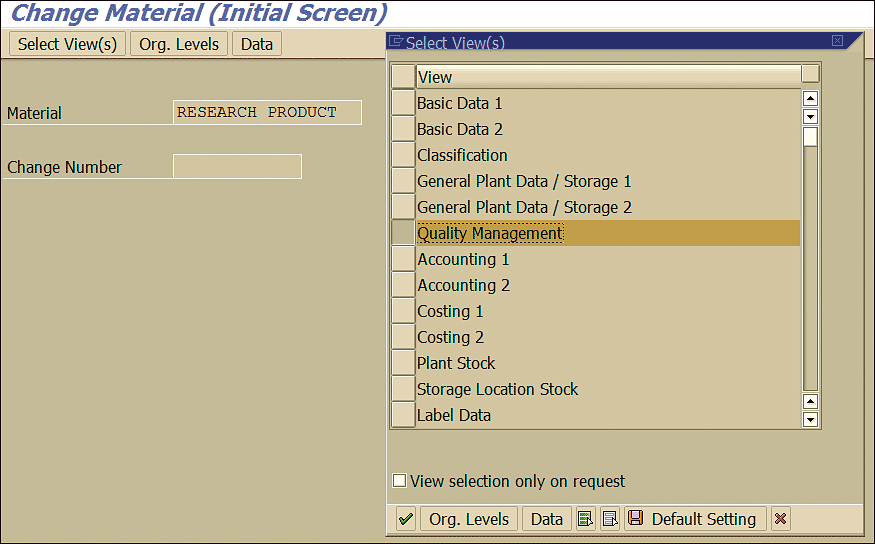
Figure 24
Material master QM view
In the screen the system displays, enter the plant code in the Plant field and click the enter icon or press Enter (Figure 25).

Figure 25
Organization levels for material master maintenance
This action displays the screen shown in Figure 26. Click the Insp. (inspection) setup button.
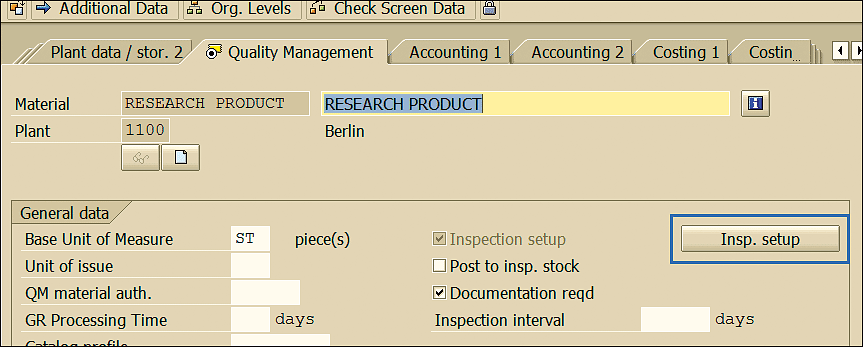
Figure 26
Material master QM view
In the next screen click the Inspection Types button to activate new inspection types for a material (Figure 27).
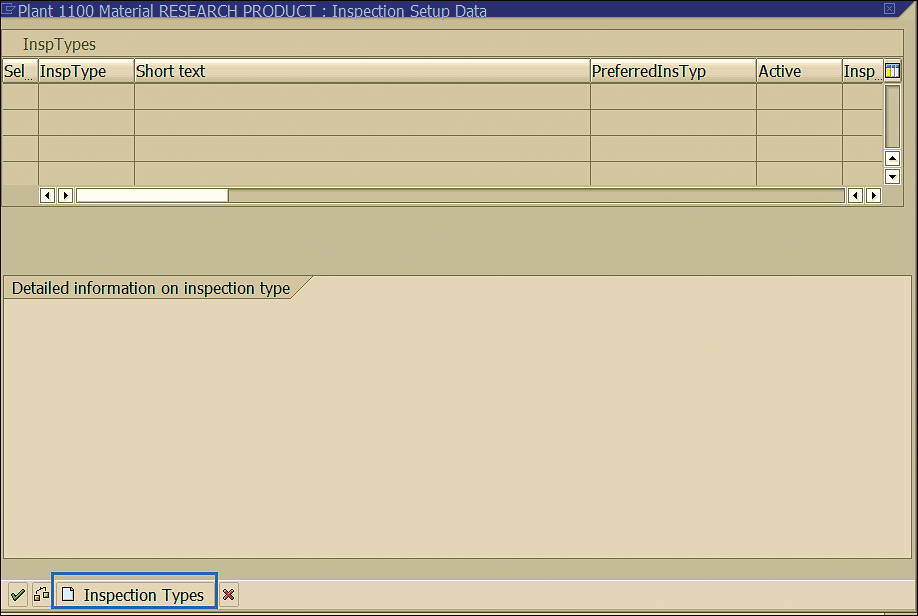
Figure 27
New inspection types assignment to a material
This action displays the screen in Figure 28.
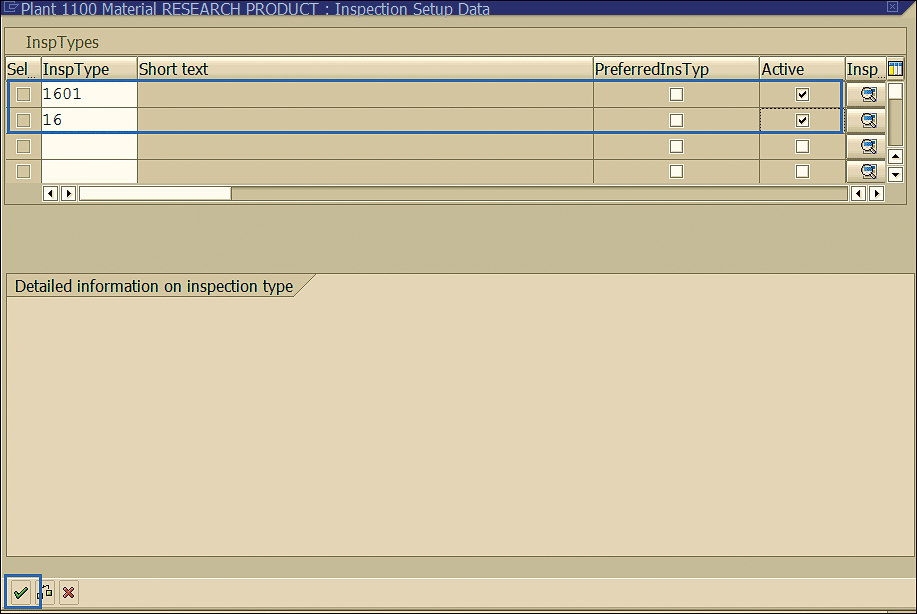
Figure 28
Inspection types related to the stability study
Specify the inspection types shown in Figure 28 and select the check boxes under the Active column to activate these inspection types. Inspection type 1601 is for Initial Test (Stability Studies) and 16 is related to Inspection for Storage Condition. Click the enter icon (the green check mark) to save your material master entries and display them in the screen in Figure 29.
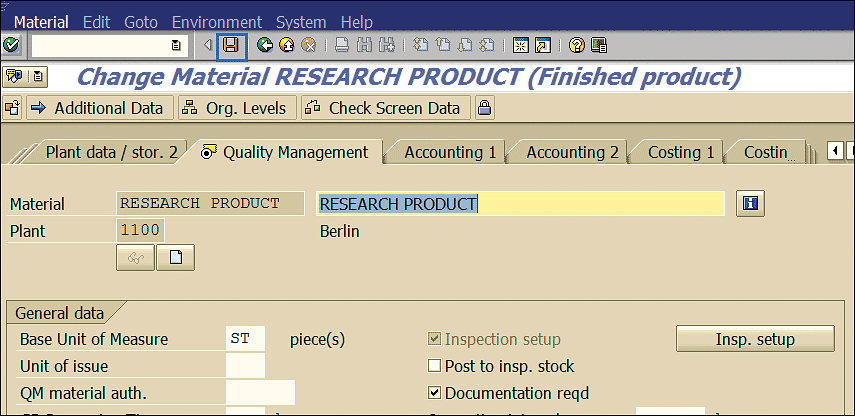
Figure 29
Material master changes saved
This concludes the configuration and settings you need to perform in the SAP system for a stability study.
Now, I describe the end-to-end business process involved in a stability study.
The Stability Study Process
The stability study process starts with a notification in the SAP system. Execute transaction code QM01 to initiate the process of creating a notification. This action displays the screen in Figure 30. In the Notification type field (Figure 30), enter the notification type QS (i.e., stability study with material), and in the Notification field, enter the notification number. Press the Enter key.
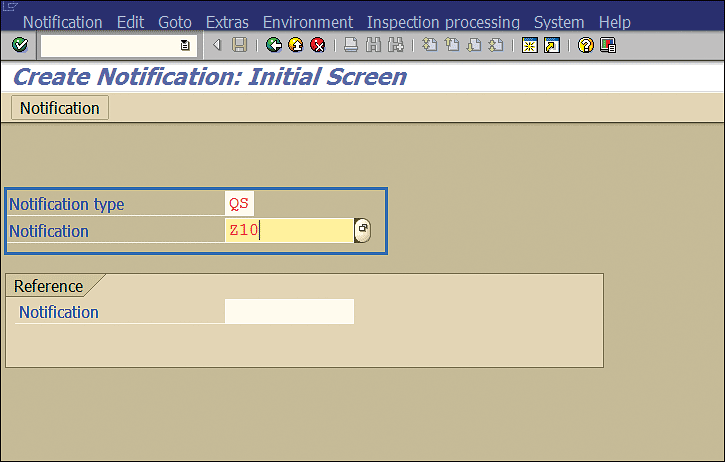
Figure 30
Quality Notification initial screen
Note
Here, the notification number needs to be entered as the configuration of the external number range is entered. If the number range entered is internal, then the SAP system proposes the notification number as per the next available number.
Specify the material number, plant, storage location, and batch as shown in Figure 31.

Figure 31
Material and batch detail for notification
Click the save icon (Figure 32).
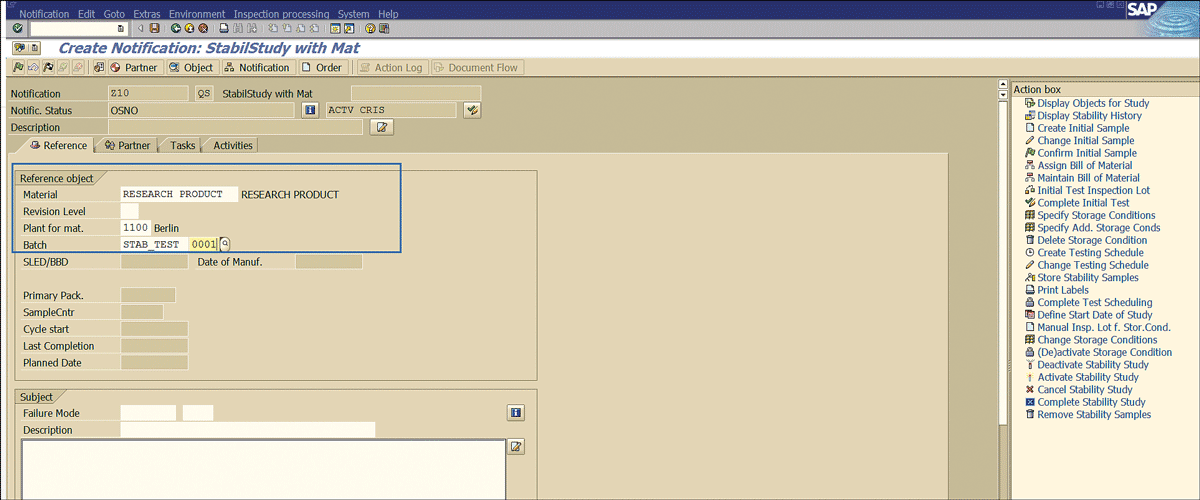
Figure 32
Stability notification
Once the notification for the stability study is in place, the next step is to proceed with the initial sample. To initiate the initial sample processing process, enter the notification in change mode via transaction code QM02. In the initial screen that the system opens (not shown), enter the notification number and press the Enter key.
This action displays the screen in Figure 33. Click the Create Initial Sample link to specify the information as shown and click the save icon.
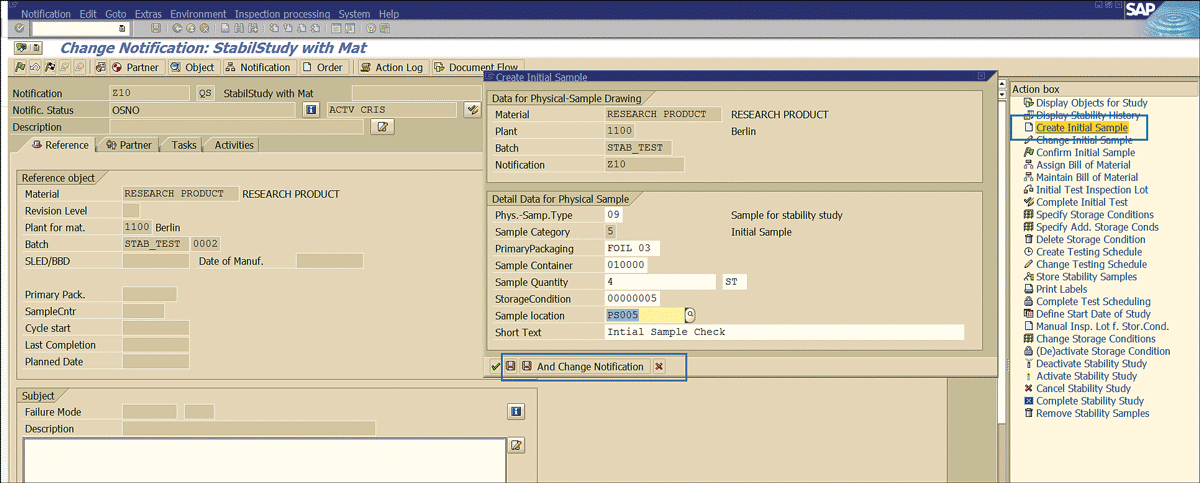
Figure 33
Initial stability sample trigger
Note
At any one point during a stability study processing the business objects linked with an SAP stability notification can be referred to by specifying the notification number in transaction code QM02 or QM03 (Figure 34) and clicking the Document Flow button (Figure 35).

Figure 34
Notification change mode

Figure 35
QM notification document flow
In Figure 36, you can see that the initial stability sample triggered (Figure 33) is linked with the stability notification.
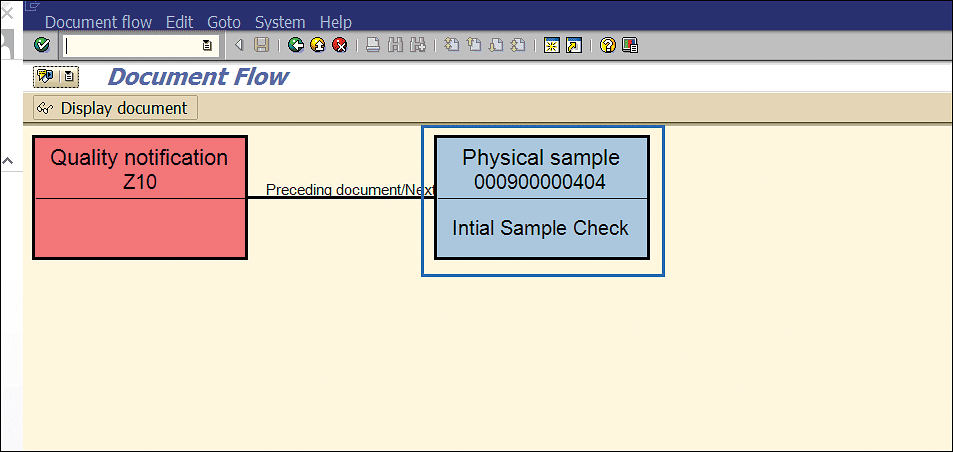
Figure 36
Physical sample for initial stability study linked with notification
Double-click the Physical sample box (Figure 36) to view the details of the stability study initial physical sample (Figure 37).
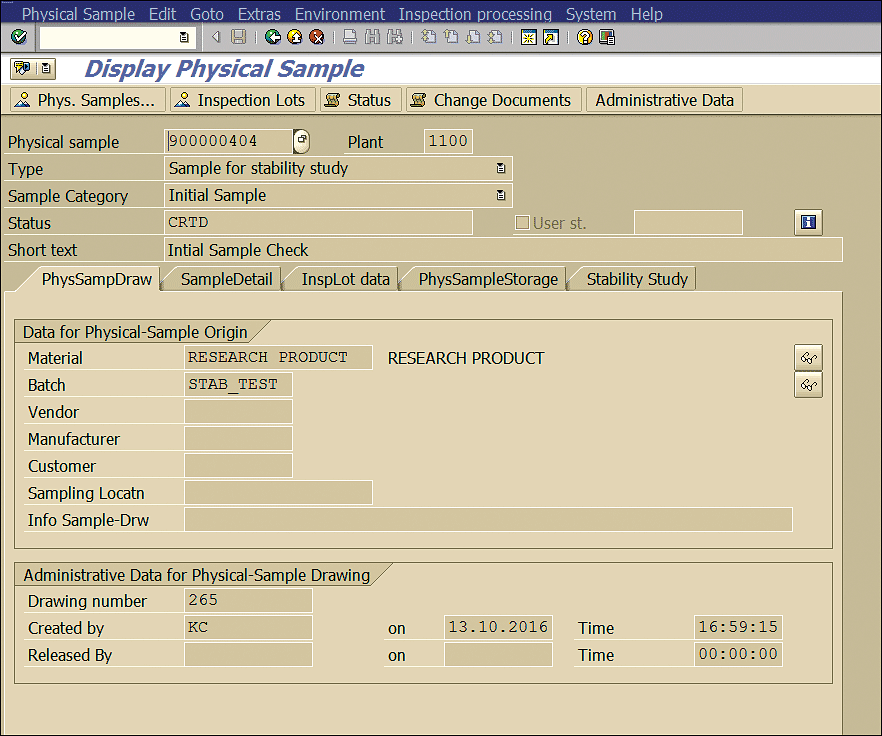
Figure 37
Initial physical sample
If you need to change the information mentioned in Figure 33 related to the initial sample, then specify the QM notification number (Figure 34) in transaction code QM02 and press the Enter key. Click the Change Initial Sample link shown in Figure 38 to edit the details.
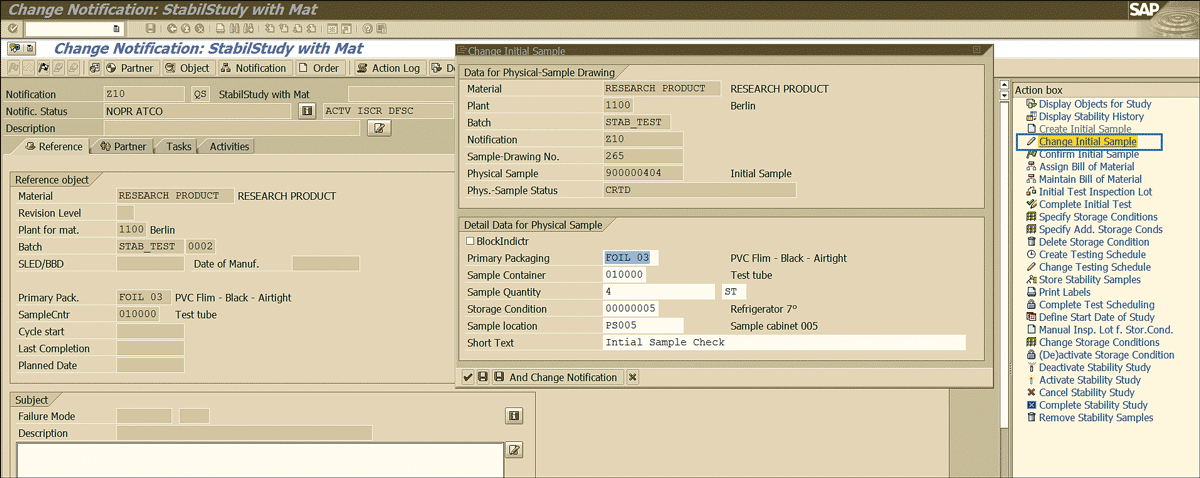
Figure 38
Change stability study initial sample detail
After you trigger the initial sample, the next step is to confirm the initial sample. To complete this step, click the Confirm Initial Sample link shown in Figure 39 and click the Save and Change Notification button enclosed in the blue square).
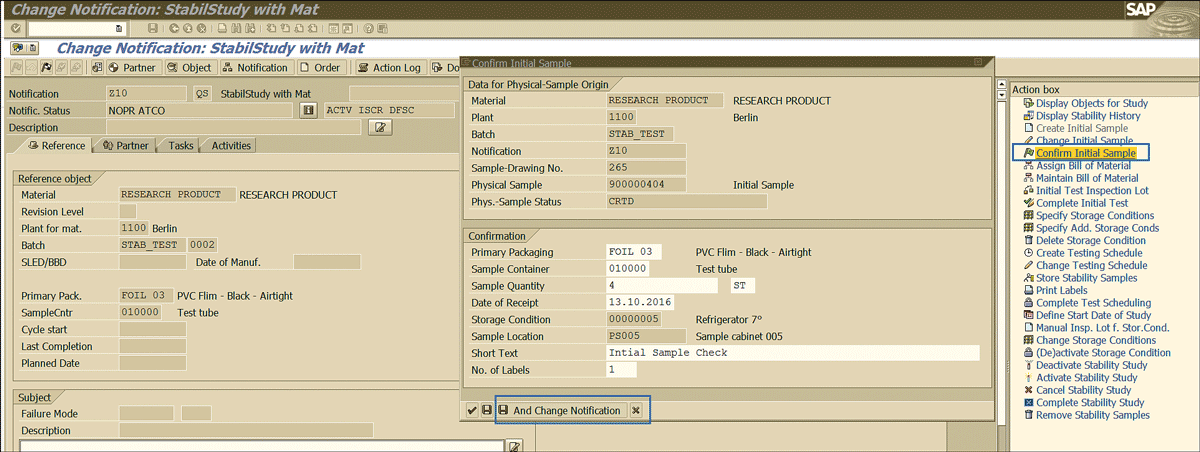
Figure 39
The initial sample confirmation
This action displays the pop-up box (Figure 40) in which you can enter any comments for a future reference perspective.

Figure 40
Additional comments to confirm that the system has taken a sample for testing
An Optional Step
For business scenarios that require you to maintain the ingredients of the stability study, an assignment of the bill of materials (BOM) to the QM stability study notification is required. This step can be done by clicking the Assign Bill of Material link shown in Figure 41 and entering the BOM details.
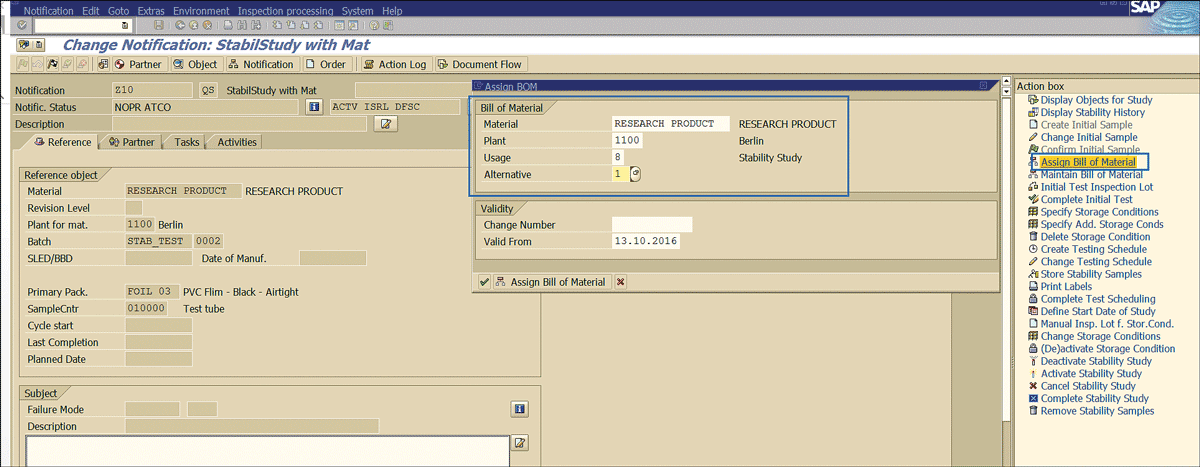
Figure 41
Assignment of a BOM to notification
Note
The standard SAP system provides a separate BOM usage type 8 for a stability study. The BOM in a stability study is only for documentation purposes. It is used for future tracking of the ingredients of the stability sample for which the stability study is performed.
Click the Assign Bill of Material button to complete the assignment (Figure 42).
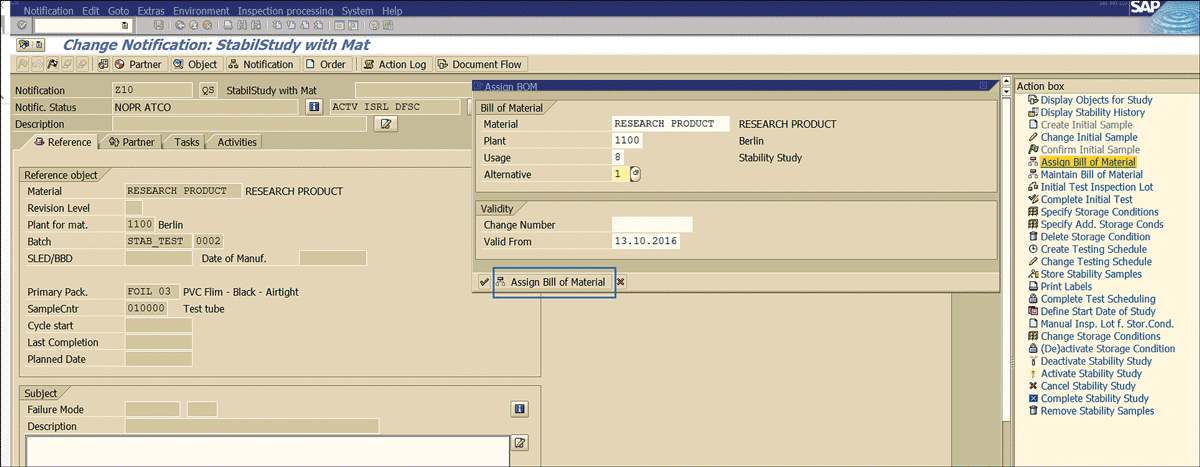
Figure 42
BOM association with stability notification
To view the SAP business objects linked with the QM stability study notification, execute transaction code QM02. In the Notification field of the screen the system displays (Figure 34), enter the notification number and press the Enter key.
Click the Document Flow button as shown in Figure 43.

Figure 43
Document flow stability notification
The initial stability physical sample and stability BOM (assigned in Figure 42) are linked with the stability study notification (Figure 44).
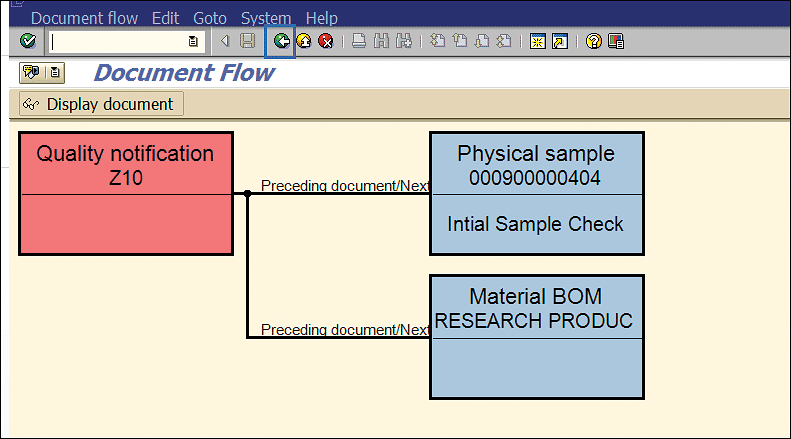
Figure 44
SAP business object linked with stability notification
Click the back icon to move to the screen in Figure 45 to process the notification further.
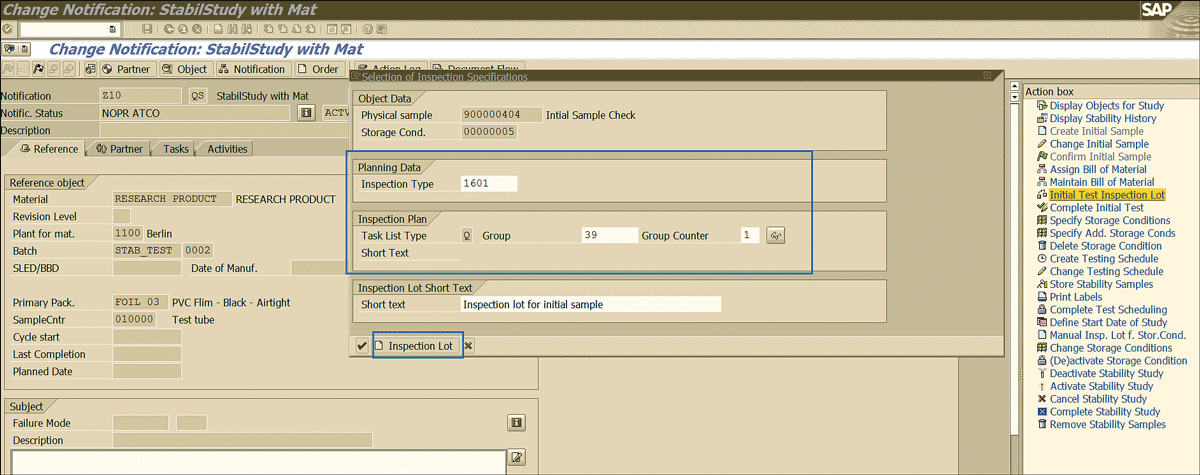
Figure 45
Inspection lot for the initial sample inspection
The next step is to initiate the inspection of the initial stability sample and to enable it. To complete this step, click the Initial Test Inspection Lot link shown in Figure 45 and enter the inspection plan to be used for the initial sample inspection. Click the Inspection Lot button to trigger the creation of the inspection lot.
The SAP system displays all the operations maintained for the inspection plan mentioned in the above step. It provides an option to business users to select the inspection operations that are relevant to the initial stability sample inspection.
For my example, consider a scenario in which all the inspection operations are relevant for the initial sample check. To select all the inspection operations, highlight the operations and click the Copy All button (Figure 46).

Figure 46
Inspection operation for initial stability sample inspection
Like any other quality inspection, the processing life cycle results of the sample can be recorded in the SAP system by executing transaction code QE51N. In the screen the system displays, enter the stability study initial sample check inspection lot number and click the execute icon (Figure 47).

Figure 47
Selection screen for inspection lot result recording
This action displays the screen in Figure 48.

Figure 48
Inspection results recording for the initial stability sample
Specify the results found for the various parameters related to the initial sample (Figure 48). For example, here it is mentioned that the potency of the active ingredient found after testing is 35 and the color is 20 light red.
Click the valuation icon shown in Figure 49 to perform the valuation (passed or fail) based on the results recorded for the inspection lot.
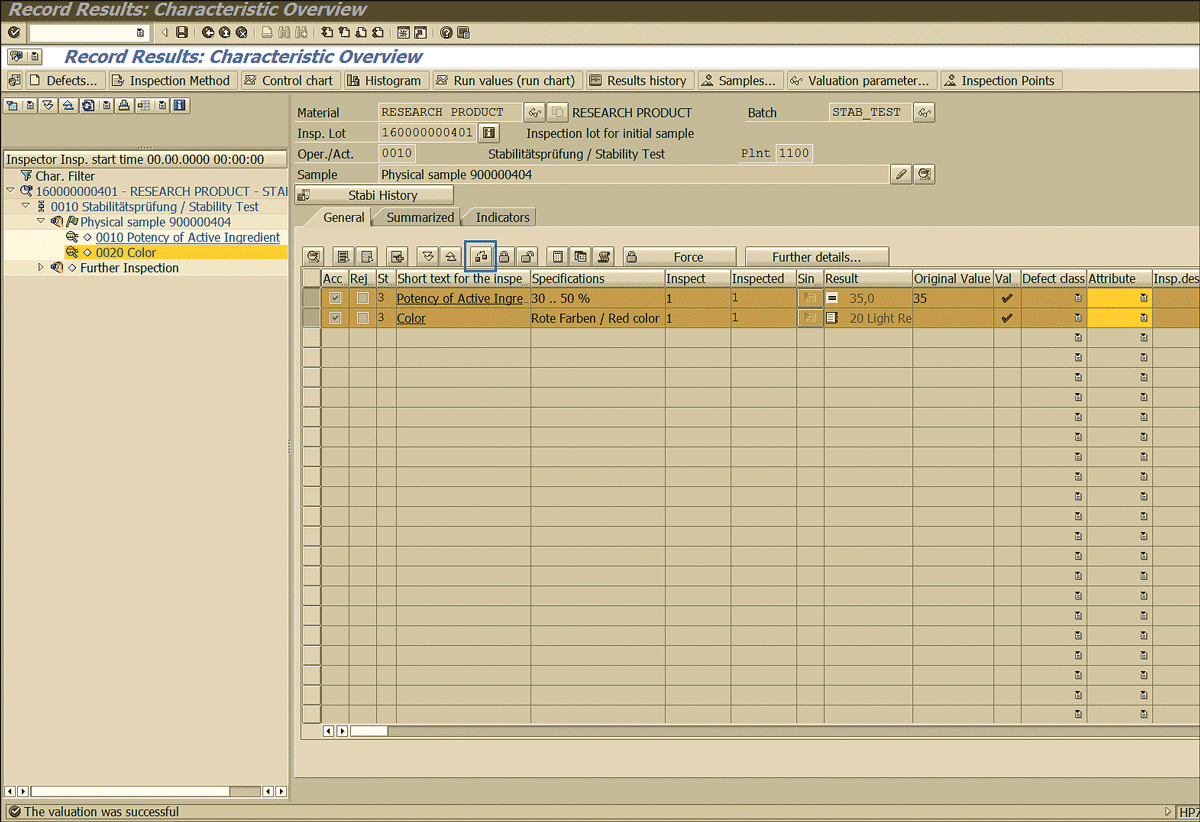
Figure 49
Valuating the inspection lot
The recording usage decision is like any other inspection lot processing. Execute transaction code QA11. In the Inspection Lot field of the screen the system displays, enter the inspection lot number and press the Enter key (Figure 50).
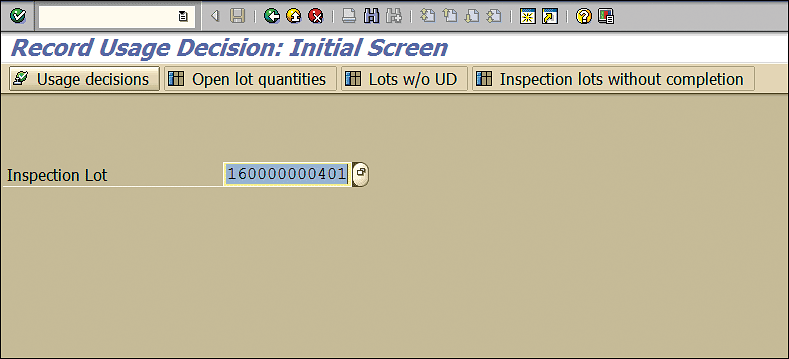
Figure 50
Usage decision for inspection lot
In the next screen (Figure 51) select the Usage decision (UD) code based on the result observed for the initial sample stability study.
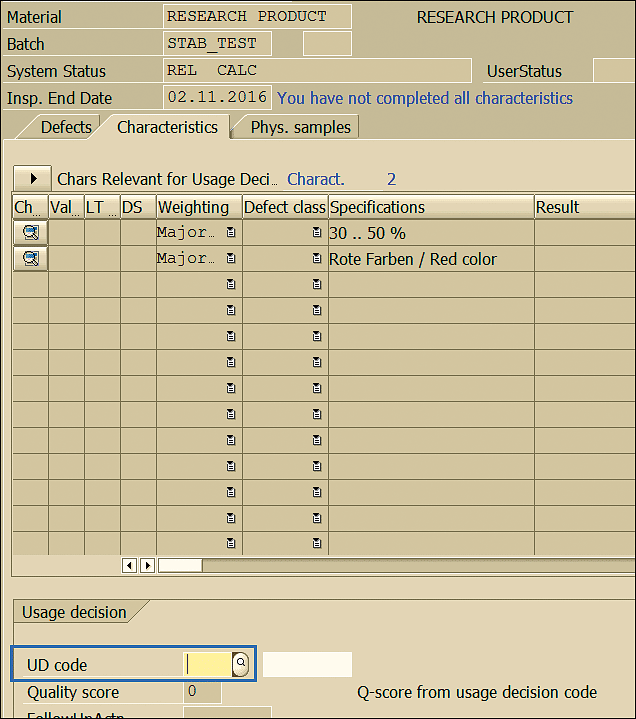
Figure 51
Acceptability decision of the sample
In the current example, you have two usage decisions to select. UD code 0010 suggests the initial sample results are in line with expectations and a further stability study is performed. In case the results observed after inspecting the initial sample are out of the tolerance range, the UD code 0030 to be selected and the stability study is not executed further (Figure 52).

Figure 52
Stability study follow-on decision
As in the current example the initial stability sample results are in the tolerance range, select UD code 0010 and click the save icon. This action saves the usage decision of the inspection lot (Figure 53).

Figure 53
Usage decision saved for the initial stability study inspection lot
Note
By specifying the stability study quality notification number in transaction codes QM02 or QM03, pressing the Enter key, and clicking the Document Flow button (Figure 54), you can link SAP objects with the notification and view their statuses.

Figure 54
Document flow – Quality Notification
As you can see in Figure 55, the initial stability sample inspection lot shows the result recording done (status ICCO) and usage decision taken (status UD).
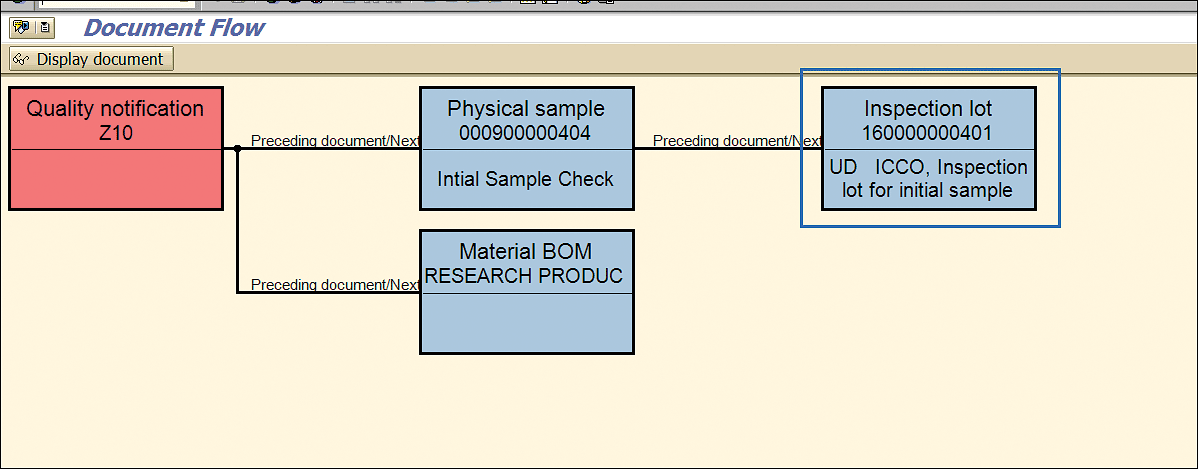
Figure 55
SAP business object linked with the stability notification and status
If the initial stability study sample results are in the tolerance range and you decide to continue the stability study, then enter the stability study QM notification (Figure 34) in change mode. Click the Specify Storage Conditions link (Figure 56) to maintain the physical condition in which the stability sample is stored.

Figure 56
Stability sample storage condition
For example, after you click the Specify Storage Conditions link, the screen in Figure 57 appears. For my example, specify two samples at room temperature and two stability samples at 7 degrees Celsius. Click the Save And Change Notification button enclosed in the blue square after maintaining the storage condition of the stability samples.

Figure 57
Physical sample storage condition
Clicking the Document Flow button (shown in Figure 54) shows that the additional stability samples now have been created and associated with the stability study notification (based on the information shown in Figure 58).
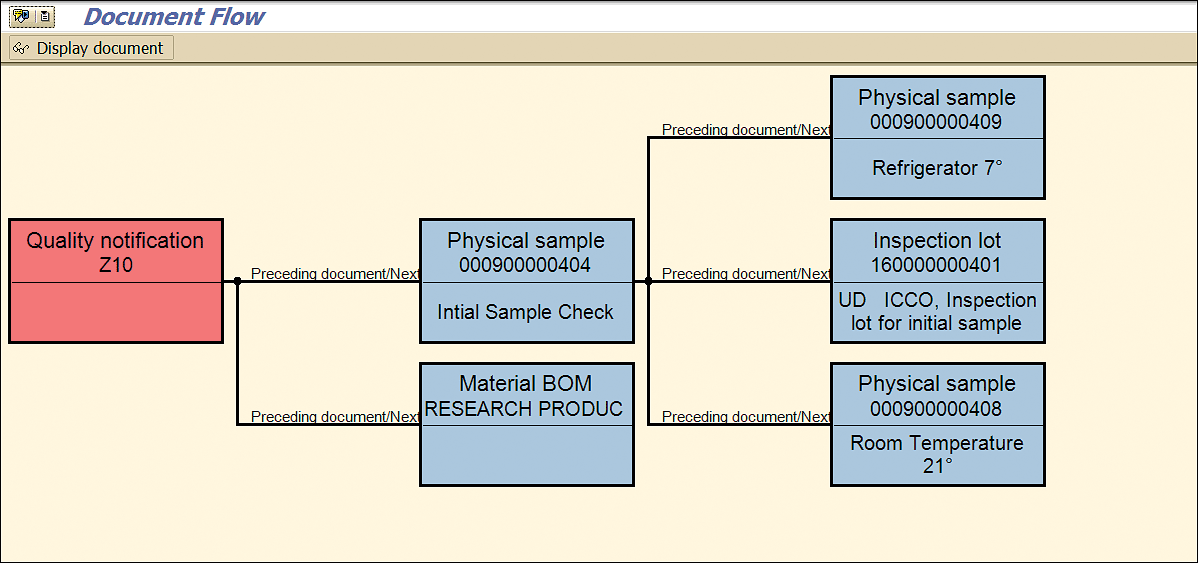
Figure 58
Stability study samples linked with a stability quality notification
After you specify the physical condition in which stability samples will be stored, the next step is to enter the frequency in which stability samples stored in different physical samples will be inspected.
Click the Create Testing Schedule link and enter the testing schedule details in the pop-screen that appears (Figure 59).
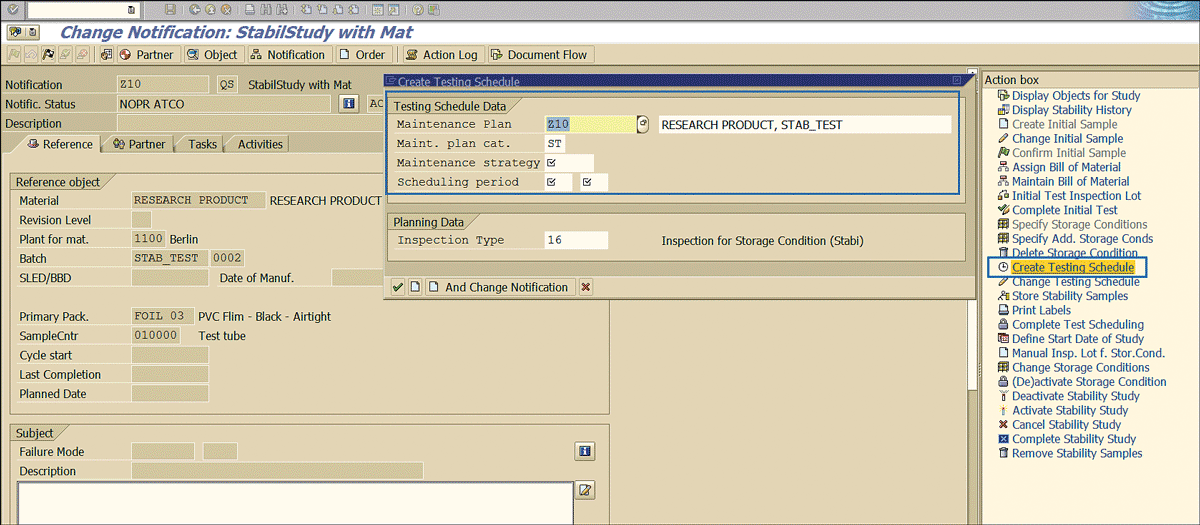
Figure 59
Testing the frequency of stability samples
Specify the testing schedule data as shown in Figure 60 and click the Save And Change Notification button enclosed in the blue square.

Figure 60
Testing schedule details for the stability study
Note
At any point during the stability study life cycle, clicking the Display Stability History link (Figure 61) brings up the results recorded earlier during the stability study. For example, you can see the initial stability sample results recorded earlier during the process.
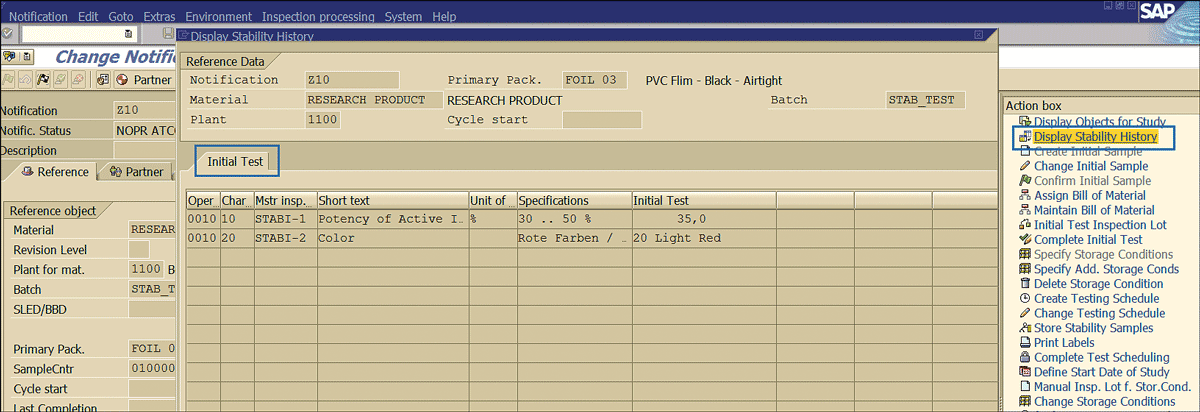
Figure 61
Stability study historical result
When the testing schedule needs to be amended, click the Change Testing Schedule link (Figure 62) and in the pop-up screen, click the Yes button to edit the testing schedule.
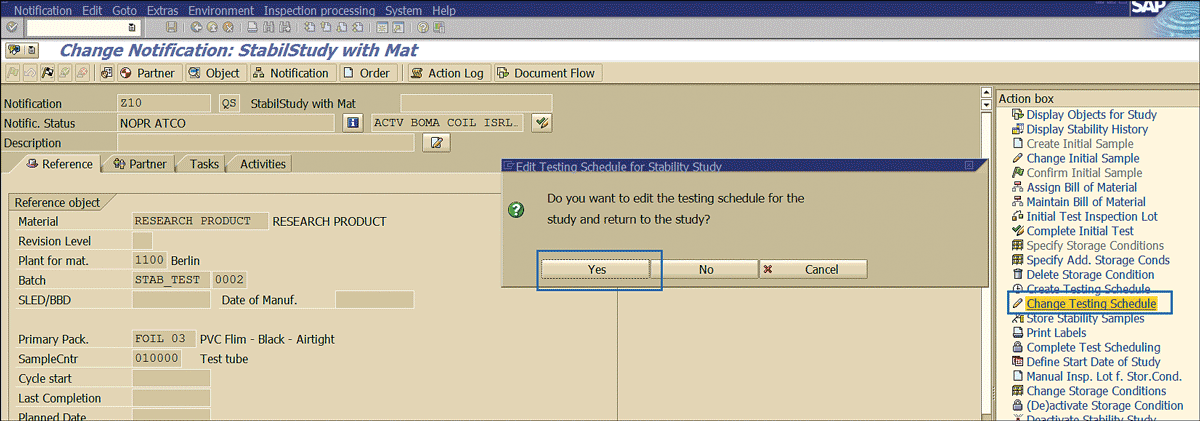
Figure 62
Amendment of testing schedules
Quality papers such as the physical stability sample storage condition can be printed by executing transaction code QM02 and following menu path Notification > Print > Notification. This action displays the screen shown in Figure 63. Select the quality papers to be printed and click the Print/Fax button.

Figure 63
Quality papers print
Sample quality forms that are available in the standard SAP system out of the box are shown in Figures 64 and 65. These are just examples shipped with SAP out of the box. You can develop and tweak the forms as per your own business and legal requirements.

Figure 64
Standard SAP form for stability sample storage
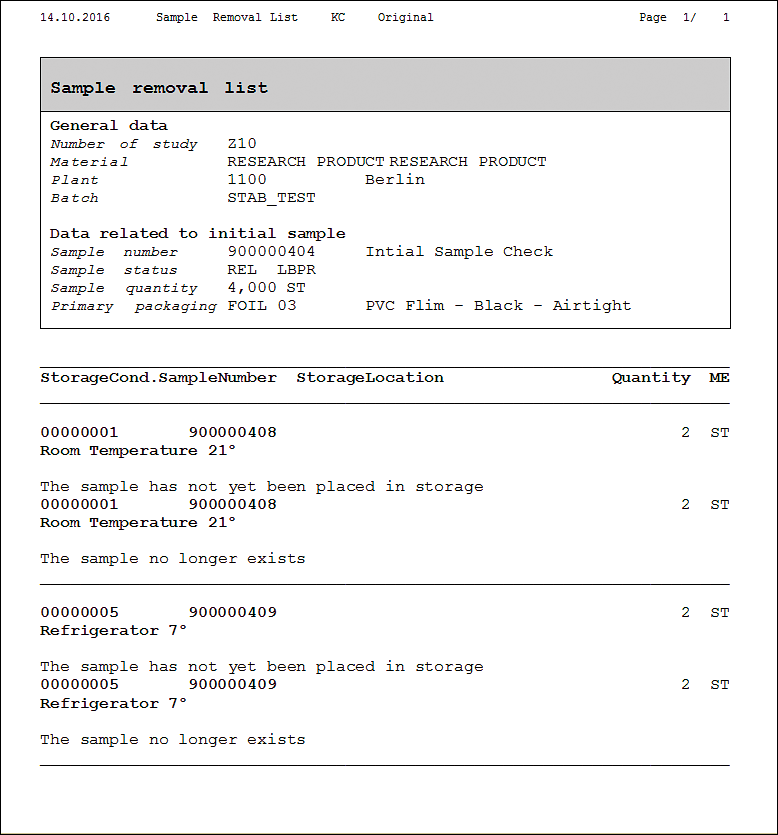
Figure 65
Standard SAP form for stability sample removal
After you specify the testing schedule for the stability study, the next step is to complete the testing schedule (Figure 66) in change quality notification mode (transaction code QM02). Click the Complete Test Scheduling link, and in the pop-up screen, click the Yes button.
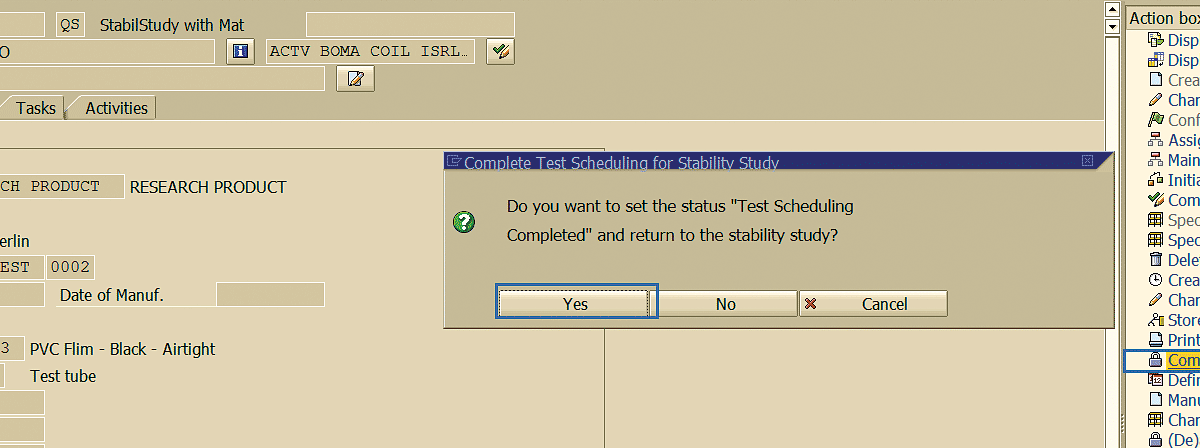
Figure 66
Testing schedule completion
Until now you have seen the initial stability sample processing and planning/scheduling stability study for a stored sample under different physical conditions.
Once the stability sample is stored in the designated location, you can update the location where the sample is stored. To complete this step, execute transaction code QM02. This action displays the Change Notification screen shown in Figure 67 in which you click the Store Stability Samples link and populate the field under the Sample location column. Press the Enter key to save your data. You can update this information after entering the notification in change mode by executing transaction code QM02, specifying the stability study notification number, and pressing the Enter key.

Figure 67
Stability sample storage update
Clicking the Store Stability Samples link opens the pop-up screen where you can update the sample location, the data on which the sample was stored, and the quantity (Figure 68). Click the Save And Change Notification button enclosed in the blue square to save your data.
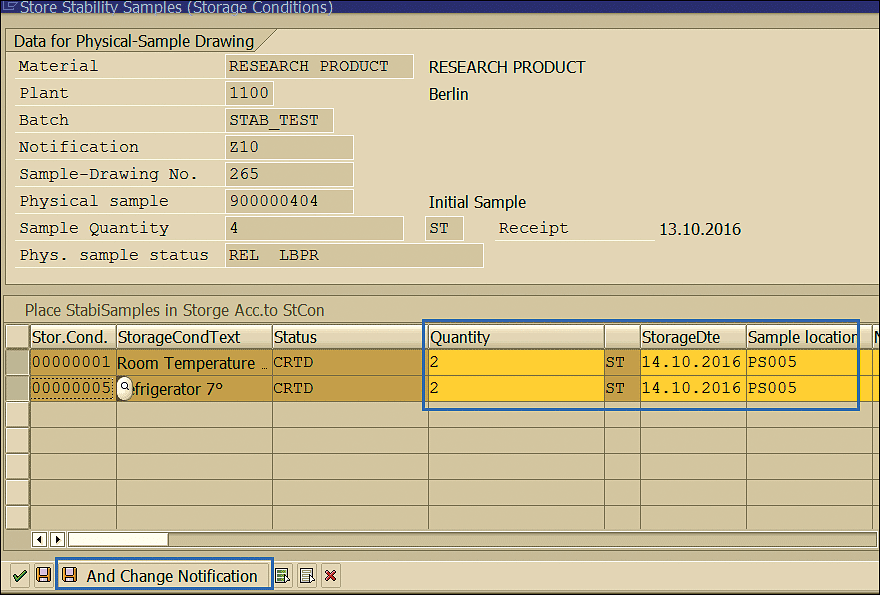
Figure 68
Stability sample storage location, date, and quantity
The date that is to be used as a reference by the testing schedule for calculating dates on which the stability inspection is due is specified by clicking the Define Start Date of Study link, as shown in Figure 69. Enter the start date in the Start of cycle field in the pop-up screen. Click the Save And Change Notification button enclosed in the blue square to commit the date specified.
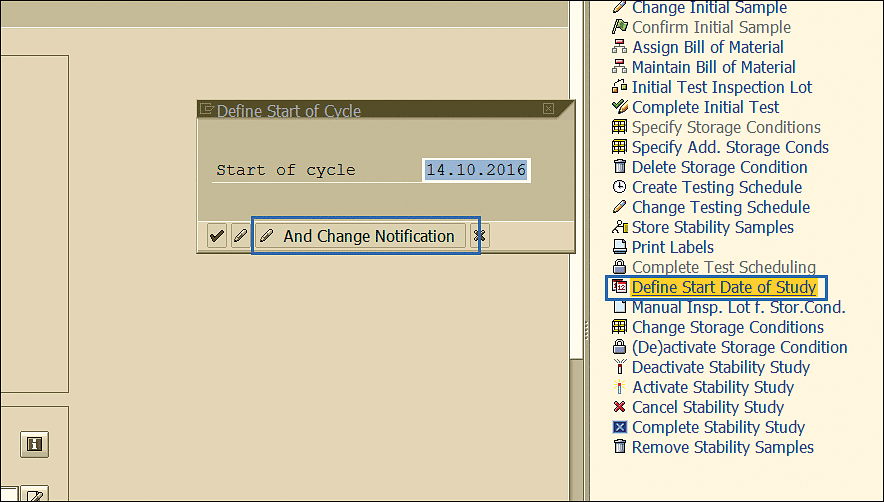
Figure 69
Stability study start date
Note
At any point during the stability study the task can be triggered and its status can be viewed by clicking the Tasks tab (Figure 70) in the stability study quality notification. The statuses of the tasks are displayed in the Task Status column in the Tasks tab (Figure 71).

Figure 70
Quality notification Tasks tab
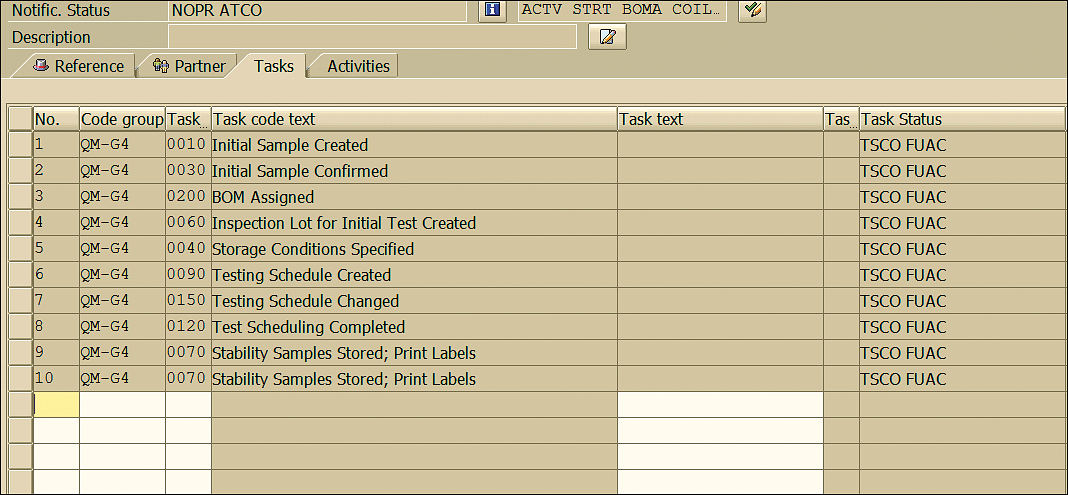
Figure 71
Quality notification task status
Generally, a background job is scheduled to monitor and trigger the stability inspections as per the strategy assigned. In foreground mode this program can be run by executing transaction code IP10. This action displays a screen in which you enter the maintenance plan, strategy, and other details as shown in Figure 72.
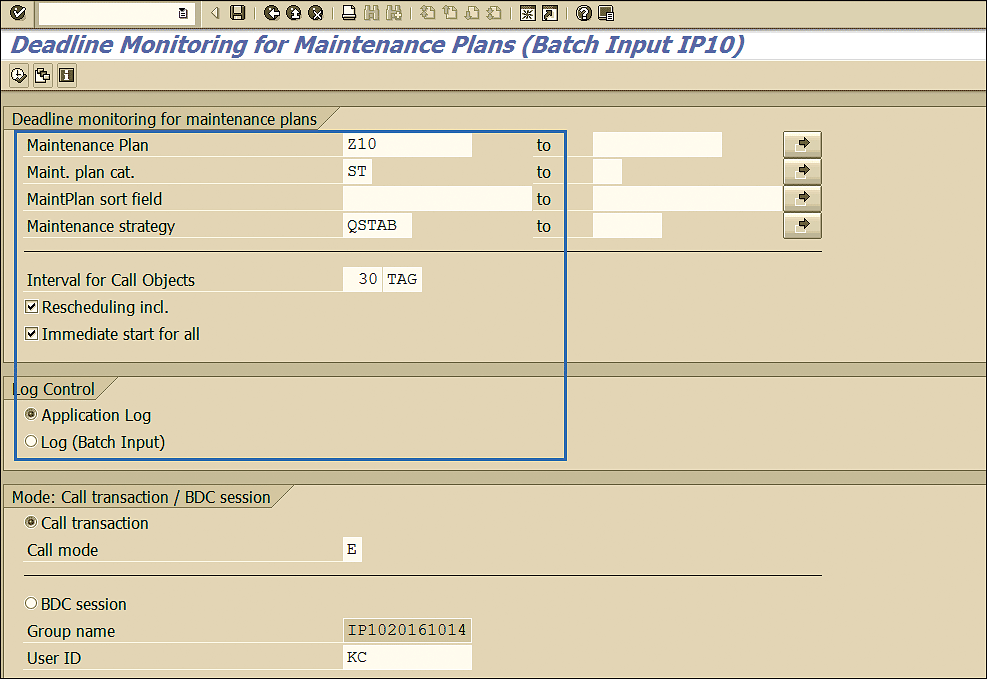
Figure 72
Deadline monitoring in foreground mode
If the stability study for the stored samples is due as per the strategy, then deadline monitoring calculates the physical sample size (Figure 73) and links it with the stability study inspection lots. Execute the deadline monitoring via transaction code IP10 (Figure 72) to display the logs (Figure 73).
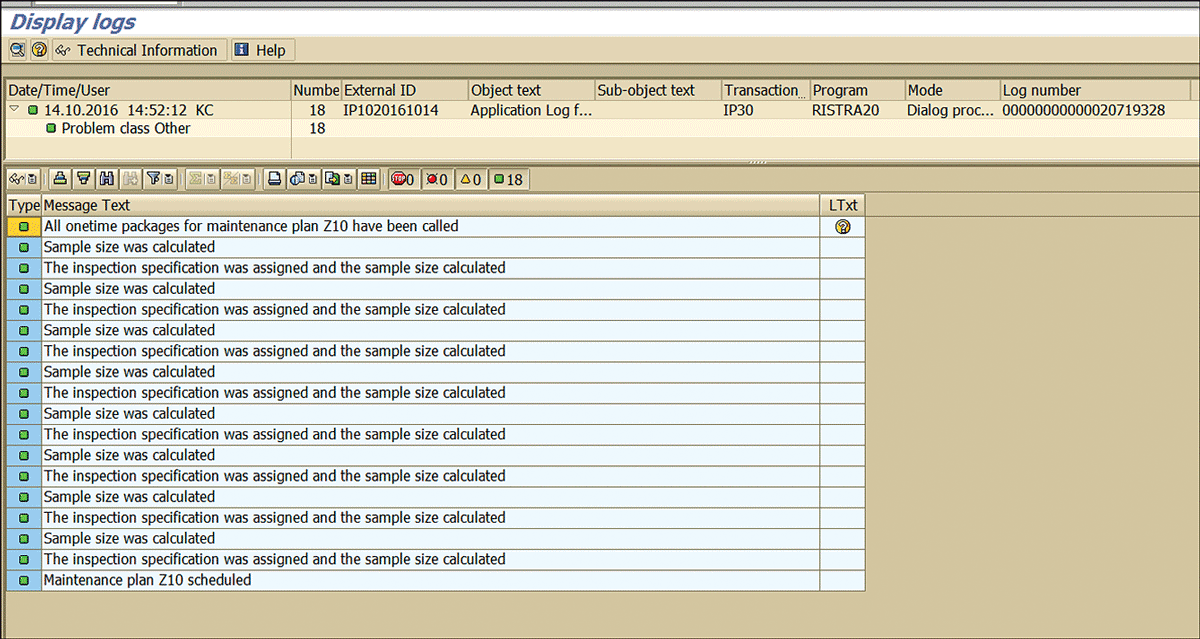
Figure 73
The deadline monitoring log
The inspection lots that the system creates for different stored samples are linked with the stability study quality notification. You can view them in the document flow of the notification (Figure 74).
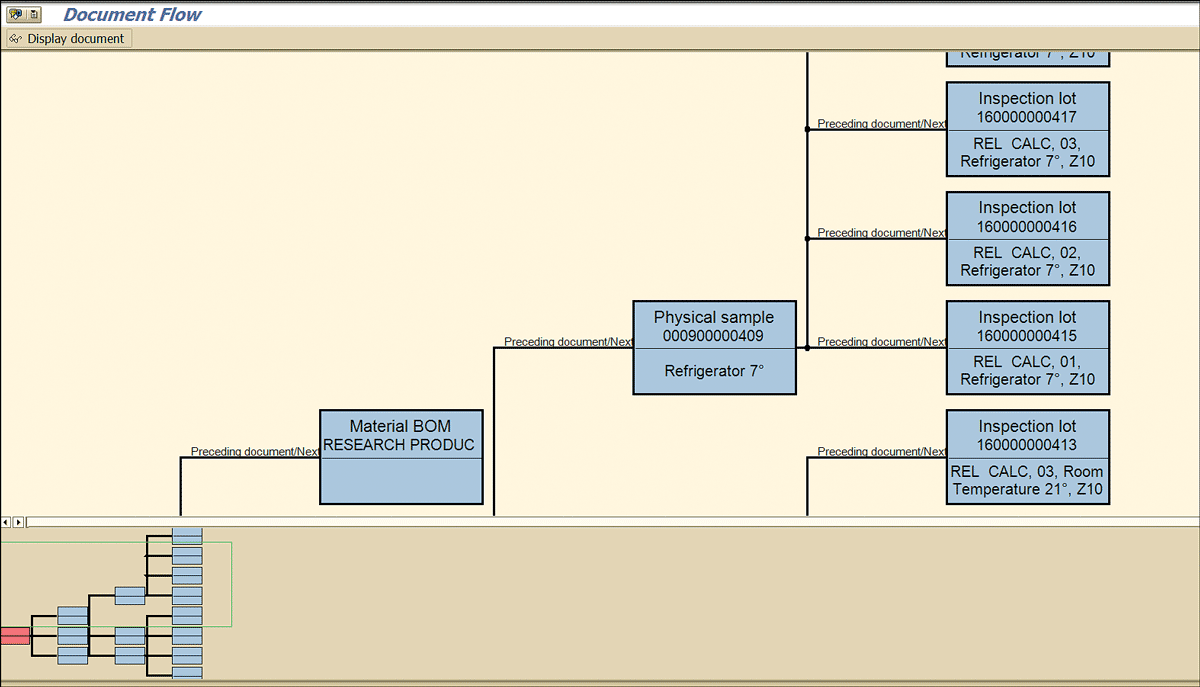
Figure 74
Document flow showing the stability study inspection lots linked with QM notifications
After you execute transaction code QA33, specify the material number, plant, and date range in the screen that the system displays (Figure 75).
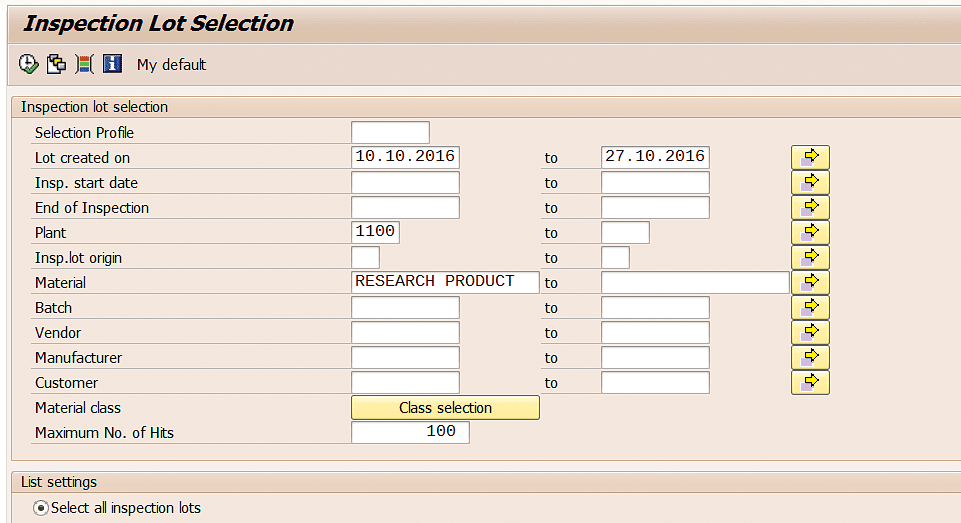
Figure 75
Screen for listing the inspection lot selections
You can see that the deadline monitoring program has created inspection lots for each scheduled inspection date (Figure 76) to perform the inspection, record the results, and take the usage decision against the inspection lot.

Figure 76
Stability study inspection lots
Results can be recorded and the usage decision can be made for these inspection lots, as described in the steps between Figures 47 and 52.
For a future traceability perspective, results recorded for all the stability study samples stored under different physical conditions and the initial stability sample can viewed by clicking the Display Stability History link (Figure 77) in the change or display stability study quality notification (transaction codes QM02 or QM03).

Figure 77
Stability study results for samples
Note
Stability sample quantities are not deducted from inventory automatically, and they need to be posted manually.
In the standard SAP system, movement type 333 - Withdrawal for sampling from unrestricted-use stock can be used to reconcile the stock used for the stability study. Execute transaction code MIGO to post the sample consumption and stock reconciliation. In the screen that the system displays specify the movement type 333 and press the Enter key (Figure 78).

Figure 78
Inventory reconciliation of the stability samples
Mention the material number and other details as shown in Figure 79 and post the goods movement.

Figure 79
Stock posting to declare quantity consumed for stability study
After you execute transaction code MB03, you can see the inventory (Figure 80) and financial posting (Figure 81) against the material document.

Figure 80
Inventory posting

Figure 81
Financial posting
After all the scheduled stability inspection lot results are recorded, the usage decision is taken and finally the stability quality notification needs to be marked as complete.
Note that you can only set the completion status if there are no open inspection lots pending (scheduled inspection lots for which results are not recorded need to be cancelled or skipped). Click the Complete Stability Study link shown in Figure 82 to complete the stability study notification in transaction code QM02.
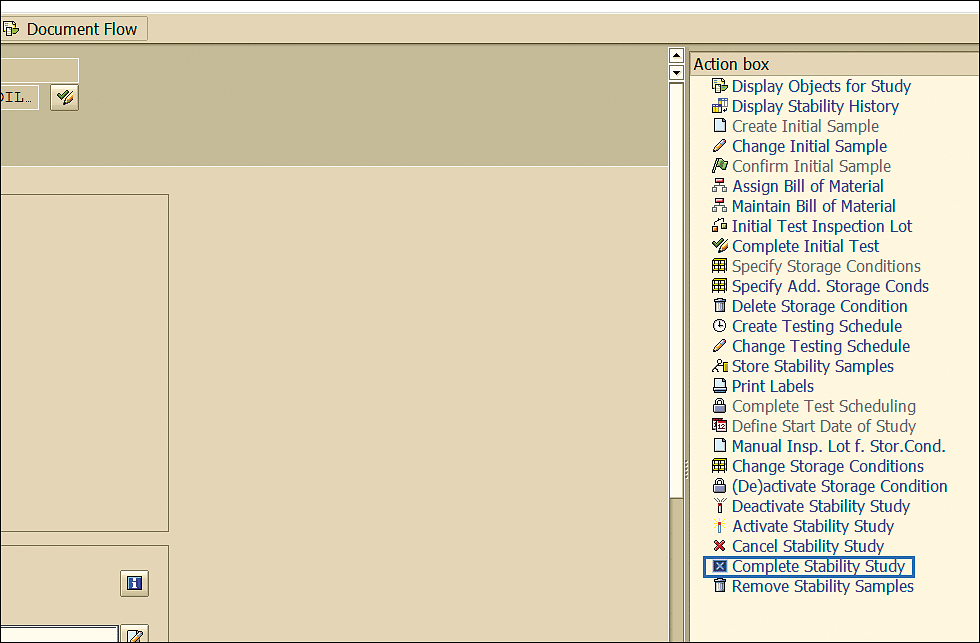
Figure 82
Stability study quality notification completion
You saw real-life business cases and went through step-by-step configuration and end-to-end transactional steps to realize requirements with the help of SAP stability study functionality.
In a few cases, you may need additional action boxes in the stability notification to cover business scenarios. I have mentioned the steps you need to follow to include additional action boxes in the Appendix.
Appendix
The Action box (Figure 83) related to a quality notification type can be customized after you execute transaction code SPRO.
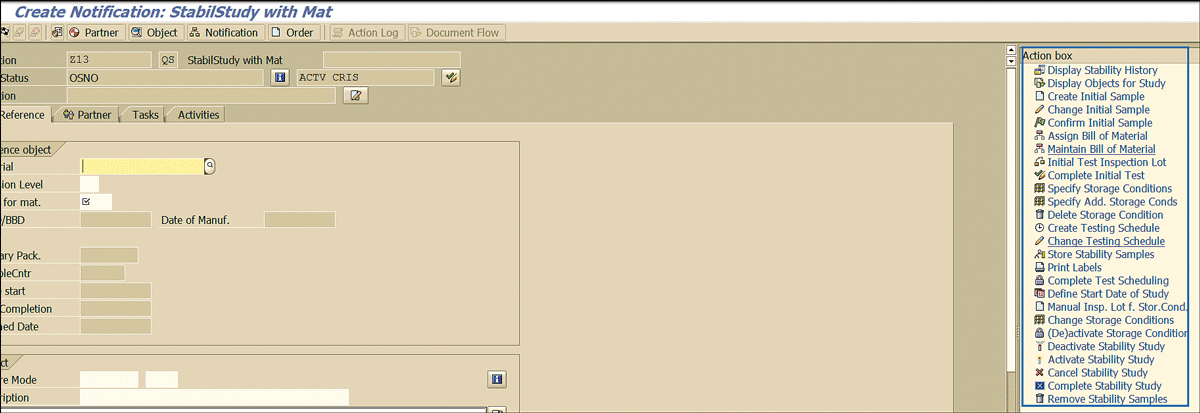
Figure 83
Action box in quality notification
Follow menu path SPRO > Quality Management > Quality Notification > Notification processing > Additional Notification Functions > Define Action Box. This path takes you to the screen shown in Figure 84.
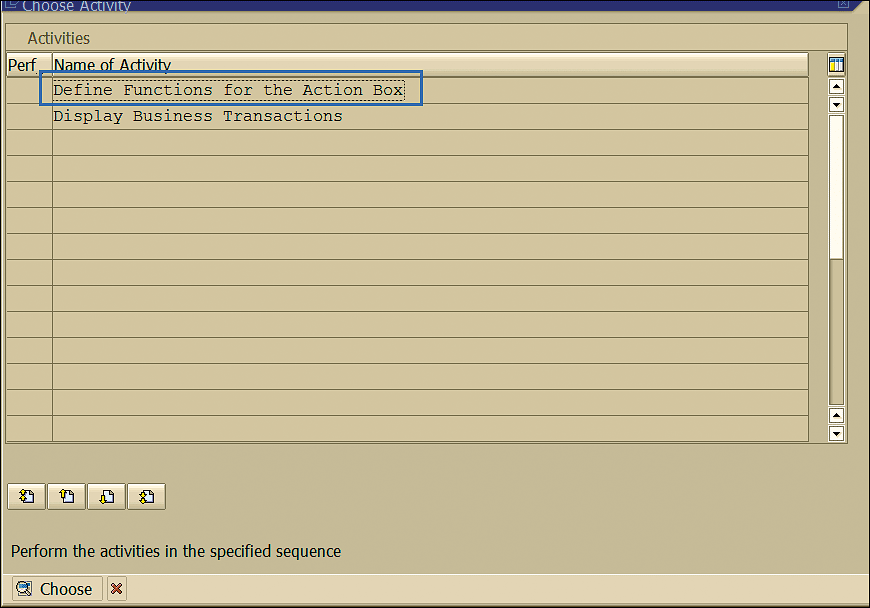
Figure 84
Functions for the action box
Select the option shown in Figure 84 to define which function module system executes after you click the action boxes in the notification.
Highlight the notification type for which action sequences need to be amended and then select the Activities folder (Figure 85).

Figure 85
Quality notification configuration
The field Sort number (Figure 86) defines the sequence in which actions are shown in the notification while processing. If you need to introduce a new action (task), click the New Entries button.
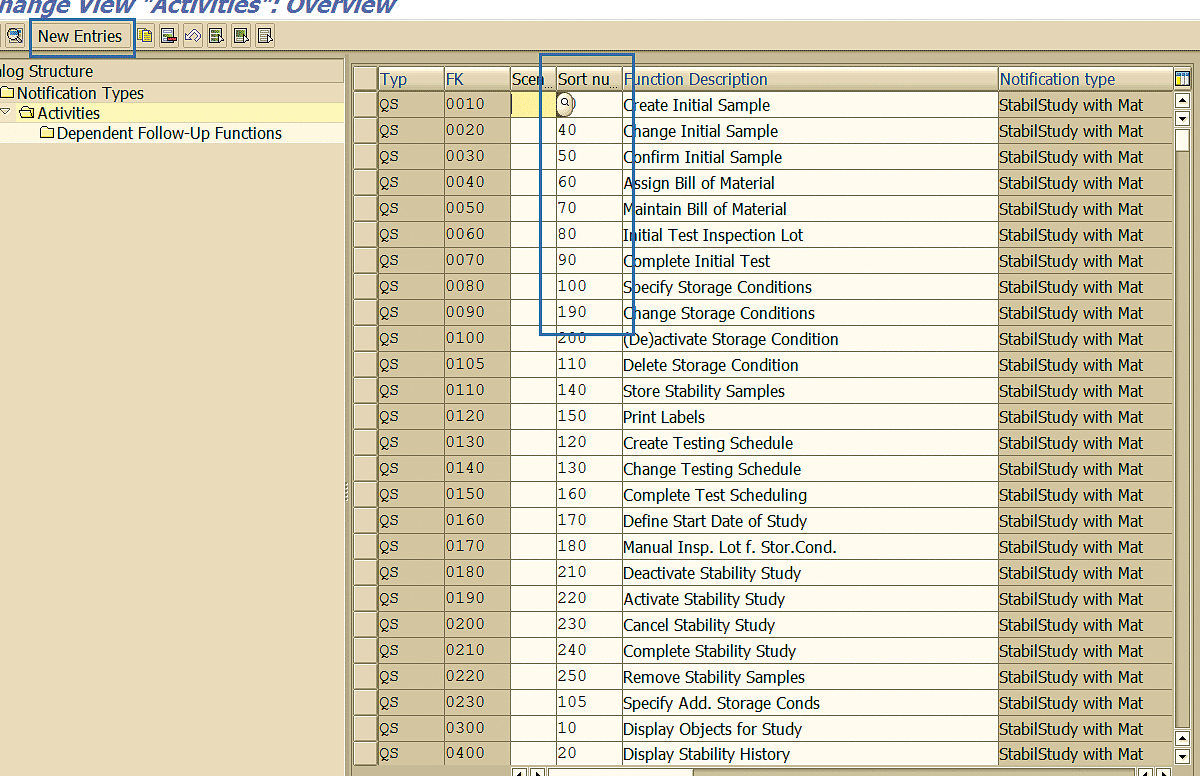
Figure 86
Action sequence in quality notification
In the next screen, define the function module that will be executed after you click this new action, enter the name of the new action, and enter the name of the icon of the new action, as shown in Figure 87.
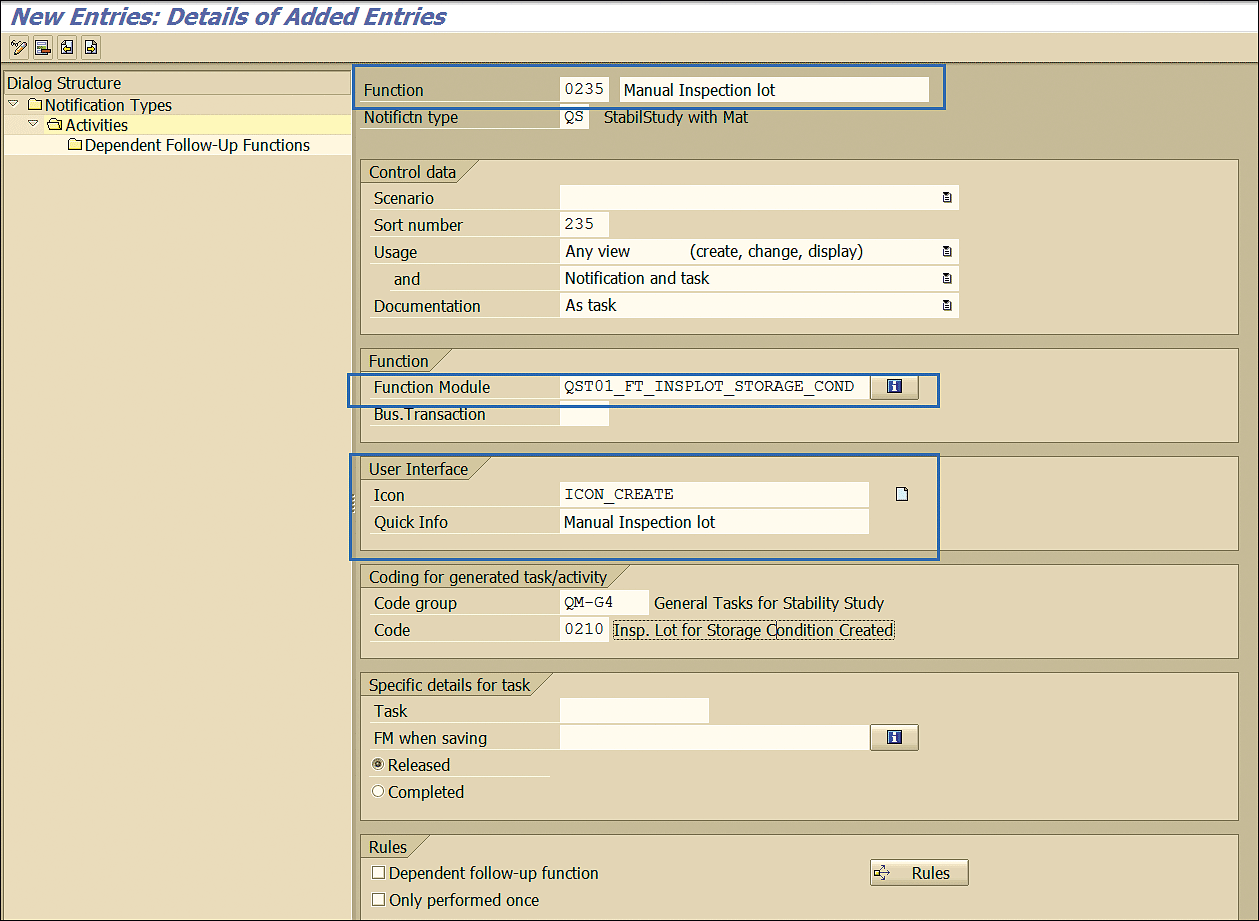
Figure 87
New action definition for a notification
After you execute the notification in transaction code QM01, you can see this new action item now (Figure 88).
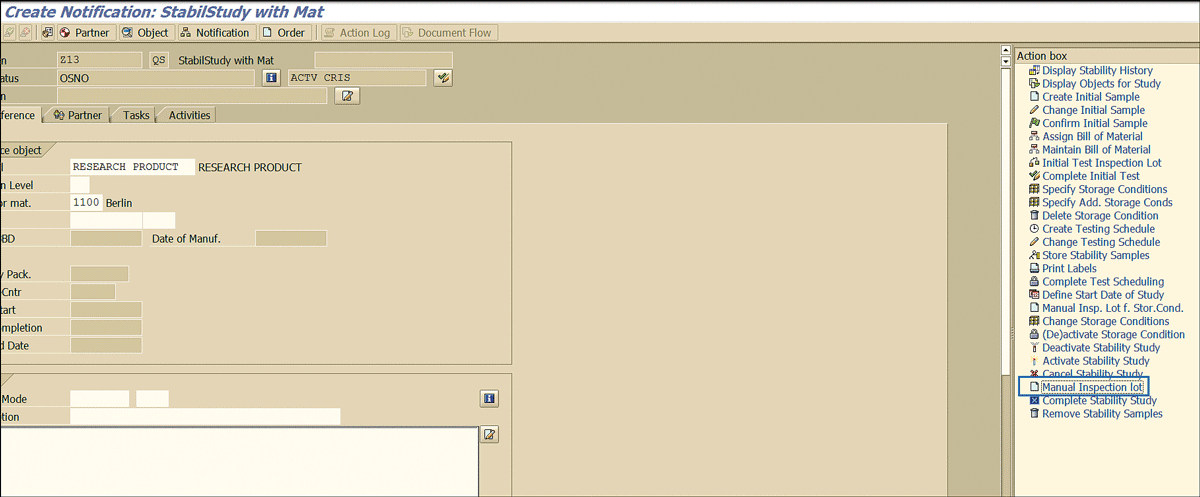
Figure 88
New action in a notification
As defined in the configuration (Figure 85), clicking this action executes the function module QST01_FT_INSPLOT_STORAGE_COND and brings up the pop-up box to select the storage condition for which the manual inspection lot needs to be created (Figure 89).
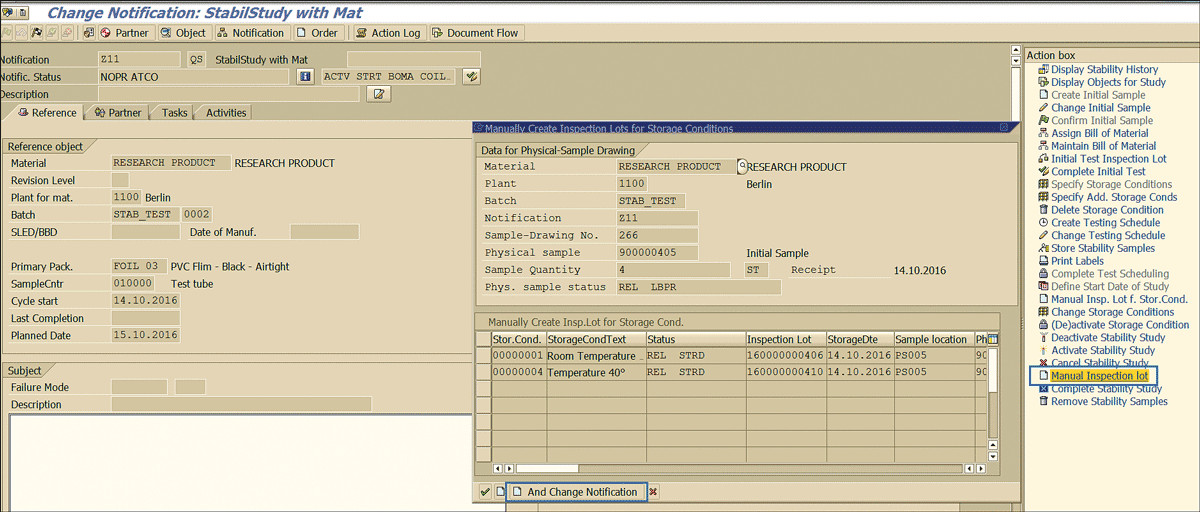
Figure 89
Manual inspection lot trigger for stability study
Kaushik Choudhury
Kaushik Choudhury is a senior consultant in the supply chain management field with more than a decade of experience in supply chain consulting in principal positions for leading brands across the globe. His focus is on business transformation, business reengineering, proof of concept and solution design, and end-to-end implementation. He has a proven track record of delivering in alignment with business expectations and possesses a unique combination of profound business process understanding, consulting skills, hands-on SAP system experience, and effective management capabilities. Kaushik has operated seamlessly in highly agile and iterative environments in which solutions are implemented incrementally with ongoing design changes. He has extensive experience in Agile and Waterfall delivery methodologies in large SAP supply chain implementation programs.
You may contact the author at Kaushik.choudhury@outlook.com.
If you have comments about this article or publication, or would like to submit an article idea, please contact the editor.


