Learn about the integration between two key SAP BusinessObjects tools: BusinessObjects Analysis, edition for Microsoft Office, and Design Studio. Specifically, two features, calculations and conditional formatting, are not in Design Studio natively, but are enabled when you integrate them with BusinessObjects Analysis, edition for Microsoft Office.
Key Concept
BusinessObjects Design Studio is positioned as a dashboarding and cockpit-building toolset to build complex and, if designed correctly, easy-to-use reporting tools for all levels of users. BusinessObjects Analysis, edition for Microsoft Office, on the other hand, is an Excel-based advanced analysis toolset for use by analysts.
Although BusinessObjects Design Studio applications build useful dashboards for analysis by all levels of users, the tool does not allow calculations to be added in an ad-hoc manner. Although the source object, such as the BEx Query or SAP HANA view, can have calculations, another option is needed so that the end analyst—the ultimate expert—can help design the guts of the dashboard (e.g., how the dashboard looks, and the data that feeds it). One option is to use SAP BusinessObjects Analysis, edition for Microsoft Office, to pass this information to the designer of the dashboard.
Note
In the context of this article, BusinessObjects Design Studio applications are referred to as dashboards. This term should not be confused with the older product, SAP Dashboards.
BusinessObjects Analysis, edition for Microsoft Office, is the main Excel-based analysis tool offered by SAP. As such, analysts can use their knowledge of Excel to access and manipulate data from a warehouse with advanced features over and above the pivot table, such as drag-and-drop features with which you may already be familiar. Two of these advanced features include conditional formatting and on-the-fly calculations that are commonplace in BusinessObjects Analysis, edition for Microsoft Office, but are not available in Design Studio. However, there is a little-known feature that allows the formatting, navigation, and complex calculations from BusinessObjects Analysis, edition for Microsoft Office, to be copied and then pasted and into Design Studio, thus enhancing the dashboard’s presentation and analysis power. These underutilized features are the main focus of this article.
Note
I do not show the specific steps required to set up conditional formatting in either the BW Query or the BusinessObjects Analysis, edition for Microsoft Office, workbook, nor do I go into the intricacies of adding calculations to workbooks. I assume readers are already familiar with these topics. If you are not, consider taking SAP Training Class
BOAN10.
Remember the features I am addressing are only available in BusinessObjects Analysis, edition for Microsoft Office, so I first show how to create them in BusinessObjects Analysis, edition for Microsoft Office, and then I show how to cut and paste them into Design Studio.
The Conditional Formatting Feature of BusinessObjects Analysis, edition for Microsoft Office, in Brief
The first feature, conditional formatting, is where cells are either colored or icons are added to the cells to highlight information and alert the user to issues with the data. For example, sales of over 1,000,000 are colored green, and sales of less than 1,000 are in red. Alternatively, green up arrows and red down arrows can be added as indicators (
Figure 1). In addition to the ability to create these conditional formatting rules in a BusinessObjects Analysis, edition for Microsoft Office, workbook, it is also possible to identify them in the BW Query that could be a data source to the workbook. When this option is chosen be aware that the BW Query tool calls these conditional formatting rules “exceptions.” The results are the same regardless of where the rules are created—in the source query or in the BusinessObjects Analysis, edition for Microsoft Office, workbook.
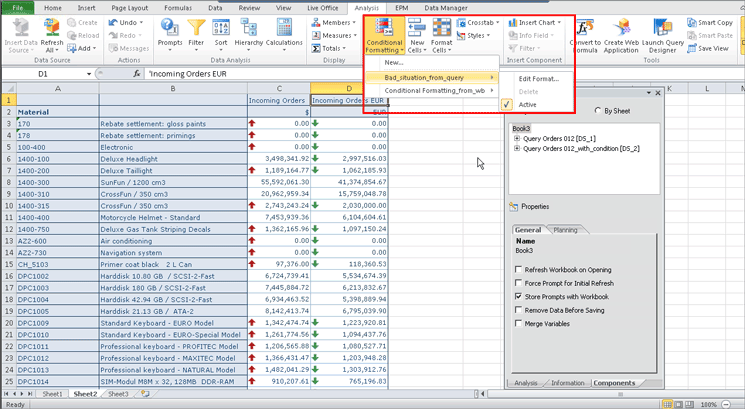
Figure 1
Conditional formatting in a BusinessObjects Analysis, edition for Microsoft Office, workbook
Figure 1 shows a BusinessObjects Analysis, edition for Microsoft Office, workbook and the Conditional Formatting button that is used to create and display conditional formatting. As you can see, two conditional formatting rules are available and active (icons are displayed) in the workbook: Bad_situation_from_query and Conditional Formatting_from_wb. Note that the rule named Bad_situation_from_query was created in the BW Query tool and the Bad_situation_from_query one was created in the workbook itself.
The On-the-Fly Calculation Feature of BusinessObjects Analysis, edition for Microsoft Office, in Brief
The second feature, on-the-fly calculations, relates to the ability of BusinessObjects Analysis, edition for Microsoft Office, to create calculations that are based on data existing in the data source and then add them to a workbook. There are a few options for this, as shown in the drop-down list in
Figure 2. These include Dynamic Calculation, Add Calculation, Add Free-Form Calculation, and Add Restriction.

Figure 2
Calculations in a BusinessObjects Analysis, edition for Microsoft Office, workbook
Note
The Add Calculation and Add Restriction options are grayed out on the screen because options are only enabled if your mouse is in the right spot on the spreadsheet.
Although there are nuanced differences between the math for each of these options, basically you can make new columns or rows of measures with all three techniques by adding logic based on measures that are in the source data. In this simple example, I choose Free-Form Calculation and named it neds_new_calc (
Figure 3).

Figure 3
Create a new free-form calculation
The results are seen in
Figure 4.
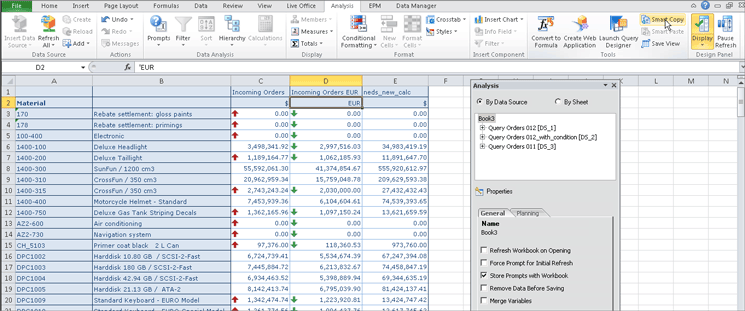
Figure 4
The workbook with the new free-form calculation added to it
Note
In most cases, for companies that use BW Queries or SAP HANA views as the data source, it is advisable to add the required calculations to these data sources before they are deployed into Design Studio or BusinessObjects Analysis, edition for Microsoft Office, workbooks, Web Intelligence, or other tools. This way, the source holds the calculation and users can avoid having to design them in various output tools like I did above. That said, in the real world, analysts need to add their own calculations, and for various reasons doing it in the workbook often does make sense.
How to Integrate These Two BusinessObjects Analysis, edition for Microsoft Office, Features and Design Studio
As you can see from these two simple examples, BusinessObjects Analysis, edition for Microsoft Office, has a host of tools for analyzing data. In addition to the two advanced features identified, the ability to perform slice-and-dice and pivot-table analyses are also basic features of BusinessObjects Analysis, edition for Microsoft Office. For example, if the original query sorts the data by material and customer, a simple drag and drop can switch the sort order to customer and company or, as shown in my example, just by material.
The next question is how to bring detailed data with the formatting and ad-hoc calculations to life using a graphical Design Studio dashboard. In this case, there are two options:
- Launch a Design Studio application from the BusinessObjects Analysis, edition for Microsoft Office, workbook and automatically create the beginning of a Design Studio dashboard with the features from the BusinessObjects Analysis, edition for Microsoft Office, workbook. I refer to this as the push method because you start from BusinessObjects Analysis and push your work to Design Studio.
- Copy the data source with all the improved calculations and formatting from BusinessObjects Analysis, edition for Microsoft Office, and paste it into BusinessObjects Design Studio. I call this the pull method because you open Design Studio separately and decide, selectively, what data should be pulled in.
The advantage of the first option is that all the data sources that feed the workbook are instantaneously available in your new Design Studio application as opposed to having to select and copy (and paste) each source separately. The disadvantage is that when doing this, the Design Studio application cannot be opened up on your PC as the icon in the workbook does this for you. This does not sound like a big disadvantage, but I found that my focus was on building the Design Studio application and therefore preferred to have it already open on my PC. With this design flow, getting the data for the design from various places, this push technique does not work as well, at least for me.
For the reason outlined above, option 2, in my estimation, is better, because it assumes you are in the middle of a complex dashboard design and just need help with the data.
In the next sections, I discuss both of these options in more detail.
Option 1: Launching Design Studio (the Push Method)
To use option 1, you first need to do a bit of setup to enable the Create Web Application button. This is done in BusinessObjects Analysis, edition for Microsoft Office, via menu path File > Analysis > Settings (
Figure 5).

Figure 5
Enable the Create Web Application button
In the Settings pop-up screen that opens, go to the Advanced Settings tab and select the Show “Create Web Application” in Tools Group check box and then click the OK button. (The other options are related to other features in BusinessObjects Analysis, edition for Microsoft Office, and are not discussed here.)
Once you’ve made this setting, when you go back to the grid area in your Excel workbook the highlighted Create Web Application button in
Figure 6 is available to the analyst.

Figure 6
Launch a web application in Design Studio
Once you’ve added the Create Web Application button (in Design Studio) via the earlier step, when you click it the system automatically opens the Design Studio application and pushes the BusinessObjects Analysis, edition for Microsoft Office, workbook’s data sources and all the associated navigations, conditional formatting, and calculations to a newly opened Design Studio session on your PC.
Although option 1 is a cool idea (you know it is not my favorite!), it is not as practical to use as option 2, as mentioned above. It only saves time when building the Design Studio application if your BusinessObjects Analysis, edition for Microsoft Office, workbook has many data sources. Since most workbooks have only one data source, again my preferred method is option 2, the so-called pull option. Another thing that makes option 1 impractical is that you cannot launch Design Studio from BusinessObjects Analysis, edition for Microsoft Office, if the Design Studio application is open on your PC. For all these reasons, I don’t recommend using this feature. I’m just explaining what this button does.
Option 2: Copying and Pasting Selected Data Sources from BusinessObjects Analysis, edition for Microsoft Office, into Design Studio (the Pull Method)
For option 2 no setup is required, but you need to be in local mode or connected to the BI platform in order to use this method. In this scenario let’s assume that you have a BusinessObjects Analysis, edition for Microsoft Office, workbook with one or more data sources for which you have navigated, formatted, and created calculation options.
With this second option, the pull method, you have to decide which data sources end up in your Design Studio dashboard. To do so, simply click a data cell that is fed by a data source that you want to use for your Design Studio application. Then select the Smart Copy option on the tool bar (boxed in
Figure 7).

Figure 7
Select a cell and then choose Smart Copy
Note
In the screenprint in Figure 7, Smart Copy has already been selected and thus is not an option. You could click Smart Paste, but this would only make sense if you opened another workbook into which to feed the data source.
Now that you have copied the data source in your clipboard, return to your already-opened Design Studio application and navigate to the DataSources folder, as shown in
Figure 8. Using the context menu, choose the Smart Paste option.

Figure 8
Paste the copied data source into the Design Studio application using the context menu
It’s that easy. When you copy and paste the data source in this way, Design Studio gets all the calculations and formatting, with one small caveat. It is true that as soon as you add a new crosstab, you see the new formula and that the data is navigated to in the same way as it was in BusinessObjects Analysis, edition for Microsoft Office. The caveat is that the conditional formatting that can be displayed on a crosstab, although available from the copied data source, must first be enabled as its default option is to be hidden. You enable this in the Properties tab of the crosstab. Once this tab is opened, enable the conditional formatting by setting the Conditional Formatting Visible property to true, as shown in
Figure 9.

Figure 9
Set the conditional formatting property to be visible
Figure 10 shows the Design Studio Application complete with a simple crosstab object (an Excel-like grid). It also includes the conditional formatting (e.g., the red up and green down arrows) and a new calculated measure (e.g., neds_new_calc), both of which originated from a data source in BusinessObjects Analysis, edition for Microsoft Office. Now it is the job of the Design Studio artist to add other design objects, such as buttons, graphs, tabs, and images to make the dashboard the best display tool that everyone can use to analyze data.

Figure 10
The new application
The result is a new Design Studio application with conditional formatting, navigation, and a new calculation originating from BusinessObjects Analysis, edition for Microsoft Office
To find out more using many hands-on exercises, attend SAP Training Class
BOD310.
Ned Falk
Ned Falk is a senior education consultant at SAP. In prior positions, he implemented many ERP solutions, including SAP R/3. While at SAP, he initially focused on logistics. Now he focuses on SAP HANA, SAP BW (formerly SAP NetWeaver BW), SAP CRM, and the integration of SAP BW and SAP BusinessObjects tools. You can meet him in person when he teaches SAP HANA, SAP BW, or SAP CRM classes from the Atlanta SAP office, or in a virtual training class over the web. If you need an SAP education plan for SAP HANA, SAP BW, BusinessObjects, or SAP CRM, you may contact Ned via email.
You may contact the author at
ned.falk@sap.com.
If you have comments about this article or publication, or would like to submit an article idea, please contact the
editor.