Learn how to configure the Global Assignment functionality in SuccessFactors Employee Central, focusing on how to maintain both home and host assignment records for any employee who is on a global assignment. Also learn how to automate the end of Global Assignment (versus having to do it manually) and how to set up manager permissions and workflows when initiating the global assignment process.
Key Concept
The Global Assignment concept in Employee Central allows companies to assign their employees to different expatriate assignments as they move to multiple geographical locations within the organization, while at the same time maintaining both home and host master data records. The concept of maintaining home and host assignment records allows organizations to track employees’ master data separately by assignment.
Inevitably, almost all global companies these days send employees on expatriate assignments or permanent country reassignment. This is necessary for global companies to maintain or gain the competitive advantage by expanding their expertise all over the world. The Global Assignment feature of SuccessFactors Employee Central enables organizations to assign employees to expatriate assignments as they move to multiple geographical locations around the globe while staying with the same organization. It also allows organizations to permanently transfer employees to other countries while maintaining both home and host master data during the assignment periods. For example, employee benefits, payroll, and dependent data may be maintained in the home record while the host record captures the new assignment information.
I guide you through the basic steps for implementing the Global Assignment feature in Employment Central. After reading this article, readers should be able to configure Global Assignment in Employee Central with both home and host records for employees on an expatriate assignment, set up Permission Roles for home and host managers, and create workflows to automate the approval process of the Global Assignment.
PROVISIONING Settings
PROVISIONING is a tool that is used to set up SuccessFactors modules for companies. Before doing any configuration in Employee Central, the Global Assignment functionality must be enabled through PROVISIONING. If you have access to the PROVISIONING account, log on to PROVISIONING and click Company Settings under Edit Company Settings. Select the Enable Global Assignment Management – requires “Employee Central V2 check box and click the Save button (Figure 1). Only SuccessFactors or their implementation partners have direct access to PROVISIONING—companies do not have access to PROVISIONING. Ask your implementation partner to enable the Global Assignment feature if you do not have access to PROVISIONING. You should also ensure that the Effective Dated Data Platform, Enable Effective Dated fields in Basic Import, and Employee Central V2 check boxes are enabled in PROVISIONING.
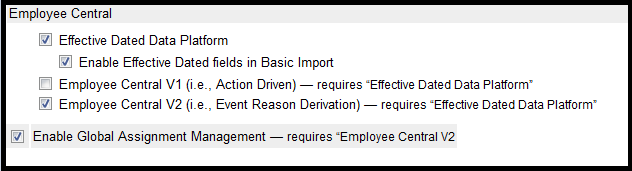
Figure 1
Enable the PROVISIONING settings
Verify that your succession data model has the global assignment HRIS element. (Data models are the XML files that you can modify based on your company’s requirements.) Export the data model from PROVISIONING and ensure that the HRIS-element ID globalAssignmentInfo is in the file.
Here are the steps:
- Log on to your PROVISIONING account
- Select your company
- Under Succession Management, click the Import/Export Data Model option
In the screen that opens showing the data model (Figure 2), if you do not see the HRIS-element “globalAssignmentInfo”, add it to your existing data model and import the file.
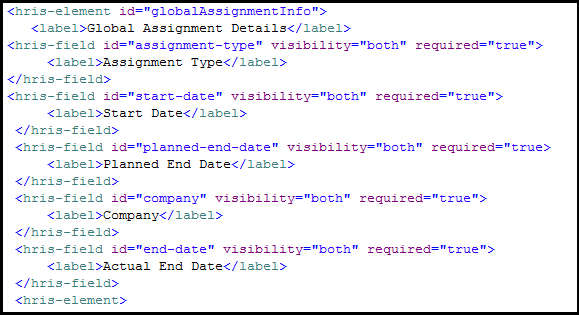
Figure 2
Make sure the global assignment HRIS-element is in the succession data model
Update Employee Home and Host Job Information Records
Every time an employee goes on an expatriate assignment, you need to create a separate set of home and host records for that assignment. By creating a separate set of data for the assignment, you are able to retain the permanent home and pay data for the employee and also concurrently track data for the employee’s current assignment. Employee Central allows you to maintain separate sets of home and host job information records on the employee, but first you have to define a new Event and new Event Reasons.
Define Events for Global Assignment
In Employee Central, each employee activity is captured through a combination of Events and Event Reasons. Events are occurrences that take place in an employee’s life cycle within the company. Some examples of Events are Hire, Rehire, Change in Pay, Promotion, Leave, and Termination. Events are defined in picklists and are pre-delivered by SuccessFactors (Figure 3). You must use one of the pre-delivered Events to capture your requirement. SuccessFactors Partners/Consultants can download pre-delivered picklists via the following link: https://partners.successfactors.com/productcentral/Pages/display/prodinfo/data+models+and+picklists/default.aspx.

Figure 3
Examples of Global Assignment Events
You may also export the existing picklist out of Employee Central and add the entries manually. The steps for doing so are as follows:
- Log on to Employee Central, click the Admin Tools drop-down option, and then select Admin Tools
- In the Company Process & Cycles portlet, click Company Settings and then Picklist Management.
- Select Export all picklist(s) and click the Submit button to export the picklist.
- Once you have exported the file, add the entries (shown in Figure 3) to your picklist (if they are not already in the picklist). You may change the label, but do not change the external code. Making changes to the external code prevents triggering of the Global Assignment process since the logic is already built in to look for the specific Event or Event Reason external code in Employee Central.
- Save the file and import it back to the Employee Central system (the file must be in CSV format).
Create Event Reasons
Once you have imported the picklist with the Global Assignment Events, you must now create Event Reasons and tie them to the corresponding Events. Event Reasons are the reasons or explanations that justify why the Event took place. Each Event must have at least one Event Reason tied to it. For example, for the Event Termination, you can define multiple Event Reasons to be more specific about why the Termination took place. So, in the case of Termination, Event Reasons may be No show, Family reasons, or Personal.
The steps for creating a new Event Reason are as follows:
- Log on to Employee Central and click open the Admin Tools drop-down list, then select Admin Tools.
- Under the Company Process & Cycles portlet, click Employee Files.
- Click Manage Organization, Pay and Job Structures
- Click Create New drop-down and select Event Reason to create a new Event Reason as shown in Figure 4.

Figure 4
Add a new Global Assignment Event Reason
You must assign the Event Reason to the Event Global Assignment as shown in Figure 4. This is because when you choose the Event Reason Add Global Assignment to initiate the assignment, the system creates a Job Information record with the Event Global Assignment and the Event Reason Add Global Assignment. When you are done, you should have successfully created the Event and corresponding Event Reasons as shown in Table 1.
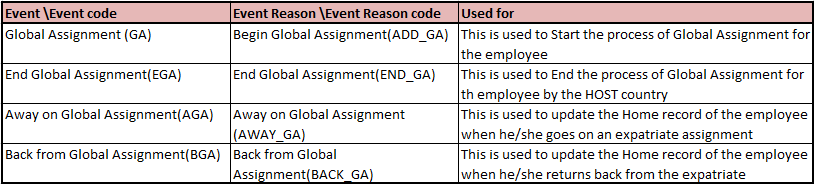
Table 1
A Global Assignment Event and its corresponding Event Reasons
Now that you have created Event and Event Reason, you must update (if not already in the system) the Global Assignment configuration for a Generic Object. Here is where you define which Event Reasons are to be used to update the home record. The steps for creating a new Generic Object are as follows:
- Log on to Employee Central, click the Admin Tools drop-down option, and select the Admin Tools option.
- In the Company Process & Cycles portlet, click Employee Files.
- Click Manage Data.
- Click the Create New drop-down and select Global Assignment Configuration from the options.
- Make your entries (as shown in Figure 5) and click the Save button to save your configuration.

Figure 5
Global Assignment configuration to update the home job information record
Note
The Global Assignment Configuration (GACONFIC) Generic Object may be
pre-delivered in your Employee Central instance and you may not need to
create a new one. If that is the case, you need only update the GACONFIC
with the Event Reasons that are needed to update the home record.
In Figure 5, enter Yes in the Update home job info record for global assignments field. By doing so, the system automatically creates a home job information record when the employee leaves for an expatriate assignment. Populate the Event Reasons for when the employee is away for a Global Assignment and back from a Global Assignment. These Event Reasons are reflected in the home record of the employee. Save the new record when you are done. You have now successfully completed all the necessary steps to put an employee on a Global Assignment.
Execute a Global Assignment in Employee Central
Once the Events and Event Reasons are created, it’s time to execute the Global Assignment. To put an employee on Global Assignment, follow these steps:
- Go to the employee’s Employment Information page.
- Click the Take Action button and select Manage Global Assignment details from the drop-down options.
- Click the Add Global Assignments Details link and select Event Reason Add Global Assignment from the Event Reason drop-downs. Make all the required entries in each portlet and click the Submit button to save the record.
If you have any workflows associated with the Global Assignment, a new window pop ups asking you to confirm the request. You can click the View Workflow Participants link to see the list of Approver(s). Once the Global Assignment request has been approved, go back to the employee’s Employment Information page, and you should see that the employee has been successfully put on Global Assignment (Figure 6).
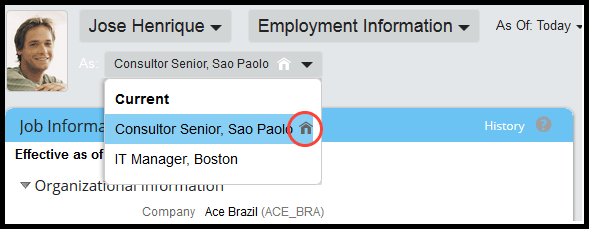
Figure 6
Employment Information page view showing both the home and host assignment information
In Figure 6, you see that Sao Paolo is the employee’s home record location and Boston is the host record location (the home record is indicated by a little house icon, circled). Click either option to be taken to the home or host record, respectively. If you go to host record and click History in the History of Job Information portlet (Figure 7), you see the employee’s newly created Global Assignment record with the Event and Event Reasons (on the right).
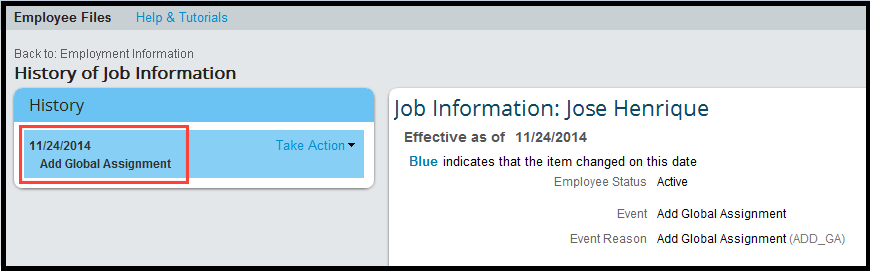
Figure 7
Employee’s host job information record
Now go to the home record and click History in the History of Job Information portlet (Figure 8). You see the employee’s newly created Global Assignment record with the Event and Event Reasons (on the right).
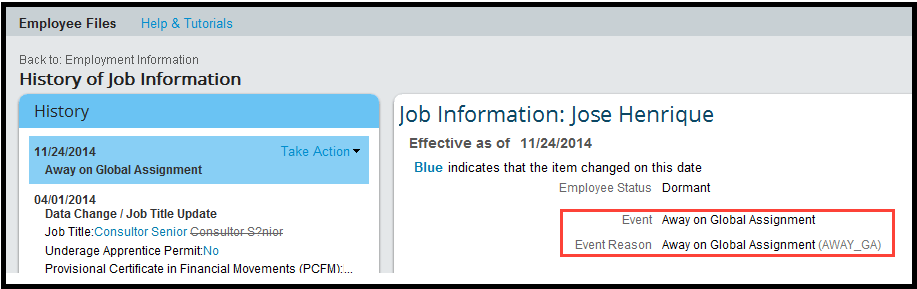
Figure 8
Employee’s home job information record
Automate the End Date of the Global Assignment
The default setup in Employee Central for ending the employee’s Global Assignment is a manual process, requiring the manager or administrator to manually enter the actual end date. This creates entries in both the employee’s home and host records with the corresponding Event types: Back from Global Assignment (home record) and End Global Assignment (host record), respectively.
Instead of the managers or administrator having to manually execute the end of global assignments for the employee, you can configured this to trigger automatically. By setting it up this way, the Back from Global Assignment home job record and the End Global Assignment host job record are automatically created for the employee.
To set up the automatic ending of global assignments, follow these steps:
- Log on to Employee Central and click the Admin Tools drop-down and select Admin Tools.
- Under Company Process & Cycles, click Employee Files.
- Click Manage Data.
- Search for Global Assignment Configuration and select Global Assignment Configuration (GACONFIG) from the drop-down options that appear.
- Click the Take Action button and select Make Correction (this opens the screen shown in Figure 9).
- Enter Yes in the End global assignments automatically field.
- Select the Event reason for ending global assignments automatically from the drop-down options and click the Save button to save the record.
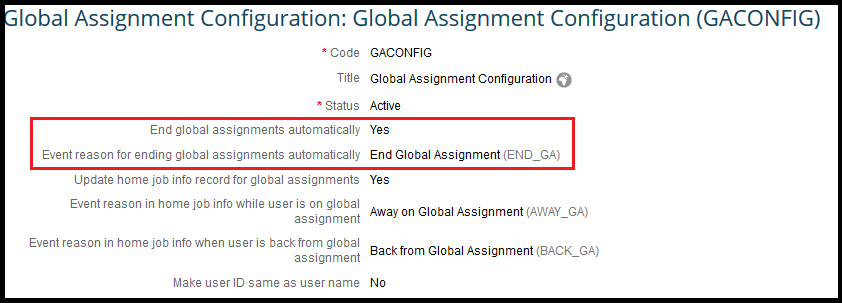
Figure 9
Enable the end of Global Assignment automatically
Once you have successfully executed the global assignment for an employee, the system automatically creates an End Global Assignment record in the employee’s host job record and a Back from Global Assignment record in the home job record.
Set Up Home and Host Manager Permissions
You can use role-based permission to grant various levels of access to home and host managers and HR administrators. Role-based permission is a way of managing an employee’s access to records in Employee Central. When you are implementing Global Assignment, you may first want to determine the answers to the following questions:
- Who in the organization has access to view employees’ Global Assignment information?
- Who can initiate Global Assignment records for the employees?
- Who can edit employees’ Global Assignment records?
- Who can end a Global Assignment?
For all of these questions, the answer options are:
- HR administrators and direct managers
- Just HR administrators
- Just direct managers
Once you have all the requirements finalized, you are ready to set up the permissions for the roles.
Note
Before setting up the Permission Roles, you first have to create
Permission Groups. Permission Groups are used to define the groups of
employees who get a specific set of permissions. For example, if you
decide that only managers can initiate and end their direct report’s
Global Assignment, you would create a Permission Group that identifies
the managers and then assign the Permission Role to Add Global
Assignment to this group. For more information about how to create
Permission Groups, refer to the Role-Based Permissions Handbook. (To see
get the latest version of the handbook, follow this link [sign-in
required]:
SAP Service Marketplace.)
Let’s look at how you can assign different Permission Roles to home and host job managers. Let’s assume you have following requirements:
- Both home and host job managers can initiate Global Assignments for their direct reports
- Only host managers (not home managers) can view, add, edit, and end their direct report’s Global Assignment records
The steps for configuring the permission roles to achieve this configuration are as follows:
1. Go to Admin Tools.
2. Under the Manage Employees portlet, click Set User Permissions and select the Manage Permission Roles option.
3. Click the Create New button and the screen in Figure 10 opens. Enter the Role Name and Description that describes the role that has permission to initiate Global Assignments. (In this case, you’re adding permission for the managers to Initiate Global Assignment for their direct reports.)
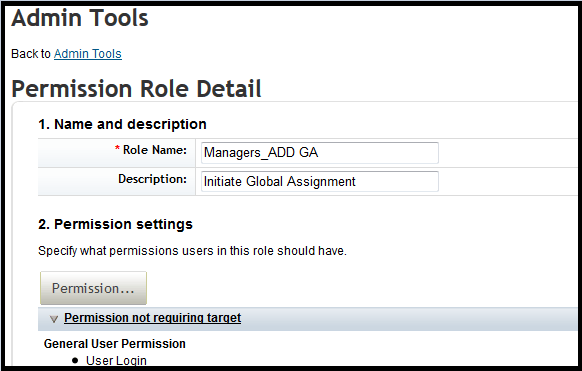
Figure 10
The Role Name and Description for the managers who has permission to add Global Assignments to roles
4. Under Permission settings, click the Permission… button. In the screen that opens (Figure 11), click Employee Data on the left. Then, in the pane on the right, scroll down to the Global Assignment Details options and select the Edit check box next to Global Assignment Add.
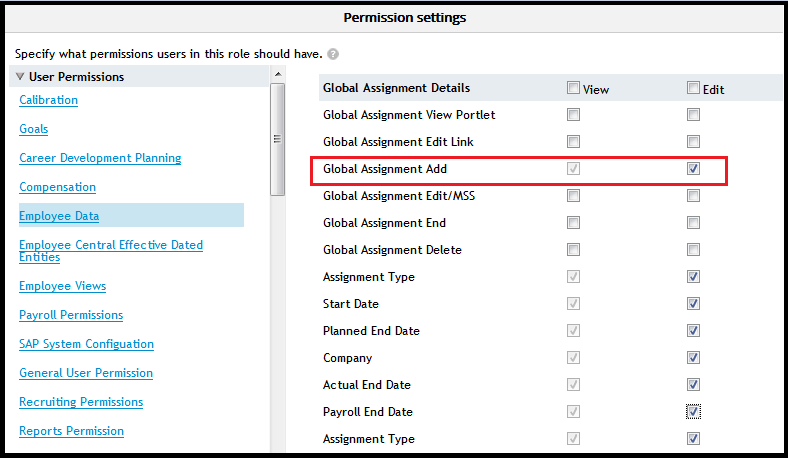
Figure 11
Permission to add Global Assignments
5. Click the Done button to save the new permissions, and you are taken back to the Permission Role Detail page.
6. The next step is to grant this permission to managers. Scroll down to the Grant this role to… section (Figure 12). In the Grant role to: field, select Managers from the drop-down options. Make the rest of the entries as shown in the screen in the figure, and save the new record by clicking the Save Changes button (not shown).
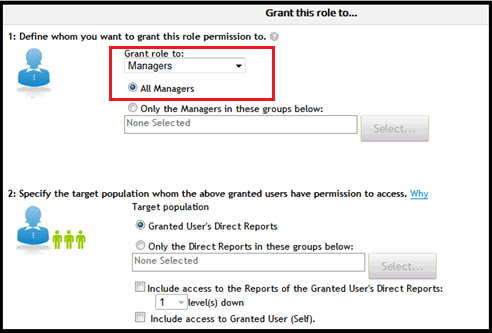
Figure 12
Grant permissions to all managers to add Global Assignment to their direct reports
Now, on to the next requirement—granting permission only to host managers to view, add, edit, and end their direct report’s Global Assignment records. To configure the system to achieve this, follow these steps:
1. Log on to Employee Central, click the Admin Tools drop-down option, and select Admin Tools.
2. Under the Manage Employees portlet, click Set User Permissions, and then Manage Permission Roles.
3. Click Create New and the screen in Figure 13 opens. Enter the Role Name and Description that describes the role that has permission. In this case, you’re adding permission for the host managers to view, add, edit, and end their direct report’s Global Assignment records to Initiate Global Assignment for their direct reports. Click the Permission… button and the screen in Figure 14 opens.
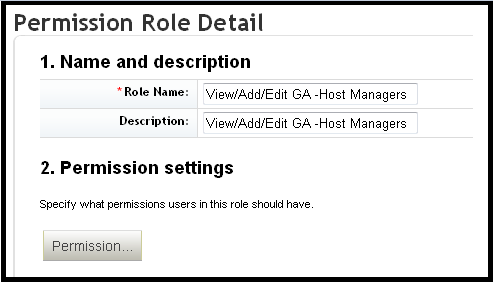
Figure 13
The Role Name and Description for the host manager role allowed to edit and end Global Assignments
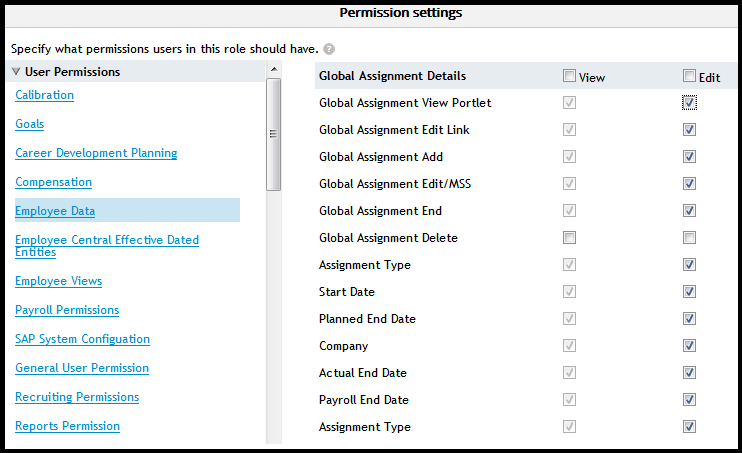
Figure 14
Grant permissions to view, add, and end the Global Assignments
4. Click Employee Data (on the left of Figure 14), scroll down to the Global Assignment Details section (on the right), and select the appropriate Edit check boxes.
5. Click the Done button to save the permission, and you are directed back to the Permission Role Detail page.
6. The next step is to grant this permission to host managers. Scroll down to the Grant this role to… section (Figure 15). In the Grant role to: field, select Host Managers from the drop-down options, and select the All Host Managers and Granted User’s Home Reports radio buttons. Then click the Save Changes button (not shown) to save your new entries, and the host manager now has permission to view, add, edit, and end Global Assignments only for their home direct reports.
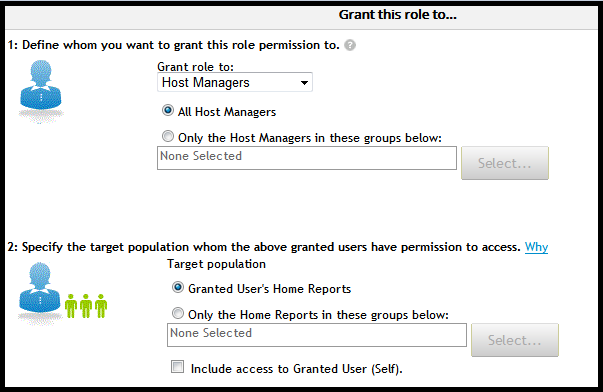
Figure 15
Grant permissions to host managers only for their home direct reports
Set Up Workflows to Automate the Approval Process
In Employee Central, workflow is set up as a Foundation Object. You define workflows for various business scenarios like approving leave of the employee, promotions, terminations, and Global Assignments. You can define when to trigger the workflow, how many levels of approvals are needed, and who the approvers are. During the Global Assignment process, it is common practice to give the home and host job managers permission to approve the process. In addition, you may want to involve the HR administrators as well.
So the question becomes when to trigger a workflow? You can trigger a workflow when a set of data on the employee’s Job Information changes or you can simply trigger a workflow if an Event or Event Reason related to Global Assignment is triggered. Let’s take a look at how to set up a basic workflow to allow home and host managers to approve Global Assignments for their direct reports.
First, you need to create a workflow ID where you define the approvers. Follow these steps:
- Log on to Employee Central and click the Admin Tools drop-down and select Admin Tools.
- Under the Company Process & Cycles portlet, click Employee Files.
- Click Manage Organization and Pay and Job Structures.
- Click the Create New button and select Workflow from the drop-down options.
- The screen in Figure 16 opens where you enter the Workflow ID, Description, and Approver Type.
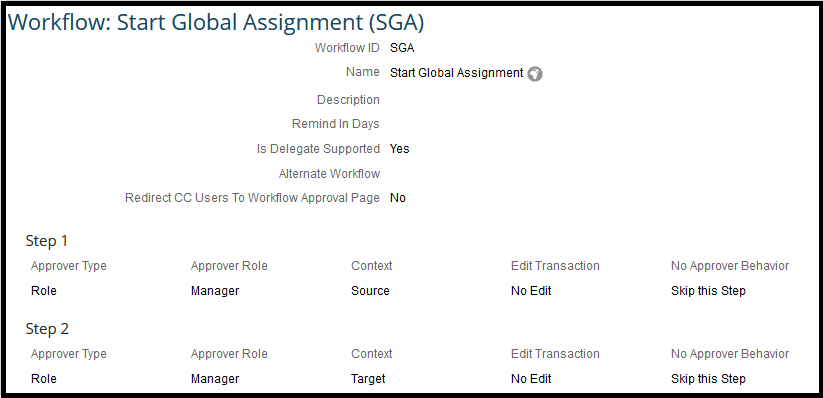
Figure 16
Workflow ID for Global Assignment and the approvers
In Figure 16, you see that there are two approvers for the Start Global Assignment workflow. Approvers are granted permission based on their roles and, in this example, the approvers are managers. Managers are further categorized based on the context (e.g., Source = home country and Target = host country). So, when a Global Assignment is triggered, both the employee’s home and most managers get the workflow request.
Now that you have created the Workflow ID and defined the approvers, you must also define the trigger point. This is done in the Workflow Data model. You can set up workflow to trigger based on either Event or Events Reason. For example, you can create a rule to trigger the workflow when an Event is a Global Assignment (GA) or if the Event Reason is Begin Global Assignment (ADD_GA).
Now, let’s take a look at how you can set up a workflow based on Event Reasons in an XML file (Figure 17).
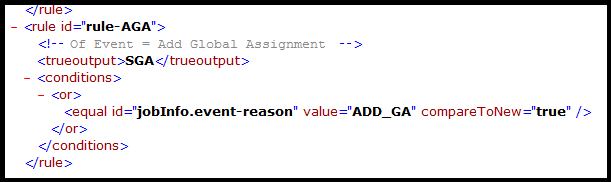
Figure 17
Rule to trigger workflow based on an Event Reason
In Figure 17, you see that the rule ID is AGA and the workflow ID that will be triggered is SGA (trueoutput = SGA). (You created this Workflow ID in Figure 17). The Workflow ID must match the trueoutput value in the Workflow Data model. This workflow is set to trigger when a job information record is saved with Event Reason ADD_GA (Begin Global Assignment). You can create a workflow for Ending Global Assignments following these same steps.
Other Considerations
Other things to consider when implementing Global Assignment in Employee Central:
- When employees go on an expatriate assignment, is the employee still in Active status in the home country? Or, should the employee be placed in inactive or a dormant status? Think about the impact on payroll, headcount reporting, and so forth when making this decision.
- How is pay compensation information maintained? Is the home country still responsible for paying the employee while on an assignment? If so, how does this impact payroll if you put the employee’s home record in inactive status?
- What is the impact on interfaces? When you have home and host records for the employee, which record should you send on outbound interfaces? Similarly, which record should be updated through an inbound interface?
Priynk Gautam
Priynk Gautam has been working with SAP ERP HCM for five years, specializing in the SAP ERP HCM Personnel Administration and Organizational Management modules, as well as SuccessFactors Employee Central. His recent experience includes integration between Employee Central and SAP ERP HCM on-premise systems using Boomi Middleware. Prior to that, Priynk worked with SAP Talent Visualization Solution by Nakisa.
You may contact the author at Priynkg@gmail.com.
If you have comments about this article or publication, or would like to submit an article idea, please contact the editor.