Become and stay Sarbanes-Oxley compliant with Risk Analysis and Remediation. Learn about its main features, technical architecture, and setup.
Key Concept
SAP GRC Access Control delivers controls that identify and prevent access and authorization risks in cross-enterprise systems. The controls prevent fraud and reduce the cost of continuous compliance and control. SAP GRC Access Control enables all corporate compliance stakeholders — including business managers, auditors, and IT security managers — to collaboratively define and oversee proper segregation of duties enforcement, enterprise role management, compliant provisioning, and super user privilege management. These focus areas of access controls correspond to the four key product capabilities of SAP GRC Access Control: Risk Analysis and Remediation, Enterprise Role Management, Compliant User Provisioning, and SuperUser Privilege Management.
The Risk Analysis and Remediation (RAR) capability of SAP GRC Access Control helps you run risk analysis and clean your back-end business systems from segregation of duties (SoD) violations. I'll show you how to efficiently set up and use RAR so that you can become, in minimal time, compliant with regulations such as Sarbanes-Oxley.
I'll start with an overview of the main features of RAR and discuss its technical architecture before guiding you step by step through the setup of the software. Then I'll provide some preferred practices on how to approach the cleaning of your business applications from SoD violations.
RAR Main Features
Among others, RAR comes with the following main functionalities:
- Rule Architect
- Risk Analysis
- Management Reports
- Risk Mitigation
- Alert Monitor
- Simulation
You use Rule Architect to define risks for any of three categories: SoD risk, critical action risk, or critical permission risk. You can define these risks in a granular way, including transaction codes and relevant authorization field values, to avoid false positives in your risk analysis. SAP delivers a standard rule set that contains several hundred risks for a variety of business processes and back-end business applications such as PeopleSoft, JD Edwards, and Oracle (
Table 1). You can use this SAP GRC standard rule set as a starting point to develop your own rule set for analysis of authorization-related risks and to adapt it according to your requirements. SAP only updates these rules when users or partners provide updates or enhancements either directly to SAP or via SDN.
| SAP |
Oracle |
PeopleSoft |
JD Edwards |
| HR
Procure-to-pay
Order-to-cash
Finance:
- General accounting
- Project Systems
- Fixed assets
Basis, security, and system administration
Materials Management
Advanced Planning and Optimization
Supplier Relationship Management
Customer Relationship Management
Consolidations |
HR
Procure-to-pay
Order-to-cash
Finance:
- General accounting
- Project Systems
- Fixed assets
System administration |
HR
Procure-to-pay
Order-to-cash
Finance:
- General accounting
- Fixed assets
System administration |
HR/Payroll
Procure-to-pay
Order-to-cash
Finance:
- General accounting
Consolidations |
|
| Table 1 |
Business applications and processes covered by SAP GRC standard rule set |
Users can run Risk Analysis based on the rule set defined in Rule Architect in one of two ways. They can schedule batch risk analysis on the entire (or a major part of the) user population in one or multiple back-end business applications, or run online ad-hoc Risk Analysis on rather small samples to produce immediate reports on the risk violations of the selected sample. You can also access the Risk Analysis engine as a Web service.
Management Reports can either display the overall status with respect to risk violations to management users on a high level or allow for drilling down and locating root causes of risk violations for users that are more familiar with the security concept of the affected back-end business application.
You can apply Risk Mitigation based on the mitigation controls maintained in the control library of RAR. You can create a mitigation control for one or multiple risks and define it by assigning a business unit, an owner or management approver, and one or multiple back-end control reports, each one having allocated a monitoring user and an execution frequency.
The Alert Monitor can create alerts when a user in your back-end business application executes two conflicting actions representing a SoD risk or a single critical action risk, or when mitigation control reports are not executed with the required frequency in the back-end business system by the monitoring users.
The Simulation feature allows for a what-if type of analysis — for example, adding or removing roles or actions from users or roles. This feature is extremely helpful during the cleaning phase and supports you in taking the right action to remediate risks and become compliant.
Note
Many new features exist in RAR 5.3. A complete list is available in the SAP GRC release notes, which you can access via https://service.sap.com/releasenotes.
SAP GRC Access Control 5.3 Technical Architecture
Figure 1 depicts the technical architecture of SAP GRC Access Control 5.3. The application is deployed on a SAP NetWeaver application server Java 7.0 with Support Package (SP) 12 or higher. Its user interface runs in any browser supported by SAP NetWeaver. For platforms supported by SAP NetWeaver, refer to https://service.sap.com/pam.
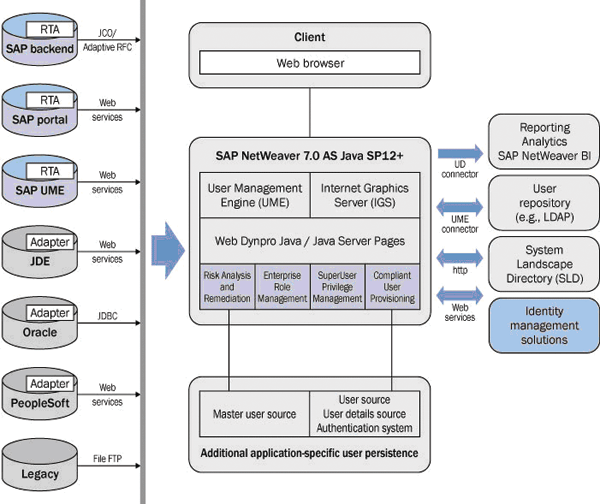
Figure 1
SAP GRC Access Control 5.3 technical architecture
RAR is a Web Dynpro application that comes with an architecture based on agents called real-time agents (RTAs) in the case of SAP systems and adapters in the case of non-SAP systems. You need to install these agents on each back-end system.
The application retrieves real-time data for risk analysis through these connectors. In the case of SAP back-end systems, you can maintain connection data for the system connectors in the System Landscape Directory (SLD), which can run either locally on the same application server with SAP GRC Access Control or centrally on another SAP NetWeaver application server. SLD allows you to maintain connection data at one central place and perform more advanced functions such as secure network communication (SNC) and SAProuter strings. In more detail, RAR can connect to the following types of back-end systems:
- SAP back-end systems with Basis release levels 4.6C, 6.20, 6.40, and 7.00
- SAP NetWeaver Portal 7.0 SP 12 and higher and underlying User Management Engine (UME)
- PeopleSoft applications supported by adapters from SAP's software partner Greenlight
- JD Edwards EnterpriseOne supported by Greenlight adapters
- Oracle applications supported by Greenlight adapters
- Legacy applications (via flat file interface only)
Note
For more detailed information on Greenlight adapters for PeopleSoft, JD Edwards, and Oracle applications, refer to SAP Note 1076755. I'm focusing on SAP back-end systems only.
For SAP back-end systems with software component SAP_HR (e.g., SAP ERP Central Component (SAP ECC) 6.0, SAP ECC 5.0, R/3 Enterprise, or R/3 4.6C [whether you are using the SAP HR module or not]), you need to install two RTAs — VIRSANH and VIRSAHR. All other SAP back-end systems only require VIRSANH. Technically, both RTAs are add-ons. Their installation on SAP back-end systems requires minimal import conditions with respect to applied SP levels (
Table 2). The SP levels in parentheses represent lowered import conditions, which require the implementation of the SAP Note in parentheses.
| VIRSANH 530_46C |
SAPKB46C55
(SAPKB46C44) |
SAPKA46C55
(SAPKA46C44) |
|
1133161
(1246567) |
| VIRSAHR 530_46C |
SAPKB46C55
(SAPKB46C44) |
SAPKA46C55
(SAPKA46C44) |
SAPKE46CC3 |
1133162
(1246567) |
| VIRSANH 530_620 |
SAPKB62063
(SAPKB62026) |
SAPKA62063
(SAPKB62026) |
|
1133163
(1247785) |
| VIRSAHR 530_620 |
SAPKB62063
(SAPKB62026) |
SAPKA62063
(SAPKB62026) |
SAPKE47066
(SAPKE47017) |
1133164
(1247785) |
| VIRSANH 530_640 |
SAPKB64021
(SAPKB64009) |
SAPKA62063
(SAPKB62026) |
|
1133165
(1252111) |
| VIRSAHR 530_640 |
SAPKB64021
(SAPKB64009) |
SAPKA64021
(SAPKB64009) |
SAPKE50015
(SAPKE50001) |
1133166
(1252111) |
| VIRSANH 530_700 |
SAPKB70013
(SAPKB70006) |
SAPKA70013
(SAPKB70006) |
|
1133167
(1247361) |
| VIRSAHR 530_700 |
SAPKB70013
(SAPKB70006) |
SAPKA70013
(SAPKB70006) |
SAPKE60013
(SAPKE60003) |
1133168
(1247361) |
|
| Table 2 |
Minimal import conditions in terms of required SP levels |
The RTA for SAP NetWeaver Portal comes as a software component archive (SCA) file that you need to deploy on your SAP NetWeaver Portal. Note that this RTA requires SAP NetWeaver Portal — it is not supported for application servers without usage type Enterprise Portal Core (EPC).
To generate graphical charts, SAP GRC Access Control 5.3 uses the SAP Internet Graphic Server (IGS), which is part of the SAP NetWeaver platform. Users accessing SAP GRC Access Control 5.3 are managed in the UME, which is part of the SAP NetWeaver application server and can connect to three different types of user repositories: local database, SAP back-end system, or LDAP directory.
To optimize user searches within the application context, you can use additional user persistence components in the infrastructure. RAR uses the master user source as the first back-end system from which you can obtain user data.
SAP GRC Access Control 5.3 is integrated with SAP NetWeaver Business Intelligence (SAP NetWeaver BI). The SAP NetWeaver BI content is packaged with the central SAP NetWeaver BI content release 7.0.3. Users can use this content to create additional SAP NetWeaver BI reports on data stored in the SAP GRC Access Control database.
Prerequisites for the Deployment of SAP GRC Access Control 5.3
Before you deploy SAP GRC Access Control 5.3, you should make sure that your system meets all requirements on the SAP NetWeaver level:
- SAP NetWeaver Application Server Java 7.0 SP 12 or higher is installed
- Java Runtime Environment (JRE) on release JRE 1.4.2_15 or higher is installed
- Java Virtual Machine (JVM) parameters are set according to SAP Notes 723909, 1044173, and 1121978
- SLD is configured, running, and you can access it from your application server. It can run either locally on the application server or centrally on another application server as part of your overall SAP infrastructure.
- SAP IGS is running on your application server. You can check this with the URL https://:480.
- UME is connected to foreseen user repository
Software Installation and the Application of Support Packages
Now you are ready to deploy the SAP GRC Access Control 5.3 software. You can download the installation file from the SAP Service Market Place. The zip file contains:
- SCA files for you to deploy on your application server containing the Java components of SAP GRC Access Control 5.3:
- VIRCC00_0.SCA: RAR
- VIRAE00_0.SCA: Compliant User Provisioning (CUP)
- VIRRE00_0.SCA: Enterprise Role Management (ERM)
- VIRFF00_0.SCA: SuperUser Privilege Management (SPM)
- VIRACLP00_0.SCA: Launchpad for single sign-on (SSO) within SAP GRC Access Control
- SCA file containing the RTA for SAP NetWeaver Portal:
- VIREPRTA00_0.SCA: Enterprise Portal
- RTAs for all supported SAP back-end releases
- Text files for UME role upload
- XML files for initialization of the application
- Text files containing the SAP GRC standard rule set for risk analysis
Use the Java Support Package Manager (JSPM) to deploy the first five listed SCA files on your application server and the RTA for your SAP NetWeaver Portal. For more information, consult the installation guide at https://service.sap.com/instguides.
Continue with the installation of the RTAs on your SAP back-end systems. Use
Table 2 to verify that minimal import conditions are met and refer to the SAP Notes stated there for more detailed instructions.
After you complete the software installation, you need to apply the latest SP for SAP GRC Access Control 5.3. The application of an SP level in general includes patching all six Java software components as SCA files (five application components plus the RTA for SAP NetWeaver Portal, if you are using it) and patching all the non-HR and HR RTAs on your SAP back-end systems. Note that the Java SP components are cumulative whereas the patches for the RTAs are incremental. The content of each SP and import instructions are documented per component in the SAP Notes listed in
Table 3. You can also access eLearning in SDN on this topic via https://www.sdn.sap.com/irj/scn/go/portal/prtroot/docs/library/uuid/604a2694-af5b-2b10-d1bd-ece46a4d36f9.
| General instructions |
1174625 |
VIRSANH 530_46C |
1138015 |
| RAR |
1168120 |
VIRSAHR 530_46C |
1138109 |
| CUP |
1168508 |
VIRSANH 530_620 |
1138016 |
| ERM |
1168183 |
VIRSAHR 530_620 |
1138020 |
| SPM |
1168121 |
VIRSANH 530_640 |
1138017 |
| Launchpad |
1168691 |
VIRSAHR 530_640 |
1138041 |
| RTA for SAP NetWeaver Portal |
1168710 |
VIRSANH 530_700 |
1138018 |
|
|
VIRSAHR 530_700 |
1138042 |
|
| Table 3 |
SAP Notes containing content and import instructions for each component of an SAP GRC Access Control 5.3 SP |
RAR Post-Installation Tasks
After software installation and the application of the latest SP level for SAP GRC Access Control 5.3, you need to execute a number of post-installation tasks before you can start using RAR. I'll guide you through them:
Step 1. Upload roles and create an administrator user for RAR. With the installation zip file comes the file cc_ume_roles.txt. It contains the four UME roles, VIRSA_CC_ADMINISTRATOR being one. These roles represent the starting point for your security concept for the RAR capability. Log on to UME, import the text file, create a user, and assign the above role.
Step 2. Start the background job daemon. Implement SAP Note 999785. Then start the Analysis Engine Daemon Manager with
https://:/sap/CCADStatus.jsp. Log in as the administrator user and the system displays the status of the available threads on each server node of your application server (
Figure 2).
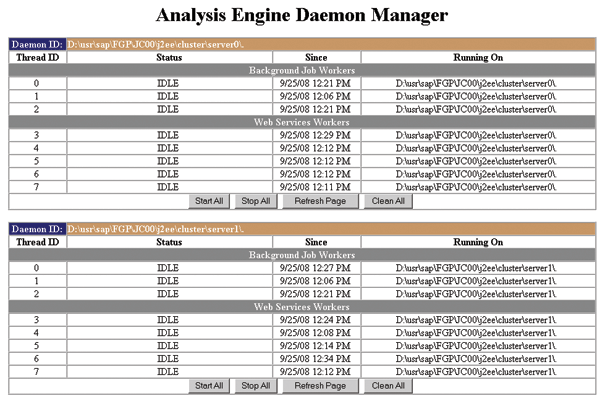
Figure 2
Analysis Engine Daemon Manager displays threads on an application server with two server nodes
Step 3. Set up connections to target SAP back-end systems. For each target system, add an entry in the operation system service file and reboot the server. For each target system, add an entry in the technical landscape in SLD. Create in each target system a logon group and a RFC user with the role /VIRSA/CC_DEFAULT_ROLE coming with the RTA software.
Then, for each target system, maintain pre-installed Java Connector (JCO) destinations in your application server as explained in the installation guide available at https://service.sap.com/instguides. Apply the JCO pool parameters as documented in SAP Note 1121978. Log on to RAR, navigate to Configuration ? Connectors ? Create, select the JCO destination, and add the remaining fields (
Figure 3).
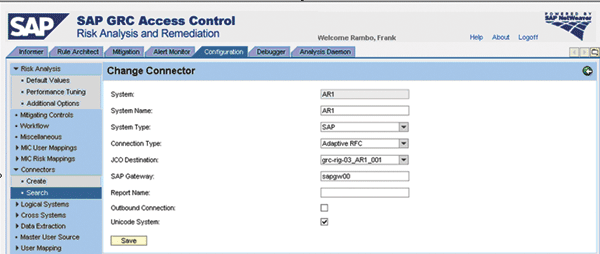
Figure 3
Choose a System ID, System Name, Connection Type Adaptive RFC, and select a JCO Destination
Step 4. Create logical systems and assign system connectors. Logical systems help make the maintenance of rules shared by multiple back-end systems more efficient. Check the standard configuration guide for more details and SAP Note 1178372 for limitations. In RAR, navigate to Configuration ? Logical Systems ? Create. Create a logical system and assign system connectors to it. These system connectors share the same rules for risk analysis.
Step 5. Upload error messages. With the installation zip file comes a file called CC5.3_MESSAGES.txt. Navigate in RAR to Configuration ? Utilities ? Import and upload this file.
Step 6. Set default values and additional options. Navigate in RAR to Configuration ? Risk Analysis ? Default Values / Additional Options and set values according to your requirements. For instance, you can select whether or not you want to include locked or expired users in your risk analysis.
Step 7. Set performance tuning parameters. Apply SAP Note 1121978, which can give you recommendations for what actions to perform.
Step 8. Set miscellaneous values. Refer to SAP Notes 1255746, 1177010, and 1255796 and set the remaining parameters in Configuration ? Miscellaneous according to your requirements. For example, you can enable the risk change log to record changes to risk definitions to comply with specific auditing requirements that you might need to follow.
Step 9. Define a master user source. In RAR, navigate to Configuration ? Master User Source and select one of the available system connectors from the drop-down list. It is not necessary that all your users are defined in the master user source. The master user source is the first source for retrieving basic user information, such as first name, last name, and user group. If the search cannot find a user ID in the master user source, it searches the remaining systems with connectors until it finds the specified user ID. To increase efficiency when searching for users, select the system that contains the most users that have their basic user information maintained.
Step 10. Upload static text from each SAP back-end system. For each back-end system, you need to upload static text, which contains descriptions and names for authorization objects, transactions, fields, values, and organization levels.
Log on to your back-end system and run report /VIRSA/ZCC_DOWNLOAD_DESC (all checkboxes are already checked) in transaction SA38 to download a text file with static text. Then log on to RAR, navigate to Configuration ? Upload Objects ? Text Objects, and upload the text file that has the source system connector selected in the screen.
Step 11. Upload transaction SU24 authorization data from each SAP back-end system. For each back-end system, you need to do the following.
Log on to your back-end system and run report /VIRSA/ZCC_DOWNLOAD_SAPOBJ in transaction SA38 to download a text file with transaction SU24 data. Then log on to RAR, navigate to Configuration ? Upload Objects ? Permission, and upload the text file that has the source system connector selected in the screen.
Step 12. Upload SAP GRC standard rule set text files. With the installation zip file comes a number of text files containing definitions and descriptions of business processes, functions, and risks for SAP back-end systems of different types (e.g., Basis, R/3, HR, Advanced Planning and Optimization [APO], Supplier Relationship Management [SRM], and Customer Relationship Management [CRM]). Upload these files in Configuration ? Rule Upload. For each back-end system type, two files exist that define functions in terms of actions and permissions. Upload these two files and select the target system connector or respective logical system for which you want to define the functions (
Figure 4). If you are using logical systems as recommended, you need to select the respective logical system.
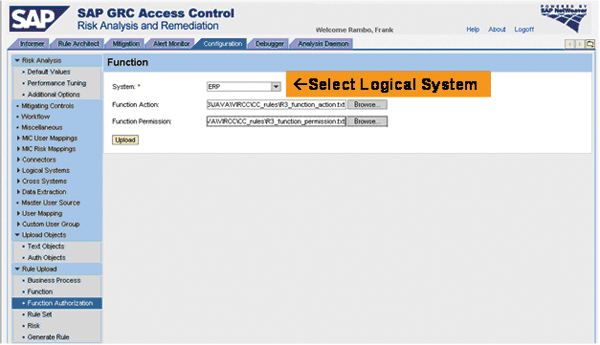
Figure 4
Upload the function defining files
Step 13. Generate rules. After uploading the SAP GRC standard rule set you need to run the rule generation background job. If you are using logical systems, you have to kick off this job in Configuration ? Logical Systems ? Generate Rules. If you aren't using logical systems, but uploaded the standard rule set in the previous step directly against a target system connector, trigger off rule generation in Configuration ? Rule Upload ? Generate Rules.
Run Initial Full Batch Risk Analysis
Now you are ready to run initial full batch risk analysis across all your back-end systems and all users. This includes three tasks, which you can schedule together as one background job (
Figure 5) or in multiple background jobs in sequential order.
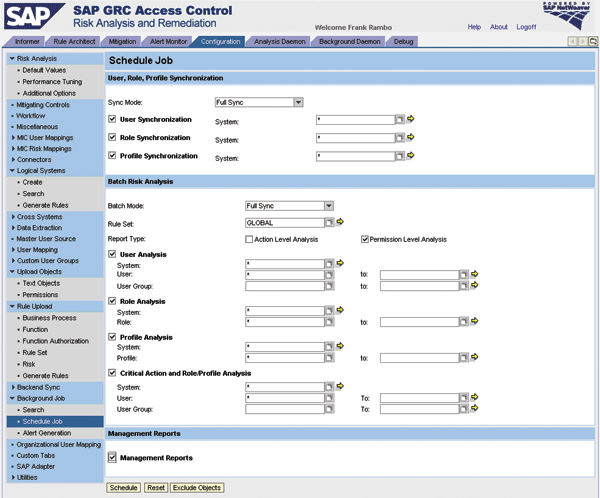
Figure 5
Schedule the background job for your initial full batch risk analysis
- Job 1. User, role, and profile synchronization. This pulls the user data (user IDs and user names only), and role and profile data (technical role and profile names only) from the selected back-end systems and stores them. This is the first section in the background job scheduler page in Figure 5.
- Job 2. Batch risk analysis. This performs SoD, critical action, and role and profile risk analysis on the users, roles, and profiles stored in the system. During the execution of batch risk analysis for users the application selects user, roles, and profiles from the database, fetches the actions and authorizations from the back-end system, and performs risk analysis using the rules stored in SAP GRC Access Control.
- Job 3. Management reports. This job uses the results of the batch risk analysis job to summarize the high-level data to be presented in graphical formats in the informer tab (Figure 6). From the analysis results, the system calculates and stores the total number of violations and distributes the violations with respect to business process and with respect to risk criticality. The system keeps one set of management report data for each month. Every time a management report is run, the management report data is overwritten for the current month.
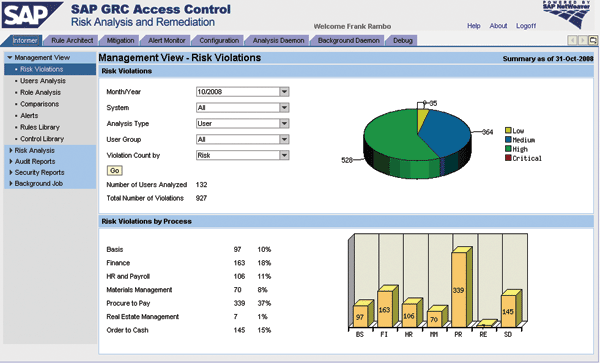
Figure 6
Figure 6 Management View displays risk violations by risk criticality (upper screen) and by business process (lower screen)
After the initial full batch risk analysis, which in the job scheduler is referred to as batch mode Full Sync, has completed, you should schedule a periodic incremental risk analysis background job by selecting batch mode Incremental. This only analyzes user, role, and profile risks in the back-end systems that have changed since the last run. After changes to the rule set or mitigation controls in RAR, you'll need to re-run a batch risk analysis in Full Sync mode again. If you run a batch risk analysis over a large user population, the runtime might become too long unless you apply best practices for performance optimization. You can read such best practices in a how-to guide on SDN at
https://www.sdn.sap.com/irj/sdn/go/portal/prtroot/docs/library/uuid/90aa3190-8386-2b10-c4ba-ced67322ea6d.
Clean Your Systems and Stay Compliant
With the results of the risk analysis, you can start risk remediation. A structured approach is important. For example, SoD violations in roles multiply with each assignment of the role to a user. For this reason, I recommend proceeding with risk remediation in the following order:
- Remediate single roles
- Continue with composite roles
- Focus on your users with risk violations
Another efficient measure for risk remediation is the use of SPM in SAP GRC Access Control. Remove access permissions granted for purposes such as troubleshooting, month-, quarter-, and year-end activities, and temporary delegation of tasks from other users from your regular users and assign them to Firefighter IDs within SPM.
You should only apply risk mitigation as a last resort in which organizational constraints do not allow for further risk remediation because you can only apply a limited number of control reports in a cost effective and diligent manner.
After you have gained compliance, you'll want to sustain it. The main sources for the intrusion of new risks are the user and role management processes. CUP and ERM provide efficient and flexible user and role management processes with integrated risk analysis and risk mitigation so you avoid or mitigate the intrusion of new risks and your business applications stay clean.
Frank Rambo, PhD
Frank Rambo, PhD, is managing a team within SAP’s Customer Solution Adoption (CSA) organization working with customers in the SAP analytics area with the objective to drive adoption of new, innovative solutions. Prior to this position, he worked eight years for SAP Germany as a senior consultant focusing on SAP security and identity management. Before he joined SAP in 1999, Frank worked as a physicist in an international research team. He lives in Hamburg, Germany.
You may contact the author at
frank.rambo@sap.com.
If you have comments about this article or publication, or would like to submit an article idea, please contact the
editor.