See how to perform approval with SAP workflow for capital investments and execution steps using appropriation requests.
Key Concept
In SAP systems, you can use workflow to move projects to different levels of approval. This is an alternative option to performing tasks manually. With projects such as capital investments, which often involve significant levels of money and various levels of approval, using SAP workflow allows you to track the project’s approval process within the system.
Because the stakes involved in capital investments are usually high, upper-level executives need to approve investment proposals with a method that provides transparency and accountability. Generally, approval levels are fixed based on investment limits. For example, up to US$1,000,000, a general manager must approve, from US$1,000,000 to US$5,000,000 both a manager and a director must approve, and above US$5,000,000, a general manager, director, and CEO must approve. However, the requirements and limits change from business to business.
In my article, “Streamline Your Capital Investment Process with Appropriation Requests,” I gave an overview of appropriation requests, how to plan cash flows, and how to carry out pre-investment analysis to justify the investment. I used appropriation request number 10020 as an example and recommended variant 0010 as the best one for approval. In this article, I will look into the investment approval and implementation (i.e., execution) steps using the same appropriation request. I recommend you read that article before moving forward with this one.
Approval of Investment Proposal
All appropriation requests are subject to an approval process either automatically through workflow or manually. The appropriation requests approval process is sequential and flows from the applicant to each approval level until the last level.
The person responsible for each workflow level is called the agent in SAP workflow. The agent receives the appropriation requests assigned to his approval level as workflow items in the email inbox, where he decides whether to approve, reject, or postpone the investment. The system uses the appropriation request master data to determine the partners (i.e., applicant, responsible person, and approvers). The applicant is a partner who processes the appropriation request, the approver is the partner who decides whether to go ahead with the appropriation request, and the responsible person takes care of the execution.
In this section, I’ll explain the configuration steps in detail. Steps 1 through 3 relate to partner functions while steps 4 and 5 cover activating workflow.
Step 1. Define partner functions and the partner determination schema. Partner functions contain information on all persons who create and process the appropriation request. You define partner functions under the partner determination procedures. Follow customizing menu path Investment Management > Appropriation Requests > Master Data > Control Data > Define Partner Determination Procedure and Partner Functions (Figure 1). Click Define Partner Functions to display the screen shown in Figure 2.

Figure 1
Maintain the settings for partner functions

Figure 2
Define the partner roles
SAP has predefined the partner roles for the applicant, person responsible, and authorizer. If you need more roles, click the New Entries button, enter the description, and specify that the partner is a US (i.e., user).
Note
You can also choose the partner role as a position instead of a user. The position is then assigned to a user in SAP HR or SAP ERP Human Capital Management (SAP ERP HCM).
If you made any changes, save them and click the back button to see the screen in Figure 1. Click Define Partner Determination Schema to reach the screen shown in Figure 3. By default, two partner schemas are available in the system: IM01 (single-level approval) and IM02 (two-level approval).

Partner schemas for appropriation requests
Define the partner roles
You specify the partner functions in the partner determination procedure in the same way as the partner determination schema. Click IM01 and navigate to Partner Functions in Procedure to specify the partner functions and their control parameters. Under procedure IM01, I have specified four partner functions (Figure 4). You can assign any number of partner functions in the procedure. For each partner function, you can specify whether it is mandatory and whether it is unique (i.e., you can assign the partner function to only one person or to multiple people). For IM: Applicant, I chose mandatory because every appropriation request must have one initiator who is an applicant. That initiator need not be unique — it can be any user responsible — so I left Unique unchecked. However, IM: Authorizer lvl 1 is mandatory and unique — only one user can be authorized to approve the appropriation request. Assigning multiple users to the partner function can dilute the approval process.

Figure 4
Partner functions settings under the partner determination procedure
Step 2. Assign a partner determination procedure in the appropriation request type. Enter the partner determination procedure in the customizing definition of the appropriation request type (Figure 5). As I explained in my previous article, the appropriation request type contains control parameters for managing appropriation requests and their variants. In Figure 5, I assign the partner determination procedure IM01 defined in Figure 3 to the appropriation request type Z1.

Figure 5
Partner function settings in the appropriation request type configuration
You also assign the relevant partner functions to Applicant and Person responsible as shown in Figure 5 so that the system triggers mail to the users assigned to these partner functions.
Step 3. Define the number of approval levels for each appropriation request type. Access this transaction by following IMG menu path Investment Management > Appropriation Requests > Approval > Define Approval Levels for Appropriation Requests (Figure 6).

Figure 6
Assign workflow levels to the appropriation request type
Click appropriation request type Z1 and navigate to Workflow approval levels to display the screen shown in Figure 7. You control the approval process using approval levels, which you can define separately for each appropriation request type. You can define as many approval levels as you need. You assign a key (e.g., 1, 2, or 3) to each approval level. The key number determines the order in which the appropriation request is processed for approval. The system processes the approval levels in ascending key order (i.e., from 1 to 3).

Figure 7
Define the approval levels and order for the appropriation request type
The system processes the first approval level when the appropriation request status is set at For approval. The system then processes the approval levels in the same order. After all the levels have been approved, the system sets the Approved status in the last approval level. If an approver rejects the appropriation request at any approval level, all further processing is stopped.
In my example, I have taken only one approver (I4) for simplicity purposes. Enter the Approv.l.. (approval level) as 1 and specify that I4 is the approval partner function in the Approver fun… column (Figure 7). You enter the partner functions directly on the General data tab page in the appropriation request master data, which I’ll show you in step 5.
Note
If the partner type is Position instead of US, more than one person may fill the partner function. The appropriation request is approved or rejected as soon as any of these persons approves or rejects it.
Note
You can link the plan versions of an investment program to an approval process from IMG menu path Investment Management > Investment Programs > Planning in Program > Versions > Define Authorization Levels for Plan Versions. Thus you can restrict the processing of this version to few users. Because the appropriation request variant is assigned to the version, only users with authorization for this version can maintain the appropriation request variant.
Next proceed with the configuration for workflow settings in steps 4 and 5 to enable automatic approval process.
Step 4. Activate the workflow settings. Follow IMG menu path Investment Management > Appropriation Requests > Approval > Activate Event Linkage for Workflow Task (Figure 8). Click Activate event linking to bring up the screen shown in Figure 9.

Figure 8
Activate the workflow settings
Expand the workflow task WS00300022. Initially, this is shown as Deactivated, but if you click the detail view icon in the Details column in Figure 9, the screen in Figure 10 appears. In this screen, you can select the Event linkage activated check box and click the green check mark icon to change it to Activated in Figure 9.

Figure 9
Click the icon in the Details column

Figure 10
Select the Event linkage activated check box
Step 5. Assign agents to execute the workflow tasks. Click the back button to return to the screen shown in Figure 8 and click Assign Agents. This brings up the screen shown in Figure 11.

Figure 11
Set up the agent’s assignment to the workflow task
Expand the Appropriation Requests folder and select the task Approve appropriation request (workflow task TS 00300052). Click the Attributes button on the application toolbar to bring up the Task screen. Select General Task, which allows you to forward the appropriation request to any user for approval depending on the appropriation request master data. All other tasks are background tasks as shown in Figure 11, so you don’t need to assign agents because the system does it automatically.
With these workflow settings completed, I am ready to test the approval process against my appropriation request (10020). The applicant is ZPETER and the approver is SRAMACHENDRU. These two partners are maintained in the appropriation request 10020 master data (General data tab) as shown in Figure 12.

Figure 12
Partner functions (applicant and approver) in the appropriation request master data
Test the Approval Process
I log in with the applicant user ID ZPETER. Before submission for approval, the system status in the Control data tab is shown as Created (Figure 13). Change the system status by clicking the For approval button to submit the appropriation request for approval.

Figure 13
Change the system status to For approval
If more than one appropriation request variant exists, the system prompts you with the Choose Variant for Approval dialog box as shown in Figure 14. You can only recommend one variant and submit it for approval to the responsible authority.

Figure 14
Dialog box for choosing the variant to be submitted for approval
Based on the assessment and feasibility analysis performed in my previous article, variant 10 is the feasible option, so I select variant 10 for approval and save it. The system automatically rejects other variants. If you choose the wrong variant by mistake, before you save, you can still return the status to its original setting using the reset icon. When the appropriation request is saved, you cannot reset the System status because the workflow is triggered (Figure 15).

Figure 15
System status is now For approval
After you save the appropriation request, the system activates workflow and sends an email to the approver. You cannot reset the System status to the earlier one because it is in display mode.
Now I login with the user ID of the approver (SRAMACHENDRU). Figure 16 shows the workflow as an item in the Inbox of the approver’s SAP business workplace. Access your office inbox. In SAP Easy Access, choose Office > Workplace or use transaction SBWP. Choose Inbox > Workflow. Process the work item for approval of an appropriation request. Select the work item and click the execute icon.

Figure 16
Approver inbox
As soon as you open the work item, the system shows four decision steps: Approve, Postpone, Reject, and Cancel and keep work item in inbox (Figure 17). The system automatically displays the relevant appropriation request in another session. The approver can go through the information in the appropriation request master data and decide whether to approve or reject it. In this example, I approve appropriation request 10020 by clicking the Approve button shown in Figure 17.

Figure 17
Workflow item in the approver’s inbox with decision steps
In this example, there are no more approvers, so the system status changed to Approved as soonas I approved the appropriation request (Figure 18). If you choose Reject, it shows as Rejected and goes no further. If you choose Postpone, no change occurs in the system status. After you execute the decision step, the workflow item moves out of your inbox and into the outbox as shown in Figure 19. When the approval is received at last level, the applicant gets an email that the appropriation request is approved (Figure 20). The system ascertains the partner function linked to the applicant with the appropriation request type configuration as shown in Figure 5.

Figure 18
System status after receiving approval

Figure 19
Workflow items that the approver executed

Figure 20
System messages to the applicant when the system status changes
As a comparison, Figure 21 shows another appropriation request (10014) that the approver rejected. You can see the corresponding message in Figure 20.

Figure 21
System status for appropriation request 10014
Note
The system does not delete the rejected or postponed appropriation requests. If you want to resubmit the proposal for approval, you manually reset their system status to For approval by clicking the reset icon

in Figure 21. This restarts the approval process.
Where Is Approval Pending?
An important question that arises is: How can the business users ascertain the level at which the approval is pending? To know this, simply follow this procedure.
Go to the appropriation request and click the services icon for the object. Then follow Workflow > Workflow overview to bring up the screen in Figure 22. You can analyze the actions performed under this workflow pertaining to this appropriation request. For example, you can see the user SRAMACHENDRU has approved the request. You can also see the workflow log by clicking the log icon on the toolbar. This brings up the screen shown in Figure 23.
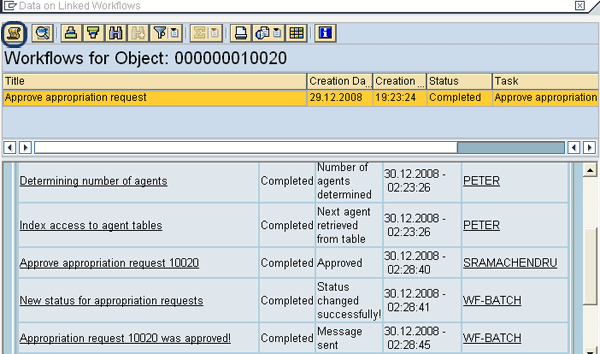
Figure 22
Workflow tasks for appropriation request 10020
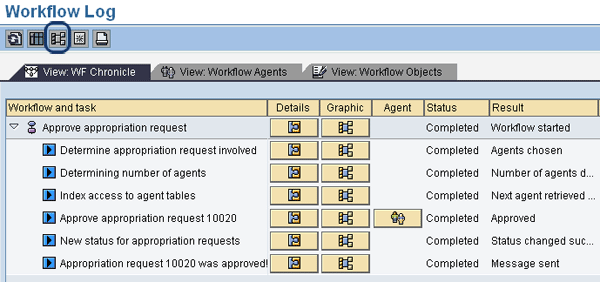
Figure 23
Workflow log of appropriation request 10020
Note
If you have created any appropriation requests before customizing the workflow approval process, you can start the approval process for these appropriation requests through the Start Workflow option shown, which you can access by clicking the services icon.
You can see the graphical view of the entire workflow by clicking the graphic icon on the toolbar circled in Figure 23. This brings up the screen shown in Figure 24, which is divided into two parts: the part on the right is an overview of the process while the left part is zoomed in to show things in more detail. You can analyze the workflow log to see if the workflow is correctly functioning and ascertain at what level the workflow task is pending. You can trace the workflow along the blue line shown in Figure 24. Wherever the blue line is stopped, the workflow is pending at that place and the remaining tasks beyond the blue line need to be executed to complete the workflow. For appropriation request 10020, the workflow has been completed so the blue line ends at the last point.
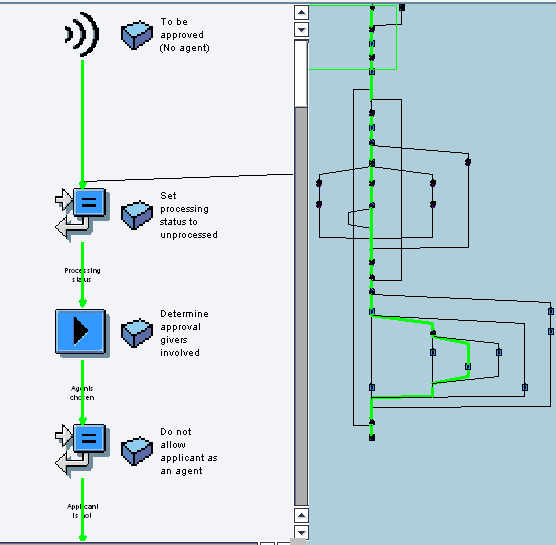
Figure 24
Graphical representation of the workflow tasks
Implementation of Capital Investment Proposal
After the appropriation request is approved, it enters the implementation phase in which it is actually carried out. You transfer the information on the appropriation request to the investment by using either work breakdown structure (WBS) elements (if Project System [PS] is implemented) or internal orders (if PS is not implemented). Figure 25 shows that appropriation request 10020 assigned to the investment measure 400040 (internal order).
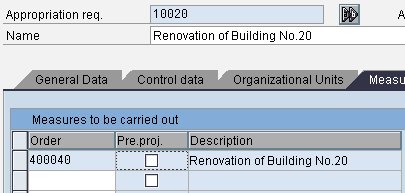
Figure 25
Assignment of the measure to the appropriation request
Appropriation request 100020 now enters the execution phase, in which the system executes it with measure 400040 and actual values flow through this measure.
Note
If you are working with a small capital investment that doesn’t need a complex approval process, you do not need to use the workflow approval option. You can go with the manual approval option. Through this option, you change the status to Approved in the appropriation request master data in the Control tab. Use application menu path Accounting > Investment Management > Appropriation requests > Edit appropriation requests > Change. Then change the System status to Approved by clicking the For approval button.
If you created more than one variant for the appropriation request, a dialog box appears similar to the one shown in Figure 14. Process it in the same way as explained in that section. Save the master data. This initiates the manual approval process.
Sivaprasad Ramachendruni
Sivaprasad Ramachendruni is a solution architect (SAP Financials and SAP S4/HANA Finance) with SAP professional certification. He is currently working for a multinational corporation in the IT sector. He has more than 17 years of functional and SAP system experience spanning across several industries. He has expertise with various modules, including FI, Controlling (CO), Funds Management (FM), Flexible Real Estate Management (RE-FX), Financial Supply Chain Management (FSCM), and SAP S4/HANA Finance. He helps companies design, implement, deploy, and streamline business processes and gain efficiency. He is an Indian cost and management accountant and has a master’s degree in financial management.
You may contact the author at sivaprasadr@rediffmail.com.
If you have comments about this article or publication, or would like to submit an article idea, please contact the editor.