Learn how to configure and use SAP Supplier Lifecycle Management for an efficient supplier registration process.
Key Concept
SAP Supplier Lifecycle Management supports the processes of registration, qualification, and evaluation aimed at fostering a positive supplier relationship management while ensuring appropriate supplier data maintenance. Supplier registration is the act of registering a vendor as the first step in establishing a business relationship with a purchasing organization. This functionality offers the capability to complete an online form which, if approved, gives the potential supplier the capability to maintain associated company and employee master data.
Streamlining the process of establishing business relationships between purchasers and buyers is becoming an increasing important strategy to gain a competitive advantage. This process becomes even more complicated when coupled with the globalization challenges created by cross-border businesses. Therefore, organizations are looking for solutions that foster the relationship between potential suppliers and purchasing organizations right from the beginning of the supplier relationship, and on to the evaluation and continuous monitoring phases.
SAP Supplier Lifecycle Management offers a number of capabilities to achieve this requirement, especially in the areas of supplier self-registration, qualification, evaluation, and master data maintenance. The SRMSMC software component (the component name for Supplier Lifecycle Management), is typically installed as an add-on for the SAP NetWeaver application server for ABAP system.
The work method for supplier registration (in SAP Supplier Lifecycle Management) is based on purchasers declaring their intent by completing an online supplier registration form that goes to the purchasing organization for approval. After approval of the registration form, the supplier is created in the system as a potential supplier and can subsequently create administrator and other employee accounts. Once in the system, the supplier can then be promoted to a full-fledged supplier with or without qualification. This capability is designed to make the registration process relatively stress free and can be done from the comfort of your office without having to be present in the buyer’s office, thereby saving time and resources.
Architecturally, the SAP Supplier Lifecycle Management system consists of the buy side and the sell side. The buy side normally resides behind the firewall. The sell side normally resides outside of the firewall. It offers the seller an environment to access the supplier lifecycle management system for registration purposes and data maintenance if the registration request is approved.
I discuss the concept of the online supplier registration process using SAP Supplier Lifecycle Management. I also discuss how a potential supplier can be created manually (without completing an offline form).
To use SAP Supplier Lifecycle Management, you must configure the system properly from a technical perspective. This configuration includes setting up the appropriate communication framework, maintaining the system landscape attributes of the participating systems, and activation (or maintenance) of SAP Internet Communication Framework (SICF) services. For detailed information about these basic technical customizing activities, refer to the SCM Expert article, “How to Set Up SAP Supplier Lifecycle Management Business Scenario Capabilities.”
Supplier Lifecycle Management is delivered via business functions that must be activated. The Supplier Registration business function and dependent business functions must be activated. To activate these functions, execute transaction code SWF5 and follow menu path SAP Customizing Implementation Guide > Activate Business Functions. In the screen that appears, you can change the status of the business functions that are displayed (Figure 1). Select the check boxes for the business functions relative to SAP Supplier Lifecycle Management as shown in Figure 1. To activate these functions, click the Activate Changes button.

Figure 1
Activate the SAP Supplier Lifecycle Management business functions
On the sell side, two business functions are of special interest for a supplier registration business scenario:
- SMC_SUPPL_REG_OFW_1
- SMC_SUPPL_SMNT_OFW_1
The activation of SMC_SUPPL_SMNT_OFW_1 is a prerequisite for the activation of all sell-side business functions.
On the buy side, these two business functions are of special interest for a supplier registration business scenario:
- SMC_SUPPL_REG_BFW_1
- SMC_SUPPL_DATA_MGT_1
The activation of SMC_SUPPL_DATA_MGT_1 business function is a prerequisite for the activation of all buy-side business functions.
Maintain Customer Parameter Settings
A number of customer parameter settings influence the behavior of the supplier registration process. To maintain these customer settings on the sell side, execute transaction code SPRO and follow menu path SAP Customizing Implementation Guide > SAP Supplier Lifecycle Management > Sell Side > Supplier Registration > Maintain Customer Settings for Supplier Registration. This action opens the screen shown in Figure 2. In this screen click the New Entries button and enter data in the rows under the Key Field and Parameter Value columns.
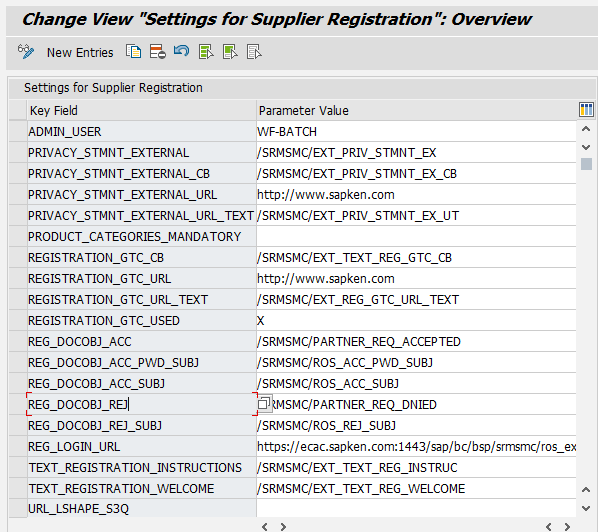
Figure 2
Typical setting for a supplier registration customer setting
• REG_DOCOBJ_ACC: This is used to specify the text of the email? sent on successful supplier registration. The default value for this parameter is /SRMSMC/PARTNER_REQ_ACCEPTED. To access parameter REG_DOCOBJ_ACC, execute transaction code SE61 and follow menu path Tools > ABAP Workbench > Utilities > Documentation. The content of document REG_DOCOBJ_ACC is shown in Figure 3.

Figure 3
The breakpoint definition in registration request acceptance emails
To get information about the host name and port number, execute transaction code SMICM and follow menu path Goto > Services. The Internet Communication Manager (ICM) monitor service display screen lists data for host names and service names or ports (Figure 4).

Figure 4
Host name and port number information
Figure 5 shows a typical setting for supplier self-registration external alias.

Figure 5
External alias for supplier self-registration
Typically, you do not maintain the logon details for this SICF service as the user calling the URL has a username and password to provide to access the data maintenance page. Figure 6 shows the attributes of the s3q_ext SICF service. To access this screen, execute transaction code SICF and follow SAP Easy Access SAP Menu > Tools > Administration > Administration > Network > HTTP Service Hierarchy Maintenance. An example of the value for this parameter is: https://ecac.sapken.com:1443/sap/bc/bsp/srmsmc/s3q_ext/default.htm?sap-client=200.

Figure 6
Supplier data maintenance SICF service attributes
Maintain Custom Document Object
For all the text-centric parameters (for example, REG_DOCOBJ*), you can decide not to use the standard text and maintain a custom version and, consequently, define the value in the supplier registration customer parameter settings. To maintain a custom text, execute transaction code SE61. In the screen that appears, select General text from the list of options in the Document Class field and the appropriate language in the Language field. In the Document section, enter a value in the Name field (for example, /SRMSMC/EXT_PRIV_STMNT_EX_CB) as shown in Figure 7.

Figure 7
Create a custom registration document
Click the copy icon (highlighted at the top of Figure 7). In the Copy Document dialog box that displays, enter a value in the Name field in the To section as shown in Figure 8.

Figure 8
Define a new document name
Click the copy icon. Figure 9 displays with a screen for package assignment.

Figure 9
Package assignment to document maintenance
Click the save icon. A status message appears in the next screen (Figure 10) indicating that the document was successfully copied. In the Document section, enter the new document name as shown in Figure 10. Click the Change button.
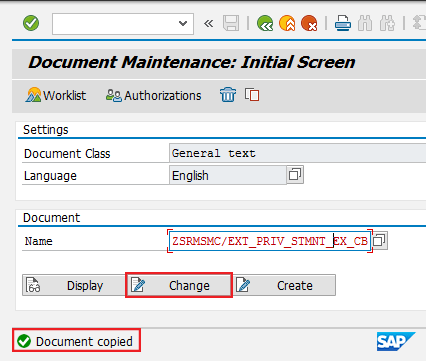
Figure 10
Status message confirming successful document copy activity
This action opens the screen in Figure 11 in which you edit the text of the document class as desired.

Figure 11
Edit the document text
Figure 12 shows an example of the edited text. Note that the link text is enclosed within brackets.

Figure 12
The edited text of the privacy statement
After you edit the text, click the activate icon. The refreshed screen displays the edited text of the message (Figure 13).

Figure 13
Message confirmation of document saved and active status
Translate Standard Texts
If you have a business requirement to use the standard texts of text type General Text in other languages than the languages delivered as standard by SAP (English, German, Spanish, French, and Japanese), you need to translate this text type. This also applies to custom versions of the texts of this text type. To translate text to non-standard languages, execute transaction code SE63. In the initial screen that displays (Figure 14), enter TX in the command field and click the enter icon (the green check mark).

Figure 14
The initial screen for text translation
Populate the Object Name (document name), Source Language, and Target Language fields in the next screen as shown in Figure 15. Click the Edit button.

Figure 15
Define the Object Name and Source Language or Target Language for text translation
In the screen that opens, enter the translation of the text in the lower section of the form as shown in Figure 16.

Figure 16
Text translations from source to target language
Click the Save Active button. Figure 17 displays with a status message.
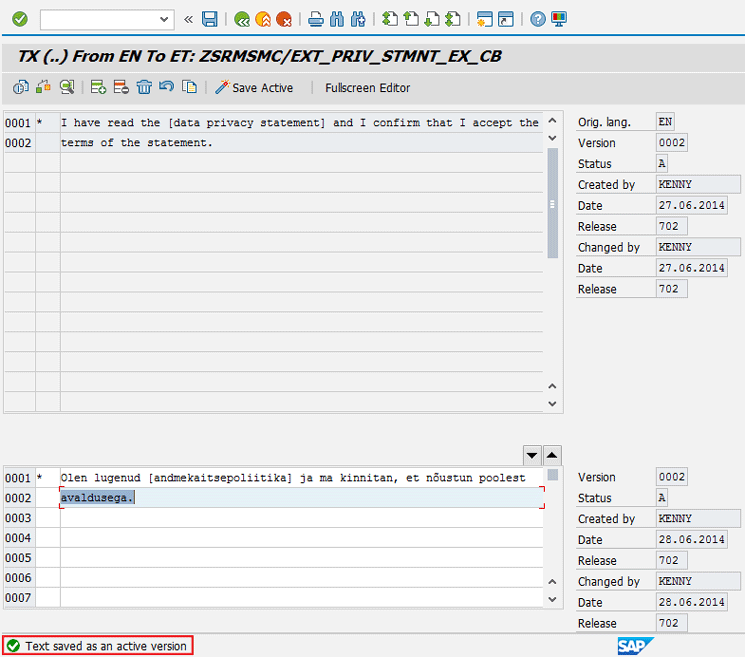
Figure 17
Status message for saved and activated translated text
You need to maintain the language for which you want translations performed in report RSCPINST. To access this report, execute transaction code SE38. In the screen that opens, populate the fields as shown in the example in Figure 18. After you populate the fields in Figure 18, click the Activate button.

Figure 18
Report RSCPINST showing the installed languages
Additionally, you must maintain the profile parameter zcsa/installed_languages. To access this parameter, execute transaction code RZ10. In the screen that appears (Figure 19) enter values for Parameter N and Parameter value.
If these activities are not performed, the error message Incorrect Codepage appears in your screen (Figure 20) after you click the Edit button (Figure 15).

Figure 19
Maintenance of the installed languages’ profile parameter

Figure 20
Error message displayed when target language is not properly maintained
Perform Supplier Self-Registration
To initiate self-registration by the supplier, the suppliers launch the appropriate URL sent to them by the purchasing organization or a publicly available URL on the organization’s web site. In the screen that opens, the potential supplier completes the form as shown in the form excerpts in Figures 21 and 22. Important information, such as company details (name and address) and contact details, must be provided in the mandatory fields denoted with a red asterisk.
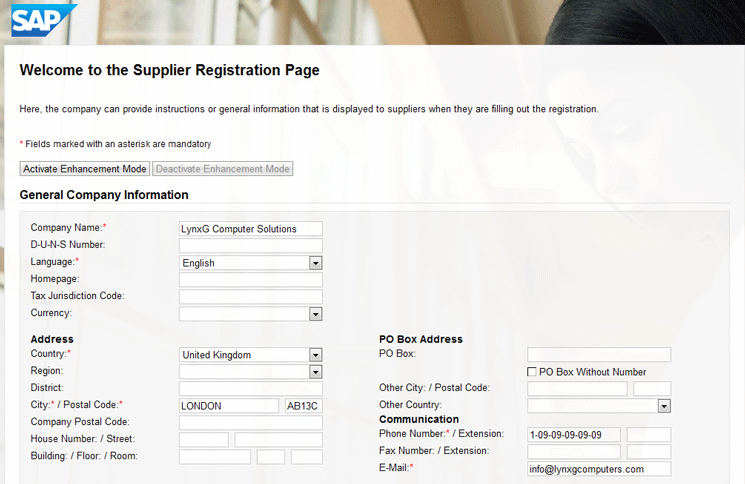
Figure 21
Excerpt of completed supplier registration page (General Company Information)
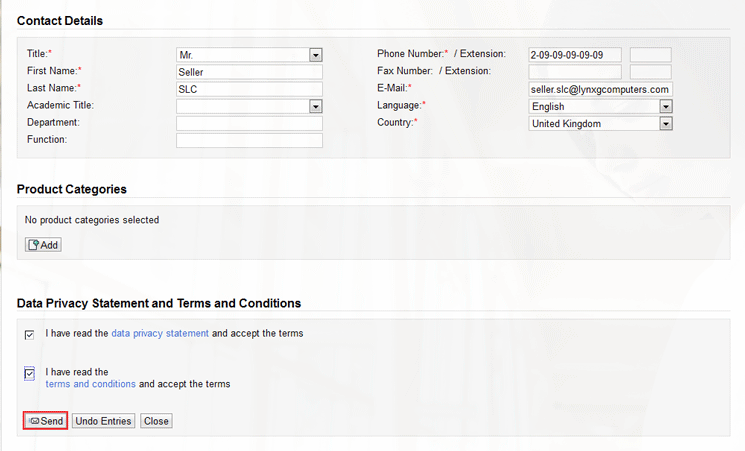
Figure 22
Excerpt of completed supplier registration page (Contact Details)
You need to select the check boxes in the Data Privacy Terms and Conditions section for the Send button to be activated. Click the Send button after you have selected these check boxes (Figure 22). You receive a message confirming the sending of the completed registration form to the purchasing organization (Figure 23).

Figure 23
Status message confirming the submission of the supplier registration form
Following the submission of the supplier registration form, the appropriate person in the purchasing organization receives the workflow item to make a decision about the registration request. To act on the supplier registration form, log in as the buyer in the buy side and navigate to the inbox by executing transaction code NWBC, and following menu path Supplier Lifecycle Management > Inbox (Figure 24).
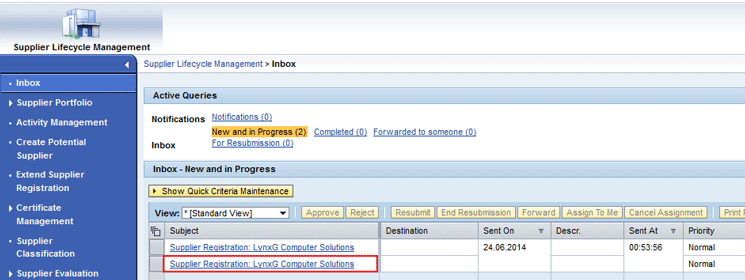
Figure 24
Work inbox of the approver in the buy side
Choose the workflow inbox item you want to approve (e.g., Supplier Registration: LynxG Computer Solutions). This action opens the screen in Figure 25 in which an excerpt of the supplier’s registration form is shown pending approval.
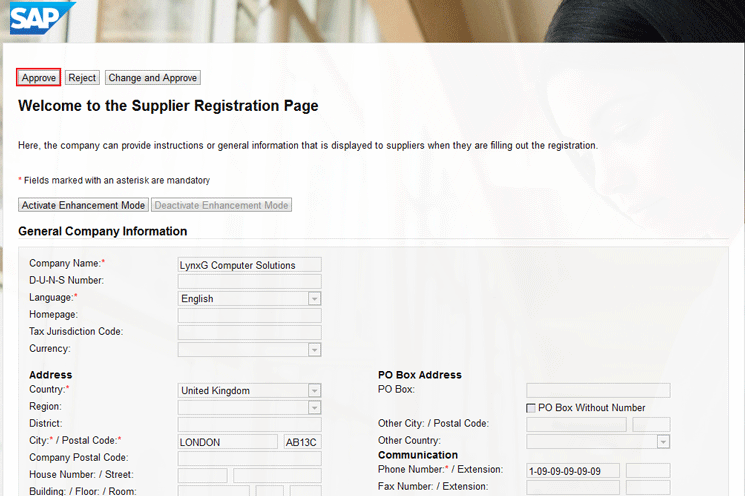
Figure 25
Excerpt of the supplier registration form waiting for approval
In Figure 25 you have the option to approve or reject the form. Additionally, you can make changes to the master data of the proposed supplier before approval by clicking the Change and Approve button. In this business example, I approve the supplier registration form by clicking the Approve button. Figure 26 displays with a status message confirming the approval.

Figure 26
Status message displayed following the approval of supplier registration form
Maintain Supplier Administrator Account
To allow the system to send the emails to different recipients, you need to configure the method GET_RECEIVER_DATA (of /SRMSMC/BD_SUPPL_NOTIF enhancement Business Add-in [BAdI] BAdI and spot) [what is BAdI BAdI and spot?] to change this standard behavior and send the email containing the password to another recipient. To perform this activity execute transaction code SPRO and follow menu path SAP Customizing Implementation Guide > SAP Supplier Lifecycle Management > Sell Side > Supplier Registration > Business Add-Ins (BAdIs) > Change Default Recipients. For the purpose of this article, I use transaction code SOST to access the details of the two email messages sent to the potential supplier as shown in Figure 27.

Figure 27
Email messages sent to the supplier

Figure 28
User ID and log-on URL for supplier administrator account maintenance
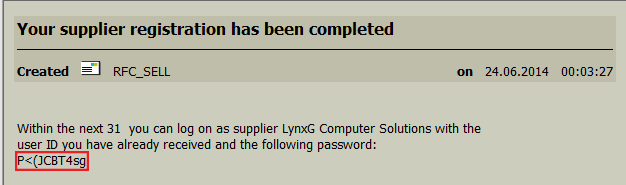
Figure 29
Password for supplier registration

Figure 30
Define an administrator account for the supplier
After you click the Create button, Figure 31 displays with a status message and a Login link with a notification to save the link for future use.

Figure 31
Confirmation of the creation of administrator account
Click the Login link to access the supplier master data screen (Figure 32).
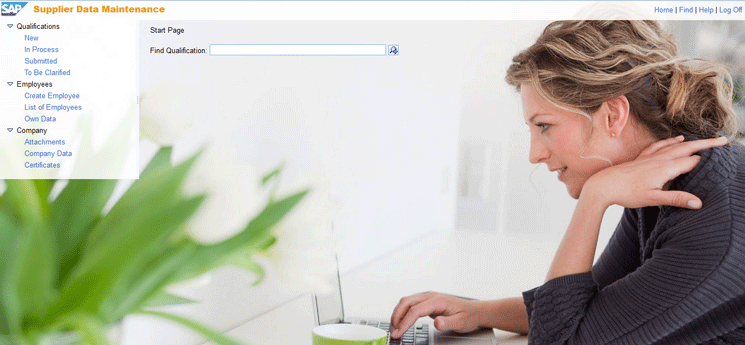
Figure 32
The initial screen for supplier master data maintenance
In the initial screen for supplier master data maintenance, you can perform a number of activities, including reviewing the status of the qualification requested (New, In Process, Submitted, or To be Clarified), maintenance of employees’ data, and maintenance of a company’s data, as shown in Figures 33, 34, and 35, respectively.
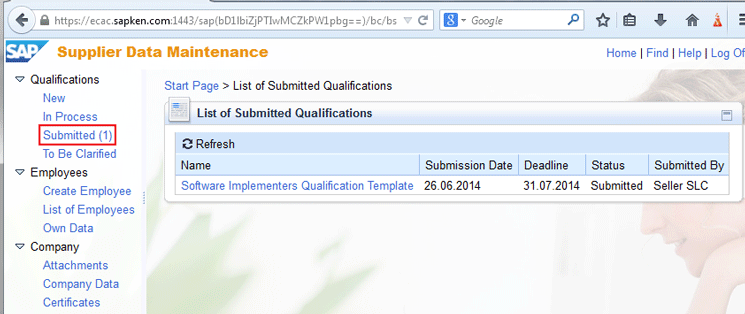
Figure 33
List of qualifications with submitted status

Figure 34
List of the employee page showing employee details
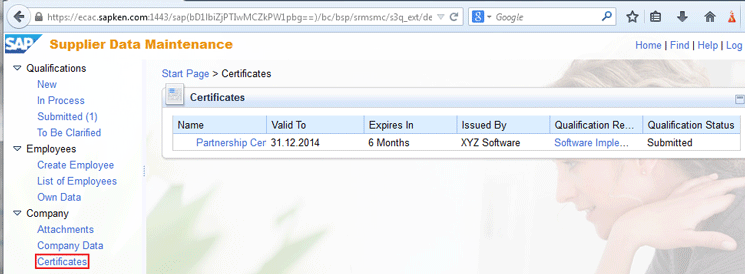
Figure 35
Certificate link showing the certificate attributes and associated qualifications
Manual Creation of a Potential Supplier
Instead of using the self-registration process, the buyer creates the potential supplier directly in the buy side. When you create the potential supplier, you need to maintain the details of the potential supplier and contact person in the mandatory fields (the fields marked with asterisk). To create a potential supplier directly in the buy side, execute transaction code NWBC and follow menu path SAP Supplier Lifecycle Management > Supplier Portfolio > Services > Create Potential Supplier. In the screen that opens, enter general details about the supplier as shown in Figures 36 and 37. Click the Save button to save your entries.

Figure 36
Maintenance of central data of potential supplier

Figure 37
Maintenance of central data (address details) of potential supplier
Click the Contacts tab (Figure 37) to populate the appropriate information (such as contact title and names) as shown in Figure 38. Click the Save button.
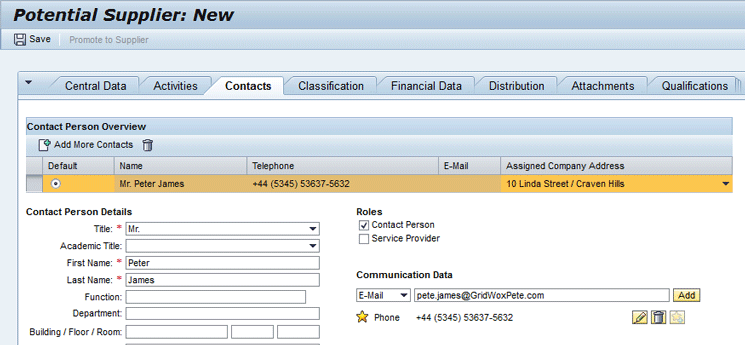
Figure 38
Maintenance of contact details of potential supplier
You can also maintain optional attributes by clicking the appropriate tab. For example, after you click the Classification tab, you can maintain settings as shown in Figure 39.
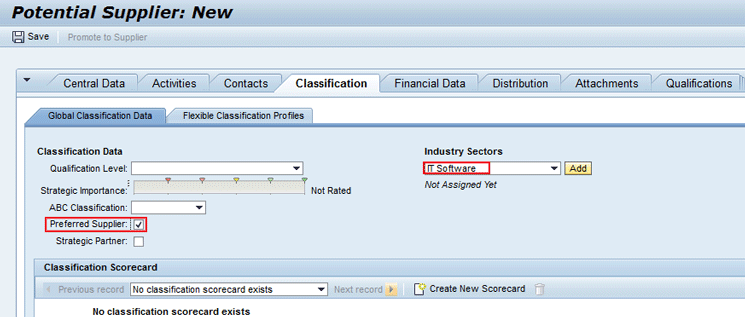
Figure 39
Maintain classification data
Click the Save button. This action opens the screen in Figure 40 that displays status messages confirming the creation of the contact person and the supplier with unique number assignment.
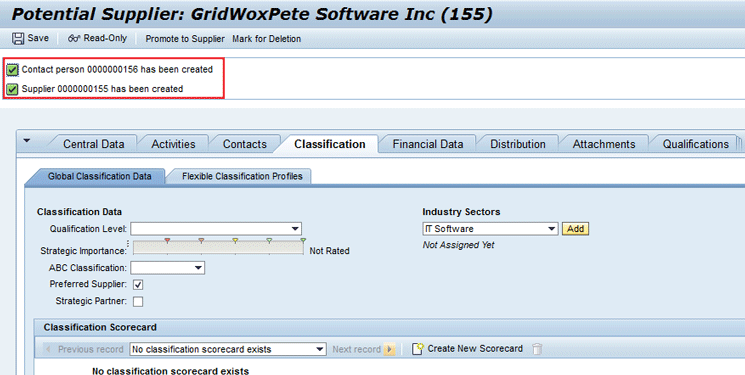
Figure 40
Status message confirming the creation of the contact person and supplier
Now if you click the Central Data tab, you see that a unique number has been auto-assigned to the potential supplier as shown in Figure 41.
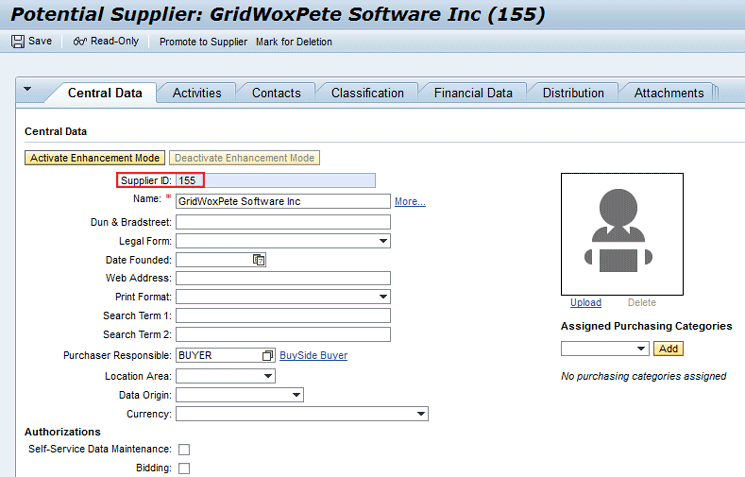
Figure 41
Unique number assignment to supplier master data
Oluwatoyin Eseyin
Oluwatoyin Eseyin is a certified SAP logistics consultant (procurement). She has more than 10 years’ implementation experience covering SAP inbound and outbound logistics processes in local and global corporations.
You may contact the author at eseyinoluwatoyin@gmail.com.
If you have comments about this article or publication, or would like to submit an article idea, please contact the editor.