Solution Manager has a Solution Documentation Assistant (SDA) that helps create and maintain solution documentation containing both technical and process information. The information is based on how the solution is actually being used by the enterprise. Explore this functionality to discover some of its more advanced capabilities.
Key Concept
The
Solution Documentation Assistant (SDA) is a tool to help companies create and maintain documentation for their SAP solutions. Leveraging Solution Manager project structures, validation rules and check steps, and content provided by IBIS RBE technology (
https://ibis-thome.com/en/services/rbe-plus/), the SDA can create and maintain structured and standardized technical and process-related documentation in Solution Manager. Using rules-based analysis, IBIS experts examine SAP systems to determine actual use. This service is called RBE+ and uses the RBE rules database. SAP has made the RBE rules database available for use by the SDA. This database can be maintained using the Rule Database editor.
The Solution Documentation Assistant (SDA) uses connections between the Solution Manager system and the managed systems to perform structured analysis on how the solution is used and to generate both technical and process documentation
The SDA uses an analysis project to house the structures and rules used to analyze the managed systems. An analysis project contains a Business Process Hierarchy that you can create from multiple sources or that you can manually maintain. It also has rules for interrogating the database of the managed system to gather details about solution use. For more details on the SDA and how to build and run an analysis project, refer to the article “
Automate Your Business Blueprint Using RBPD and the Solution Documentation Assistant in SAP Solution Manager 7.1,” by Marci Braybrooks.
It is said that “the devil is in the details,” but I prefer what a friend of mine says: “Watch out for the banana peels!” Either way, it’s important to know about hidden gotchas in the setup of the relationship between the SAP managed systems and SAP Solution Manager to successfully analyze the SAP solution.
I assume your Solution Manager system is already set up with the Landscape Management Database (LMDB) maintained for managed systems, Remote Function Calls (RFCs), and logical components. I also assume that proper authorizations have been assigned to the user IDs in both the Solution Manager and managed systems. For more details on these topics, see my article “Some Key Prerequisites for Solution Documentation Assistant.”
To prepare your analysis project, follow the steps outlined in the referenced article by Marci Braybrooks through to
Figure 4.
An analysis project contains a collection of check items and check steps. A check item is a grouping of check steps that is assigned to a node in the analysis project. The check item tells Solution Manager what kind of checks are going to be performed, and the check steps are the actual checks run within the check item.
The check steps, queries, and other content provided from the IBIS RBE content interrogate your managed systems for standard SAP functions and activities. It is rare that companies implement only the SAP standard functionality, so you probably need to set up rules to analyze some non-standard capabilities.
One example might be to determine how many sales orders use a nonstandard sales order type per month. Or perhaps you’d like to know if any customers have customized pricing groups. This is where adding check steps and check items comes in.
Adding Check Steps and Items to Your Analysis Project
Before creating and running an analysis from your analysis project, you might want to add additional checks to look for specific information in the managed system. First, you need to gather the questions you need answered. You then create rules for the SDA to “ask” the questions of your managed system.
To do this, use the Rule Database to create new rules that you can assign to your analysis project. Start by launching transaction code SM_WORKCENTER to open the My Home tab for the Work Centers web interface for Solution Manager (
Figure 1).

Figure 1
The My Home tab for the Work Centers web interface
Note
The tabs you see are based on the roles assigned to your user ID in
Solution Manager. These roles can be found by searching for SAP_SMWORK*
in transaction code PFCG. For the SDA work center, you need the role
SAP_SMWORK_SDA assigned to your user ID.
On the far right side of the screen shown in
Figure 1, click the navigation icon

to see the list of work centers assigned to your user ID. Select the Solution Documentation Assistant to navigate to the Solution Documentation Assistant Work Centers tab (
Figure 2).

Figure 2
The list of assigned work centers
Select the Rule Database menu item on the left side of the Solution Documentation Assistant Work Centers to open the search screen for the Rule Database (
Figure 3).
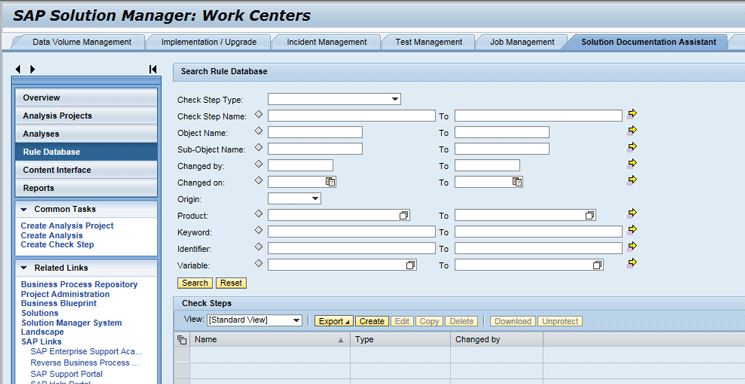
Figure 3
Accessing the Rule Database search screen
There are several check step types in the Rule Database. Each type is used for performing analysis for specific information in the managed system.
Table 1 lists the available check step types.
| Check step type |
Description or use |
| Transactions |
Search for the use of a specific transaction or a set of transactions |
| Reports |
Check use of reports |
| SQL |
Query values in database tables |
| BAdI |
Determine if Business Add-Ins (BAdIs) are used |
| Java Web Dynpro application |
Search for Web Dynpros used |
| Java Web Dynpro component |
Search for particular components within Web Dynpros |
| Java web service |
Java services used |
| Servlet |
Identify Jana servlets in use |
| iView |
Search for Portal iViews |
| Function module (RFC) |
Identify remotely called function modules in use |
| Usage and procedure log in |
System trace data, including submitted programs, dynamic calls, ABAP-based code units, such as subroutines, use of modifications, user exits, classes, and single method executions |
Table 1
Check step types
Since I cannot explore all the check step types in the scope of this article, I focus on the techniques for creating and maintaining check steps for the type transaction and type SQL as described briefly in
Table 1.
Since the IBIS RBE data upload contains literally thousands of check steps, I recommend that you search the Rule Database to find similar rules so that you can see the syntax of the rule you wish to create.
Creating Rules of the Check Step Type Transaction
If you would like to find out which custom transactions are in use in the managed system, look at how a transaction rule is created by looking up an existing one provided by IBIS.
Select Transaction from the drop-down list of options in the Check Step Type field and enter “*Sales*” in the Check Step Name field. Click the Search button. (Entering “*Sales*” in the step name is optional. It is simply to narrow the scope of the search.)
Figure 4 shows the results.
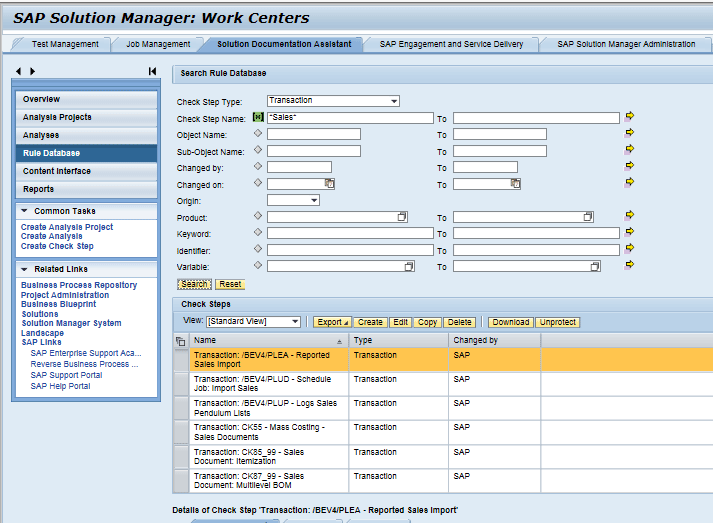
Figure 4
Search results for the Rule Database
Select the first row in the results list, and after you click the Edit button, a screen like Figure 5 appears.
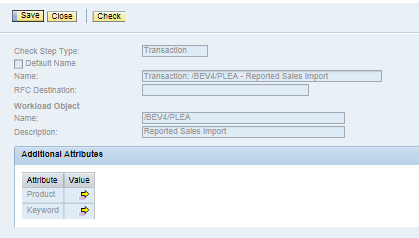
Figure 5
Transaction check rule displayed
Note that everything is grayed out because you cannot edit rules provided as part of the IBIS upload. You can, however, see how easy it is to build your own rule. All you need to build a rule to check for transaction use is the transaction you want to check. Rules of Check Step Type Transaction cannot be copied, so you need to create a custom rule.
Return to the Rule Database search screen and click the Create button at the top of the search results list (the list of check steps in the bottom portion of
Figure 6). Since the search criterion is set to Transaction, the transaction view of the Create Check Step screen appears (
Figure 7)

Figure 6
Click the Create button in the search results view
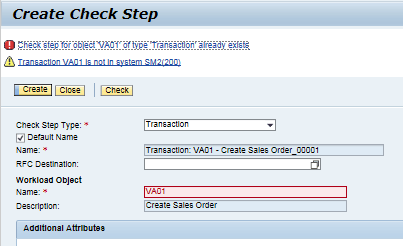
Figure 7
Create the Check Step transaction
In
Figure 7, you can see that I already entered transaction code VA01 in the Name field. By doing so, the system retrieves the transaction description for me. The system also displays two messages. The first warns that a rule looking for transaction code VA01 already exists in the database, and the second tells me that transaction code VA01 does not exist in the Solution Manager system.
The first message is important because it tells me I don’t need to create a check step for transaction code VA01. I can simply use the one already defined in my analysis project. The second message can be ignored because the check step runs against the managed system at analysis run time when the VA01 transaction code exists (assuming it’s run against an SAP ERP Central Component [ECC] system). Alternatively, you can choose an existing RFC destination that connects to the managed system you’re planning to analyze. Solution Manager confirms that transaction code VA01 exists in that managed system.
If you want to search for the use of custom transactions, you can enter Z* as the Workload Object Name (
Figure 8). This action instructs the system to search for the use of any custom transaction in the managed system. If you want to search for specific custom transactions, you need a separate check step for each transaction. They can be grouped into single check events in the analysis project.
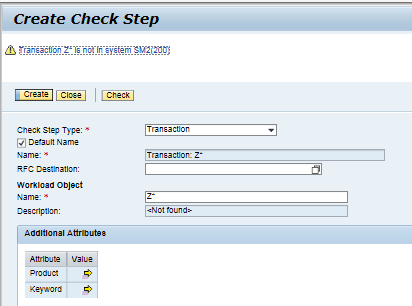
Figure 8
Search for all custom transactions
Click the Create button to save the rule. That’s it. If you have a large number of custom transactions for which you want to scan, you can use a Solution Manager project to help accelerate the creation of transaction check step types. See my article “Creating Solution Documentation Assistant Check Step Rules Using a Solution Manager Project,” which illustrates techniques for adding transactions in volume using a Solution Manager project. It also shows how to leverage the Solution Manager project to build the analysis project’s hierarchy.
Creating Rules of Check Step Type SQL
SQL rules are for running queries on the database of the system being analyzed. With these rules you can perform evaluations on transaction, master, or configuration data to provide additional clarity on how the analyzed system is being used.
The SQL rule contains tables, fields, and join conditions as well as selection and grouping conditions. You may need to solicit the assistance of a development resource to determine which database tables and fields you need to query to answer your specific questions.
SQL rules can be quite complex, so it’s fortunate that you can copy this rule type. Again, I recommend searching existing rules to find something close to what you’re trying analyze. For this example, I want to find out how many orders were created by order type and by period (month). So I searched (
Figure 4) for rules containing the words Count and Sales in the “Check Step Name” and copied one to maintain.
Figure 9 shows the rule that performs this analysis.
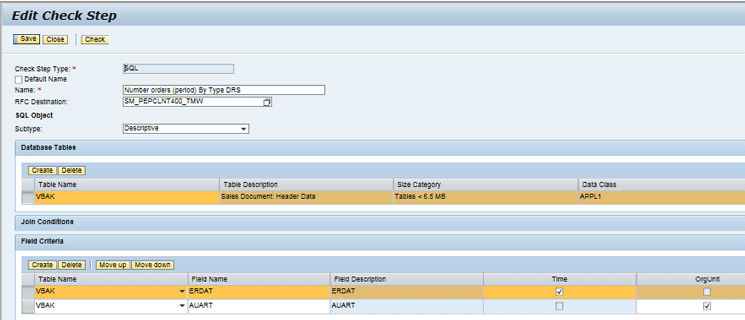
Figure 9
Orders by type by period
I now describe the following fields in
Figure 9:
- Name: This field is for the name of the rule. I suggest you use a standard tag in the name to make your rules easier to find. I suffix the name with my initials DRS.
- RFC Destination: In this field, enter an existing RFC that maps to the managed system you want to analyze. The RFC entered here is used for testing the rule while you’re developing it. Note: This does not limit the use of this rule to only that system since the analysis project determines the logical component used at analysis run time and therefore the appropriate RFC.
- SQL Object Subtype: In this field, you enter the name of a subtype that instructs Solution Manager how to retrieve and present the results of the SQL query. Table 2 briefly describes the subtypes.
| Subtype |
Description |
| Table Existence |
Returns a True/False result for the existence of a given table in the database |
| Table Field Existence |
Checks for a particular field name in a table |
| Table Entry Existence |
Sees if there are rows in the table that match the search criteria—True/False |
| Table Entry Count |
Returns the number of rows in the table that match the search criteria |
| Table Entry Count (Distinct) |
Returns the number of rows in the table for each value of the field in the search criteria—for example, materials by division. Returns a table of numbers, 1 for each division found.
|
| Descriptive |
Returns the data that matches the search criteria. Returned as a table. |
Table 2
Subtypes and descriptions
The remainder of the entry screen is broken into sections.
The Database Tables section is where you identify the database tables to be queried. If you need more than one table, you need to specify join criteria. For example, if you want to query data related to sales orders you could join the Sales Order Header table (VBAK) with the Sales Order Detail table (VBAP) by the common field of Sales Order Number (VBELN). Further exploration into SQL syntax is beyond the scope of this article.
The example rule does not need to use the Join Conditions section because the criteria can be met with a single table.
The Field Criteria section is where the real magic happens.
Figure 10 is an enlarged view of the Field Criteria for the example rule. ERDAT is the sales order header field for the date the order was created. AUART is the field that contains the order type.

Figure 10
Order data and order type field criteria
Checking the Time check box for the field ERDAT tells Solution Manager to group by analysis period by counting the number of orders that have a created date in the analysis date range. Setting the OrgUnit check box tells Solution Manager to further group by the order type (AUART).
After you enter the tables and set the field criteria, click the Check button at the top of the screen to make sure the rule is correct.
Figure 11 shows what you should see if everything is correct.
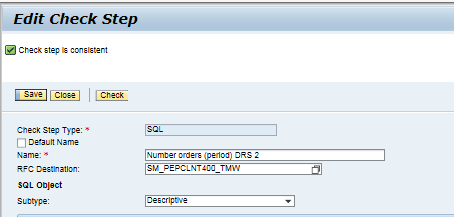
Figure 11
Validation check on Check Step entry
Click the Save button to store your rule in the Rule Database. Now the rule is ready for use in your analysis projects.
Adding Rules to the Analysis Project
In the Solution Documentation Assistant Work Centers, click the Analysis Projects menu item to open the list of analysis projects view. Numerous techniques are associated with the creation of analysis projects, but for my purposes, I focus on adding a single check item to an existing project.
Figure 12 shows the edit screen for a very simple analysis project. The PRD node is selected so that I can add my new rule to this node of the project. Click the Create button to add a new check item to the project node. Enter a name for the new check item and set the type to informative for adding a SQL rule.
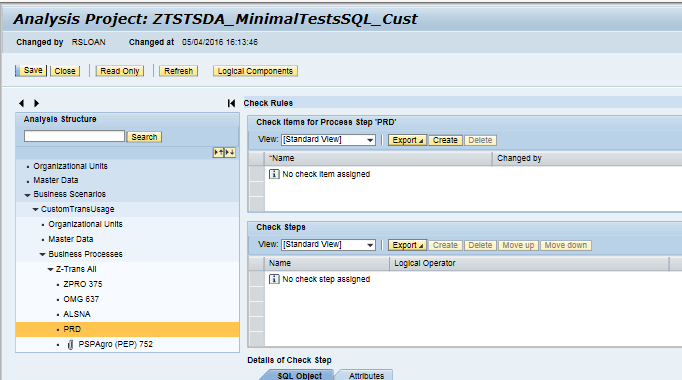
Figure 12
Edit view of an analysis project
Save the entry and then click the Create button in the Check Steps pane (lower right of
Figure 12). The Search Rule Database pop-up appears (
Figure 13). This is the same search view that I used earlier when creating my custom rule.
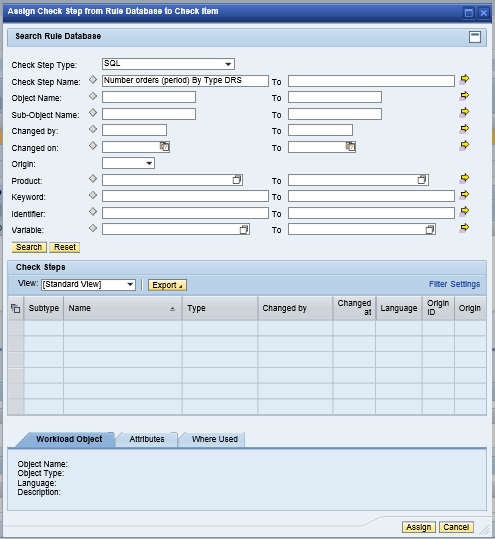
Figure 13
Search the Rule Database
Select SQL from the drop-down list of options in the Check Step Type field, and enter the name of the rule that was just created in the Check Step Name field. Click the Search button.
Select a row from the search results with the rule and click the Assign button (
Figure 14). After you click the Save button, the rule assignment is saved to the analysis project.
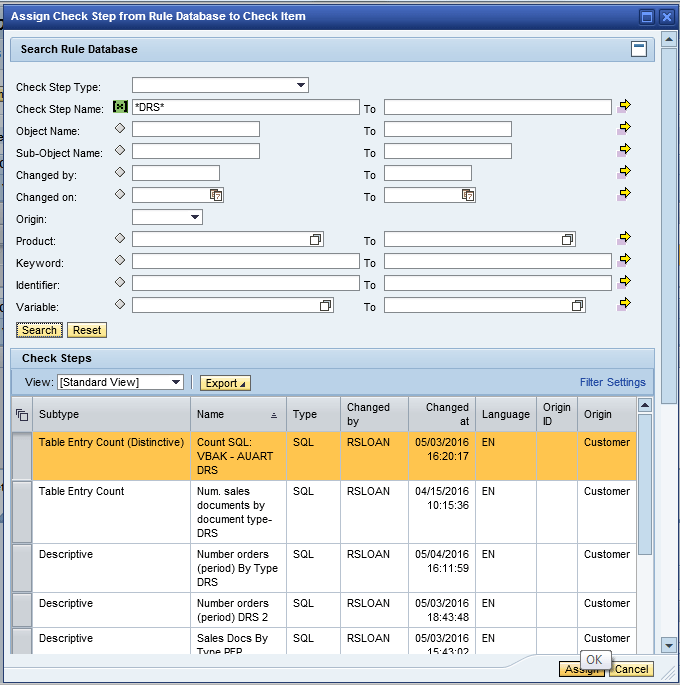
Figure 14
Select and assign the rule
You can now use this analysis project to create and run an analysis. Follow the steps in the article by Marci Braybrooks to run the analysis.
Even though I covered a lot of ground here, I only scratched the surface of the capabilities of this functionality in Solution Manager. I hope this information helps you get a better handle on the creation and ongoing maintenance of your solution documentation.
D. Russell Sloan
D. Russell Sloan, director of SAP solutions at Cognizant Technology Solutions, is a specialist in project and program governance. He focuses on the use of SAP Solution Manager for global rollout projects and has been implementing SAP software since 1996. Russell has degrees in accounting and information systems and has been a team and project leader for SAP projects for more than 14 years. He has been developing and deploying software systems for more than 30 years.
You may contact the author at
solmanruss@gmail.com.
If you have comments about this article or publication, or would like to submit an article idea, please contact the
editor.


