1.0 Introduction
This document aims to explain a possible data management strategy using SAP S/4HANA’s Data Aging to balance data availability with investment in underlying infrastructure. SAP S/4HANA landscape typically consists of large size of data in log and transaction tables. However, not all data is used in day-to-day operations. All this data continues to occupy memory from the underlying HANA database, affecting overall system performance. Additionally, historical data, which is not of everyday use, also consumes memory space further degrading performance. Hence, for optimal performance, the concept of Data Aging is advised to be implemented.
Data Aging object allows easy partition of database tables (related to Data Aging object) and setting of the data temperature, i.e., Hot and Cold. Hot data resides in HANA main memory, and Cold data resides in the HANA Database disk volume. When any transaction or program requires Cold data, the partition table will load the data into main memory and, after completion of the activity, will unload from main memory.
2.0 Data Aging Steps
Let us now understand how Data Aging can be implemented. Figure 1 below shows the process sequence for configuration of the Data Aging object.
- Display all available Data Aging objects
- Data analysis
- Create and manage partition
- Activate the Data Aging object
- Define Residence Time for Data Aging
- Create and mManage Data Aging group
- Schedule Data Aging runs
 Figure 1: Data Aging Process
3.0 Prerequisites for Data Aging
Data Aging requires some prerequisites to be implemented. Below is the list of prerequisites.
- SAP HANA 1.0 SPS10 or higher
- SAP NetWeaver 7.40 SPS10 or higher
- The SAP application must support Data Aging objects
Let us now understand how to enable Data Aging. This is an essential step before implementing the process for the same.
3.1 Enable Data Aging
Add profile parameter abap/data_aging in DEFAULT profile.
abap/data_aging = on
This step is shown in Figure 2.
 Figure 2: Enable Data Aging Parameter
3.2 Activate Business Faction
Switch on the Data Aging (DAAG_DATA_AGING) business function with Tcode = SFW5
Select DAAG_DATA_AGING business function and activate as shown in Figure 3.
Figure 2: Enable Data Aging Parameter
3.2 Activate Business Faction
Switch on the Data Aging (DAAG_DATA_AGING) business function with Tcode = SFW5
Select DAAG_DATA_AGING business function and activate as shown in Figure 3.
 Figure 3: Activate Business Function
Check business function activation job status as shown in Figure 4.
Figure 3: Activate Business Function
Check business function activation job status as shown in Figure 4.
 Figure 4: Job Status for Business Function Activation
After activate business function – DAAG_DATA_AGING as shown in Figure 5.
Figure 4: Job Status for Business Function Activation
After activate business function – DAAG_DATA_AGING as shown in Figure 5.

 Figure 5: Business Function Status
3.3 Check Authorizations
This is an essential prerequisite for enabling Data Aging. Ensure that the correct roles are set up for enabling Data Aging. Two roles are available in S/4HANA system for Data Aging:
a) SAP_DAAG_ADMIN is single role provided for administrators. You can perform the following activities:
- Activate Data Aging objects
- Execute Data Aging runs
- Create partitioning objects
- Assign tables to partitioning objects
- Create partition ranges for partitioning objects
b) SAP_DAAG_EXPERT is a single role that allows you to activate Data Aging objects and schedule the execution of Data Aging runs.
We have now enabled Data Aging. Let us now implement the Data Aging process to enable only the Hot data to be in memory while pushing the Cold data to the disk.
4.0 Execution Steps
4.1 List of Data Aging Object
Start by going to the TCODE - DAGOBJ
This will display all available objects for Data Aging and show the status if active or not as show in Figure 6.
 Figure 6: List of Data Aging Objects
 Figure 7: Data Aging Objects Information Link
4.2 Data Analysis in SAP System
Before creating the database table partition, you need to analyze data and find out the age of data and its volume. Based on that you can create a number of partitions and their range.
To do this go to TCODE: - TAANA. Select Table Analysis. Then select Analysis variant and finally schedule job in background and run job. This is as shown in Figure 8.
 Figure 8: Table Data Analysis
4.3 Creating Partitions
Now, you need to create partition before activating Data Aging object. Without the partition an error would be encountered as shown in Figure 9.
Figure 8: Table Data Analysis
4.3 Creating Partitions
Now, you need to create partition before activating Data Aging object. Without the partition an error would be encountered as shown in Figure 9.
 Figure 9: Error Shows Data Aging Object Active without Partition
Now execute the transaction DAGPTM to open the report.
On the left panel, you will see a list of partitioning objects and groups, assigned tables, and already created partitions. Details on partitioning are on the right table.
Initially tables are not partitioned, which is indicated with a red icon in the Is Partitioned column
Note: To execute a Data Aging run, at least two partitions must always be available: a current partition and a historical partition. Without these partitions you cannot move any data in a Data Aging run.
Figure 9: Error Shows Data Aging Object Active without Partition
Now execute the transaction DAGPTM to open the report.
On the left panel, you will see a list of partitioning objects and groups, assigned tables, and already created partitions. Details on partitioning are on the right table.
Initially tables are not partitioned, which is indicated with a red icon in the Is Partitioned column
Note: To execute a Data Aging run, at least two partitions must always be available: a current partition and a historical partition. Without these partitions you cannot move any data in a Data Aging run.
- Time ranges are consecutive – no gaps and they do not overlap
- One partition must cover current date
- Hot partition should not be entered; it will be created automatically
a) To do so, select the transaction Manage Partitions (transaction DAGPTM).
 Figure 10: Select Data Aging Objects for Table Partition
b) Select the partitioning object for which you want to propose partition ranges.
Figure 10: Select Data Aging Objects for Table Partition
b) Select the partitioning object for which you want to propose partition ranges.
 Figure 11: Create No of Partition
c) Choose Propose Partition Range
d) Choose Generate Partition Ranges
Figure 11: Create No of Partition
c) Choose Propose Partition Range
d) Choose Generate Partition Ranges
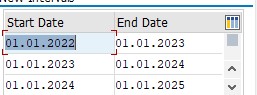 Figure 12: Partition Range
e) In the Schedule Job window, choose Execute to schedule a job.
After partitioning has completed, the table will show as shown in Figure 13.
Figure 12: Partition Range
e) In the Schedule Job window, choose Execute to schedule a job.
After partitioning has completed, the table will show as shown in Figure 13.
 Figure 13: Show Table Partition
Now, the partition has been created on HANA Database Table related to Data Aging object. Check the partition from HANA Studio as shown in Figure 14.
Figure 13: Show Table Partition
Now, the partition has been created on HANA Database Table related to Data Aging object. Check the partition from HANA Studio as shown in Figure 14.
 Figure 14: Show Table Partition Information on HANA Database (HANA Studio)
4.4 Activating Data Aging Objects
Once the partitions are ready, you need to activate the Data Aging object, using transaction DAGOBJ.
a) To do so, select transaction Data Aging Objects (transaction DAGOBJ). You will see that the status is shown as red. This is shown in Figure 15.
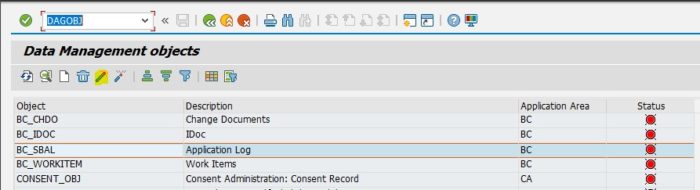 Figure 15: Before Activating Object – Status RED
b) Select the Data Aging object that you want to activate.
c) Click on Activate. Post activation, the status will be shown Green as shown in Figure 16.
Figure 15: Before Activating Object – Status RED
b) Select the Data Aging object that you want to activate.
c) Click on Activate. Post activation, the status will be shown Green as shown in Figure 16.
 Figure 16: Screen after Activating Object - Status GREEN
Note that a new column ‘_DATAAGING’ has now been added to table.
Figure 16: Screen after Activating Object - Status GREEN
Note that a new column ‘_DATAAGING’ has now been added to table.
 Figure 17: Show Additional Column in Table
4.5 Maintain Residence Time
The next step is to maintain Residence Time to decide how much time data will continue to reside in memory before being moved to cold storage. To define the Residence Time, go to transaction code -SLGR. This is as shown in Figure 18.
 Figure 18: Set Residence Time
4.6 Create Data Aging Group
Once the Residence Time has been set up, you now have to create the Data Aging group. This will ensure related objects are maintained in the same group for Data Aging.
a) Transaction = DAGRUN Overview of Data Aging runs.
b) In the menu, choose Go to Edit Data Aging groups.
c) Click on ‘New Entries’ and create a Data Aging group and save it.
d) From the list, select the Data Aging group that you have just created and then choose Data Aging objects in the dialog structure to assign the required Data Aging objects to the group.
e) Save your entries.
These steps are shown in Figure 19.
 Figure 19: Create Data Aging Group
4.7 Data Aging Run
Note that Data Aging in production mode can only be executed in the background. To ensure the process runs seamlessly:
a) In transaction DAGRUN, select the Schedule New Job, or Go to -> Schedule Job in the menu.
 Figure 20: Data Aging Job Schedule
b) Enter the Data Aging group for which you want to start a run.
c) Enter the maximum runtime in minutes. You use this field to indicate the time in minutes after which the Data Aging run has to be stopped.
d) You also have the option of adding job parameters or spool parameters.
Figure 20: Data Aging Job Schedule
b) Enter the Data Aging group for which you want to start a run.
c) Enter the maximum runtime in minutes. You use this field to indicate the time in minutes after which the Data Aging run has to be stopped.
d) You also have the option of adding job parameters or spool parameters.
 Figure 21: Data Aging Job Status
e) Choose Execute to schedule the job.
Figure 21: Data Aging Job Status
e) Choose Execute to schedule the job.
 Figure 22: Data Aging Job Status
After completion of Data Aging run Data moved into Partition tables.
Figure 22: Data Aging Job Status
After completion of Data Aging run Data moved into Partition tables.
 Figure 23a: After Data Aging Run Data Move to Partition table (Hana Studio)
 Figure 23b: After Data Aging Run Data Move to Partition Table (Hana Studio)
After data unload from RAM, the process to load has to be repeated again. This is shown in Figure 24a-b.
Figure 23b: After Data Aging Run Data Move to Partition Table (Hana Studio)
After data unload from RAM, the process to load has to be repeated again. This is shown in Figure 24a-b.
 Figure 24a: After Data Unload to Partition Table (Hana Studio)
 Figure 24b: After Data Unload to Partition Table (Hana Studio)
4.8 Monitor Data Aging and Analysis Log
Now that you have set up Data Aging, as a final step, monitoring has to be set up to ensure the process runs without any glitch. To set up the process, go to the transaction with the Tcode – DAGLOG. This shows the logs as well as any error messages which might have come up. This is helpful while debugging issues and to ensure the resolution of errors.
There are two logs which are of primary importance: the Analysis log and the Job Run log. The Analysis log is shown in Figure 25.
 Figure 25: Data Aging and Analysis Log
The Job Run log is as shown in Figure 26.
Figure 25: Data Aging and Analysis Log
The Job Run log is as shown in Figure 26.
 Figure 26: Data Aging Job Run Log
5.0 Conclusion
You have now successfully implemented Data Aging. This will enable data to be segregated effectively, resulting in a leaner but robust landscape. This will also enable better performance enabling business users to accomplish day-to-day transactions rapidly delivering rapid time to value.