Sometimes the SAP-delivered Business Content does not map exactly to your requirements and you must modify it. This article explains how to add a field to an existing DataSource.
One of BW's biggest strengths is the amount of standard Business Content that is delivered with it. Business Content includes DataSources, InfoObjects, data targets, and InfoSources that support the entire flow of data within BW. It provides a rapid starting point when modeling key business information requirements, and it is also intended to cover most of the traditional reporting requirements that companies face.
However, Business Content will not solve all your data information needs. For example, if you face a scenario where you need to pull additional data from an SAP source that is not included in Business Content, you have two primary ways to proceed: append new fields to an existing DataSource and populate these fields via SAP enhancement RSAP0001, or use the generic extractor to create a new DataSource.
I will show you how to do the first option, enhancing standard Business Content by adding fields to a DataSource. In a later article, I will also demonstrate how you create a new DataSource using the generic extractor. If you are new to BW, you might want to review the sidebar, “How to Evaluate Business Content,” which explains how to determine if the standard Business Content will meet your requirements.
Here's a scenario involving the FI Accounts Payable (A/P) module where you need to enhance a Business Content object: You have a requirement that demands vendor analysis based on the account group to which the vendor is assigned. In R/3, every vendor belongs to an account group, which serves two main purposes. First, it classifies every master record in the module, which is useful for reporting purposes and business process segregation. Second, it provides a large number of control parameters for the associated master data such as number ranges and screen layouts.
This is all fine and dandy, except that “account group” is not an attribute of InfoObject 0VENDOR. Consequently, you won't be able to fulfill your requirement with standard Business Content. At this point, you could either develop an entirely new information model built around this one extra field, or just enhance the standard InfoObject 0VENDOR. Obviously, it's more cost effective to enhance a single InfoObject than to develop an entirely new data model.
I'll show you how to add account group as an attribute to 0VENDOR. You can apply the same process to enhance other DataSources. For my scenario, I have already determined all the affected items and where they reside. Keep in mind that this can be a difficult task if the requirement involves several items that are hard to find in R/3 (such as system status for a WBS [work breakdown structure] element). For vendors, I've already researched the master data table LFA1 and determined that the field for account group is KTOKK.
Note
The instructions in this article are based on BW 3.0B, so some of the screens might look different if you are currently working with the 2.0B/2.1C release. However, the concepts I describe also apply to these 2.x releases.
Step 1. Edit Standard DataSource
The first step is to enhance the DataSource for vendor master data (0VENDOR_ATTR) by adding the field for account group. Go to transaction code RSA6 in the R/3 source system; you can also find this transaction in the BW source system IMG in under Postprocessing of DataSources> Edit DataSources and Application Component Hierarchy.
At the resulting screen, navigate through the hierarchy until you locate the DataSource 0VENDOR_ATTR. Select the DataSource and then click on the Enhance Extract Structure button, as shown in Figure 1. You will then be prompted to choose a name for your enhanced extract structure. Accept the system default, ZABIW_LFA1_S, and press the Enter key.

Figure 1
Select the DataSource and click on the Enhance Extract Structure button
At the following screen (Figure 2), enter a description for the structure and specify the Component and Component type as shown. The field for account group is KTOKK. For the Component, enter a unique name that begins with “ZZ,” as I've done in Figure 2. Before you exit, make sure that you activate the structure by clicking on the activate button.

Figure 2
Specify a name for the structure and the Component and Component type
You need to confirm that the account group has been added to the DataSource and that it will be available to BW. When you arrive back at the Postprocess Datasource and Hierarchy screen, select the same DataSource again and press the Change DataSource button. Scroll down to the bottom and you'll see the field has been successfully added to the extract structure. However, the Hide field will most likely be selected. To make this field available to the BW transfer structure, this field needs to be inactive. Deselect the indicator and press the Save button. Before you exit the screen, be sure to notice the extract structure that the DataSource uses (Figure 3). This structure (BIW_LFA1_S) will be needed in the next step.
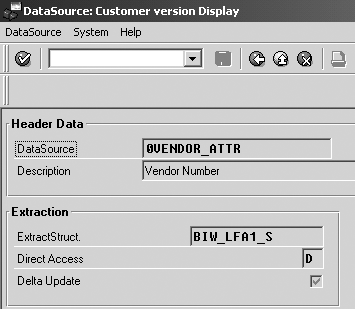
Figure 3
Note the name of the extract structure
At this point, the DataSource has been successfully enhanced. To be more specific, the extract structure that the DataSource uses to pass data to BW has been physically extended with the account group field found in the vendor master data table LFA1. However, the data for the account group will not immediately be available to BW until you use an SAP enhancement to properly fill the DataSource with the values from this table, which is the next step.
Step 2. Populate the Extract Structure
SAP provides enhancement RSAP0001 that you use to populate the extract structure. This enhancement has four components that are specific to each of the four types of R/3 DataSources:
- Transaction data
- Master data attributes
- Master data texts
- Master data hierarchies
With these four components (they're actually four different function modules), any R/3 DataSource can be enhanced. In this case, you are enhancing a master data attributes DataSource, so you only need one of the four function modules. Since this step requires ABAP development, it is best handled by someone on your technical team. You might need to provide your ABAP colleague with this information:
- The name of the DataSource (0VENDOR_ATTR)
- The name of the extract structure (BIW_LFA1_S)
- The name of the field that was added to the structure (ZZACCTGRP)
- The name of the BW InfoSource (0VENDOR)
- The name of the R/3 table and field that contains the data you need (LFA1-KTOKK)
With this information, an experienced ABAP developer should be able to properly code the enhancement so that the extract structure is populated correctly. The ABAP code itself would look similar to that shown in Figure 4.
| Figure 4 |
ABAP code to populate the extract structure |
Step 3. Replicate the DataSource
You now need to replicate this enhanced DataSource in BW. To do so, log into your BW system and go to the Source Systems listing in the Administrator Workbench. Right-click on the appropriate source system and choose Replicate DataSources from the context menu. This will most likely process for quite awhile, but it will eventually return a listing of all DataSources from the R/3 system, including the DataSource you changed earlier, 0VENDOR_ATTR.
Step 4. Create and Assign InfoObjects
Now that the DataSource has been enhanced and replicated in BW, you need to create a new InfoObject for the account group and assign it as an attribute of 0VENDOR. To do so, go to transaction code RSD1, enter a name for the new InfoObject, and click on the Create button. You will then see a dialog window where you must enter a description for the new characteristic.
On the General tab, specify the data type and length of the characteristic as CHAR and 4, respectively, as shown in Figure 5. At the Master data/texts tab, specify that the InfoObject will manage texts by clicking on With texts and Medium length texts exist. Finish creating this characteristic by clicking on the activate button and exiting the screen.

Figure 5
Specify the data type and length of the characteristic
Now that you've created this new characteristic, you need to add it to 0VENDOR as an attribute. Go back to transaction code RSD1, enter 0VENDOR, and press the Maintain button (Figure 6). Navigate to the Attributes tab and enter ACCTGROUP at the bottom of the list. Click on the activate button to finish enhancing 0VENDOR.

Figure 6
Add the new characteristic to 0VENDOR as an attribute
Step 5. Update the Transfer Rules
The next step is to maintain the transfer rules in order to properly map the fields from the DataSource to the
communication structure of the InfoSource. In this example, you will be mapping them on a 1-to-1 basis from the DataSource field ZZACCTGRP to the ACCTGROUP InfoObject in the 0VENDOR InfoSource. Go to the listing of InfoSources and find the InfoSource for 0VENDOR. Right-click on the source system ID and choose the Change Transfer Rules... option (Figure 7). When you first enter the next screen, Figure 8, you'll notice that the transfer rules are shown with a yellow light. Also notice that the only InfoObject in the Communication str./Transfer rules group (displayed in the lower-left corner) that doesn't have a mapping to a InfoObject from the Assign.InfObjct-field group (displayed in the lower right corner) is ACCTGROUP.

Figure 7
Find the InfoSource for 0VENDOR
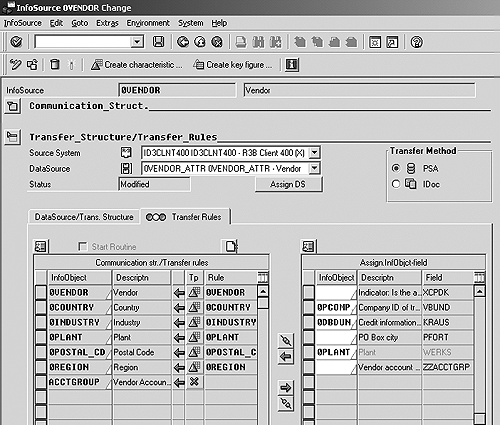
Figure 8
Screen to change the transfer rules for 0VENDOR
In the Assign.InfObjct-field window in the lower right of the screen, scroll to the bottom until you find the field ZZACCTGRP. In the Communication str./Transfer rules group, select the InfoObject ACCTGROUP as shown in Figure 9 and press the Transfer in transfer rules button. This maps the R/3 field ZZACCTGRP to the characteristic attribute ACCTGROUP in 0VENDOR.

Figure 9
Map field ZZACCTGRP to characteristic attribute ACCTGROUP
At this point, you should see the Transfer Rules definition change to a green light. Activate the transfer rules by pressing the activate button and then exiting.
Step 6. Load Source Data
The final step is to actually load the vendor master data from R/3 into BW via an InfoPackage. Figure 10 shows the PSA for InfoSource 0VENDOR_ATTR. You can see that the Account group in the seventh column has been successfully loaded.

Figure 10
The PSA for InfoSource 0VENDOR_ATTR
At this point, you have successfully added the account group as an attribute to 0VENDOR. This lets you perform analysis of the vendors based on their respective account group. Even though you focused on account group and 0VENDOR, this process is easily adaptable for similar scenarios that require the simple enhancement of Business Content DataSource. It is also available for all types of DataSources, which makes the manipulation of Business Content much easier. With these steps, you should be able to customize the standard content to meet your specific information needs and accelerate your BW implementation.
How to Evaluate Standard Business Content
When evaluating Business Content, you need to first determine how to carry out the evaluation. If you are pulling from an SAP source system such as R/3, it is generally recommended that you use a bottom-up approach. This means that you start by evaluating the standard Business Content against the business information requirement to see if any contain the necessary fields. Once you've identified the appropriate DataSource, you proceed up the BW data flow until you arrive at the final data target and query. If the source data is from a non-SAP system, a top-down approach might be better. Here, you start at the role or InfoCube/query level and work your way down to the source data level. For the example in this article, a bottom-up approach is best.
The good news is that you have only a few DataSources to consider for a specific information need. Vendor analysis, for example, has only three DataSources, one for each of the different types of master data DataSources: attributes, texts, and hierarchies. To evaluate these against your business information requirement, go to transaction code RSA6. Navigate through the hierarchy until you find the DataSource that is relevant. You can also expand the entire hierarchy by pressing the Expand button and then searching on a key word such as “Vendor.” Once you've located the DataSource, select it and press the Display button. At the next screen, you can view all the available fields in the extract structure and determine whether or not additional items need to be added.
Nathan Genez
Nathan Genez is an SAP FI/CO- and SAP BW-certified consultant who has worked with SAP ERP since 1996, with an emphasis on the capital accounting modules: PS, IM, and FI-AA. A former platinum consultant with SAP America, Inc., he has worked with SAP BW since release 1.2B. He is currently a managing partner at Serio Consulting in Houston, Texas.
You may contact the author at nathan.genez@serioconsulting.com.
If you have comments about this article or publication, or would like to submit an article idea, please contact the editor.