Alerts are more enhanced in Access Control 10.0 and 10.1 as compared to the Access Control 5.x releases. From the 10.x release and on alerts are generated only when an access risk is satisfied at the permission level, which eradicates false positive alerts. An example illustrates the enhanced alerts. Also gain insight into mitigation control alerts and the cleared vs. deleted alert concept.
Key Concept
Alerts can be used to prioritize access risks for early remediation as they indicate which access risk is more exploited. Alerts are not meant to replace the remediation process; rather, they assist it. Alerts are early indicators that you can use for deeper investigation to check whether actual changes were made or if a user has just displayed the transactions. They show how many times these transactions were executed.
Alert functionality in SAP Access Control provides a medium to generate alert notification when a user performs critical or conflicting actions in SAP ERP or SAP NetWeaver systems.
In Access Control release 5.x alerts are generated for display transactions. The system only checks if the user has violated segregation of duties (SoD) or critical action access risks at the action level. However, in the Access Control 10.x release, alerts functionality has been enhanced and SoD and critical action alerts are only generated when a user violates access risk at the permission level. I cover how alerts are captured in Access Control, followed with an example to explain how permission alerts are generated in the 10.x release.
Alert Functionality in Access Control 10.x Releases
An alert report captures all the transaction usage records from transaction STAD (Business Transactions Analysis), which contains a record of the use of individual transactions executed by users in an SAP system (SAP ERP or SAP NetWeaver). For more information on STAD use this SAP Help page link: “Displaying a Business Transaction Analysis.”
Alert reports do not provide information on what kind of changes were made in the executed transactions. This needs to be manually examined.
An alert job extracts the transaction usage data from STAD, which could be a very high volume of data on any given day in an SAP ERP or SAP NetWeaver system. After analysis of this volume you should decide on the periodic cycle for the alert job. As a best practice you can schedule the alert job on an hourly basis.
Alert Generation Program Overview in a GRC System
An alert generation program in Access Control 10.x can be run using any of these options, all of which take you to Figure 1:
- Transaction code GRAC_ALERT_GENERATE
- SE38 program name GRAC_ALERT_GENERATION
- IMG menu path Governance, Risk and Compliance > Access Control > Access Risk Analysis > Generate Alerts
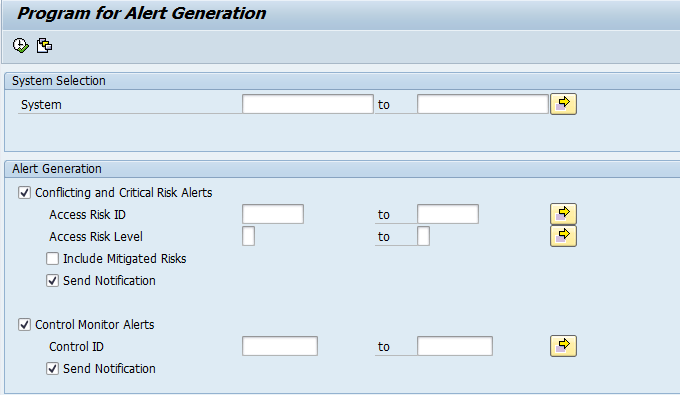
Figure 1
Alert generation program
You execute the alert job by clicking the execute icon  in Figure 1.
A prerequisite for running the alert job (as shown in Figure 1) is to execute the action usage synchronization job (which is shown in Figure 2) in the GRC system. Action usage data synchronizes the user-executed transactions from the connected plug-in systems to the GRC tables. The plug-in system here refers to the SAP ERP or SAP NetWeaver system configured in the GRC system.

Figure 2
Action usage synchronization program
- Transaction code GRAC_ACT_USAGE_SYNC
- SE38 program name GRAC_ACTION_USAGE_SYNC
- IMG menu path Governance, Risk and Compliance > Access Control > Synchronization Jobs > Action Usage Synch
The action usage program syncs the action usage data from the plug-in system to the GRC tables. This synched data is related to the user-executed transaction codes. Through this program, user-executed transactions are copied from the connected plug-in systems into the GRC tables.
Note
For the alert generation program in Figure 1, you need to execute the action usage synchronization program by clicking the execute icon in Figure 2.
Ensure that the User field is blank so that the action usage job is
executed for all users. Provide the connector ID (the connector ID is
defined in transaction code SM59 and connects the SAP ERP or SAP
NetWeaver system).
Illustration of Permission Alert Logic
Scenario 1: In this scenario I assume user <User1>has access to transaction codes CMOD and /SAPDMC/LSMW in the SAP ERP system. However, the user does not have access to authorization S_DEVELOP with ACTVT 01. <User1> executes the transaction codes CMOD and /SAPDMC/LSMW.
Scenario 1 uses the action rules and permission rules concept for the access risk. A rule defines a combination of transactions that if executed by one user can lead to fraud.
Figure 3 shows the logic behind action rule and permission rule formation.

Figure 3
Action and permission rules combination
Figure 4 shows the same action and permission rules in the GRC front-end application. You can open the GRC front end through a GRC Enterprise Portal link or through an SAP NetWeaver Business Client (NWBC) URL. Navigate to Figure 4 by going to the work center Setup. Then follow menu path Access Rule Maintenance > Access Risk.

Figure 4
Action rules and permission rules
Note
SAP Access Control 10.x is pre-delivered with many tabs, such as My
Home, Setup, Access Management, and Reports and Analytics. These tabs
are part of the work center. For more information on the work center use
this Help page link:
Role and Work Center Concept.
Select Access Risk ID B001. Click the Generate Rules button and then the Foreground button (not shown). View the action rules and permission rules by clicking the Action Rules link and the Permission Rules link.
Considering the authorization of <User1> in this scenario and the action and permission rules from Figure 4, let’s see one by one how the 5.x release and 10.x release generate alerts.
In the Access Control 5.x release, if <User1> executes transactions CMOD and /SAPDMC/LSMW in the SAP ERP system and runs an alert report, alerts are generated. The reason is that in the Access Control 5.x release, permission-level risk analysis does not happen when the system generates alerts. The system only checks the action level access risk for generating the alerts.
In the Access Control 10.x release, if <User1> executes transactions CMOD and /SAPDMC/LSMW in the SAP ERP system and runs an alert report, alerts are not generated. This is because <User1> does not violate the permission-level access risk.
SoD Permission Alert Example from the Finance Business Process
Let’s take two users, JERRY and MIKE, for this illustration. I go through a number of steps in this example.
Step 1. Assign Authorizations to JERRY and MIKE
I assign two different roles to each of them. I assign Z_ROLE_WITHOUT_PERMISSION to JERRY, which has only actions but not the required permissions for making changes. As you can see in Figure 5 this role has only display permission (Activity 03) for authorization object F_PAYR_BUK. Figure 5 is displayed when you open the role authorization screen through transaction code PFCG.
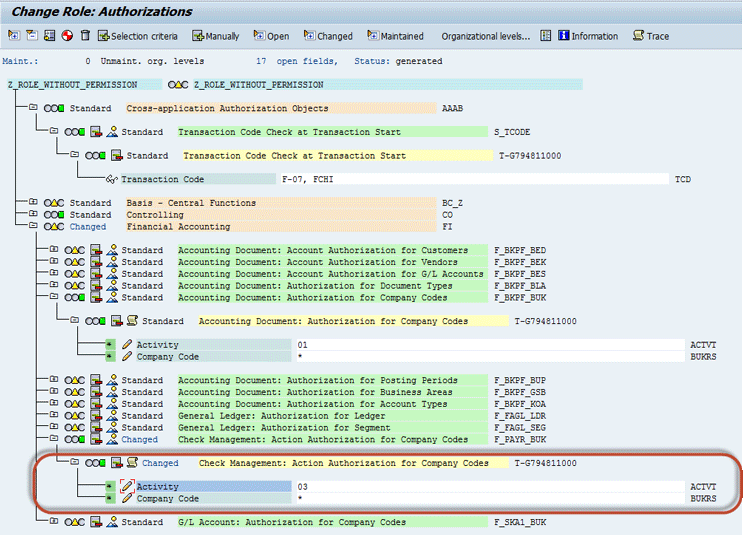
Figure 5
Authorization screen for Z_ROLE_WITHOUT_PERMISSION assigned to user ID JERRY
I assign Z_ROLE_WITH_PERMISSION to MIKE. It has necessary actions and permissions to perform the job, which can lead to fraud. As you can see in Figure 6 this role has the authorization to maintain a number range object (Activity 17) for authorization object F_PAYR_BUK.

Figure 6
Authorization screen for role Z_ROLE_WITH_PERMISSION assigned to user ID MIKE
Step 2. Maintain Access Risk ID F032
In this step you see the access risk ID I use: risk ID F032 (Risk Description: Maintain bank account and post a payment from it). This access risk ID is taken from the delivered global ruleset. The first part of this section creates the required authorization for test users.
Figure 7 is displayed when you open the SOD Risk POWL. To do so open GRC Access Control in the front end either through the SAP NWBC URL or through the Enterprise Portal. Go to the work center Setup. Follow menu path Access Rule Maintenance > Access Risk. Click the Filter link and then filter the access risk ID for F032.
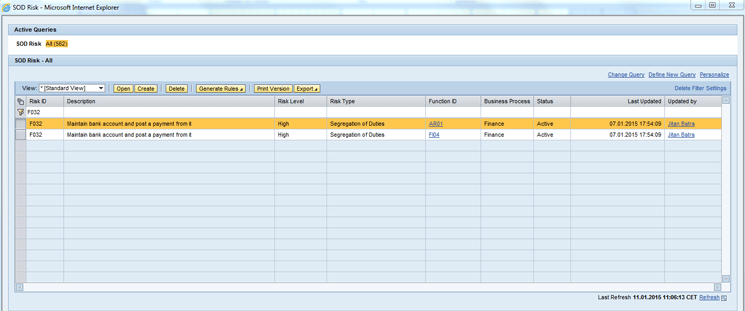
Figure 7
SOD Risk screen filtered for access risk ID F032
From Figure 7 you can generate the Action and Permission rules. Select the access risk ID F032. Click the Generate Rules button. Click the View Action Rules link in the next window (not shown). Figure 8 should appear with a set of action rules.

Figure 8
Action rule for access risk ID F032 (rule ID 0002)
After reviewing the action rules you can check the permission rules. Navigate from Figure 7 by selecting Access Risk ID F032. Click the Generate Rules button. Click the View Permission Rules link in the next window (not shown). Figure 9 should appear with a set of permission rules.

Figure 9
Permission rule for access risk ID F032 (rule ID 0002)
Now you have both the test data (authorization for test users JERRY and MIKE) and master data (information on access risk ID F032). Next you see the results of user risk analysis on these test users.
Step 3. Execute User Level Risk Analysis for Users JERRY and MIKE
For executing user-level risk analysis, open the GRC Access Control in the front end either through the SAP NWBC URL or through the Enterprise Portal. Go to the work center Access Management. Follow menu path Access Risk Analysis > User Level. This opens Figure 10.

Figure 10
Executing user risk analysis for JERRY and MIKE
In Figure 10 enter the criteria for executing risk analysis for JERRY and MIKE. System GI7CLNT600 is the test SAP ERP system where users JERRY and MIKE exist. For User enter JERRY and MIKE in separate rows. The Access Risk ID is F032. Then click the Run in Foreground button, which opens Figure 11.
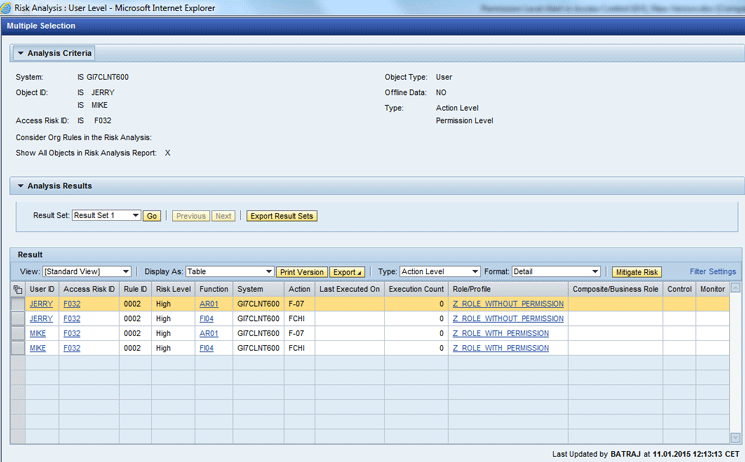
Figure 11
User risk analysis result for the users JERRY and MIKE at the Action Level
As per Figure 11, both Jerry and Mike have a SoD violation at the Action Level for the access risk ID F032. In Figure 11 JERRY and MIKE both have a single violation F032 Access Risk ID with Rule ID 0002. In Figure 11 change the Type from Action Level to Permission Level, which takes you to Figure 12.
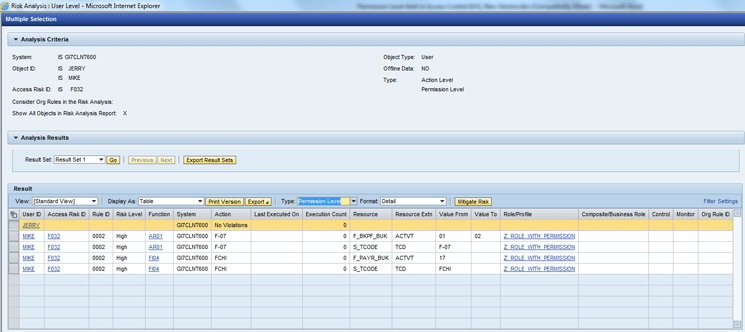
Figure 12
User risk analysis result for the users JERRY and MIKE at the Permission Level
However, if you check Figure 12 for the Permission Level only Mike has a SoD violation. The complete set of four rows constitutes the violation. There is a single SoD violation at the Permission Level with Rule ID 0002. Jerry does not have any violation at the Permission Level. This means there were false positive entries for Jerry at the Action Level.
I now show how to generate the alerts at the 10.x release for the access risk ID F032.
Step 4. Maintenance of Risk Owner in Access Risk ID F032
In this step you create the risk owner who receives the alert notification mail. Only the risk owner receives the alert mail. Create this by following menu path GRC Access Control in the front end either through the SAP NWBC URL or through the Enterprise Portal. Go to the work center Setup . Follow menu path Access Owners > Access Risk > Access Control Owners. This takes you to Figure 13.

Figure 13
Central Owner screen
For more information on how to create or modify control owners visit the SAP Help page: Access Control Owners.
Through the Central Owner maintenance screen you can set up Jitan Batra with the Owner type as Risk Owner as highlighted in Figure 13.
Note
Risk Owner is the person designated for approving changes to access risk
definitions. This is the same person who also receives the email for
conflicting and critical action alerts.
To add Jitan Batra, open the access risk ID F032 by clicking the work center Setup in the SAP NWBC or through the Enterprise Portal link. Follow menu path: Access Rule Maintenance > Access Risk. Click the Filter button. Filter the access risk ID for F032. Select the Access Risk ID F032. Click the Open button and then the Risk Owners tab. Click the Add button. Select Jitan Batra as the risk owner from value help. Click the Save button. The screen should look like Figure 14.
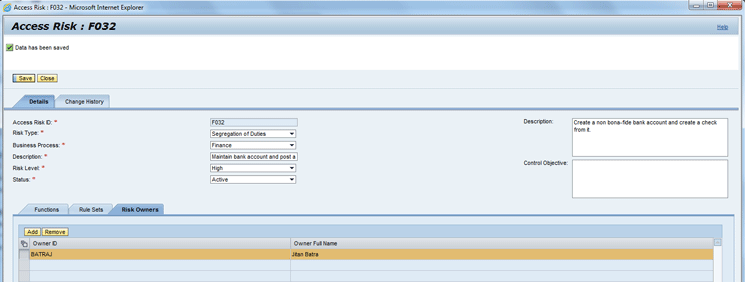
Figure 14
Access risk ID F032 - Risk Owner tab
Step 5. Check the STAD records for Test Users MIKE and JERRY in the SAP ERP System
Execute transaction codes F-07 and FCHI in the SAP ERP system. To check the STAD records for MIKE execute transaction code STAD and filter the records for test user MIKE. This opens Figure 15.
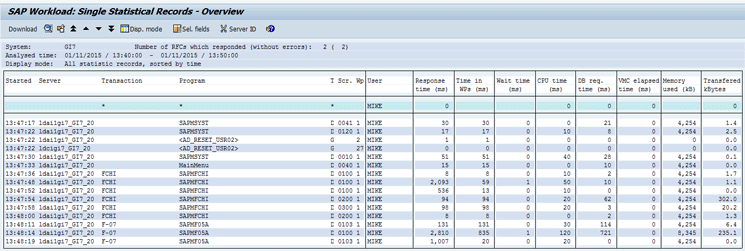
Figure 15
STAD record for the user MIKE
Figure 15 shows the technical transaction details performed by MIKE in the SAP ERP system. To check the STAD records for Jerry execute transaction code STAD and filter the records for test user JERRY. This opens Figure 16.
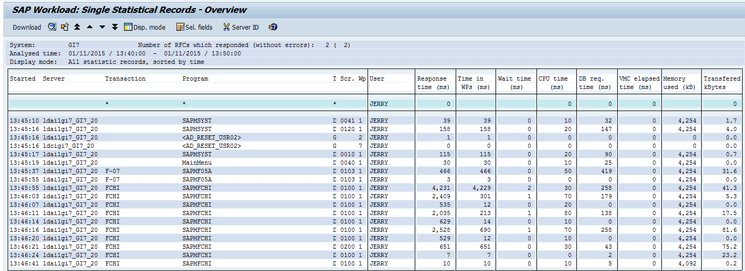
Figure 16
STAD record for the user JERRY
Figure 16 shows the STAD record for the user JERRY, which shows technical transaction details performed by JERRY in the SAP ERP system.
Step 6. Execute an Alert Generation Report in the GRC System
A prerequisite for running an alert generation program is to run the Action Usage Synchronization program. Follow IMG menu path > Governance, Risk and Compliance > Access Control > Synchronization Jobs > Action Usage Synch. Enter the name of the SAP ERP system (created through transaction code SM59) in the Connector field of Figure 17.

Figure 17
Action usage synchronization
Click the execute icon or press F8. This program copies the action usage records for SAP ERP system GI7CLNT600 into GRC database tables.
Note
You can run the action usage synchronization program either through
foreground mode (by clicking the execute icon in the alert generation
screen or by pressing F8) or background mode (by following menu path
Program > Execute in background or by pressing F9).
Execute the Alert generation program for access risk ID F032 by following IMG menu path Governance, Risk and Compliance > Access Control > Access Risk Analysis > Generate Alerts. Enter the SAP ERP system GI7CLNT600 in the System field. Select the Conflicting and Critical Risk Alerts check box and enter F032 in the Access Risk ID field. Also select the Send Notification check box.
Click the execute icon or press F8 in Figure 18.
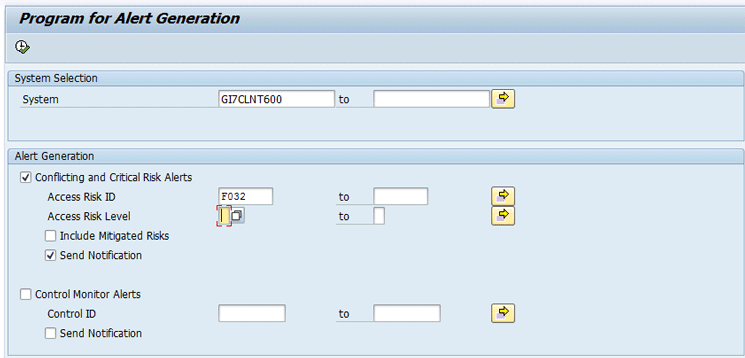
Figure 18
Alert Generation program
Note
You can run the alert generation program either through the foreground
mode (by clicking the execute icon in the alert generation screen or by
pressing F8) or in background mode (by clicking the menu Program >
Execute in background or by pressing F9).
A message that the process was successful is displayed once the alert generation program is executed for the selected selection criteria (Figure 19).

Figure 19
Successful message displayed
Step 7. Check the Generated Alerts in the GRC System
You can check the alerts generated in Step 6 by clicking on the work center Access Management. Follow Menu path Alerts > Conflict and Critical Alerts. This takes you to Figure 20.
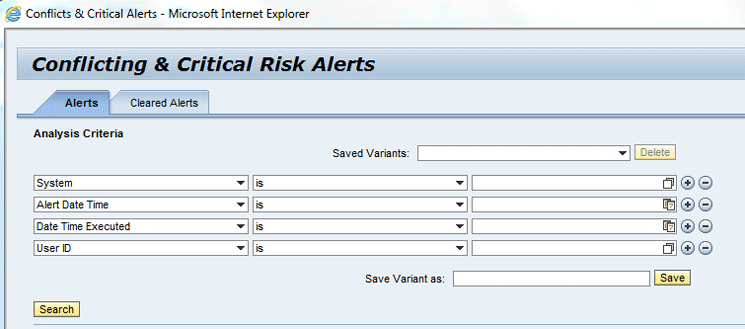
Figure 20
Conflicting & Critical Risk Alerts screen
To view the alerts enter the system ID details of the SAP ERP system with the test user ID MIKE and JERRY (Figure 21).
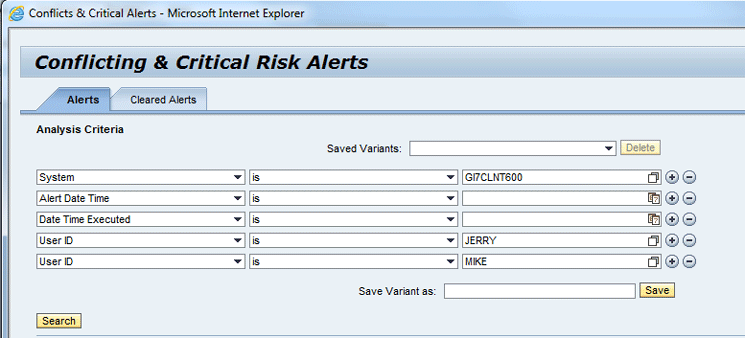
Figure 21
Conflicting & Critical Risk Alerts screen
Click the Search button in Figure 21 to go to Figure 22.
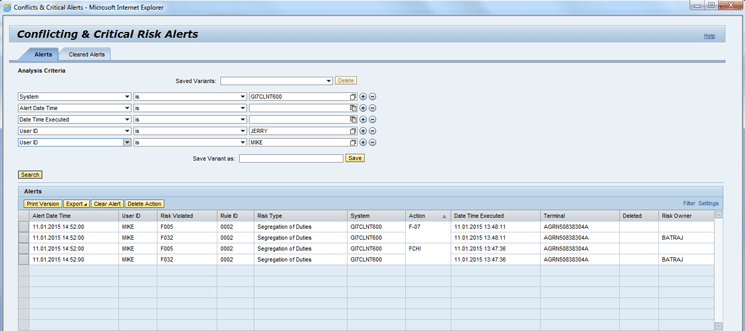
Figure 22
Conflicting & Critical Risk Alerts output screen
In Figure 22 you can see that alerts are only generated for the User ID MIKE. The reason is the logic change done in Access Control 10.0 release in which you only generate an alert when the user ID has a violation at the permission level.
The same holds for notification as you only get one notification in the Jitan Batra mailbox for the user MIKE (Figure 23). No notification is generated for the user ID JERRY as there is no alert generated for JERRY.
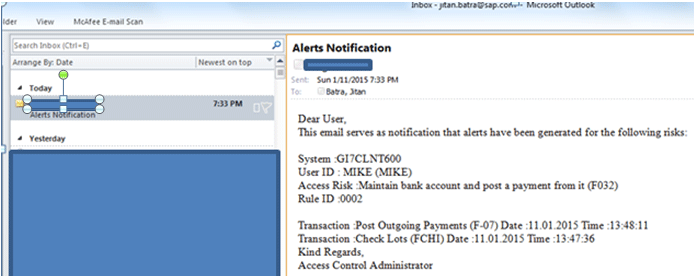
Figure 23
Alert notifcation email for the User ID MIKE
Note
You can customize the alerts by following two steps. Execute transaction
code SE61 and create a custom document for alert notification. Then
follow IMG menu path SPRO IMG > Governance, Risk and Compliance >
Access Control > Workflow for Access Control > Maintain Custom
Notification Messages. Click the New Entries button. Use the message
class 0AC_SOD_ALERTS and the document object you just created to create a
new customization entry for alerts. This is an optional step that is
only required when you want to modify the alert notification template.
Other delivered content will be used by the system to generate the
alerts.
Mitigation Control Alert Functionality
Next you need to generate the mitigation control alert. This alert is generated for all the monitors for the specified selection criteria that have not executed their tasks as per the definition of mitigation control.
You now know that user MIKE can perform fraud. However, there could be multiple reasons for MIKE to hold such authorizations including these:
- The access risk is not that critical and because of that you need to change the role.
- Role revamping is a major exercise that cannot be completed immediately and in between that period you need to control this in some other manner.
The other option is to mitigate the user MIKE for access risk ID F032.
For this scenario, the business owner of finance could either use the existing mitigation control for access risk ID F032 or you can create a new mitigation control. Figure 24 is displayed when you go to the work center Setup. In the Setup work center click the Mitigation Controls link and then click the Create button.
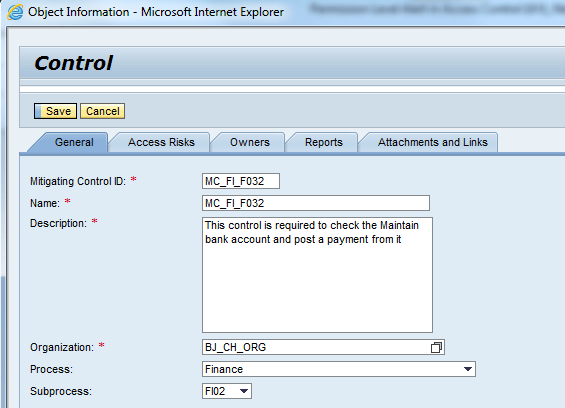
Figure 24
Create control screen
Enter the required mitigating control information in Figure 24. Select the correct Organization unit to assign the mitigating control. Select the Process Finance and Subprocess FI02. The Description area is what will be shown in the mitigation report. It should contain enough information for management and auditors.
Click the Access Risks tab to open Figure 25 where you can enter the access risk ID F032. Click the Add Row button and select the access risk ID from the Access Risks value help.

Figure 25
Access Risks tab under the create control screen
In Figure 25, click the Owners tab to open Figure 26 where you can see two records, one for the Monitor and another for the Approver.

Figure 26
The Owners tab under the create control screen
In Figure 26, add the approver and monitor to the mitigation control. The mitigation approver is the user who owns the mitigation control maintenance. He or she also approves mitigation maintenance workflows and receives the mitigation control alerts. The mitigation approver gives notice of the decision to the internal audit team, security colleagues, and other business process owners about the control and monitoring person. This is the user who is responsible for assignment of mitigation control to any user/role/profile as per the business configuration.
The mitigation monitor is designated for monitoring the transactions mitigated users have executed in the plug-in system. The monitor does this by running the report maintained under the Reports tab in the mitigation control definition as shown in Figure 27. This monitor ensures mitigated users’ IDs are doing jobs as per the business requirement and should report any fraudulent activity if found to the approver and business owner.
In Figure 26, click the Reports tab to open Figure 27 where you can add the report name that needs to be executed by the monitor in the SAP ERP system.

Figure 27
The Reports tab under the create control screen
Once the mitigation control is created you can assign it for the user MIKE either through the Mitigated User Link (click the work center Access Management and follow menu path Mitigated Access > Mitigated Users) or mitigate the user through risk analysis report result view (Figure 28).
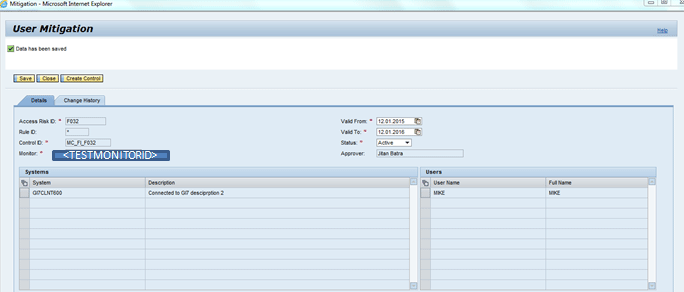
Figure 28
Mitigated user screen
Now from Figure 28, you know that there is a monitor <TEST_MONITOR> who monitors the activities of user MIKE in the plug-in system. The monitor uses the report STAD in the plug-in system. The Frequency in Days parameter provided in Figure 27 shows that monitor needs to run the specified report each day.
For the illustration, in this case the monitor has not executed the specified task that is running the STAD report in the plug-in system. To check that the monitor has done the specified task, you use the mitigation control alert functionality in which the alert goes to the approver assigned in the mitigation control.
I am scheduling the mitigation control alert program for the control MC_FI_F032, which was created from Figures 24 to 27. Execute the alert generation program for SAP ERP system GI7CLNT600 by following IMG menu path Governance, Risk and Compliance > Access Control > Access Risk Analysis > Generate Alerts (Figure 29). Enter the SAP ERP system GI7CLNT600 in the System field and select the Control Monitor Alerts and the Send Notification check boxes. Enter the Control ID as MC_FI_F032.

Figure 29
Alert generation program for the mitgation control alerts
In Figure 29, click the execute icon or press F8. You can run the alert generation program either through foreground or background mode. A successful message is displayed once an alert generation program is executed for the selected selection criteria.
Now as the alerts have been generated, I will check them through menu path work center Access Management > Alerts > Mitigation Controls. This takes you to Figure 30. To view the alerts, enter the System details with the Monitor ID.
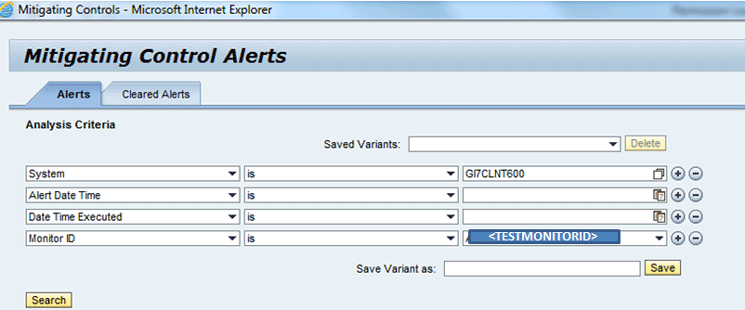
Figure 30
Mitigation Control Alerts screen
Click the Search button to go to Figure 31.

Figure 31
Mitigation Control Alerts output screen
Now in the last part of mitigation control alert functionality, I address the mitigation control alert notification. This notification is generated because I selected the Send Notification check box in Figure 29. As you can see, mitigation control alerts are only generated for the control ID MC_FI_F032. Notification for the mitigation control alert goes to the approver mailbox as shown in Figure 32.
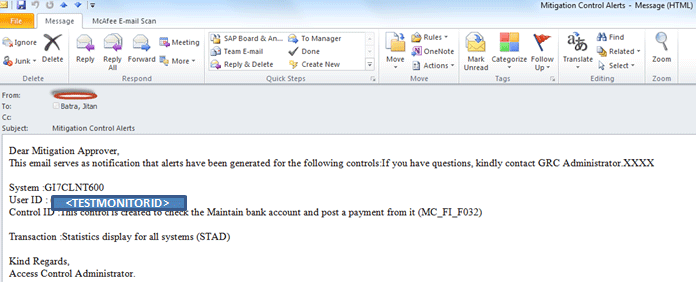
Figure 32
Notification for the mitigation control alert
Clear and Delete Alerts
The generated conflicting and critical risk alerts and generated mitigating control alerts can be cleared from the respective search screens. This activity is required to clear the alerts that have already been reviewed by the administrator.
Clear Alert: When you clear the alert, all transactions of that alert are marked as cleared. However, the user needs to execute all transaction codes again for that alert to reappear.
Delete Action: When you delete the action, the deleted transaction needs to be executed again by the same user. With that a new alert is generated. By deleting the individual transaction from the conflicting transaction group, you are specifying that the undeleted transaction is still active and an alert is necessary for this user the next time the deleted transaction is executed.
If you delete both the conflicting transactions from the alert, then in this case the user needs to execute both the deleted transaction codes so that the same alert is generated again.
You can search the conflict and critical alerts by going to the work center Access Management. Follow menu path Alerts > Conflict and Critical Alerts > Search the Alerts. Enter the System as GI7CLNT600. Click the Search button, which takes you to Figure 33.

Figure 33
Search results for Conflicting & Critical Risk Alerts
You can either clear the alert through the Clear Alert button or delete the alert through the Delete Action button. In both the cases the alerts will be removed from the screen in Figure 33. However, both these actions have different impacts. Let’s perform both the actions one by one.
Option 1: Clear Alert
In Figure 34, I have selected one alert to clear. Click the Alerts button and the system opens the pop-up screen Clear Alert as shown in Figure 34.
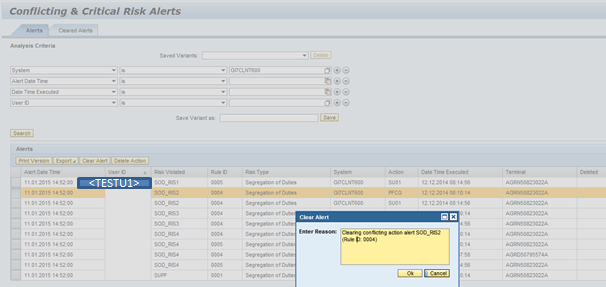
Figure 34
Pop-up screen for Clear Alert
In Figure 34, enter the reason in the pop-up screen. Click the OK button. This takes you to Figure 35, which is the original Conflicting & Critical Risk Alerts screen. Now the alert that you cleared is no longer visible.

Figure 35
Conflicting & Critical Alerts screen without the alert
Click the Cleared Alerts tab on this screen and you are taken to a screen displaying a list of cleared alerts as can be seen in Figure 36.
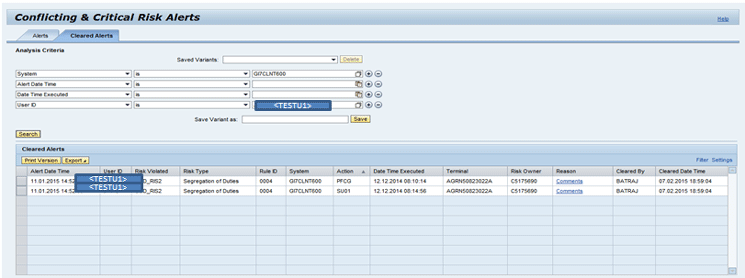
Figure 36
Cleared alerts
For a clear alert, user <TESTU1> has to execute both the transaction codes PFCG and SU01 in the plug-in system (GI7CLNT600). Only then is the alert for conflicting action risk (risk ID: SOD_RIS2; action rule ID: 0004) generated.
Option 2: Delete Action
Search the conflict and critical alerts again by going to the work center Access Management. Follow menu path Alerts > Conflict and Critical Alerts > Search the Alerts. Enter the System as GI7CLNT600 and the User ID as <TESTU2>. Click the Search button to go to Figure 37.
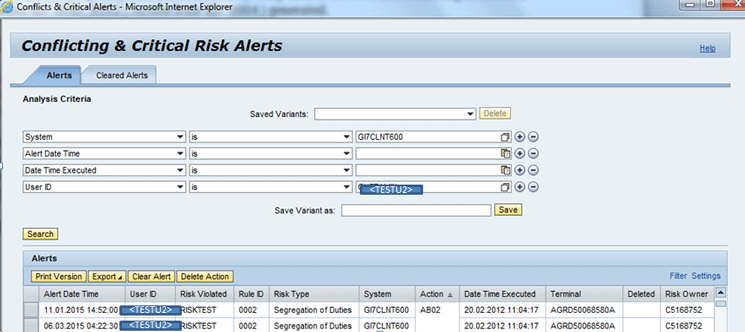
Figure 37
Search screen for Conflicting & Critical Risk Alerts
Now in Figure 38 select the first line and click the Delete Action button.
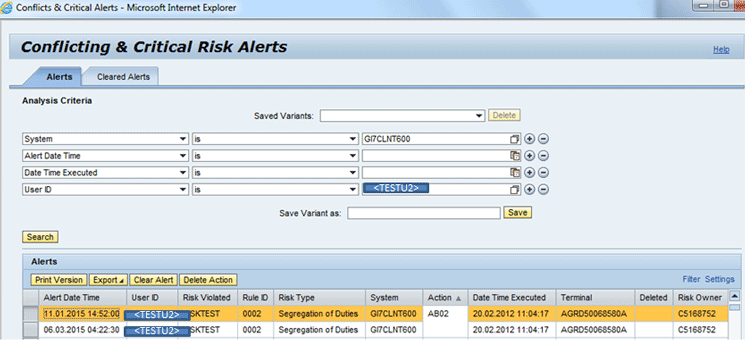
Figure 38
The Search screen for Conflicting & Critical Risk Alerts with delete selection
The delete action on the selected line in Figure 38 takes you to Figure 39.

Figure 39
Row marked for deletion
In Figure 39, you can see that the first row has been marked for deletion with the mark X in the Deleted column. By deleting the individual transaction from the conflicting transaction group, you are specifying that the undeleted transaction is still active and an alert is necessary for this user the next time the deleted transaction code AB02 is executed.
Note
For mitigating control alerts only the Clear Alert action is supported
and it works in a similar way as has already been mentioned above for
Conflicting & Critical Risk Alerts.
Enhancements in Alert Email Notification
There are some important corrections done in Alert E-Mail notification that are explained in the follow SAP Notes:
- SAP Note 1612573 - Transaction code missing in alert notification
- SAP Note 1901657 - Alert e-mail notification not aligned
Jitan Batra
Jitan Batra is a senior developer for SAP Access Control and is currently working in SAP Labs India Pvt. Ltd. in development support for SAP Process Control. He has different certifications, including SAP Access Control 10.0, ISEB, and ISTQB. He was the development implementation partner for GRC Access Control 10.0 at Daimler APAC, which was the first deployment of the product in APJ and globally. He has also conducted public batch trainings for the SAP Access Control 10.0 course.
You may contact the author at jitan.batra@sap.com.
If you have comments about this article or publication, or would like to submit an article idea, please contact the editor.


