Discover how SAP Screen Personas can enhance user experience and productivity exponentially. Learn how to design and build personas screens without any involvement of technical consultants. Learn step-by-step configuration to realize a real-life business requirement.
Key Concept
SAP Screen Personas is an add-on for SAP ERP Central Component (ECC), SAP Business Suite on SAP HANA, and SAP S/4HANA. The user experience is the center of the user adoption of an application and SAP has made it as its prime focus now.
In my view, for a long time SAP has focused primarily on functionality and user interface (UI) was secondary in the priority list. I have come across business users from different business sectors across the board who were impressed with the features and functionalities available in SAP, but expressed their discontent in using complex SAP navigation screens. The good news is that SAP has taken this feedback seriously and has come up with a new approach to address the user experience. As of today, a number of methods are available to boost the user experience, and each is best suited for a particular business environment.
Before I describe the SAP Personas 3.0 in detail, I outline the scenarios for which SAP Screen Personas is the right UI approach.
As shown in Figure 1, you should consider using SAP Screen Personas when the transaction access requirement is not around mobility (mobile devices) and your business is looking for a customized, personalized, simplified screen. Over a period of time SAP has included a number of fields in the user screens to cater to the business requirements of different industry sectors. This has resulted in complex, crowded screens with many fields that may not be required or available in a number of different user screens. SAP Screen Personas enable you to easily design screens that are relevant for your needs and merge screens into one single screen. It is possible to have the same look and feel (style guide) as a Fiori application to ensure the identical user experience as you would have using Fiori.
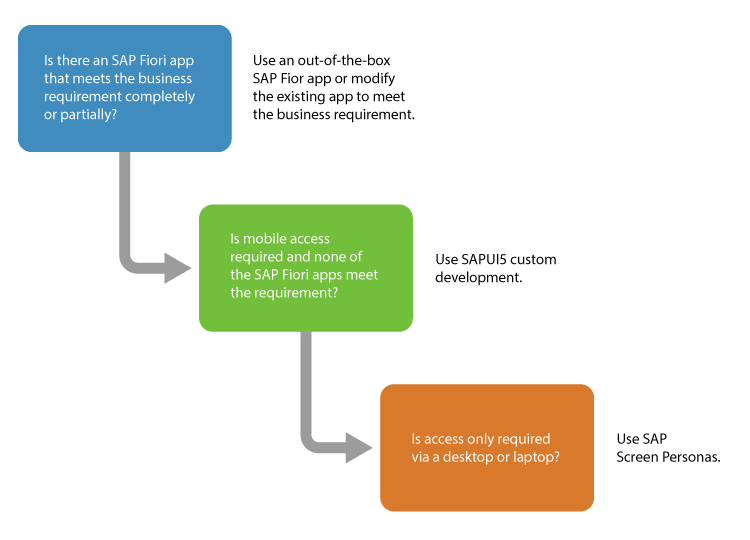
Figure 1
An SAP Screen Personas use case
Here are a few of the terms related to functionalities used frequently in SAP Screen Personas:
- Flavors: A flavor is like a screen variant. A particular SAP screen is personalized as per a business requirement. The important thing to remember is that you can have more than one flavor for an SAP transaction.
- Theme: Themes are like the style guides in which a set of fonts, colors, and layout is defined. Themes are used to realize consistency in the look and feel of a screen’s design.
- Scripts: Scripts are a set of codes written to automate or tweak a few things. In SAP Screen Personas these codes are stored along with a flavor.
Now that you have an understanding of the basic terminology, I explain how SAP Screen Personas can be leveraged to meet business requirements and shape the user experience.
Business Case Study 1
Consider a scenario in which a material requirements planning (MRP) controller needs to view the material master, stock requirement list, bill of material (BOM), and routing only in his SAP system to perform his work. This business is looking for a user interface in which MRP controllers do not need to remember the transaction code and can navigate quickly without going through the SAP menu.
In SAP Screen Personas, in a couple of hours you can design a tile-based dashboard with direct access to transactions for which the business needs access. Here is how you can address this business requirement in SAP Screen Personas.
To start designing the screen in SAP Screen Personas, log in to the SAP Web GUI. In the initial screen that appears (Figure 2) click the P icon to enter the SAP Screen Personas screen editor mode.

Figure 2
SAP Screen Personas launch screen
Now, click the plus icon (shown in Figure 3) to create a new flavor.

Figure 3
Click the plus icon in SAP Screen Personas to create a new flavor
This action displays a pop-up screen (Figure 4) in which you need to give an appropriate name and description to the new flavor. For my example, you are creating the flavor for MRP controllers, so enter the name accordingly.
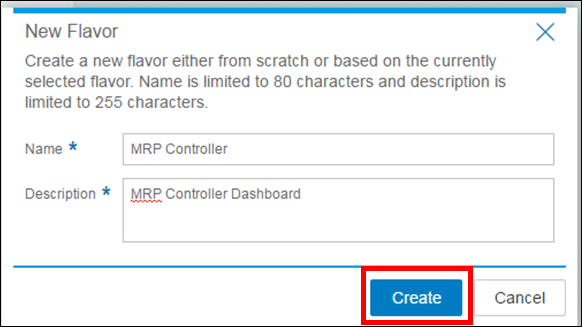
Figure 4
Enter a new flavor name and description
After you click the Create button (Figure 4), you are in flavor edit mode. Here you can design the screen as per the business requirement. As a first step you need to hide the superfluous controls and buttons. Select the buttons and click the Hide button as shown in Figure 5.
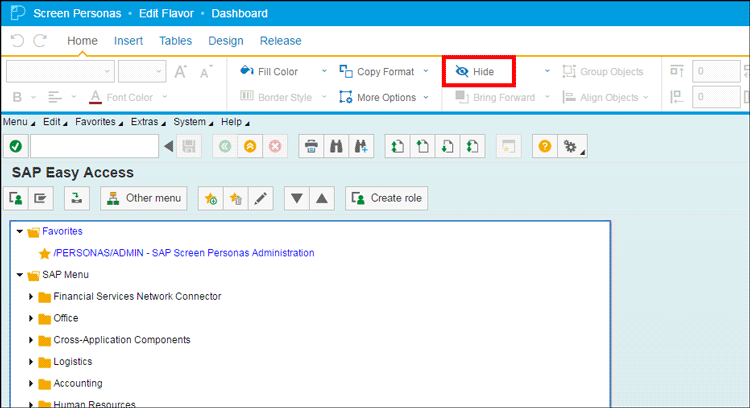
Figure 5
Hide screen fields and controls
After the buttons are hidden, the screen in edit mode looks like the one shown in Figure 6.
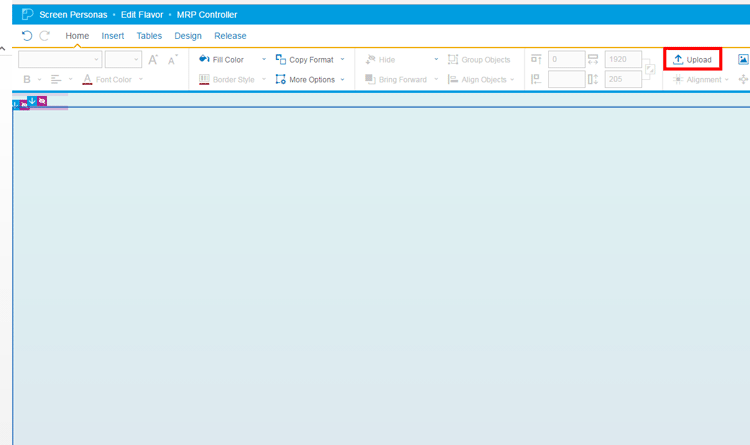
Figure 6
Screen with fields and control hidden
After you hide the buttons, your next step is to add a background, which generally is a corporate logo or standard branding image. To upload the background image, click the Upload button (shown in Figure 6) and then click the Browse File button to browse the folder path to access where the image is stored (Figure 7).
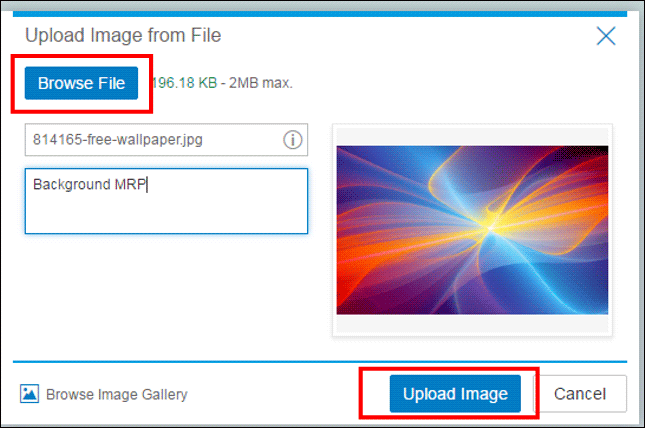
Figure 7
Upload a background image
Click the Upload Image button to start uploading the image. After the image is successfully uploaded, click the Insert Image button to apply the image as background (Figure 8).
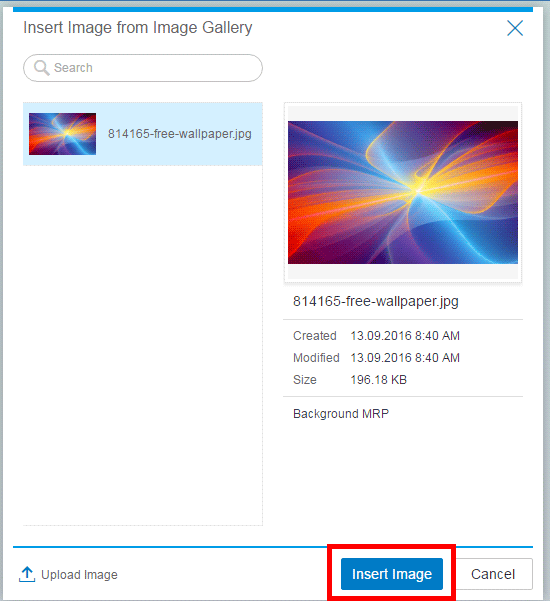
Figure 8
Apply a background image
Figure 9 shows the screen after your background image has been inserted.
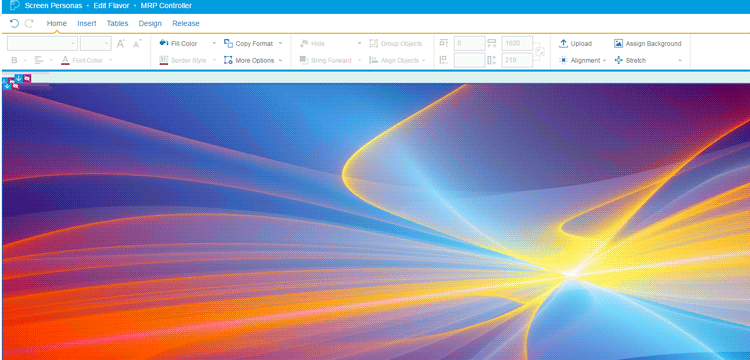
Figure 9
Background image applied
Until now you have cleaned (hidden) the controls that you don’t need and inserted a background image. Now your next step is to start placing the transactions as tiles.
Click Insert and then click Transaction Button (Figure 10).

Figure 10
Place transaction tiles
This action displays the screen shown in Figure 11. Input the transaction name and transaction code and then click the Done button.

Figure 11
Tile name and description
The Material Master Display tile is positioned on the screen (Figure 12). In run time, you can directly navigate to the Display Material transaction without navigating through the SAP menu or remembering the transaction code (discussed later in the article).
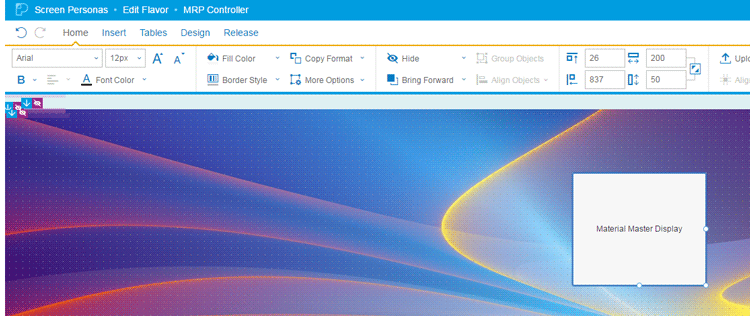
Figure 12
The Material Master Display transaction tile
To change the look and feel of the tile, height, placement in the screen, and fonts select the tile and then click the Home menu as shown in Figure 13. This process is quite similar to the way you can edit in Microsoft Word or Excel.
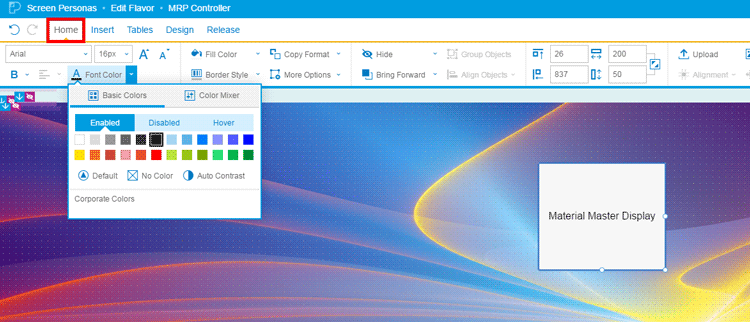
Figure 13
Tile placement and fonts
In the current business scenario, the user needs to access a few more transactions, namely, Display Routing (transaction code CA03), Display Material BOM (transaction code CS03), and Display Stock/Requirements Situation (transaction code MD04). Instead of creating a tile for each of these transactions from scratch, you use clone control functionality to copy the existing tile and subsequently only change the tile description and transaction code attached to it.
Select a tile and then click the Clone Control button to copy a tile (Figure 14).

Figure 14
Clone control
After the tile is copied, select the copied tile and double-click it. This action opens a pop-up screen (Figure 15) in which you can update the tile description and transaction code.
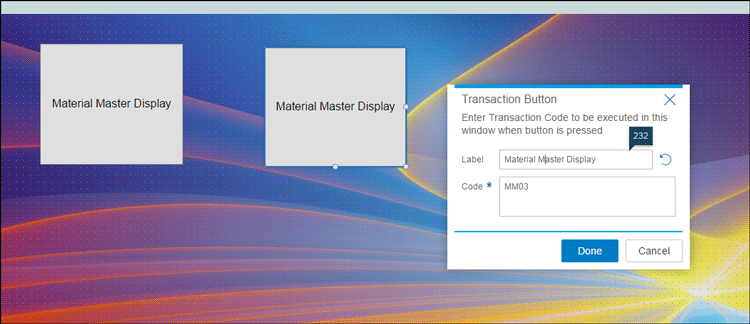
Figure 15
Tile label and associated transaction code
Follow the same process to add the other transaction tiles. Then place them as appropriate in the screen by either dragging or keying in the distance from the edges in the boxes enclosed in the red square in the right section of Figure 16.

Figure 16
Transaction tile placement and size
After you finish positioning the transaction titles on the screen, click the Home button. This action displays the screen shown in Figure 17.
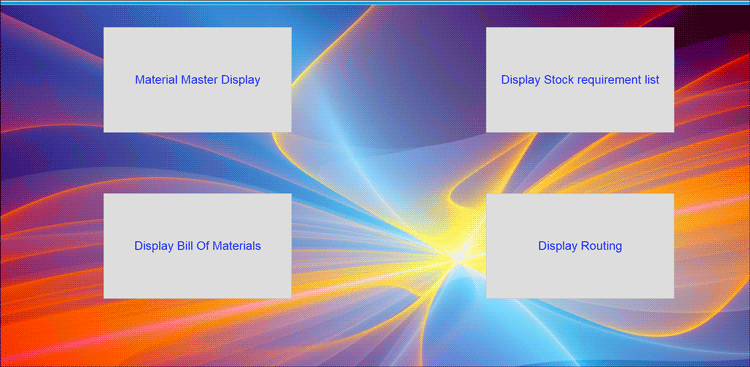
Figure 17
Transaction tiles
Now click the X in the upper right part of the screen to save and exit the screen editor mode (Figure 18).

Figure 18
Save and exit the personas screen editor
This completes the designing process. Now business users assigned to this flavor do not have to navigate through the SAP menu or remember the transaction codes. The tiles work as a dashboard that enables users to execute the transaction by just clicking the tiles (Figure 17).
Business Case Study 2
In this scenario, a business has a number of fields in the process order display screen under different tabs. The business prefers to have a cleaner view (hide the fields that are not required) and to bring all the relevant fields in one tab to make navigation easier.
To realize this business requirement, you need to use the SAP Screen Personas tab’s merging functionality and hide the superfluous fields.
In the Display Process Order transaction (transaction code COR3), enter the process order number, as shown in the Process order field in Figure 19, and then click the enter icon (the green check mark) or press the Enter key on your keyboard.
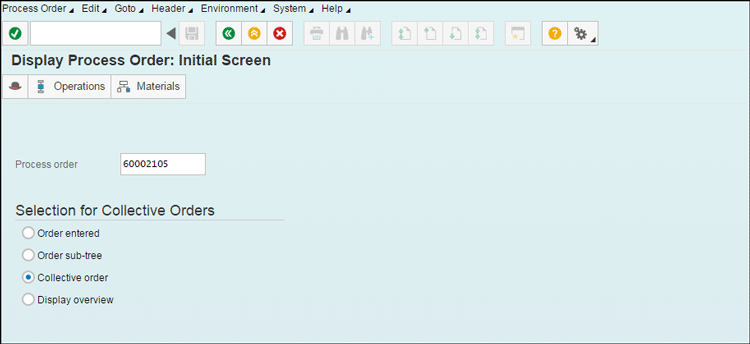
Figure 19
Display the process order
Now click the P icon (Figure 20) to switch to the Personas editor mode.

Figure 20
Personas editor launch
This action displays the screen shown in Figure 21. Click the plus icon to create a new flavor.

Figure 21
Click the plus icon to create a new transaction flavor
After you click the plus icon, the screen in Figure 22 appears. Fill in the name and description of the new screen flavor of transaction code COR3 and click the Create button.
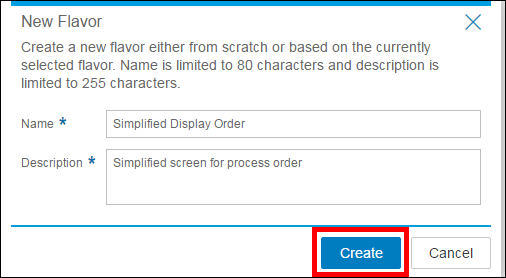
Figure 22
Flavor name and description
Your first step is to hide the tabs that are not necessary for transaction code COR3. To hide the tabs, select each tab and then click the Hide button (Figure 23).
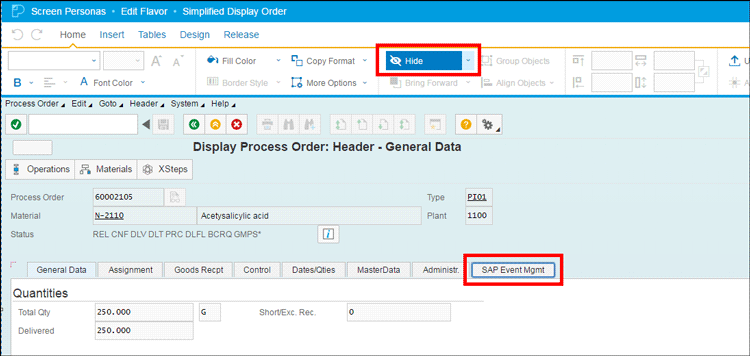
Figure 23
Hide tabs in transaction
In the screen edit mode the tabs that you selected to be hidden appear as shown in Figure 24.
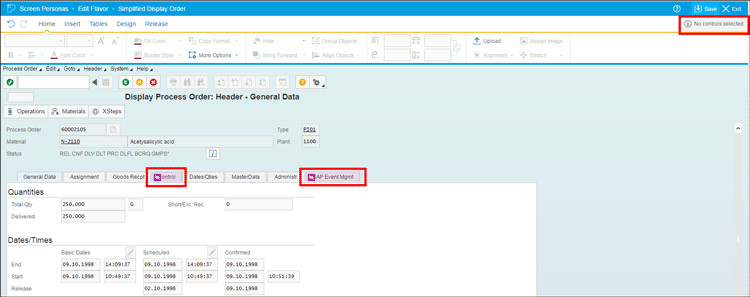
Figure 24
Hide tabs in personas screen editor
To save your changes, click the Save button shown in Figure 24 and then click the X to exit the edit mode. After you exit the edit mode, in run time the hidden tabs cannot be seen (Figure 25).
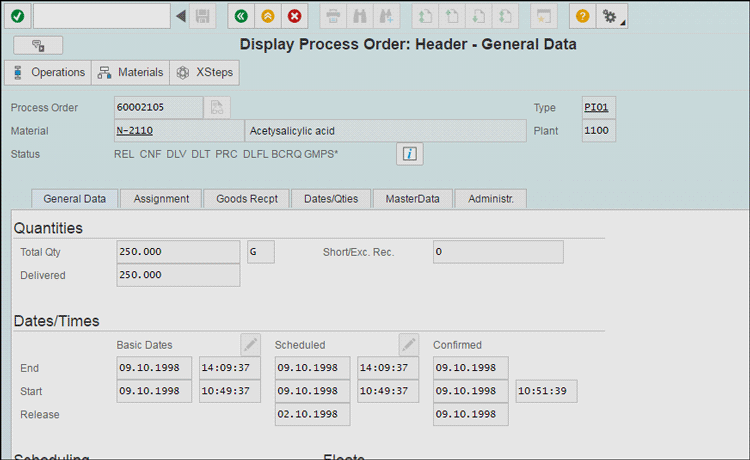
Figure 25
Screen after superfluous tabs are hidden
Now hide the fields that you do not need and bring all the fields from different tabs under one tab for a quick snapshot view. To make further changes in the screen, select the flavor and then click the edit icon (Figure 26).

Figure 26
Edit the existing flavor
To hide the fields, select the fields as shown in Figure 27 and click the Hide button.
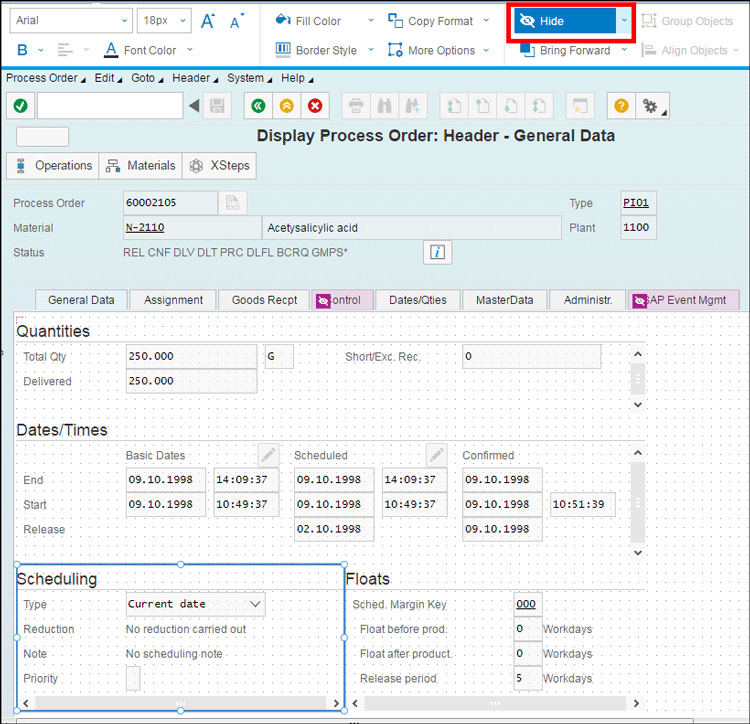
Figure 27
Hide screen fields
After you hide all the superfluous fields in a tab, click the Save button and then click the Exit button to exit the edit mode (Figure 28).

Figure 28
Save and exit the flavor
In the run-time mode you can see that the fields that you hid cannot be seen anymore (Figure 29).
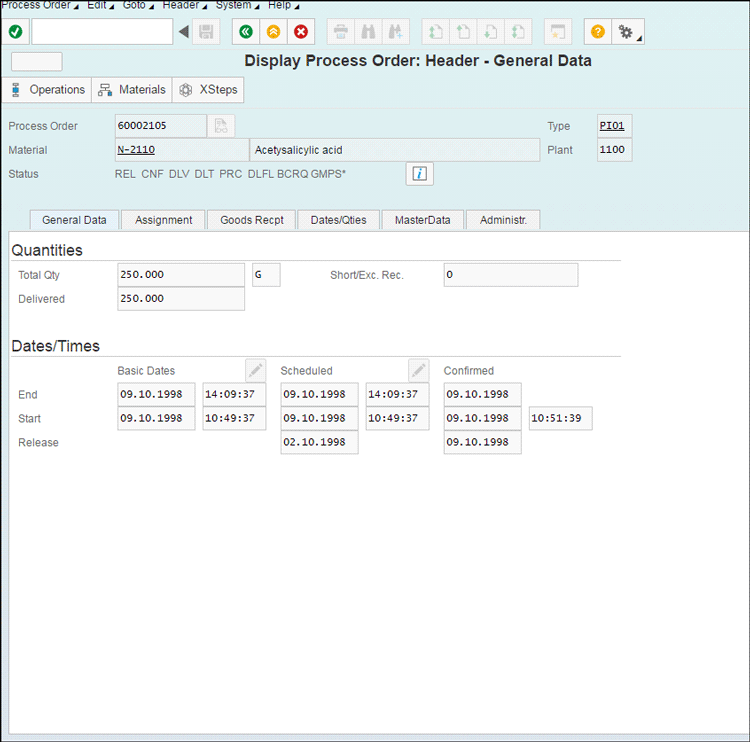
Figure 29
The Display Process Order screen with fields hidden
Note
You cannot navigate from one tab to another tab in edit mode. If you want to make changes in another tab, then you need to save the current changes, exit edit mode, click the tab in which you need to make the changes, and then enter edit mode again.
To move the fields from one tab to another tab, first switch to the SAP Screen Personas editor mode (Figure 26). Select the list of the fields (Figure 30) in the Responsibility section and move it to the area shown in Figure 31.
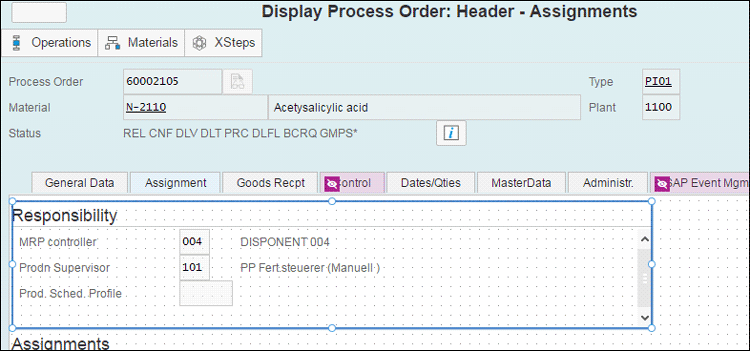
Figure 30
Selected fields to be moved
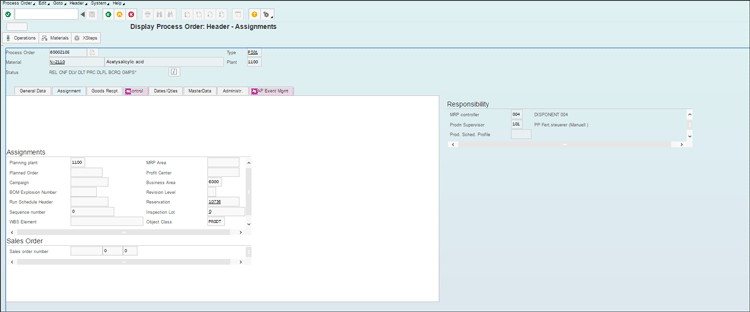
Figure 31
Selected fields moved
If no other fields are of interest in this tab, then you need to hide the fields as explained above (Figure 23) and then save the changes.
After you click the X icon to exit the edit mode, you can see the fields in the right side of the screen (Figure 32) where you dragged them in edit mode as mentioned above.
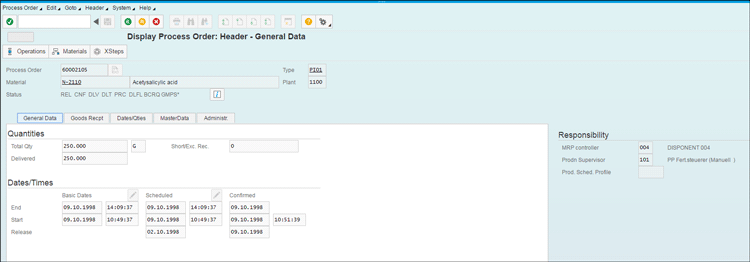
Figure 32
Field moved from another tab
To position these fields in the appropriate place, enter the flavor edit mode as mentioned above (Figure 26) and then drag and drop the fields as per your business requirement—for my example, you can drop the fields MRP Controller, Prodn Supervisor, and Prod. Sched. Profile to the bottom of the screen (Figure 33).
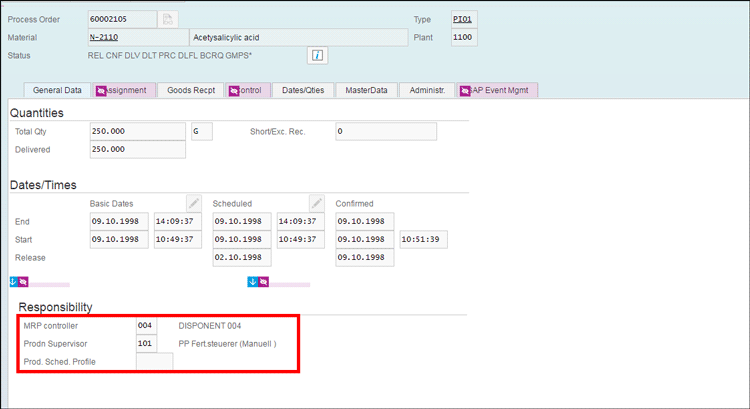
Figure 33
Field positioned in the screen
If a particular field is not used by your business, you can select the individual field and click the Hide button. For my example, select Prod. Sched. Profile and then click the Hide button (Figure 34).
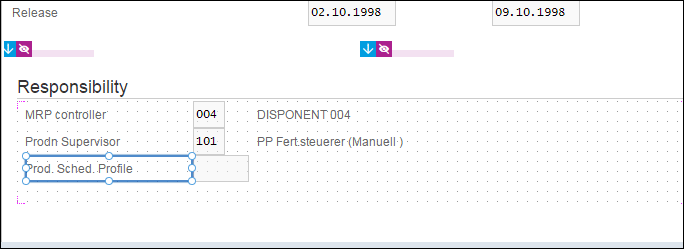
Figure 34
Hide a screen field
Figure 35 shows the screen after the field you selected has been hidden.
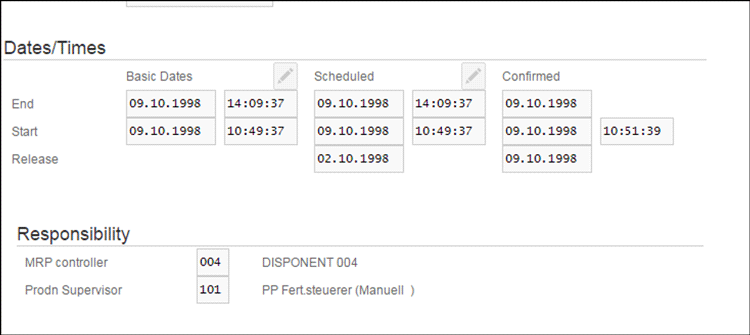
Figure 35
Screen after the field is hidden
You need to follow the same steps to bring the fields from one tab (source) to another tab (target) and hide the tabs (source) after all the relevant fields from the tabs have been positioned to the other place.
You can change the tab name by double-clicking it (Figure 36) and entering the appropriate name in the Text Editor screen. Click the Done button after you enter the name in the Text Editor.
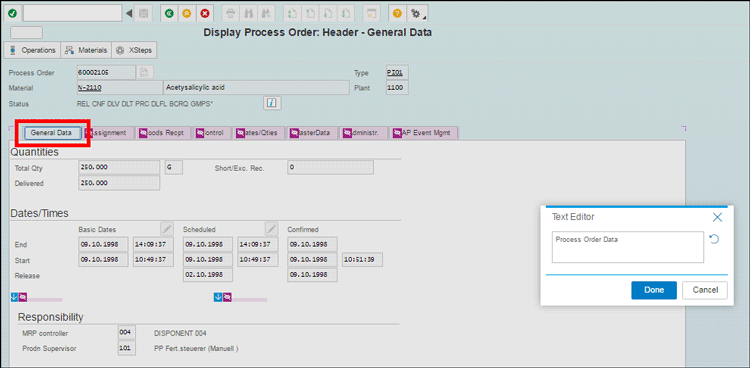
Figure 36
Change the tab name
Navigation buttons that are not required can be hidden by selecting them and clicking the Hide button as shown in Figure 37.
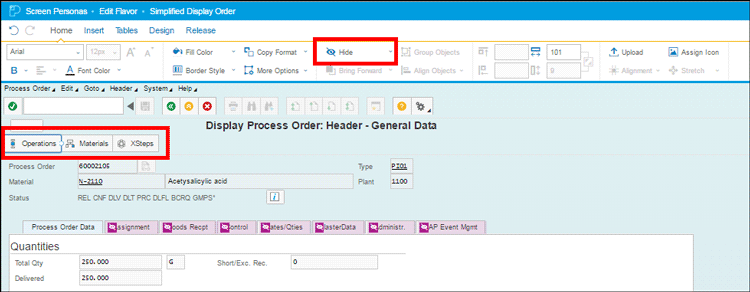
Figure 37
Hide navigation and other buttons
Finally, you can edit the header text by double-clicking it (Figure 38) and then changing the name. Click the Done button after you change the name.
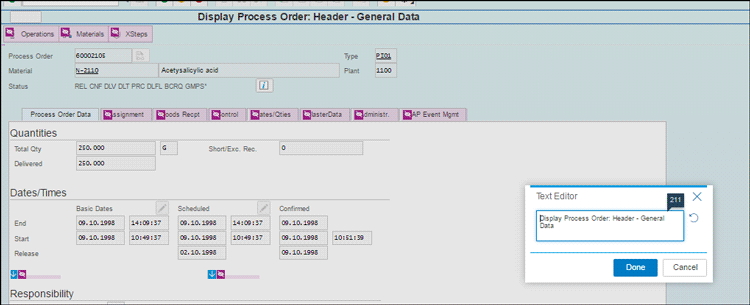
Figure 38
Change the header name
After you save the changes and exit the edit mode, you can see the simplified screen with all the relevant fields required by the business under one tab (Figure 39).
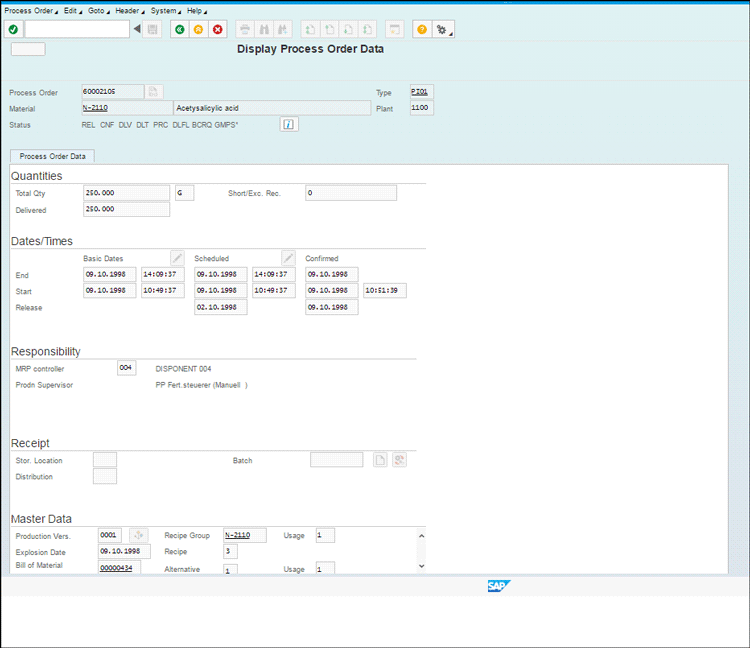
Figure 39
Process order display simplified screen with relevant information in a single screen
After you have designed the flavor, you need to assign it to the particular role or user to ensure that this particular flavor is loaded every time the transaction is executed.
Execute transaction /PERSONAS/ADMIN (SAP Screen Personas Administration). This action displays the screen shown in Figure 40.
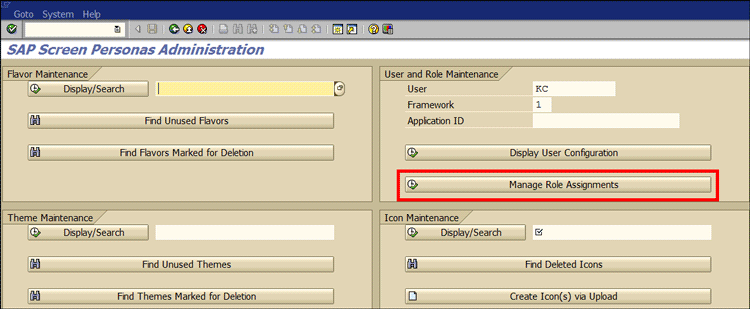
Figure 40
SAP Screen Personas screen administration
Click the Manage Role Assignments button to associate a flavor to a role. Press the F4 key for the field shown in Figure 41 to select the flavor to be assigned to the role.
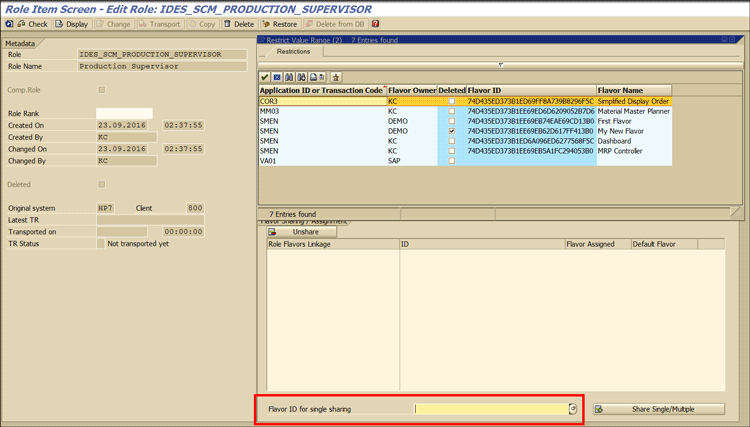
Figure 41
Role assignment to flavor
Click the Share Single/Multiple button shown in Figure 42 and save the transaction. This action associates the role with the flavor.
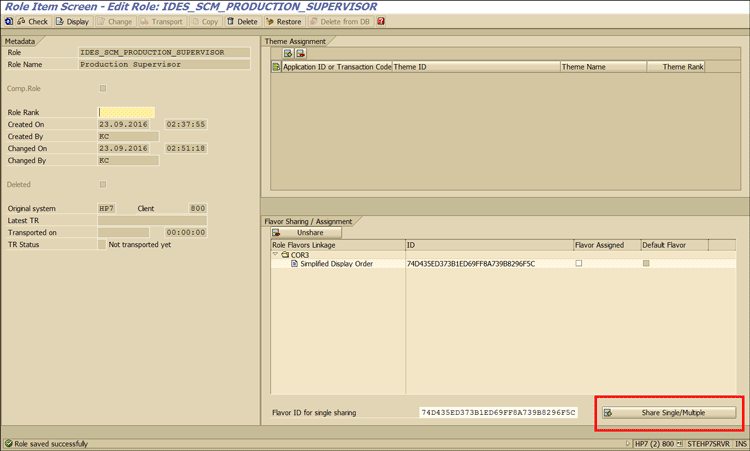
Figure 42
Save the flavor assignment
Go to the initial screen of the SAP Personas Administration selection screen and find the flavor ID by pressing the F4 key for the field highlighted in Figure 43.

Figure 43
Flavor maintenance
Click the Display/Search button (Figure 44) to display the screen shown in Figure 45.
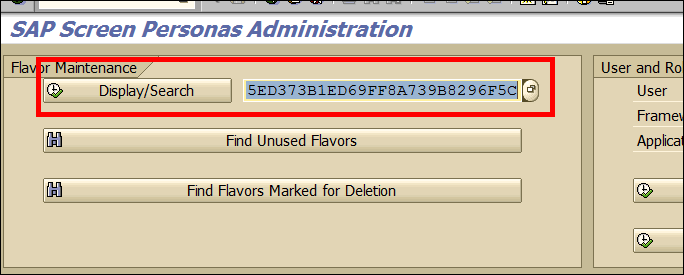
Figure 44
Display flavor maintenance
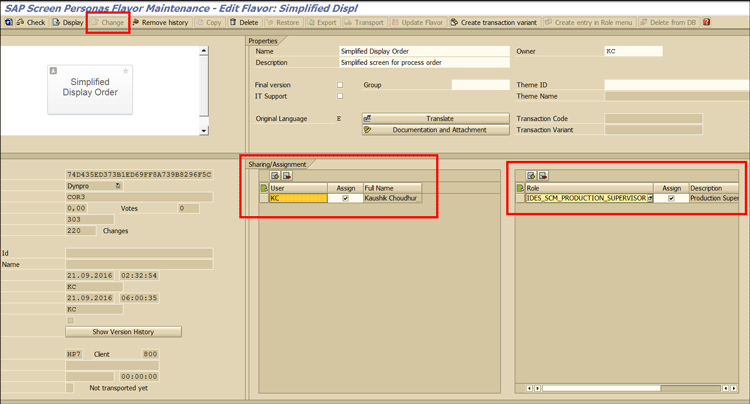
Figure 45
Assign a flavor to user and/or roles
Click the Change button and then you can assign a particular user or role to the flavor as per your business requirement. If you assign a role, then all the users assigned to the role will be able to view the flavor version of the transaction loaded instead of a standard SAP system screen.
Save the transaction and exit it. Now every time a user or people assigned to the role mentioned above run the display process order transaction, they will view the simplified screen you designed instead of the SAP standard system’s screen with multiple tabs (Figure 46).
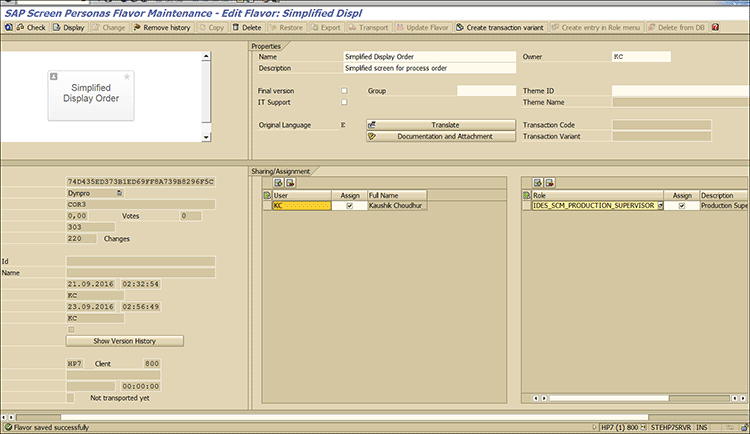
Figure 46
Save role assignment
You have seen two real-life business cases and went through step-by-step configuration and design steps to realize requirements with the help of SAP Screen Personas. You can see the way you can design simplified screens in a super rapid mode in a couple of hours without the help of any technical consultant.
The screens designed with SAP Screen Personas can be made similar to Fiori in look and feel. Refer to the following links for the style guide:
Fiori-Inspired Letterbox Theme
Fiori-Inspired General Concepts
Fiori-Inspired List Report Floorplan
SAP Screen Personas 3.0 and the SAP Fiori Launchpad Guide
Kaushik Choudhury
Kaushik Choudhury is a senior consultant in the supply chain management field with more than a decade of experience in supply chain consulting in principal positions for leading brands across the globe. His focus is on business transformation, business reengineering, proof of concept and solution design, and end-to-end implementation. He has a proven track record of delivering in alignment with business expectations and possesses a unique combination of profound business process understanding, consulting skills, hands-on SAP system experience, and effective management capabilities. Kaushik has operated seamlessly in highly agile and iterative environments in which solutions are implemented incrementally with ongoing design changes. He has extensive experience in Agile and Waterfall delivery methodologies in large SAP supply chain implementation programs.
You may contact the author at Kaushik.choudhury@outlook.com.
If you have comments about this article or publication, or would like to submit an article idea, please contact the editor.


