IT
See how to set up communication between Internet Information Services (IIS) and your SAP system using a Remote Function Call (RFC) to enable your users to approve or reject documents remotely.
Key Concept
The Component Object Model (COM) is an architecture and infrastructure for building extensible component-based software. Remote Function Call (RFC) is the standard SAP interface for communication between SAP systems. RFC calls a function to be executed in a remote system. You can use these technologies for the communication between an SAP system and Internet Information Services (IIS).
You can develop an application in ASP.net that communicates with an SAP application server using Remote Function Call (RFC) functions. This application allows your users to log in to the system from a mobile device and view approvals in process. The user then can approve or reject them. The system is browser based, so it is platform independent and no special installation or configuration is needed to use it.
I describe an overall view of communication between Internet Information Services (IIS) and an SAP application server. I use the SAP RFC Unicode Component object module (COM) for SAP connectivity.
You need the following tools to develop this application:
- Windows 2003/2008 server with an IIS server installed, and IDE .NET 2008 Express Edition
- SAP GUI 7.1 or later with development authorization
Note
I do not go in-depth about workflow development and configuration. I assume that the purchase requisition and purchase order standard workflows are activated and configured in the SAP system.
The next step is to develop SAP RFC functions. Following are the customer functions used during this development:
- ZBAPI_READ_INBOX
- ZBAPI_WAPI_READ_CONTAINER.
- ZBAPI_REQUISITION_REFUSE_GEN.
- ZBAPI_PR_GROSS_PRICE
For the purposes of this article, use the standard report program name RSWIWORK in the function module to get the list of in-process items. Do an implicit enhancement in this report to get the data in the function. Next, execute transaction code SE38 and open the report name as shown in Figure 1.

Figure 1
ABAP Editor
Open the report in display mode and click the Edit menu link in the ABAP editor (Figure 1). Follow menu path Enhancement Operations > Show Implicit Enhancement Options.
Scroll to line number 547 in the program and click the spiral-shaped enhance icon  at the top of the toolbar. Right-click line 547 and a pop-up menu appears (Figure 2).

Figure 2
Implicit enhancement line shown
Follow menu path Enhancement Operations > Create Enhancement Implementation. In the next screen get the name of the enhancement and the short description. Click the white paper-shaped new icon (Figure 3) to create a composite enhancement.

Figure 3
Enhancement implementation
When the next screen appears, fill in the name of the composite enhancement (e.g., ZCOMP) and enter a short description in the Short Text field (Figure 4).

Figure 4
Enter the enhancement name and a description
Click the green checkmark icon in Figure 4, which takes you back to Figure 3. Click the green checkmark icon again to save all objects as local. To export the end result table, follow the code in Figure 5.

Figure 5
Export code
To activate this enhancement click the activate Enhancements button at the top of the application toolbar. You have created an implicit enhancement. Now you can call this program from the function.
To develop these function modules, create a function group. In my example I am calling it ZFGRP. Execute transaction code SE80 in the drop-down as shown in Figure 6 to select the function group. Write the name as shown and press Enter. The system then asks if you want to create Group ZFGR. Click the Yes button.
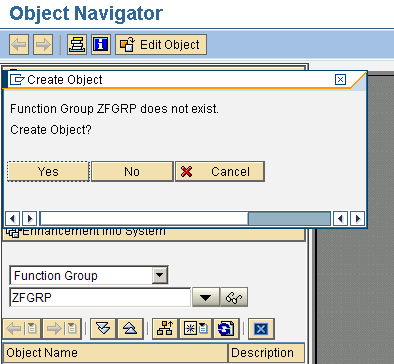
Figure 6
Create the function group
Another pop-up box appears (Figure 7). Enter a short description in the Short text field and click the Save button to save this module as a local object.

Figure 7
Enter a short description of the function group
Now right-click the name ZFGRP (Figure 8). Click the Create button and then select Function Module from the drop-down menu to create a function module.
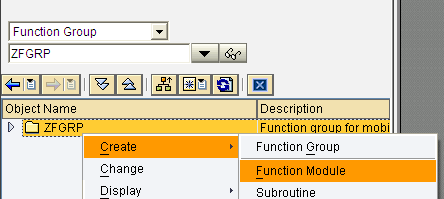
Figure 8
Create a function module
In the next window, enter the module name and a short description. Click the Save button to save your data (Figure 9).

Figure 9
Enter a name and description
The next step is to define the import and tables parameters. After you save the function module data shown in Figure 9, you define the import parameters in the next screen (Figure 10).

Figure 10
Function module import parameters
There are two import parameters shown in Figure 10. The first, AGENT, represents the SAP system user whose inbox is going to be read. TASK is essentially the Task ID defined in the purchasing document workflow. It is for the purchase order/requisition. The workflow ID for a purchase order is WS20000075. The workflow ID for Task ID is TS20000159. These are standard numbers in workflow. Click the Tables tab and define the parameter I_WORKLOAD of associated type SWI_WILIST (Figure 11). This table consists of all the items that need approval.

Figure 11
The table parameter
To view the code for this table parameter, click the Source code tab (Figure 12).
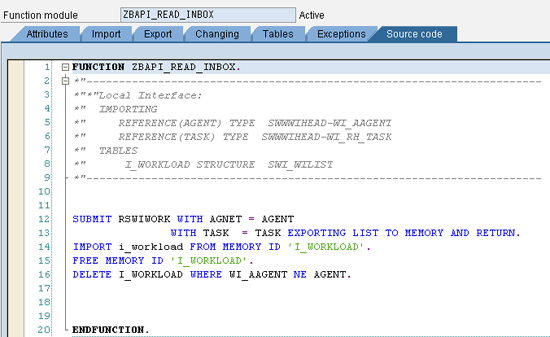
Figure 12
The code displayed in the Source code tab
Use the submit program statement of ABAP to call the program RSWIWORK in your function and to pass the two parameters, AGENT and TASK. Bring the table that you exported from the program shown in Figure 12 using an implicit enhancement with the statement import. Free the reserved memory and delete anything unnecessary using the last delete statement.
Before you go on to develop the next function, open Microsoft .net IDE 2008 Express Edition to start your mobile application development in asp.net. Click the File button and select New Project… from the drop-down menu to bring up the New Project… window (Figure 13).

Figure 13
Mobile application development in Microsoft Visual Studio 2008
From the tree to the left open the menu under Visual Basic and select Web. On the right side, select ASP.NET Web Application. In the Name field enter MobileApplication. Enter the location where you want to save the project and click the OK button (Figure 14).
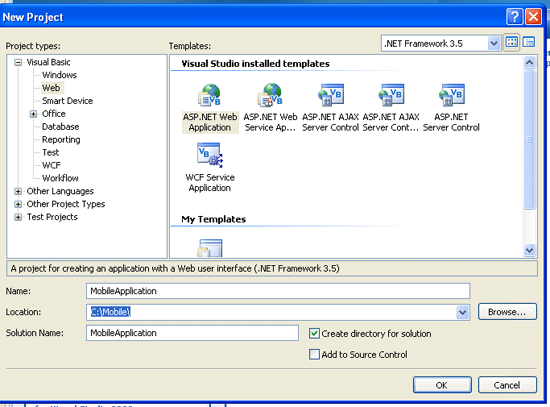
Figure 14
Start the project in Microsoft Visual Studio 2008
In the next screen click the Solution Explorer icon highlighted in Figure 15 to get to the Solution Explorer docking windows. Double-click the Web.config file to open it (Figure 16).

Figure 15
The Solution Explorer icon in Microsoft Visual Studio

Figure 16
Open the Web.config file in Solution Explorer
Add SAP login information into the Web.config file to change from one central location and for security. The Web.config file is an XML file that consists of tags, so it important to add the following tags (Figure 17).

Figure 17
Add tags to the Web.config file
Open Default.aspx in Solution Explorer by double-clicking the Default.aspx file shown in Figure 18.

Figure 18
Open the Default.aspx file
When you create a new solution in a development environment, Default.aspx is inserted. Press Ctrl+S to save the project. The page shown in Figure 19 appears. It is the top-level menu bar in Microsoft Visual Studio 2008.

Figure 19
The Default.aspx page in Microsoft Visual Studio 2008
Click the Table tab from the toolbar in Microsoft Visual Studio and select Insert Table from the drop-down menu (Figure 20). This inserts a table on the page and allows you to place text and controls. Type the words SAP Login information into the blank table.

Figure 20
Select Table from the toolbar
Fill in the number of rows, number of columns, and border size in the Insert Table window (Figure 21). For my example, set the number of rows to three, the number of columns to two, and the border size to one. Press Enter to get the window shown in Figure 22. You do not need to make changes to any other settings. The end result is like what you see in Figure 22.
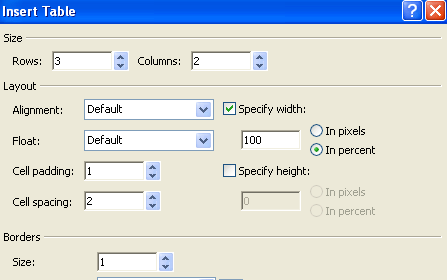
Figure 21
The table information window

Figure 22
Table inserted with two columns and three rows
In the first column of the table write User Name. Click the toolbar icon  . You can also view this toolbar in Figure 20 to open the toolbox. The toolbox window contains controls that you can drag to the page. Drag the text box from the toolbox and place it in the first column in Figure 22. Enter txtusername in the text box. In the second row, write Password. In the next column of the table, add another text box from the toolbox. Name it txtpassword, and in the Text mode property, select a password.
In the third row and second column, add a push button and name it btnlogin. Enter Login in the text property. Add a label from the toolbox to show error messages. The error label displays login errors by using its text property. The Default.aspx file should now look like the one shown in Figure 23. Adjust the column width by moving the mouse over the table lines and dragging the edges of the columns.

Figure 23
The login screen design mode
Now you develop code for login validation in case the user field is blank or there is an incorrect password or user name. You need to add the COM reference to your project. Go to the Project menu and select Add Reference… from the drop-down menu. The Add Reference window now appears. Select the COM tab and scroll to SAP Remote Function Call Unicode Control. Click this name and then click the OK button (Figure 24.)

Figure 24
Add a project reference to an SAP RFC
Click the view code icon  in Solution Explorer (Figure 25) to open the code window.

Figure 25
The Solution Explorer code window
Define the objects and variables. The purpose of each is explained in the notes throughout the code shown in Figure 26.
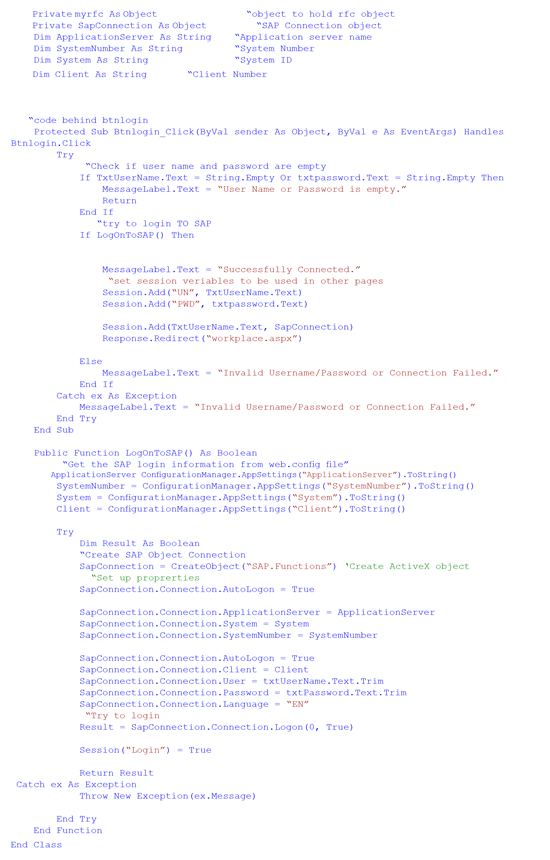
Figure 26
Code for SAP login validation
Now the login page design and coding are complete. When a user successfully logs in, he or she is redirected to the page workplace.apsx. This page shows the user’s purchase requisitions that are waiting for approval.
To add another page to this project, go to the Solution Explorer docking window and right-click the solution named MobileApplication. Click Add and then select New Item… from the drop-down menu (Figure 27).

Figure 27
Add a new page in the project
In the Add New Item window, name the new item Workplace.aspx. Click the Add button (Figure 28).

Figure 28
Select a Web Form
To display the login user name, type Welcome in Workplace1.aspx (Figure 29).

Figure 29
New page
The next step is to place a label and name it lblname. To place the label, click the Toolbox button (Figure 30).

Figure 30
Open toolbox
A toolbox docking window opens on the left side. Select Label from the menu and drag Label to the right side of the page and into the text box in front of the word Welcome (Figure 31).

Figure 31
Place a label control on the page
Double-click the page to get to the code window. In this window, you can develop the code to show the logged-in user. This code shows the user name of the user who has successfully logged in to the application (Figure 32).

Figure 32
Code behind workplace.aspx
Next, add a button for logging off. Choose the button control from the toolbox in IDE and place it on the second line. Name it btnlogoff. Change the text property from button to Log off. Below the Log off button, write this text: Following purchase requisitions need your approval (Figure 33).

Figure 33
Workplace.aspx design
To display work items on this page, you need to add a data grid. Select GridView from the Data menu in the Toolbox and drag GridView view from the toolbox to the page (Figure 34).
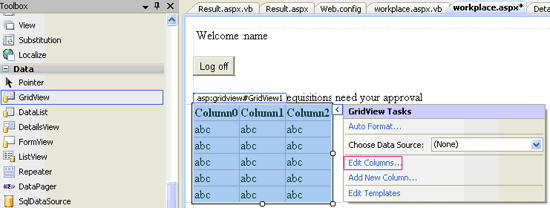
Figure 34
Drag the GridView control to the workplace.aspx page
Click the Edit Columns… button to bring up the window in Figure 34. Uncheck the Auto-generate fields check box. Then add two columns. Select the HyperLinkField from Available fields and click the Add button. Then select the BoundField field and click the Add button. These type of columns are already available in grid control. To set properties, enter the first column header text as WorkPlace. Enter the creation date in the header text of the second column. In the property DataNavigated enter the name of your column, WI_TEXT, and name the second field WI_CD (Figure 35). You can view the properties of Field 2 by selecting it. Click the OK button to create these two fields in the data grid.

Figure 35
Create GridView fields
Figure 36 shows the final design for workplace.aspx.
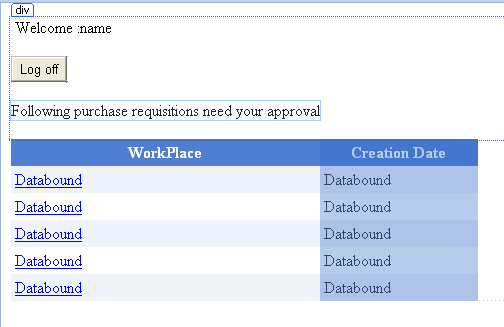
Figure 36
The final design of page workplace.aspx
Double-click the page shown in Figure 36 to get to the code window. Comments are provided throughout the code in Figures 37 and 38 for explanation.

Figure 37
Variable declaration
The RFC_Function is the object used to call the SAP RFC function. SapConnection is the object used with the SAP system. Put the SapConnection object in your application session, and you can access it from there. Use BAPIReturnedTable to access the exporting the table I_WORKLOAD.
ZPRRELTable is the data source for your grid control. Use ZPRRELRow to populate rows and add it to your table, ZPRRELTable. Next, code the page load event to get the data from the SAP system. Use the code shown in Figure 38.

Figure 38
Fetch work items from the SAP system
Now, design the detail.aspx Web page for your project. Right-click the project in Microsoft IDE and add a new item. Select the Web form and name it Detail.aspx. Add two labels and three buttons to the page.
Name the label lblprno and for gross price write in lblprice. Name the buttons btnapprove, btnreject, and btncancel. Enter Approve, Reject, and Cancel in the properties of the buttons. The end result should look like the screen shown in Figure 39.

Figure 39
Display purchase requisition and gross price
Now create an RFC function in the SAP system to get the gross price of the purchase requisition. Execute transaction code SE37, and in the screen that appears, name the function ZBAPI_PR_GROSS_PRICE. Click the Create button (Figure 40).

Figure 40
Create an RFC function
Purchase requisition number BANFN is your import parameter. Calculate the total price as shown in Figure 41. The export parameter name GSWRT returns the total price.
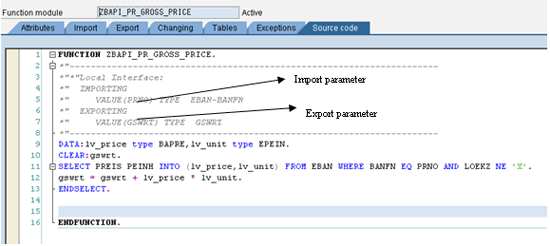
Figure 41
Create a function to get the gross price
Click the Attributes tab (refer back to Figure 41) and select RFC function so that you can call this function remotely. Figure 42 shows the code for the requisition number and the gross price. Comments are provided for reference.
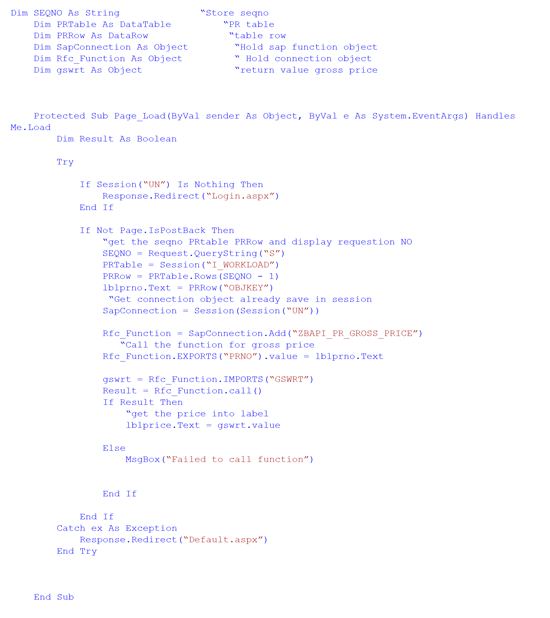
Figure 42
Get the gross price of the requisition
Next, you need to develop the code for the approve button. First, you need the release code for a specific purchase requisition. You have to use WORKITEM_ID for the call function module to get the release code from its workflow container. The name of the function module is ZBAPI_WAPI_READ_CONTAINER. WORKITEM_ID is the only import parameter, and it returns the release code from the workflow container (Figure 43). You can see the code and import and export parameters defined in Figure 43, which shows the import and export parameters in the code window.

Figure 43
Function module to read the release code from the workflow container
Figure 44 shows the code you use to release code from the workflow container.

Figure 44
The release code from the workflow container
Now you approve the document by using the SAP standard BAPI, BAPI_REQUISITION_RELEASE_GEN , as shown in Figure 45.
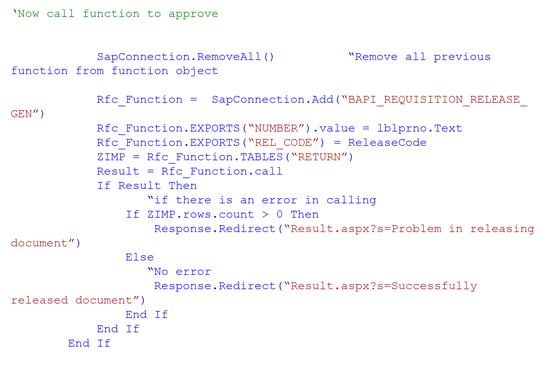
Figure 45
Release/Approve document
To reject the requistion, you need to develop a function module because there is no BAPI available in the SAP system for the rejection purpose. Figure 46 shows the details of the BAPI with the import and export parameters.
The export parameter has the Name BANFN and the Type BANFN. The Export Parameter Return has the TypeBapiret1. Again execute transaction code SE37 and enter the function name and a short description.
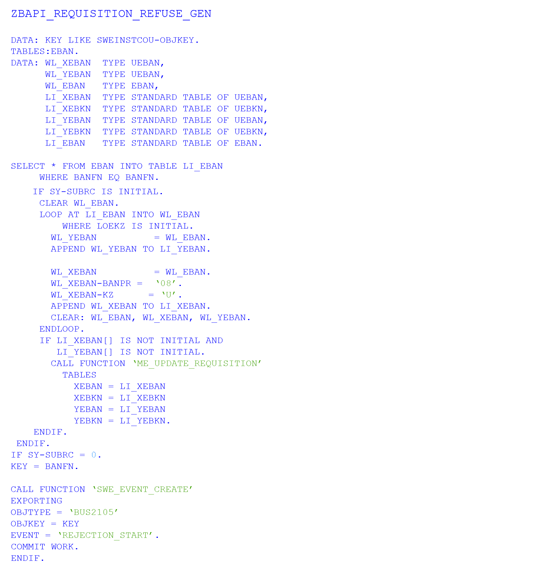
Figure 46
Function module code to reject the purchase requisition
Now, develop your code in the asp.net application (Figure 47). Double-click the reject button as shown in Figure 39.

Figure 47
Call the reject funciton in the SAP system
Double-click the cancel button and write the line of code in Figure 48 to make the code workable.

Figure 48
Redirect back to inbox
Now you can publish this as an asp.net application on a Web domain. You can secure this site by using an SSL certificate, but that discussion is beyond the scope of this article. Now, run the application using your SAP user name and password to log in.
You can see a list of purchase requistions in your inbox. Click any requisition and on the next page use the approve or reject as needed.
Fahim Ahmad
Fahim Ahmad is a senior ABAP consultant for Descon Engineering Ltd. He has master’s degrees in statistics and computer science from the University of Punjab in Lahore, Pakistan. He has 10 years of experience as a software engineer. Fahim specializes in ABAP enhancements and reports, workflow, RFC programming, interfacing, OLE, and SAP Web services configuration and development.
You may contact the author at fahim119@gmail.com.
If you have comments about this article or publication, or would like to submit an article idea, please contact the editor.


