Since the beginning of the SAP R/3 system, SAP has provided transaction MASS for mass maintenance of master data. Mass maintenance means that per object type you can maintain several objects simultaneously. Examples of object types are cost center, customer, and purchase order. It is now possible to upload the changes to be made using a Microsoft Exel file. The advantage of uploading changes to be made via an Excel file is that you can execute multiple changes at the same time instead of one by one.
Key Concept
Transaction MASS is a cross-application transaction to be used for mass maintenance of master data.
In several situations you need to do a mass update of specific data—for instance, during a project or when master data that is already uploaded must be changed because of changing requirements. In the SAP system there are several alternatives to do such a mass update. You can use specific transactions to do the update. An example is the Display Customer Line Items transaction (transaction code FBL5N) that you can use to change all selected items. Other examples are Customer Master Mass Maintenance (transaction code XD99) and Mass Changes in Project System (transaction code CNMASS).
SAP has combined the maintenance of many master data objects in transaction MASS. When you start transaction MASS you can choose from 20 object types each representing a master data object.
Figure 1 shows which object types currently are supported.

Figure 1
Object types in transaction MASS
Preparing the Excel File
In my example I want to update the field User responsible for several cost centers. This means that I must be able to identify the cost centers that I want to change. Normally, you identify a cost center by its cost center number and the company code. Therefore, I create an Excel file with these three fields: Company code, Cost center, and User responsible. The sequence of the fields is not important.
Figure 2 shows how my file might look. I have used a header line (in yellow) as this makes it easier to understand the meaning of the columns. However, the use of a header row is not required. You can use as many columns as you require.
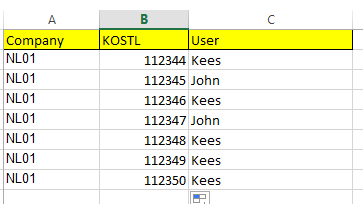
Figure 2
Example Excel upload file – version 1
I have three header fields that are called Company (for the company code), KOSTL (for the cost center number), and User (for the user responsible). I have used KOSTL to identify the cost center number column. KOSTL is the technical field name for the cost center number. Because I used a technical name, transaction MASS will automatically identify what is in the column with that technical name.
This small example shows the advantage of the upload. When entering changes directly in transaction MASS you can only update one value at the time. So first you can change only the cost centers that have responsible user Kees. Then you can change the cost centers that have responsible user John. Via the upload functionality you can do it in one go. In principle my file is now ready for the upload.
Upload the File
Now start transaction MASS. On the start screen,
Figure 3, you must enter the object type that you want to maintain. In this case I select BUS0012. In
Figure 1 you can see that BUS0012 is the object type belonging to cost centers.

Figure 3
The start screen for transaction MASS
After selecting the object type, click the execute icon at the top of the screen. In the next screen (
Figure 4), you need to indicate which part of the object type you want to maintain. In my example I want to maintain cost center master data (and not the texts). Therefore I need to select the line for the cost center master data by clicking the select icon in front of the line. To import the Excel file click the Import Data from File button. This button is found at the top of the screen.
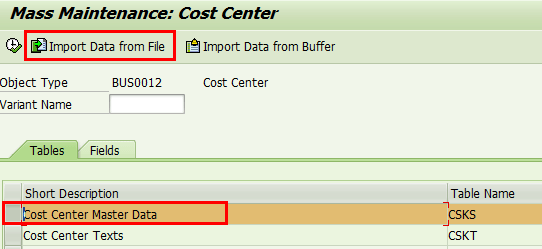
Figure 4
The detail selection screen for transaction MASS
The system then asks you to select the file to be uploaded. This selection is not shown because it is very basic.
After you select the file, a pop-up screen appears (
Figure 5). This pop-up screen allows you to set upload parameters. You can indicate the date format and decimal format that you are using in the file. For my example I only needed to indicate that I am using a file with a header line. All other parameters are already correct.
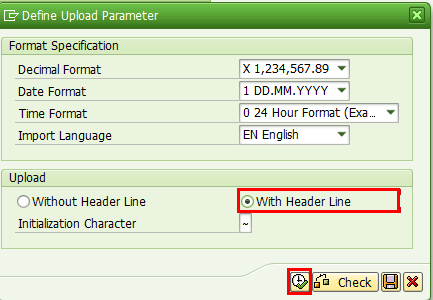
Figure 5
Pop-up screen for upload file parameters
After entering the parameters click the execute process icon at the bottom of the pop-up screen to start the upload process. You may get a warning that the file is read only, but you can ignore that warning.
The screen looks like the one in
Figure 6. When you look at the data part of the screen, you can see two types of icons. An icon with a green dot is vertically centered between Cost Center and KOSTL. This green dot icon indicates that the system knows what data is found in that column.

Figure 6
Preview uploaded file
The other two columns have an icon with a gray dot. This indicates that the SAP system doesn’t know which field is contained in columns A and C. (If the system knew, then the field description would have been used as in the case of the second column.) You must make a mapping for those two columns.
To map the cost center field to a column, double-click the gray dot icon. The cost center fields that are not yet assigned are shown in a pop-up screen (
Figure 7).
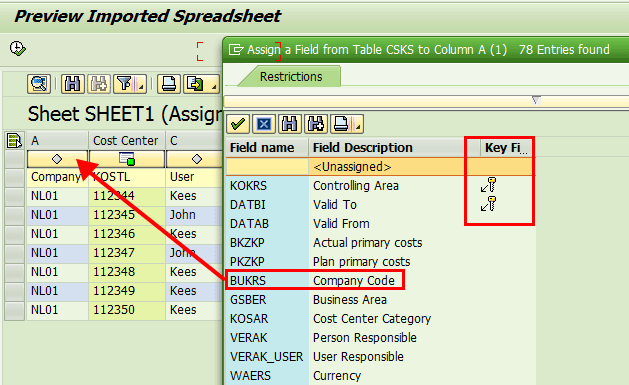
Figure 7
Mapping fields
For the first column double-click the line Company Code. The pop-up screen disappears, and the company code field is linked to the first column (in my example, A changes to CoCode [company code]). The result is that now the first two columns show a green dot icon and have a field name instead of a letter (
Figure 8).
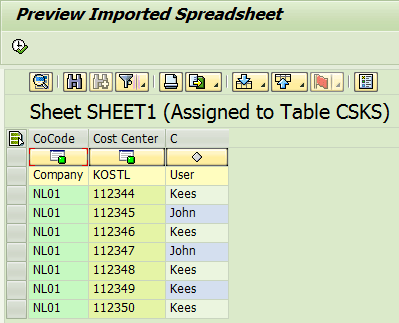
Figure 8
Result of mapping the company code field
However,
Figure 7 shows something you always need to take into consideration. On the right side of
Figure 7 you see two key symbols. They indicate key fields. For cost centers the controlling area and Valid-to data are key fields. The cost center number is also a key field, but that field has already been selected, and therefore, is not shown. All key fields must be part of the upload file. The consequence is that I need to update my upload file.
In
Figure 9 you can see the two additional columns for the key fields.

Figure 9
Adjusted upload file
Figure 7Figure 10
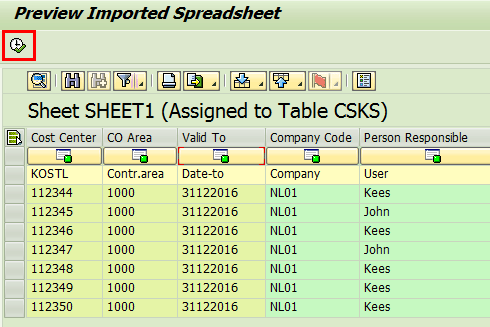
Figure 10
File ready for upload
To execute the actual update click the execute icon at the top left. If there are no errors so that all changes can be executed, the transaction confirms the updates as shown in
Figure 11.
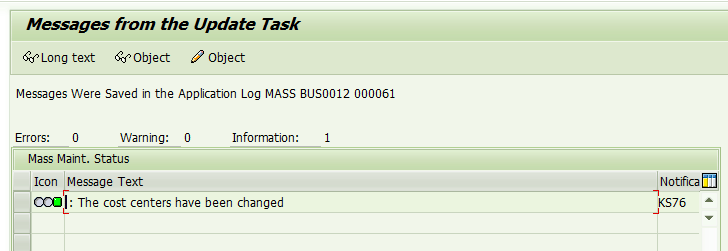
Figure 11
Confirmation of the changes
In case of missing master data you see an overview as shown in
Figure 12. The overview shows all changes that can be executed and a list of master data that is not found. When you click the save icon, found at the top of the screen, all possible changes are executed.

Figure 12
Overview of updates and errors
Note
Errors that occurred during the actual update are shown on the screen in Figure 11.
When you click the save icon, at the top of the screen in
Figure 12, all possible changes are executed.
Note
If there were errors during the actual update, they would be shown in Figure 12.
The new functionality of transaction MASS makes this a simple version of Legacy System Migration Workbench (LSMW). However, MASS doesn’t allow you to upload new master data. Also there is no functionality to build in any logic in the upload.
When you use MASS without the file upload, there is a limitation of 19 fields that can be selected. With the file upload the limitation to 19 fields is no longer applicable.
Kees van Westerop
Kees van Westerop has been working as an SAP consultant for more than 25 years. He has an MBA degree in mathematics and a degree in finance. Kees has been concentrating on the financial modules, especially in general ledger accounting, cost center accounting, and consolidation. He also has a great deal of experience with rollouts of kernel systems and integrating finance and logistics.
You may contact the author at
keesvanwesterop@hotmail.com.
If you have comments about this article or publication, or would like to submit an article idea, please contact the
editor.


