Sarah Lottman shows how to configure the new SAP Web Integrated Development Environment (SAP Web IDE) and connect it to your on-premise systems using HANA Cloud Connector.
Key Concept
SAP Web Integrated Development Environment (Web IDE) was formerly known as the River Rapid Development Environment (River RDE). It is a browser-based development platform that contains numerous built-in tools to allow you to rapidly and easily create SAPUI5 applications and extend SAP Fiori applications.
The new SAP Web Integrated Development Environment (Web IDE) is a tool you can use to quickly and easily create new SAPUI5 applications from scratch and extend existing Fiori applications. It includes the ability to connect the Web IDE to your on-premise systems. Connecting the Web IDE to your on-premise systems allows you to bring in all SAP-delivered and custom Fiori applications. You can bring the Fiori applications into the Web IDE tool, make changes to the applications, and then deploy them back to the on-premise systems to be consumed by users. The on-premise systems can be SAP HANA or non-SAP HANA systems. The system used in my example is non-SAP HANA.
This guide gives you step-by-step instructions on how to connect your on-premise SAP systems to the Web IDE using the SAP HANA Cloud Connector. The basic architecture consists of the following components:
- Web IDE – Browser-based development system for Fiori
- SAP HANA Cloud Cockpit – Allows you to manage all SAP HANA Cloud accounts and Web IDE applications
- SAP HANA Cloud Connector – Serves as the link between your on-premise SAP systems and the Web IDE
Prepare the HANA Cloud Cockpit
In the first step you enroll for the SAP HANA Cloud Cockpit and provision it to be ready for development using the Web IDE. Sign up for a free trial account to the SAP HANA Cloud Cockpit at
https://account.hanatrial.ondemand.com. Once you have successfully enrolled, click the Subscriptions button shown in
Figure 1.

Figure 1
HANA Cloud Cockpit options
Next, click the New Subscription… button in
Figure 2 and select webide from the list of available options.

Figure 2
Add a webide subscription
After you select webide, a green circle appears under the State column as shown in
Figure 2. This circle indicates that the subscription was successfully added. Click the webide link under the Name column. This action takes you to
Figure 3.

Figure 3
The webide URL
Copy the Application URL (
Figure 3) and enter it into a web browser (Google Chrome or Mozilla Firefox are the recommended browsers). You use this URL to access the Web IDE, so bookmark this page.
Next, you add some destinations. This step is necessary for the Web IDE to access the SAPUI5 libraries. In the SAP HANA Cloud Cockpit shown in
Figure 1 click the Destinations button.
In the screen that appears click Add Destination and enter the following values (
Figure 4):
- Name: ui5dist, which is the name of the connection to the SAPUI5 libaries
- Type: HTTP, which establishes the connection type (always HTTP for a web connection)
- URL: https://sapui5.hana.ondemand.com/sdk/resourses. Ensure that the URL is correct. Each time SAP releases a new version of SAPUI5, the libraries are automatically updated to this URL.
- Proxy Type: Internet
- Cloud Connector Version: 2. This defaults to the latest version of the Cloud Connector (in my case it is 2). Leave this field as the default so that the latest version is used.
- Authentication: NoAuthentication as no authentication is needed to access SAPUI5 libraries

Figure 4
ui5dist destination
You can now access the SAPUI5 library and tools using the Web IDE. You need to add your on-premise system to the SAP HANA Cloud Cockpit. First, gather some required information from the on-premise system. Open your SAPGUI connections, highlight the system to which you want to connect, right-click the Connection Name, and go to Properties. Note the information that is in the System ID: field (
Figure 5).

Figure 5
The system ID
Next, log in to the SAP system and execute transaction code SMICM. For the HTTP Protocol, note down the Service Name/Port and the Host Name, as shown in
Figure 6.

Figure 6
Get the Service/Host Name
You now have all the system information needed to add your on-premise system to the SAP HANA Cloud Cockpit. Go back to the Cockpit and click the Destinations button (
Figure 1). Click Add Destination again and enter the following parameters as shown in
Figure 7:
- Name: System ID (You obtain this name from Figure 5.)
- Type: HTTP
- URL: https:// Host Name: Service Name/Port (Figure 6)
- ProxyType: OnPremise
- Cloud Connector Version: 2. This defaults to the latest version of the Cloud Connector (in my case it is 2). Leave this field as the default so that the latest version is used.
- Authentication: My system is configured to accept Basic Authentication; this may vary depending on your system security settings.

Figure 7
On-premise configuration
Click the Save button. The system has been added, so now you need to configure some additional properties to be able to use the Web IDE.
Navigate to Destinations by clicking the Destinations button in the SAP HANA Cloud Cockpit (
Figure 1). Click the Edit Button by the Destination that you just added for the on-premise system. Click the New Property button and add the following properties shown in
Table 1:
- The WebIDEEnabled property allows you to use the Web IDE tool to deploy applications to the on-premise system.
- WebIDESystem identifies the SAP system that you plan to use.
- WebIDEUsage specifies all the actions that you can use in the Web IDE against the on-premise system.

Table 1
webide properties
The final result should look like
Figure 8.

Figure 8
The webide configuration
Install the SAP HANA Cloud Connector
The SAP HANA Cloud Cockpit is fully configured. The next step is to install and configure the SAP HANA Cloud Connector. The Cloud Connector is used to connect the on-premise systems to the Cloud Cockpit. This connection allows you to pull in existing Fiori applications as well as OData services from the SAP back end.
Note the prerequisites for installation:
Go to the following link and download the SAP HANA Cloud Connector Developer edition for your operating system. It will be either the .zip file (Windows) or the .gz file (Linux):
https://tools.hana.ondemand.com/#cloud
After you download the file, extract the zip file to any location. Open the extracted folder and double-click the go.bat file. A command window appears (
Figure 9).
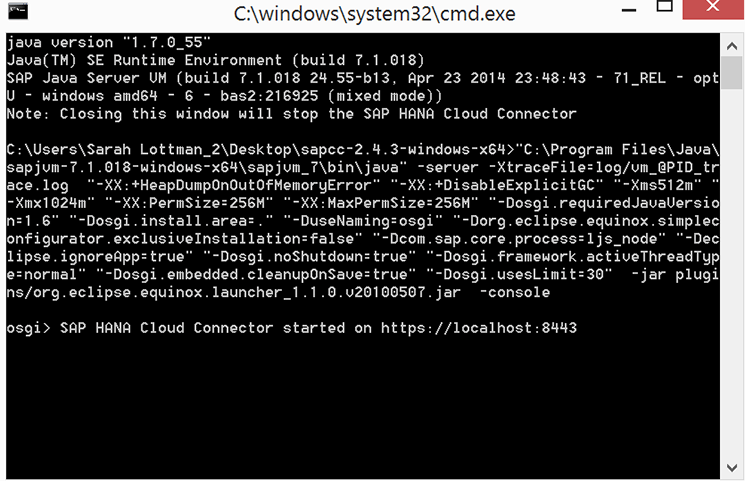
Figure 9
HANA Cloud Connector command
The SAP HANA Cloud Service is now running, and you are ready to set up your account. Open a web browser and enter the following link:
https://localhost:8443. The SAP HANA Cloud login window appears (
Figure 10).
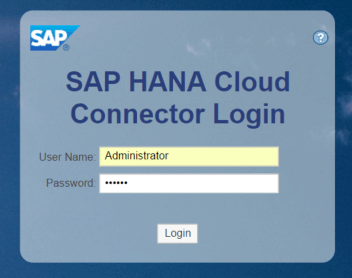
Figure 10
Log in to the HANA Cloud Connector
The default user name is Administrator and the initial password is manager. After you log in for the first time, you are required to change your password. You now need to connect the Cloud Connector to the SAP HANA Cloud Cockpit. After you change your password, you are prompted for some initial configuration details. Enter the items listed in the following fields:
- Landscape Host: hanatrial.ondemand.com
- Account Name: Your trial user name on HANA Cloud Cockpit
- User name: Your SAP S-User ID
- Password: Your SAP S-User password
You end up with a screen similar to the one shown in
Figure 11.

Figure 11
HANA Cloud Cockpit configuration
After you provide the configuration information, you are logged in to the SAP HANA Cloud Connector. Now you are ready to connect your on-premise system. Click the Access Control button in the list on the lower left of the SAP HANA Cloud Connector (
Figure 12).
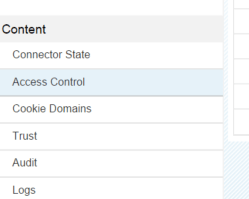
Figure 12
HANA Cloud Connector options
Click the Add Button and provide the details in the following fields (The host name and port were obtained in step 1 [
Figure 6]):
- Virtual Host: Host Name (from step 1)
- Virtual Port: Port (from step 1)
- Protocol: HTTP
- Back-end Type: ABAP system
You now need to specify the paths to which you need access on the on-premise system. For the Web IDE, you want access to the Fiori/UI5 applications as well as the OData services. Highlight the system that you just added and click the Add... button under Resources (Figure 13).

Figure 13
Add resources
A pop-up screen appears (
Figure 14). Select the Enabled check box and enter/sap/bc/ui5_ui5 in the URL Path: field. This is the SICF path to all SAPUI5 applications in your on-premise system. In the Access Policy: field, select the Path and sub-paths button. This option enables you to access all subnodes.
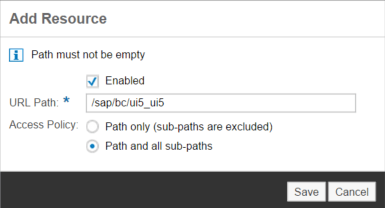
Figure 14
Configure paths
Repeat this step for the following paths using the same properties as those shown in
Figure 14:
- /sap/bc/adt: Path to ABAP Development Tools
- /sap/opu/odata: Path to OData services
After you enter this information, click the Save button. If the connection is successful a green circle appears in the State column. Click Connector State, located in the list at the top of
Figure 12. This action takes you to the Connection State of SAP HANA Cloud. This step ensures that all connections are established correctly.
If the Cloud Connector setup was successful, you should see green indicators next to Landscape Host and HTTPS Proxy as shown in
Figure 15.
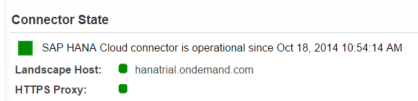
Figure 15
The status of the Connector State configuration
Launch to Web IDE
The SAP HANA Cloud Cockpit and the SAP HANA Cloud Connector are now configured. You are ready to launch the Web IDE. Open the page that you bookmarked in step 1. The SAP Web IDE is launched and takes you to
Figure 16.

Figure 16
SAP Web IDE
Create a New SAPUI5 Application Using OData Services from the On-Premise SAP System
Now that the Web IDE is connected to the back-end SAP instance, you are ready to start developing Fiori applications. This portion of the article describes the development tools available to create a custom SAPUI5 application using OData services from the on-premise system configured in the previous sections.
The ability to use templates to quickly create custom SAPUI5 applications is useful. To create a simple SAPUI5 application using a template, go to the Web IDE tool shown in
Figure 16. Click File > New > Project and enter a name in the Project Name field (
Figure 17).
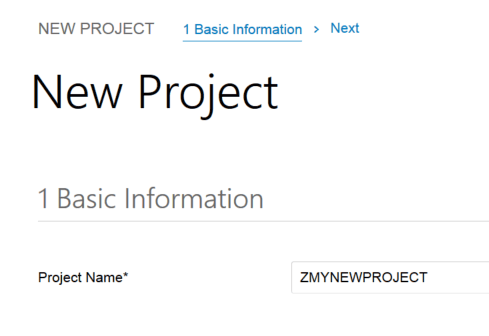
Figure 17
New project
Click the Next button. If you look at the drop-down of templates, several options are presented. Select SAPUI5 Mobile Application as shown in
Figure 18.

Figure 18
Select the application type
Click the Next button. You are now presented with the option to add OData services (
Figure 19). Select an existing service from the on-premise system. Under the Service Catalog select the system that was configured above (ED1) and select an SAP-provided OData service. The system selection is a drop-down menu that contains all connected systems. When selecting the OData services, you can type in a few words to narrow down the search; otherwise, you get a large list (
Figure 19).
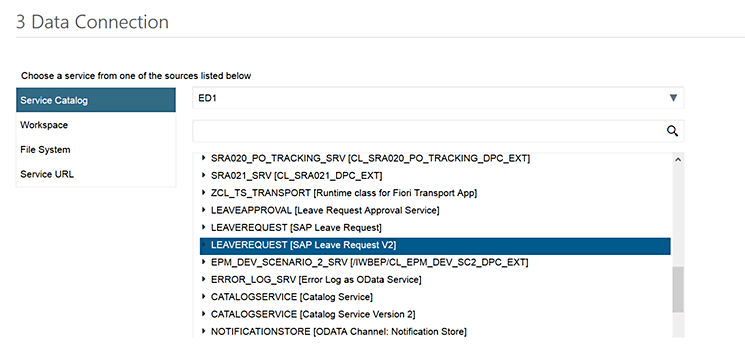
Figure 19
OData services
Click the Next button, which navigates you to
Figure 20. Now you are presented with the option to customize the template. The template is composed of the standard SAPUI5 Master/Detail view. Enter the following information under Project Settings and Master Section:
- Project Namespace: The Fiori project name that is created in the Web IDE workspace
- Title: The text entered here is displayed in the Title Bar of the application
- OData Collection: The collection used in the master list
- Search Placeholder: The help text that is displayed to the user in the Search Field – this field is used to search the master list
- Search Tooltip: When you hover your cursor over the Search field, a tooltip is displayed. The text entered here is the text that is in the tooltip.
- Search Field: The field used to search against when you search the master list
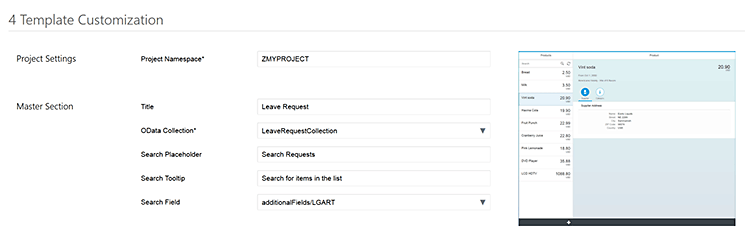
Figure 20
Customize the template
Enter the information under Main Data Fields and Detail Section as shown in
Figure 21. Note that
Figure 21 is a continuation of
Figure 20.
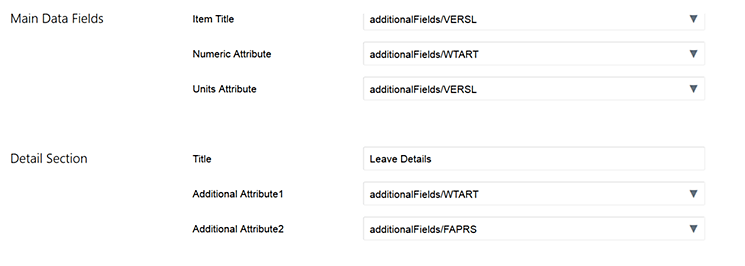
Figure 21
Customize additional fields in the template
Click the Next button and then the Finish button, which navigates you to the main Web IDE development view. The new project is now created in your Web IDE workspace.
Figure 22 shows you the newly created project.
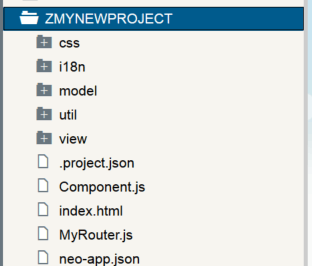
Figure 22
The IDE workspace
Now you can test the newly created SAPUI5 application. Select the index.html file (shown in
Figure 22) and right-click it. In the menu choose Run > Run without Frame. The new application is now launched in a new tab (
Figure 23).
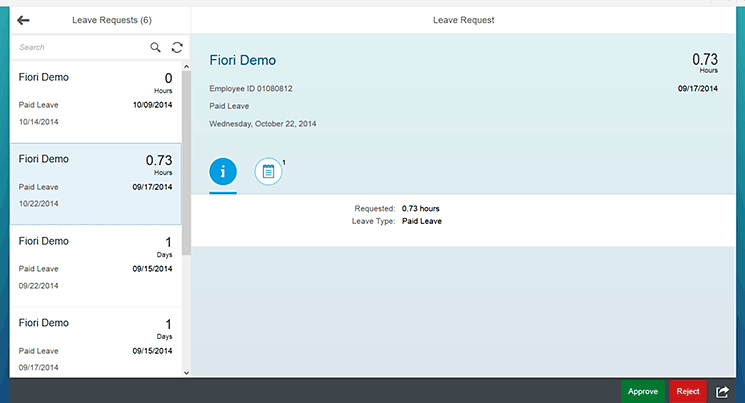
Figure 23
Fiori application
The final step in the process is to deploy the application to your on-premise system. To do that, right-click the project in the Web IDE (
Figure 22). Click Deploy > Deploy to SAPUI5 ABAP Repository. Select your back-end system and ensure that the radio button Deploy a new application is selected as shown in
Figure 24.
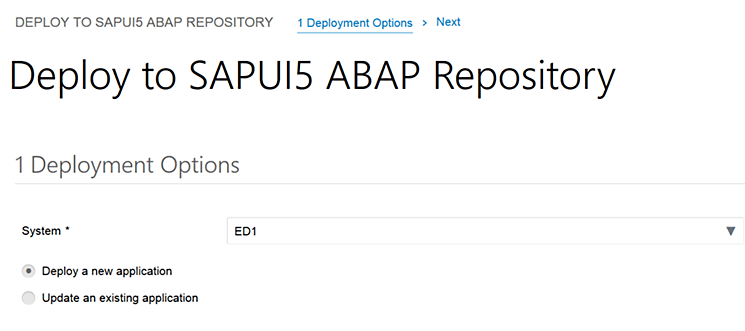
Figure 24
Deployment options
Enter a name for the application, which will create a new Business Server Page (BSP). Select a development package (
Figure 25). Note: The name must begin with a Y or Z to follow SAP’s naming convention rules. You can search for existing development packages in your on-premise system by clicking the Browse button, or if you know the name, you can enter it in the input field.
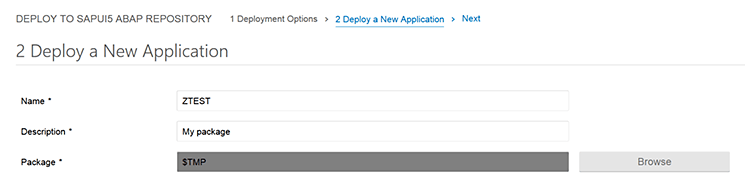
Figure 25
Package options
Click the Finish button. The application is now deployed to the on-premise system. Using pre-defined templates, you can create custom SAPUI5 applications. The above example only showcases one SAPUI5 template. There are several, and I recommend using the different templates to realize the functionality available in the Web IDE.
How to Extend an Existing SAP Fiori Application Using the Web IDE
My objective is to extend an SAP standard Fiori application using the Web IDE. Using this tool, I plan to hide some unnecessary fields from the SAP-delivered Leave Request Fiori application. This section includes a description of the various tools available as well as a real-world example of extending the application and deploying it to the SAP server. From the main Web IDE development view(
Figure 16), click File > New > Extension Project to go to
Figure 26.
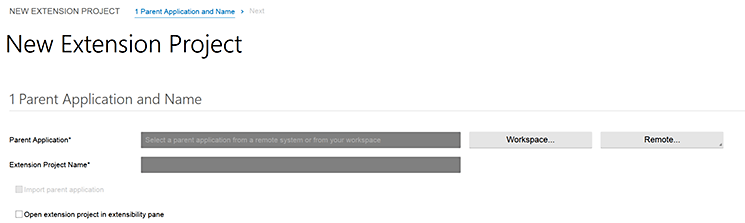
Figure 26
New Web IDE extension project
After you click the Remote… button, a list appears that has all your connected on-premise systems. Select the system that you want to use. After you’ve selected your system, a pop-up screen appears that has all existing Fiori applications installed in your back-end system. Note that all applications are available, including custom Z applications that have been developed. This is useful because using the Web IDE you are able to easily extend and enhance all Fiori applications.
Select a standard SAP Fiori application. My example uses HCM_LR_CRE, which is the Fiori application for creating Leave Requests (
Figure 27). Click the OK button after selecting an SAP Fiori application.
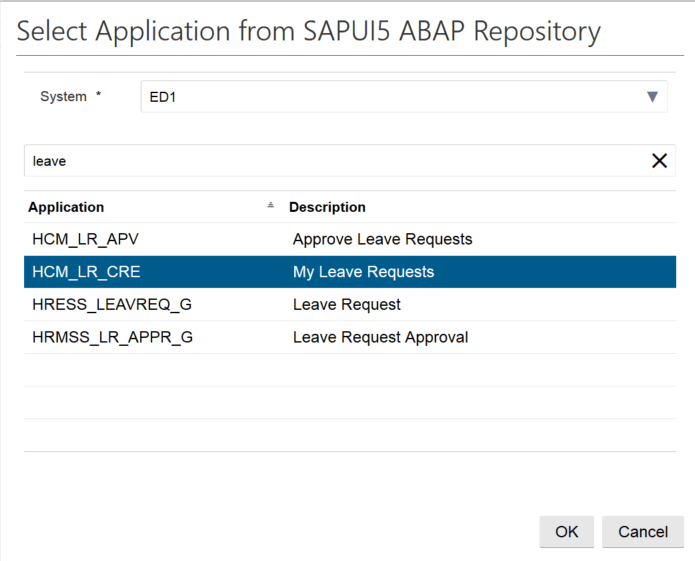
Figure 27
Application selection
Check the Open extension project in extensibility pane check box shown in
Figure 28.

Figure 28
Application selection options
Using this tool you can modify Fiori applications without programming. This feature is useful for hiding unnecessary fields on the Leave Request screen. Click the OK button, the Next button, and finally the Finish button.
After the project has been built, the extensibility pane opens with the Leave Request application displayed. Note: This preview pane is bringing in the actual Fiori application from your back-end system. Therefore, all data provisioned in the back end for the logged-in user in the Web IDE is displayed.
The view displayed in
Figure 29 is the initial screen for the leave request application. A calendar is displayed that shows the time off requested by the user.

Figure 29
Extensibility pane
When the pane launches, you are in Preview Mode. Because you want to make changes to the application using the extensibility pane, switch from Preview Mode to Extensibility Mode by clicking the drop-down menu in the menu bar at the top of the screen (
Figure 30).

Figure 30
Extensibility mode
Notice that all the UI5 controls are listed on the right side of the screen. Switching to Extensibility Mode allows you to highlight the controls on the application and the corresponding control is shown in the list (
Figure 31).
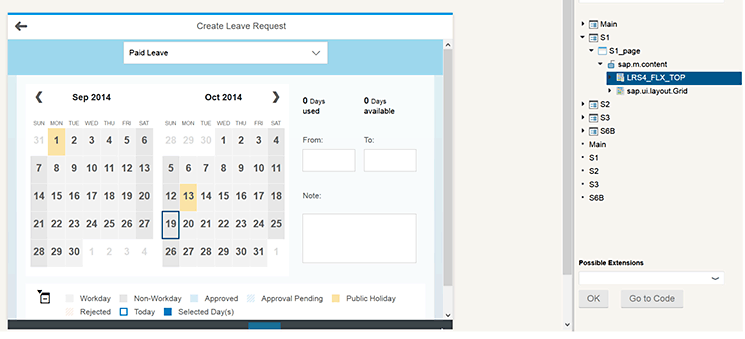
Figure 31
Extensibility controls
Using the extensibility pane you want to hide some controls on the screen. For example, my company does not use Time to enter Leave Requests. All leave requests must be requested for a full day. As you can see in
Figure 32, the From: and To: fields enable the user to enter a partial day leave. You need to remove this option. To hide controls, select the control that you want to hide. Notice that under Possible Extensions in
Figure 32, Hide Control appears.
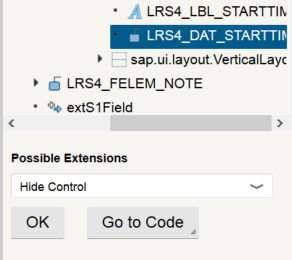
Figure 32
Hide controls
Hide these four controls:
- LRS4_LBL_STARTTIME(Label for Start time)
- LRS4_DAT_STARTTIME(Text for Start time)
- LRS4_LBL_ENDTIME(Label for End time)
- LRS4_DAT_ENDTIME(Text for End time)
Each time you hide a control the word Hidden appears next to the control in the list, as shown in
Figure 33.
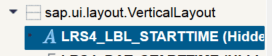
Figure 33
Hidden controls
You must refresh the screen to see the changes. After you have hidden all four of the above controls, press the F5 key to refresh the view. The refreshed screen looks like
Figure 34.

Figure 34
Extended application
Now you have no Start/End times listed for the leave request.
The extensibility pane is used to hide controls without programming. The tool also enables you to replace an existing view or controller with a custom one. In the list that shows all UI5 controls (
Figure 31), all views and controllers are visible and are shown in
Figure 35.
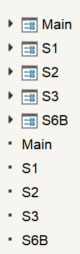
Figure 35
Views and controllers
The views are listed at the top with the SAPUI5 controls underneath. The views are denoted by an arrow next to them, and when expanded, show the SAPUI5 controls. The controllers are the stand-alone elements listed at the bottom. Highlight any view listed, and look at the extension options available, (
Figure 36).
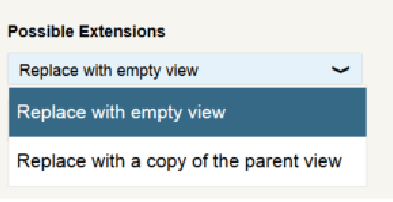
Figure 36
Extensibility options
You can either replace the entire view with a custom one (Replace with empty view), or you can bring in all existing code from the original view (Replace with a copy of the parent view) and modify it as needed. This feature is useful if you want to add additional fields or logic to the application.
Sarah Lottman
Sarah Lottman has more than seven years of technical experience in SAP user interface technologies, including SAPUI5, Fiori, and Web Dynpro. Sarah worked at SAP as a technology consultant helping customers build desktop, tablet, and mobile applications that interface with SAP. She currently works as a senior software developer for SAP Custom Development and is working on new user interfaces for S4/HANA. She graduated from the University of Central Oklahoma with a bachelor of science degree in computer science and holds numerous certifications including ITIL, SAP HANA, and SAP ABAP.
You may contact the author at
sarah.lottman@sap.com.
If you have comments about this article or publication, or would like to submit an article idea, please contact the
editor.