See how to use the Adapter Development Kit (ADK) to develop new adapters for SAP HANA Cloud Integration (SAP HCI). You apply the ADK to build a connector to content management systems adhering to the Content Management Interoperability Services (CMIS) standard. You can then use the new adapter to move documents from and to different folders of the publicly available Alfresco CMIS server.
Key Concept
Transferring documents between enterprise content management systems is a frequent task in real-life integration scenarios. So far, however, different vendors have come up with their own proprietary Application Programming Interfaces (APIs) for accessing their respective systems. Fortunately, in May 2010, content management system vendors agreed upon a harmonizing standard, the Content Management Interoperability Services (CMIS) standard. It allows for open interoperability between content management systems of different vendors across the Internet. They use web protocols to communicate with each other. The standard is under the control of the Organization for the Advancement of Structured
SAP HANA Cloud Integration (SAP HCI) is SAP’s integration solution for connecting to a multitude of systems, in the cloud and on premise. It comes with a number of adapters that allow communication with other systems on different levels, including different technologies, security standards, and application-specific requirements.
Typical examples are adapters connecting to Twitter, Ariba, and SuccessFactors applications, or adapters connecting via protocols such as HTTP, Simple Object Access Protocol (SOAP), IDoc, Open Data Protocol (OData), or Secure File Transfer Protocol (SFTP). However, SAP will never be able to cover the huge variety and combinations of applications, protocols, security, and versions solely on its own. This gives customers and partners the unique opportunity to fill those gaps by providing their own adapters.
That brings us to the question of how you develop adapters for SAP HCI. That is what we cover in this article. We show how to develop and add a new Content Management Interoperability Services (CMIS) adapter to the palette of existing SAP HCI adapters.
The CMIS adapter represents a means to connect to any content management system following this standard. It is an ideal candidate to explain SAP HCI’s adapter development process. At the same time you will learn how to connect to non-SAP systems because we connect SAP HCI to a free, publicly available content management system provided by Alfresco. The overall scenario we are going to implement looks like what is shown in Figure 1.

Figure 1
Copying documents between folders of a document repository in a public cloud
First, we show how to pull a document from a folder of a content management system using our own newly developed CMIS adapter. After processing the data on SAP HCI we again make use of our CMIS adapter to push the document back into a different target folder on the same content management system. Although we are using the Alfresco CMIS server in this article, the adapter can also work in combination with SAP’s own SAP HANA Cloud Platform (SAP HCP) Document Service as well as with any other CMIS-compliant server. For more details about the document service provided by SAP HCP go to https://help.hana.ondemand.com/help/frameset.htm?e60b7e45bb57101487a881c7c5487778.html. So without further ado, let’s get started.
The Adapter Development Kit (ADK)
In previous parts of this series about developing integration scenarios for SAP HCI, we frequently referred to the Apache Camel engine as the central integration framework working under the hood of SAP HCI. When it comes to the development of adapters for SAP HCI it essentially means developing adapters for Camel. The official term for adapters in Apache Camel’s nomenclature is components. Camel is an open-source framework and a lot of articles have been published online explaining how to implement components to increase Camel’s connectivity options.
See, for example, Camel’s official documentation web page for component development at https://camel.apache.org/writing-components.html. We also recommend you take a closer look at Camel in Action, by Claus Ibsen and Jonathan Anstey, published by Manning Publications Co. Chapter 11.3 is spent entirely on Camel components. Finally, for getting an impression about already-available Camel components, we recommend the web page https://camel.apache.org/components.html.
To make those components enterprise ready, you need to provide a configuration user interface (UI) for the adapters in SAP HCI’s WebUI, as well as for the integration of components within SAP HCI’s monitoring infrastructure. More than writing a simple Camel component is necessary. That’s the reason SAP released the ADK for SAP HCI in August 2015.
Here is the trick: Once you have developed a component following the Apache Camel guidelines described in the various resources mentioned above, the ADK allows you to wrap that component in additional code to make it compliant with the SAP HCI infrastructure. We explain every step towards a fully running implementation of the CMIS adapter. This process was thoroughly tested and worked at the time of this writing; however, the ADK is under continuous development. As a result, the steps described and accompanying screenprints might change over time. We recommend checking the online documentation at https://cloudintegration.hana.ondemand.com/PI/help to find the latest changes to make your adapter executable.
Installing the ADK
The development process for an adapter differs significantly from modeling and running integration flows as discussed so far in the SAP HCI article series. It cannot be done using a web-based graphical modeling tool. It requires a full-blown development environment such as Eclipse. That’s why the ADK comes as an Eclipse installation. The current ADK was tested with Eclipse Luna (equivalent to Eclipse version 4.4). Download the respective release for your operating system from the Eclipse web page at https://www.eclipse.org/luna/.
Once it is downloaded, extract the ZIP file into a folder of your choice. The folder contains another folder named Eclipse. The eclipse.exe file inside the Eclipse folder can now be started with a double-click. You are then asked for an appropriate folder where Eclipse can store the project files during development. This special area is called an Eclipse workspace.
To separate the several Eclipse workspaces that are required, we recommend that you have a dedicated folder for your new installation. Using the Browse… button, we chose the C:EclipseWorkspacesLuna folder for this purpose (Figure 2).
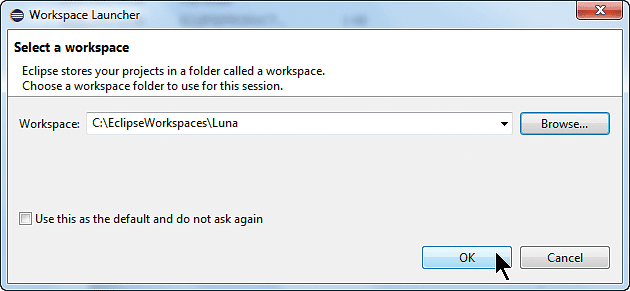
Figure 2
Select an Eclipse workspace
Click the OK button to continue. Once the Eclipse environment is up and running, you can install the ADK. Select Install New Software… from Eclipse’s Help tab menu (Figure 3).
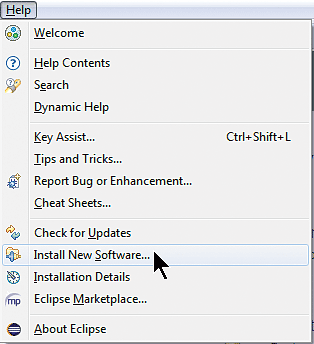
Figure 3
Start the wizard for installing additional software
The installation wizard opens. The wizard asks you to provide the location of the new software on the Internet from which the new software can be downloaded. Click the Add… button next to the Work with field (Figure 4).

Figure 4
Assign the download location for new software
The Add Repository dialog box opens (Figure 5).
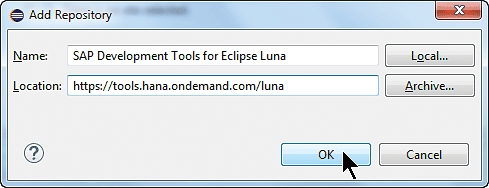
Figure 5
Add the URL for downloading the SAP HCI tools
Give your download location an appropriate name (e.g., SAP Development Tools for Eclipse Luna) and assign it to the Location URL https://tools.hana.ondemand.com/luna. Click the OK button. The next screen that opens (Figure 6) shows a list of available software components. Note the SAP HANA Cloud Integration Tools option. Beneath the root node is a list of available SAP HCI-related tools. One of them is the Adapter SDK for SAP HANA Cloud Integration. We recommend that you select the complete package as shown in Figure 6, where we have selected all the boxes beneath SAP HANA Cloud Integration Tools. The rest of the selections on the screen stay the same.
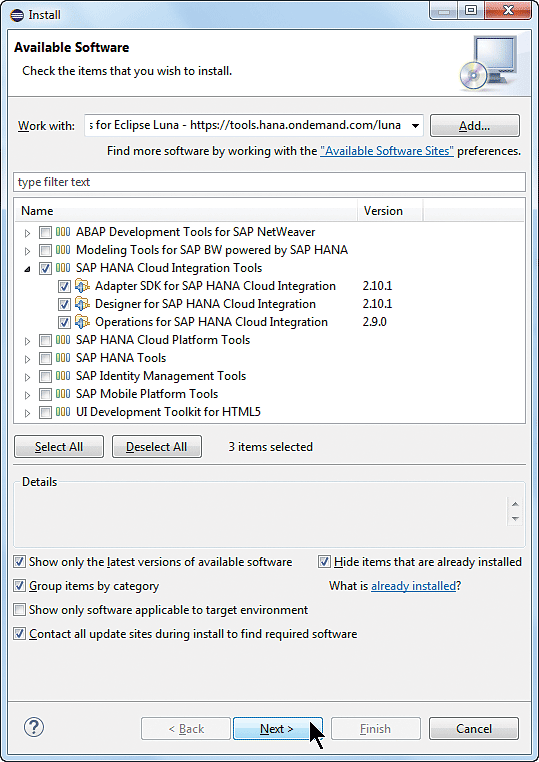
Figure 6
Select the SAP HANA Cloud Integration Tools for installation
Once you have selected the SAP HANA Cloud Integration Tools package, confirm this and the forthcoming step without modifications by clicking the Next button. A screen titled Install Details opens showing a summary of the selected packages. Click the Next button on that screen to reach the license agreement screen. At the end of the wizard accept the license agreement and close the wizard by clicking the Finish button.
The tools will be added to the Eclipse environment. Once they’ve been successfully installed, Eclipse needs to be restarted to complete the installation. After the restart you have to connect the Eclipse environment with your SAP HCI tenant on which you will deploy your newly developed adapter. Open the Preferences dialog for this by selecting Window > Preferences from the Eclipse main menu. The Preferences dialog opens (Figure 7).
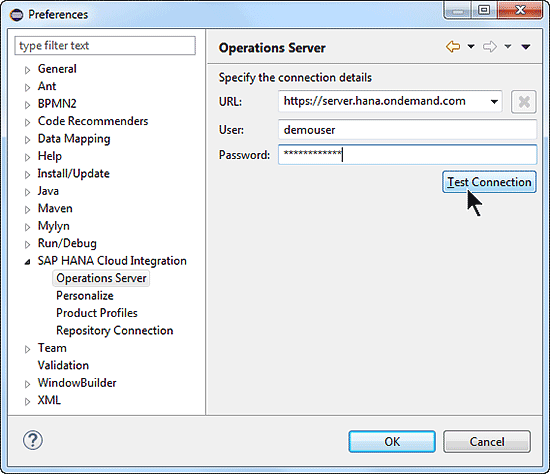
Figure 7
Preferences dialog for specifying the connection to your SAP HCI tenant
Expand the SAP HANA Cloud Integration node on the left, select the Operations Server node, and enter the URL to your tenant in the URL field on the right. This URL, along with the user name and password, is sent to you by your HCI-tenant administrator. Enter the required credentials and test the connection by clicking the Test Connection button to verify your entries. Once your entries have been confirmed, click the OK button to close the dialog. You are now ready to develop the adapter.
Developing a CMIS Adapter
CMIS is an ideal candidate for showcasing the adapter development process. That is because a Camel component already exists that supports the CMIS standard. In addition, an openly accessible CMIS-based content management system is provided by Alfresco Software, Inc., allowing you to retrieve and store documents on it using your newly developed CMIS adapter (https://www.alfresco.com/cmis). You implement the adapter following a development method guided by so-called cheat sheets. You can find the available cheat sheets in your Eclipse installation by choosing Help > Cheat Sheets… from the main menu. This opens the Cheat Sheet Selection dialog (Figure 8).
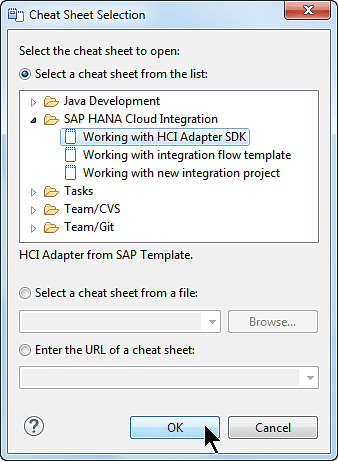
Figure 8
Select a cheat sheet for developing adapters
Highlight the Working with HCI Adapter SDK entry and click the OK button. A new tab entitled Cheat Sheets opens in the Eclipse main window (Figure 9).
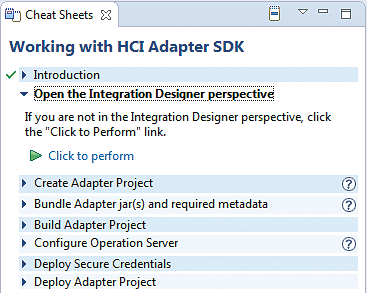
Figure 9
The cheat sheet for developing adapters
This cheat sheet is the guide for the development process. It consists of the following steps (from top to bottom):
- Create an adapter project.
- Bundle the adapter jars and the required metadata (importing existing classes and libraries required for a Camel component). Create the metadata based on those sources (the classes and libraries).
- Build the adapter project.
- Configure the operation server (already done; see description above about connecting the Eclipse environment to your SAP HCI tenant).
- Deploy secure credentials that are necessary to connect to the externally available Alfresco content management system.
- Deploy the adapter project.
The cheat sheet shows you what to do. Obviously, you have to open the Integration Designer perspective within Eclipse. The link in the cheat sheet allows you to execute the step immediately by clicking the Click to perform link (Figure 9). If the link in the figure doesn’t show up in your environment, you might first have to click another link entitled Click to begin.
You can achieve the same outcome manually by selecting Window > Open Perspective > Other… from the main menu and choosing the Integration Designer perspective in the dialog that opens (not shown). Once the perspective is opened, create the project either by clicking the Click to perform link or by choosing File > New > Project… from the main menu and selecting SAP HANA Cloud Integration > Adapter Project in the dialog that opens (not shown). This opens the New Adapter Project dialog (Figure 10).
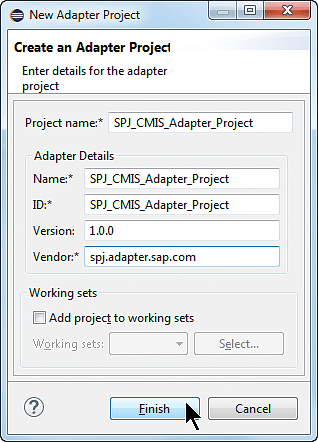
Figure 10
Create a new adapter project
Provide meaningful entries in the respective fields, as shown in Figure 10. Then click the Finish button. This results in a newly created project listed on Eclipse’s Project Explorer tab (Figure 11).
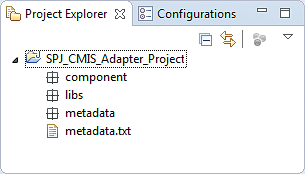
Figure 11
The newly created project in Eclipse’s Project Explorer
Bundle the Adapter Jars and the Required Metadata
The next two steps are the most important ones in the overall adapter development process:
- Add the necessary libraries to the adapter project
- Generate the adapter’s metadata (the metadata is required for creating the input forms for configuring the adapter during the development of integration flows).
We start by taking a closer look at Figure 11. The component and libs sub-nodes are important. So let’s see what they are good for. As you remember from the introduction to this article, we are relying on already existing Camel components that have been developed following the rules defined by the Apache Camel component’s development guidelines.
The Camel components homepage (at https://camel.apache.org/components.html) has the CMIS component pointing to a dedicated CMIS component homepage. There you can find all the details about the CMIS component itself, including download links and the component’s parameters that you can configure during its usage in a real integration flow. The downloaded component’s JAR file needs to be added to the component sub-node.
Based on this information, the ADK can later generate the metadata file describing all the configuration options for the CMIS adapter. The generated file with its metadata is based on XML and, in turn, is used by the SAP HCI WebUI to generate an appropriate input form for actually configuring a concrete connection to a CMIS-based content management system. As the implementation of a Camel component typically relies on supporting libraries, they must be added to the project as well. This explains the second node in the tree, the libs sub-node.
So let us briefly summarize the rules for adding libraries to the adapter project’s component and libs nodes. Add the existing Camel component’s JAR file to the component sub-node. Add all supporting libraries to the libs sub-node. Because SAP HCI itself is based on the Open Service Gateway initiative (OSGi) component model, all components and libraries must also be valid OSGi bundles.
To add libraries, simply copy the respective libraries (e.g., JAR files) from the file system and paste them under the appropriate nodes in Figure 11. In this case, copy the camel-cmis-2.14.1.jar file (containing the CMIS Camel component) and paste it under the component node. Copy the five chemistry-opencmis-*.jar files (containing the Apache Chemistry client API for CMIS) and paste them under the libs node. Once done, the project structure should look like the one in Figure 12. For more details on how to find and download libraries, see the sidebar “Downloading the Necessary Libraries.”
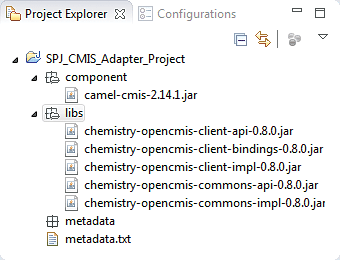
Figure 12
Project structure after adding the JAR files for the component and the supporting libraries
Downloading the Necessary Libraries
You need to download the already available Camel CMIS component and
dependent OSGi client libraries for connecting to CMIS-compliant
document servers. In this sidebar, we explain how to actually find and
download the respective Java archives.
To download the Camel CMIS component:
1. Open the URL https://repository.apache.org/ to go to Figure A.

Figure A
Enter CMIS as the search criterion
2. Enter CMIS as the project name. Press Enter or click the magnifier icon to go to Figure B.
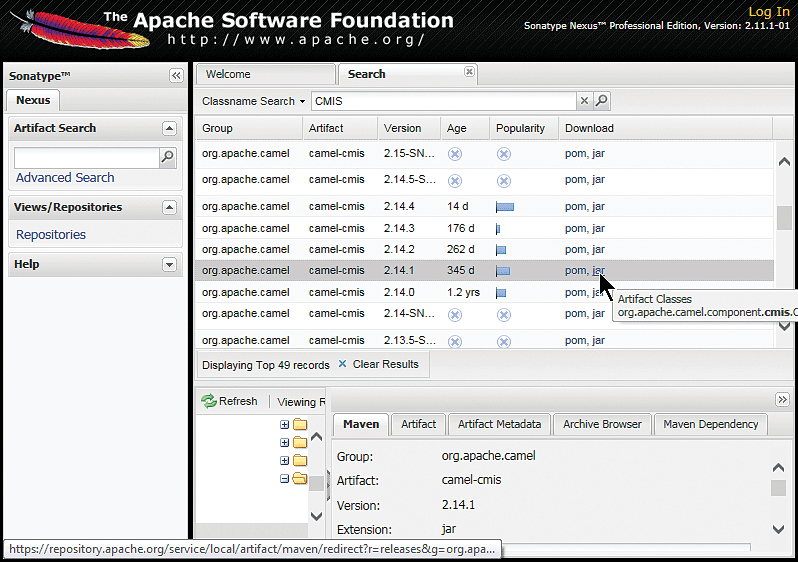
Figure B
Start downloading the CMIS component by clicking the jar-link
3. In the result table shown in Figure B, scroll down until you see version 2.14.1. In the Download column click the jar-link to start the download.
To download the dependent OSGi client libraries:
1. Open the URL https://archive.apache.org/dist/chemistry/opencmis/0.8.0/.
2. A directory listing appears (Figure C). Scroll down to the
chemistry-opencmis-osgi-client-0.8.0.jar link. Click it to start the
download. The ZIP-archive contains the required jar-files.
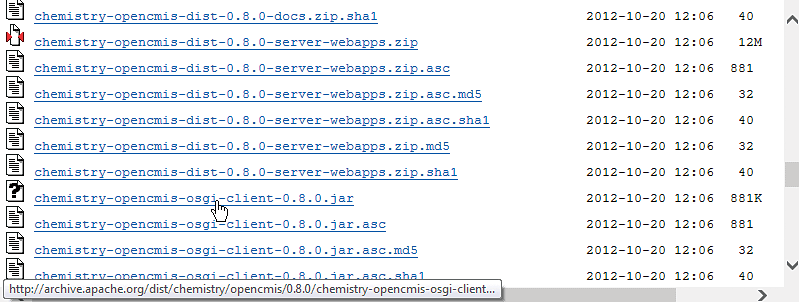
Figure C
Download dependent OSGi client libraries
Now that all the libraries necessary to implement the adapter’s behavior are available, you can generate its metadata. This is just a one-click activity. Right-click the project’s root node SPJ_CMIS_Adapter_Project and choose Generate Component Metadata from the context menu. The logic behind this activity checks the component’s parameters and creates an XML file that describes them in a readable format. This XML file is added to the project structure beneath the metadata node (Figure 12). You can open the metadata.xml file by double-clicking it. The beginning of the file is shown in Figure 13. Note the selection of the Source tab at the bottom of the screen. If it is not selected you get a view that is not very easy to understand.
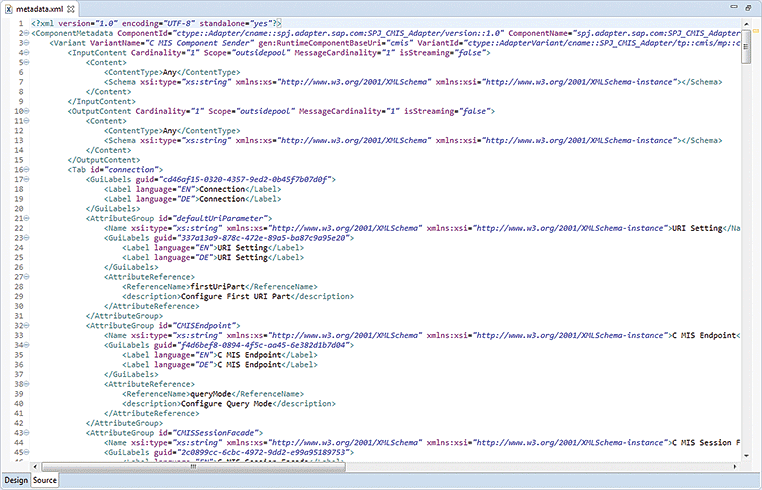
Figure 13
Generated metadata file for the CMIS adapter
The configurable attributes of the CMIS adapter are assembled in so-called Attribute Groups. You find identically named XML-tags throughout the metadata file. To reduce the number of attributes to configure in this example, we comment out some parameters for the Attribute Group entitled ScheduledPollConsumer in the metadata file to be compliant with SAP HCI’s current scheduler. It is a series of parameters that starts with the sendEmptyMessageWhenIdle and ends with the timeUnit attribute for the sender adapter.
You can comment them out in one consecutive sequence using the typical XML opening (<!--) and closing (-->) tags. The correctly modified code snippet is shown in Figure 14. That’s it for the steps you have to execute in the Eclipse environment.

Figure 14
Correctly modified metadata.xml file reducing the number of configurable attributes
Save all your changes by clicking the disk icon in the Eclipse’s bar by choosing File > Save from Eclipse’s main menu or by entering CTRL-S. Prove the consistency of your project by right-clicking the project’s root node SPJ_CMIS_Adapter_Project and choosing Execute Checks from the context menu. You should get a message on the Console tab confirming that the check is successful.
Build and Deploy the Adapter Project
Now the time has come to actually build and deploy your newly developed adapter on the SAP HCI tenant. First, build your adapter by choosing Build Adapter Project from the project’s context menu. This should result in a confirmation dialog as well as a success message on the Console tab (both shown in Figure 15).
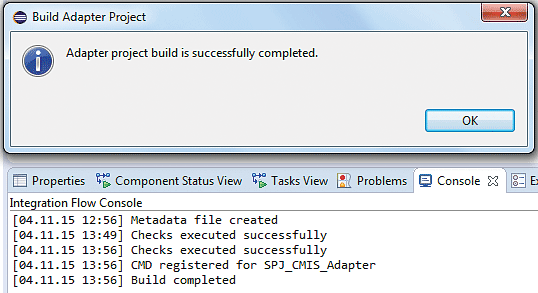
Figure 15
Confirmation of a successful adapter build
The adapter is now ready for installation on your server. Again, right-click the project’s root node and choose Deploy Adapter Project from the context menu. In the screen that opens, select the correct server (Figure 16). There should only be one entry in your list and it should be automatically selected.
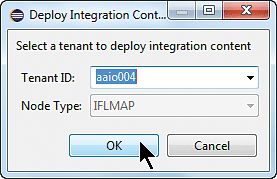
Figure 16
Choose the tenant on which the adapter should be deployed
Click the OK button. A confirmation dialog opens, confirming the triggered deployment (Figure 17). Click the OK button to close.

Figure 17
Information dialog about triggering the adapter's deployment
The development environment connects to your tenant based on the connection you configured earlier in this article (e.g., setting the Operations Server in Eclipse’s preferences). It deploys all the artifacts belonging to your project. To verify the successful deployment of your adapter, open a new Eclipse perspective by choosing Window > Open Perspective > Other… from the Eclipse main menu. In the Open Perspective dialog that opens (Figure 18), choose Integration Operations. Remember: this perspective was installed together with the ADK earlier (Figure 6).
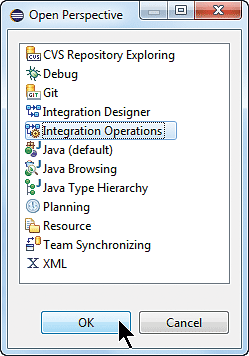
Figure 18
Selecting the Integration Operations perspective
Click the OK button to confirm your selection. On the far left of your newly opened perspective you find the Node Explorer tab. The tab itself contains a tree of nodes and lists your tenant as the root node (e.g.,  ). Double-click the node to open details about your tenant (Figure 19).

Figure 19
A list of deployed artifacts
Select the Deployed Artifacts tab at the bottom of the page to get an overview of all the different pieces such as key stores, integration flows, adapters, or credentials currently running on the server. You particularly want to verify the deployment status of your adapter, so narrow down the list by entering the appropriate filter term into the input field (boxed in Figure 19). In this case you enter SPJ manually.
You should see a similar result as is depicted in the figure. Make sure that the Deploy State column is set to DEPLOYED. You finished the development of your first adapter. Let’s see how it can be configured in a concrete integration scenario.
Working With the Alfresco CMIS Server
Before you can start modeling your integration scenario, you have to prepare two folders in a content management system: one representing the folder from which a file will be retrieved for sending, and a second one to be used as the target folder for the transferred file after the integration flow’s execution. We use the publicly available Alfresco CMIS server for this purpose. You can find details about how to connect to the server and about the credentials to be used on the Alfresco CMIS homepage at https://www.alfresco.com/cmis (Figure 20).

Figure 20
Details about accessing the Alfresco CMIS server
To prepare for testing, to check in and maintain test documents on the server, use another publicly available tool, the OpenCMIS Workbench, located at https://chemistry.apache.org/java/developing/tools/dev-tools-workbench.html. The download is here: https://chemistry.apache.org/java/download.html (Figure 21).

Figure 21
Downloading the OpenCMIS Workbench
In the Commodity Packages section, click the Download link in the OpenCMIS Workbench row (Figure 21). Once the download has finished, extract the ZIP file to a location of your choice and run the appropriate batch file for your operating system. For Microsoft Windows systems it is the workbench.bat batch file. The batch file actually starts the workbench (Figure 22). Note that it requires direct Internet access for connecting from the OpenCMIS Workbench to the CMIS server. Otherwise (e.g., from your company’s network) you have to adjust the batch file accordingly by adding proper proxy settings. Although we use the OpenCMIS Workbench in this article to illustrate our example, several CMIS clients are available.
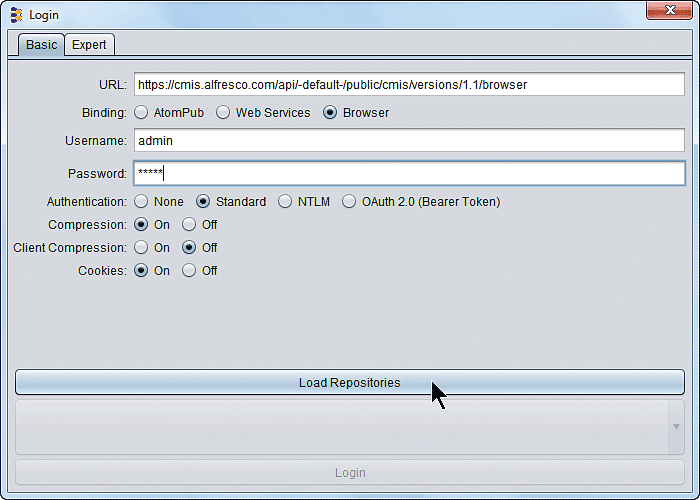
Figure 22
Login screen for the Alfresco CMIS server using the OpenCMIS Workbench
Enter the following details in Figure 22:
URL: https://cmis.alfresco.com/api/-default-/public/cmis/versions/1.1/browser (taken from CMIS Browser Binding link shown in Figure 20)
Binding: Select the Browser radio button
Username: admin
Password: admin
Next, click the Load Repositories button to retrieve all available repositories with their respective unique identifiers. Only one repository (with the identifier -default-) is listed (Figure 23).

Figure 23
List of available repositories on the Alfresco CMIS server
Click the Login button and you are connected to the Alfresco CMIS server via the OpenCMIS workbench (Figure 24).
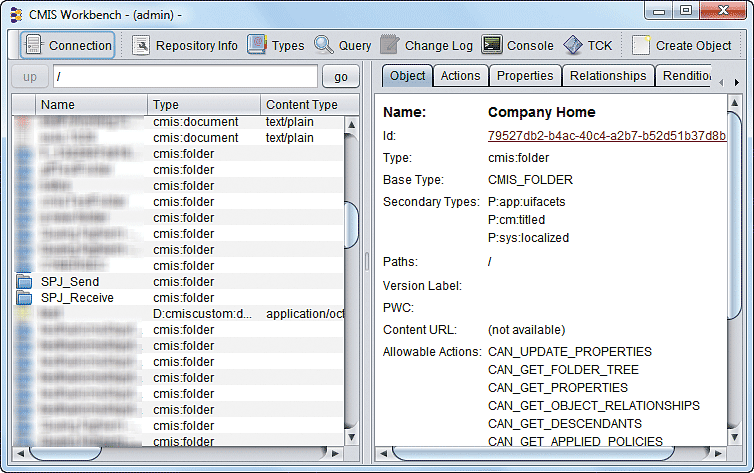
Figure 24
OpenCMIS Workbench connected with the Alfresco CMIS server showing the repository's content
In the list of the root directory’s content on the left you see two folders that we created before: SPJ_Send and SPJ_Receive. Don’t expect them in your list whenever you connect to the CMIS server as the directories might be cleaned from time to time. Therefore, create your own folders for this tutorial. Simply click the Create Object button in the ribbon (Figure 24) and pick Folder from the drop-down options that opens to create a new folder.
When creating new folders, provide an appropriate folder name and make sure you choose Folder (cmis:folder) (not Custom Folder (F:cmiscustom:folder)) as the Type. Users can easily mix them up as both contain the term Folder. With Custom Folder the scenario does not work.
Finally, upload your chosen file into the send folder (SPJ_Send in this example). To achieve this, navigate to your send folder (by double-clicking it), click the Create Object button again, and select Document from the drop-down list. This opens the dialog shown in Figure 25.
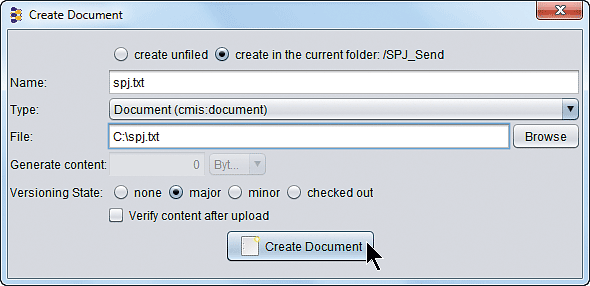
Figure 25
Creating a document in the SPJ_Send folder
Give your chosen document an appropriate name (spj.txt, in this example), select Document (cmis:document) as the Type, and navigate to your example file on your local computer using the Browse button. (You can take any file you want; ideally it is a simple text file.) Once it is selected, click the Create Document button to actually add the file to the selected folder. With the preparations for the actual file transfer completed, you can start developing your integration scenario. We recommend that you use a file with a small footprint. Remember that you are connected to a publicly available document server and it shouldn’t be spammed with large files. The exercise described in this article focuses on the development of a new adapter and not on content management in general.
Using Your New Adapter in an Integration Scenario
Next, we will model an integration flow that reads a file from the Alfresco CMIS server and writes it back on the same server in a different directory. The newly developed adapter is responsible for connecting to the server to read and write the documents. As for all connections to external resources (to the CMIS server in this case), the respective adapters have to authenticate themselves against the server.
This holds true for the adapter as well. A common assumption would be that you should provide the credentials directly in the configuration of the adapter. However, this does not work. If you build several integration scenarios connecting to the same CMIS server, you would have to adjust all adapter configurations in case the credentials change. That doesn’t make sense.
We had to find an alternative way to keep the maintenance effort at a reasonable level. The solution to this problem is to deploy the security-related parameters independently from the integration flows under a certain name (e.g., Alfresco_SP) centrally on the SAP HCI server, and reference the credentials in the configuration of the CMIS adapter by using the same name.
So let’s see how the security parameters can be deployed on the SAP HCI server. You are back in the Eclipse environment with the Integration Operations perspective still open. Select the Deployed Artifacts tab at the bottom of the tenant’s details view (Figure 19). In the upper right corner click the Deploy… button, which opens the dialog in Figure 26.
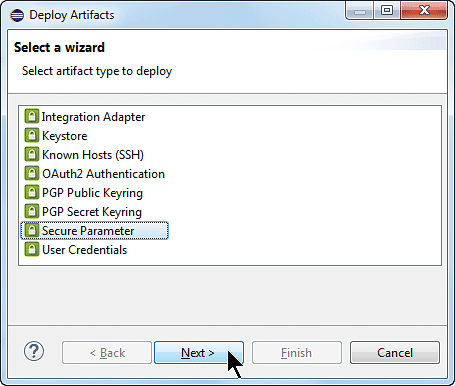
Figure 26
Deployment of security-related artifacts on the SAP HCI tenant
Select the Secure Parameter entry and click the Next button. In the screen that opens (Figure 27), provide the details of the security parameters. In this case, the Secure Parameter is the password for the Alfresco CMIS server—admin. Enter the password again in the Repeat Secure Parameter field to ensure it’s spelled correctly.
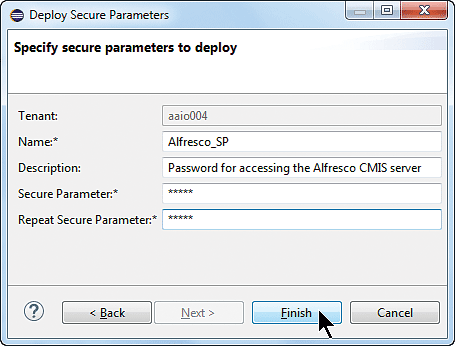
Figure 27
Specify the secure parameter for the connection to the Alfresco CMIS server
When you’re done making your entries, click the Finish button to actually deploy the data on the SAP HCI server. You get a small dialog confirming the successful deployment of the secure parameter. Verify the availability of the credentials on the server by searching for them on the Deployed Artifacts tab (Figure 19). It might be necessary to refresh the list by clicking the refresh icon ( ).
).
Now that the credentials are in place, you can start modeling the test scenario using one of the packages used before for your models. The integration flow looks like the one depicted in Figure 28.

Figure 28
Integration flow for copying files on a CMIS server
What is missing are the details of the integration flow’s configuration. Note the selection of the new adapter (e.g., SPJ_CMIS_Adapter) as the sending as well as the receiving side of the integration flow. To choose the new adapter, you get an appropriate entry in the adapter’s selection dialog during configuration of the message flow automatically (Figure 29).
The configuration of adapters was explained in previous articles. In short, you model the dashed arrow from the Sender pool on the left to the Start event in Figure 28. A new dialog opens automatically which is depicted in Figure 29. In this list the new entry SPJ_CMIS_Adapter appears. The entry appears because you have deployed the new adapter to the server (Figures 16 and 17). This configuration step has to be repeated for the receiving side as well. The modeler has to draw a dashed arrow from the End event to the Receiver pool in Figure 28.
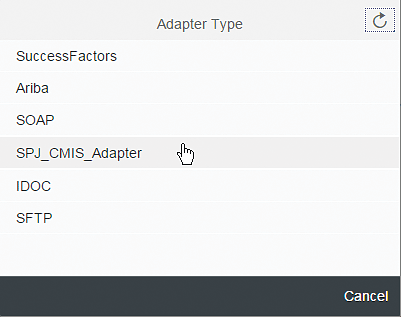
Figure 29
Pick the newly developed adapter during configuration of the integration flow
Let’s take a closer look at the integration flow’s configuration. First, select the message flow between the Sender pool and the message Start event in Figure 28. The configuration of the connection’s details is shown in Figure 30. Note that the screen in Figure 30 was automatically generated based on your metadata.xml file. All the parameters listed in that file are now represented by the input fields on the configuration screen. To get a better understanding of how the file and the UI relate to one other, you can compare the XML tags in the metadata.xml file with the input fields shown in Figure 30.
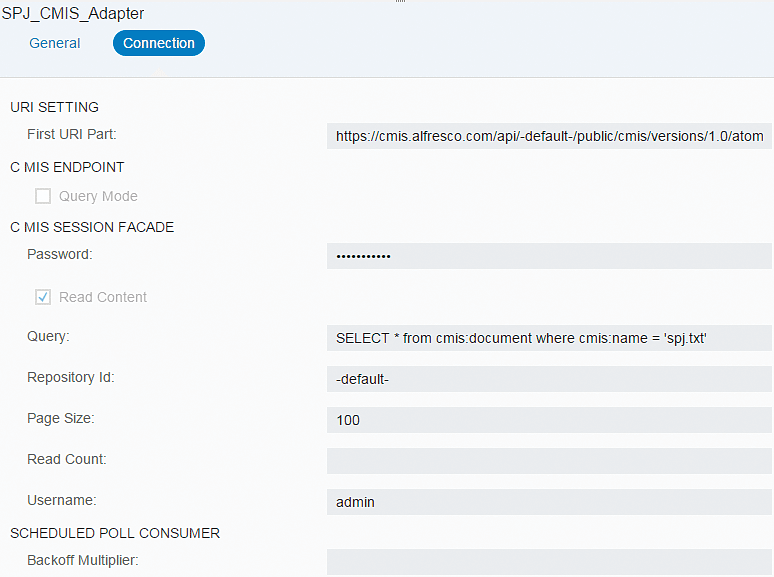
Figure 30
Configuration of the CMIS Sender Adapter
The configuration itself is pretty straightforward. The URI setting at the top is taken from the Alfresco CMIS server homepage (Figure 20). This time, we have taken the CMIS 1.0 AtomPub Binding URL. The Password field is not filled with admin, as you might expect. Instead the Password field needs to be filled with a reference to the secure parameter that we deployed before. You create such a reference by entering Alfresco_SP according to the Name value set during the Secure Parameter’s configuration (Figure 27).
The Query field simply selects the file with the given filename for transmission. The Repository Id is the same one used for connecting to the server using the OpenCMIS Workbench (take another look at Figure 23). For the Username, again use admin. Note that the file will be searched for in all available folders on the server so there is no need to provide a concrete directory to search in. For more information about the CMIS Query Language go to https://wiki.alfresco.com/wiki/CMIS_Query_Language.
Let’s continue with the content modifier. Its configuration is shown in Figure 31.
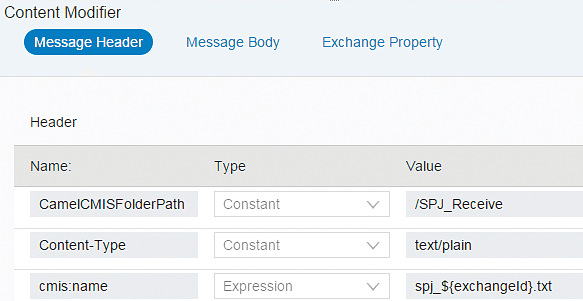
Figure 31
Setting some header variables in the Content Modifier
Obviously, we are just setting a few variables on which the receiving CMIS adapter is relying. It requires the content type (variable Content-Type with the Value text/plain) of the file we want to write back, the target directory (variable CamelCMISFolderPath with value /SPJ_Receive), and the target filename (variable cmis:name with value spj_${exchangeId}.txt).
Note the use of the Camel variable ${exchangeId} in this example. You append the current exchangeId to the filename to make the file unique as each exchange also has a unique identifier. This is a typical example of how to use Camel variables to dynamically set certain values during run time. This is fully transparent to the adapters and can also be applied for the configuration of adapters themselves. Take a look at the documentation of the respective adapter to find out where dynamic replacements of values using Camel variables are allowed. SAP HCI’s documentation can be found at https://cloudintegration.hana.ondemand.com/PI/help.
Finally, review the configuration of the receiving CMIS adapter, shown in Figure 32. It is pretty straightforward as all parameters have already been discussed during the configuration of the sending CMIS adapter.
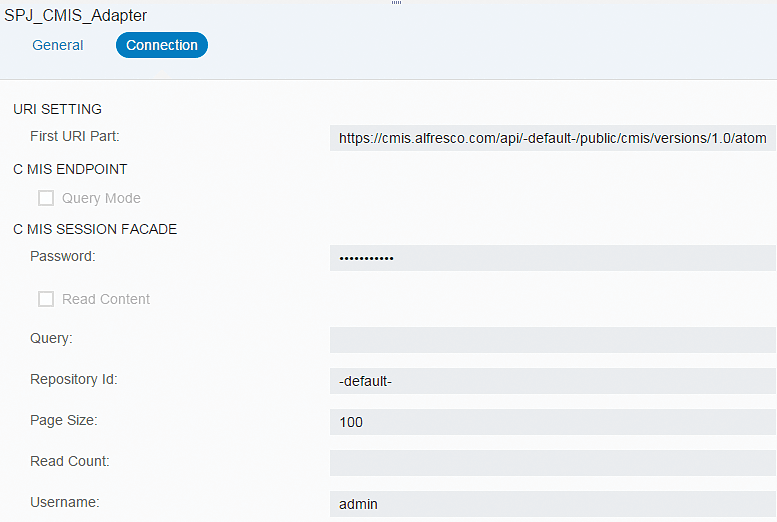
Figure 32
Configuration of the CMIS Receiver Adapter
That’s it. You can now deploy and run your scenario. Verify that the file is indeed copied to your SPJ_Receive folder using the OpenCMIS Workbench (Figure 33).

Figure 33
Copied files in the SPJ_Receive folder
Don’t forget to un-deploy your integration flow once you have tested it. Otherwise the integration flow keeps copying files from the source to the target directory every minute, flooding the server with files. You can un-deploy your integration flow by using the Integration Operations perspective shown in Figure 19. Select your integration flow in the table of deployed artifacts and click the Un-deploy button (also shown in Figure 19). Confirm the upcoming dialog and the integration flow is removed from the server.
Summary
You can easily extend the connectivity of SAP HCI to non-SAP cloud systems by using the ADK in the Eclipse development environment. Based on already existing Camel components, you can use the ADK to wrap those components and make them available to SAP HCI for modeling your integration flows. With the CMIS standard as an example, you have learned what the overall development process for adapters looks like. With this knowledge you can now start extending the SAP HCI platform with connectors to any system/application that your particular integration scenarios require.
The authors would like to thank their colleagues Vivek Mangaonkar and Sujit Hemachandran for their continued support and advice.
Holger Kunitz
Holger Kunitz is a product expert and member of the product management team for SAP HANA Cloud Integration and SAP Process Orchestration, SAP’s integration products for cloud and on-premise deployment. Holger has worked on integration topics at SAP for more than 20 years. Previous assignments include his work at SAP Research in the Internet-of-Things space and for SAP’s Regional Implementation Group with a special focus on SAP Process Integration.
You may contact the author at holger.kunitz@sap.com.
If you have comments about this article or publication, or would like to submit an article idea, please contact the editor.

Dr. Volker Stiehl
Prof. Dr. Volker Stiehl studied computer science at the Friedrich-Alexander-University of Erlangen-Nuremberg. After 12 years as a developer and senior system architect at Siemens, he joined SAP in 2004. As chief product expert, Volker was responsible for the success of the products SAP Process Orchestration, SAP Process Integration, and SAP HANA Cloud Integration (now SAP HANA Cloud Platform, integration service). He left SAP in 2016 and accepted a position as professor at the Ingolstadt Technical University of Applied Sciences where he is currently teaching business information systems. In September 2011, Volker received his Ph.D. degree from the University of Technology Darmstadt. His thesis was on the systematic design and implementation of applications using BPMN. Volker is also the author of Process-Driven Applications with BPMN as well as the co-author of SAP HANA Cloud Integration and a regular speaker at various national and international conferences.
You may contact the author at editor@SAPpro.com.
If you have comments about this article or publication, or would like to submit an article idea, please contact the editor.


