Learn how to build a storyboard for a voice application and configure it for deployment on the SAP NetWeaver Composition Environment 7.1 platform using the Voice Kit add-on.
Key Concept
Voice applications are software applications that can be executed by voice input via phone or computer. They also provide output to the user in voice instead of traditional user interfaces.
The Voice Kit in Visual Composer 7.1 is an add-on that is delivered as part of SAP NetWeaver Composition Environment 7.1 (SAP NetWeaver CE). You can install this add-on so you can to model interactive voice applications and integrate them with enterprise applications, such as SAP ERP and SAP CRM, to deliver their functionalities over the phone.
We begin by providing an overview of the Voice Application Suite and its capabilities. Then we walk you through a step-by-step description on how to model a real-time voice application for querying material inventory from an SAP ERP system by voice and numeric input through a phone or computer.
Prerequisite
The readers should be familiar with Visual Composer and the SAP NetWeaver platform.
What Are Voice Applications?
Today’s business world is dynamic, and information workers need to access information anytime anywhere. Given this fact it does not make sense to restrict access to IT applications to traditional channels such as Web or desktop computers. People now want to access information through natural ways such as talking on a phone. In an enterprise context, sales personnel and customers may want to know the inventory stock or status of an order without connecting via the Web or computer networks. The answer to this need is voice applications that enable direct access to enterprise data and business processes just by dialing a number. The voice applications are generally invoked by dialing a specific number on the phone. They then take user input in the form of numbers by the phone or by speech recognition. These applications are gaining more and more importance with the increasing number of call centers that support customers 24/7.
Voice applications can also invoke composite applications developed over one or more business systems to support an enterprise business process such as purchasing, employee leave, or plant maintenance requests. The user can invoke the business process with a mobile phone instead of a computer. The advantages include reducing the operating cost by automating the telephone processes, getting rid of paper-based transactions, removing the limitation of dependency on computers and the Web, and gaining the ability to cater to large-scale customers.
Visual Composer Voice Kit
A voice application typically consists of a voice gateway, which receives the voice inputs from phone or computer input and converts it to VoiceXML. VoiceXML is sent by HTTP requests to the application server, which includes the voice application runtime. VoiceXML is the W3C’s standard XML format for specifying interactive voice dialogs between humans and a computer. The voice runtime present in the SAP NetWeaver Application Server (SAP NetWeaver AS) interprets the VoiceXML input and processes it according to the design time model.
The Voice Kit consists of the design time in Visual Composer and the runtime in SAP NetWeaver AS for Java. The kit integrates with third-party voice gateways such as Genesys and Voxeo to accept the voice input. The voice runtime available in SAP NetWeaver AS Java interprets the VoiceXML input and executes the design time application returning the output as VoiceXML again to the voice gateway. The gateway then converts the VoiceXML to voice for the user.
Visual Composer provides a graphical environment for modeling the voice application as part of its design-time environment. It provides features for accepting the voice input, returning voice output, processing voice input, logging, and executing Remote Function Calls (RFCs) and BAPIs or Web services from back-end enterprise systems. Thus, voice applications in SAP NetWeaver provide features to integrate SAP business applications by executing BAPIs, RFCs, or enterprise services to retrieve or update data. Voice applications in SAP NetWeaver also provide out-of-the-box logging features to log any event from the application to SAP NetWeaver Business Warehouse (SAP NetWeaver BW). You then can have access to SAP NetWeaver BW reports for ad-hoc analysis. Figure 1 shows the Voice Kit components and high-level architecture in SAP NetWeaver CE 7.1.

Figure 1
Voice Suite in SAP NetWeaver CE 7.1
Modeling Voice Applications in Visual Composer
Voice applications in SAP NetWeaver CE 7.1 are modeled using the Visual Composer storyboard, which is a Web-based user interface (UI) modeling tool. To develop voice applications, you first install the Voice Kit as an add-on installation in the SAP NetWeaver AS Java. As part of this example I will show how to create and execute a voice application for a material stock query scenario. Step-by-step, you will see how to use Visual Composer voice modeling and execute enterprise services from the back-end business systems to retrieve data and provide it to the user.
Design the Storyboard
To create a new voice application, log in to Visual Composer by following the URL https://:/VC. Click the New Model menu. The Create Menu Model screen appears (Figure 2) with the options for the type of mode you want to create.

Figure 2
Creating new voice applications in Visual Composer
Select the Voice Application option to create a new executable application. You use the Voice Component option to create a reusable voice component, which is not executable but can be used inside other voice applications. Next, enter a name for the voice application you want to create (in this example, queryInventory). Select the Local Repository option if you are developing an application locally in the server. If you need to make the application available across your system landscape and if SAP NetWeaver Development Infrastructure (NWDI) is available, select Shared Repository. Next, specify the Software component and Development component (e.g., sap.com_UWSoftwareComponent and invmgmt, respectively) and then click the OK button. The design time editor for modeling voice application in Visual Composer opens (Figure 3).

Figure 3
Model a voice application using Voice Composer
Modeling voice applications is similar to modeling other Visual Composer applications. You can model the voice application by dragging and dropping the control elements, components, connectors, and event signals from the Compose Model pane onto the storyboard. You use the tools on the toolbar on the right to change modes. For the purpose of this article, you will model a voice application that can query the stock available for a material in SAP ERP by providing the numeric material number and plant as input.
Add a Speak Element
Select the Compose tool in the task pane on the right. Drag and drop the Start Point element onto the storyboard, and then drag and drop the Speak element, linking them together. You can use a Speak element to play a predefined message or a recorded message to the user. For this application, the Speak element plays a welcome message to the user each time the application starts.
Right-click the Speak element in the storyboard, and select Settings on the context menu (Figure 4).
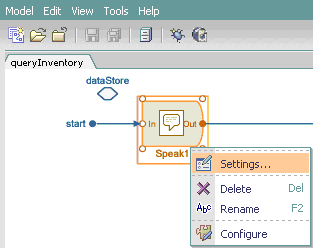
Figure 4
Specify the settings of the the Speak element
In the Settings window that appears, select Text from the drop-down as the Type. In the Text field, enter the message that you want the user to hear (e.g., the welcome message, Welcome to Material Inventory Query application), as shown in Figure 5. You can specify multiple Speak Items on the left to specify the message, which will be played one after another from top to bottom. For example, you can use both fixed text and a variable to specify the message. You can also specify a condition, if required, and when the condition is met (i.e., Condition =true), then the message plays the message. Enter =true in the Condition field, and then click the OK button.
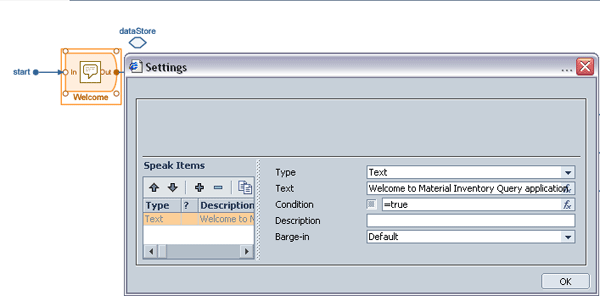
Figure 5
Set the message that the user will hear
Add a Listen Element
Next, you can add an optional user authentication step by asking the user to specify a user name and PIN for authentication to use the application. Add a Listen element to receive the user input of user name and PIN entered by a phone dialing pad or by speech. Drag and drop the Listen element into the storyboard. You need to store the user (employee) number and the user’s PIN as variables within the DataStore element for the application. You can use the dataStore, which is available by default in the storyboard, for storing all variables or user inputs in that application.
First, define the temporary variables in the dataStore. Right-click the dataStore element, and then select Define Data on the context menu. In the pop-up screen, click the + (add) icon to add a new variable. Select Record, which is a logical group for the variables, and enter the name userAuthParams as the name of the variables group. Under that, select Number as a data type from the list to add two numeric variables as usernumber and userpin, as shown in Figure 6.
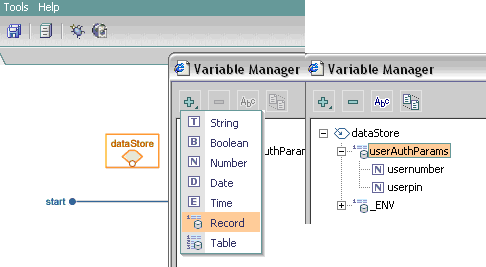
Figure 6
Add new variables to the dataStore
Now you need to configure the Listen element to prompt the user for a response and to accept the user input. Right-click the Listen element and select Settings from the context menu. Switch to the Input tab (Figure 7). Specify Digits as the Grammar Type to accept numeric input only. There are different types of inputs, including Boolean, Currency, Date, Time, or you can have a list of choices from which the user can select one. As the Result Variable, select the user number (userAuthParams.usernumber) from the dataStore to accept the user number specified by the user as input. Specify the Input Mode as DTMF, Voice, or Voice+DTMF to accept the user input as only a numeric key press on the phone or console, only voice input by the phone or microphone, or both. Enter a value for the minimum and maximum number of digits that can be specified as the input.

Figure 7
Configure the Listen element to accept the user input using voice and digits
You can specify the prompt message using the Prompt tab (similar to the way you configure the Speak element). You can specify a re-prompt message (for re-prompting the user) if the user input is not entered correctly or is unacceptable). You can also specify events, such as noinput, nomatch, maxspeechtimeout, and subsequent actions on their occurrence.
Similarly, you need to add another Listen element to accept the userpin as its Result Variable from the dataStore. Configuration is similar for the second Listen element.
Set the User Authentication
Because the Voice Kit doesn’t provide any specific service for user authentication for the voice application, you need to use a preexisting Web service or a custom-built one that will accept the usernumber and userpin and check for its validity. You can either execute a Web service or an RFC available in any system accessible through the network. If you choose an RFC, you need to define the provider SAP system in the Destination menu under Configuration Management in SAP NetWeaver Administrator (https://:/nwa). For a Web service that provides authentication, you need to either define a WSDL or WSIL system in the Destination Template Management menu under SOA Management in SAP NetWeaver Administrator.
After configuring the service destination in SAP NetWeaver Administrator, click the Search tool on the toolbar. In the Search in field, select the service provider destination as configured in SAP NetWeaver Administrator from the drop-down list, and search for the relevant service that provides the authentication check. Once the search result is displayed in the Results pane below, select the service to be used and drag and drop it into the storyboard (Figure 8).

Figure 8
Search for a service and drag and drop it onto storyboard
Next, link the Out node of the second Listen element to the In node of the Service element. Right-click the Service element, and then select In Mapping from the context menu. In the pop-up window, map the input parameters of the Service element with the variables defined in the dataStore. Use the Browse option to select them against each service input parameter.
Next, you need to map the input parameters of the service element with the output parameters of the Listen elements, which is called in mapping (Figure 9).

Figure 9
Map the input parameters to the output parameters using a Web service
After you map the input to the output parameters, close the Map Data window. Now, you need to create the mappings for the output of the Service element to the dataStore variable with the output of the service call by selecting Out Mapping from the context menu, as shown in Figure 10. This is done to map the output parameters of the service to the dataStore elements to be used later.

Figure 10
Configure the Service element output mapping using a Web service
Next, add a Route element to the storyboard to determine the output of the authentication Web service and channel the process flow accordingly. The Route element determines the process flow direction at runtime based on the variable values for multiple flow paths. It is analogous to an IF statement in common programming languages. In the example, you need to inform the user if the authentication fails and to repeat the authentication process until the user can provide the correct authentication. With correct authentication, the process moves forward to the inventory query.
Drag and drop the Route element onto the storyboard, open the Settings window, and configure the two routing paths, as shown in Figure 11. Specify one path as Yes and in its Expression specify =IF(@authCheckOutput.retNum=="1",true,false). This checks the output parameter from the authentication service call and proceeds forward if successful. Specify another path as No and make it default, so that if the authentication service call returns 0, the execution proceeds to that path. Join the No path to a new Speak element to inform the user by an error message, and then to the Listen element (which you have already configured to accept the user authentication). Join the Yes path to another Listen element that you have configured to accept the user input for the material number being queried.

Figure 11
Configure the Route element for process branching
Define the Inventory Query Service
The purpose of the application is to find the available inventory of a material as maintained in the back-end ERP system. For the purposes of this example, you use the SAP Enterprise Service, InventoryByMaterialAndLocationQueryResponse_In, which determines the inventory value of a specific material using plant and material number data. See the sidebar “Prepare an SAP Enterprise Service for Use in Visual Composer” for more information.
In addition to prompting and accepting the user input for authentication, you need to prompt the user to specify the plant and material number for the item for which the inventory is queried. You need to add two more Listen elements to accept the plant and material number inputs and then to store the input in the dataStore, similar to the previous process of storing the user authentication. Once the user inputs the plant and material number, the application needs to query the SAP ERP system using this data.
Using an SAP Enterprise Service, such as InventoryByMaterialAndLocationQueryResponse_In, in Visual Composer is not possible because of its complex output structure by which it provides the inventory quantity of the specified material as available in different storage locations in the plant. Therefore you need to create a wrapper application service (Web service) using the Composite Application Framework (CAF). You use it to write a logic to loop into the service’s complex output structure and calculate the total inventory available for all storage locations in the plant. You can also change the input range structure of the enterprise service to single parameters, plant, and material number, in the CAF application service. First import the Enterprise Service into a CAF project created in SAP NetWeaver Developer Studio as an External Service of type Web service and use that to create an Application Service.
Next, map the plant and the material number input parameters defined for the application services to the external service (Web service) input. Specify the InclusionExclusionCode as I and IntervalBoundaryTypeCode as 1 in both SelectionByMaterialID and SelectionByLocationInternalID. Map the material and plant to the LowerBoundaryMaterialID and LowerBoundayLocationInternalID in the application service implementation, respectively. Then expose the CAF application service as a Web service. Deploy it in the Java server and create a WSIL or WSDL destination for it in the NetWeaver Administrator (NWA).
First, you need to add a Service element, which for our example, is the custom Composite Application Framework (CAF) application service created as a wrapper over the enterprise service. Switch to the Search tab and drag and drop the CAF application service into the storyboard. Join the Out node of the second Listen element to the Service element and configure the in mapping of the service. Map the plant and the material number from the Data Store to the service input, as shown in Figure 12. Note that you can query only materials and plants that have digits as a material number, for example, material number and plant, e.g., material number 234529, 000283; plant 1000, 2000, 1100.

Figure 12
Configure input mapping for the CAF service
Similarly, configure the out mapping for the Service element. Select Out Mapping from its context menu and map the available inventory and unit of measure values from the service output message to a variables defined in the dataStore, as shown in Figure 13.

Figure 13
Configure out mapping of the Service element with dataStore variables
Next, add a Speak element that informs the user of the available inventory. Join the Out node of the Service element to the In node of a Speak element. Configure the Speak element with a pre-defined message (The available inventory is) and the variables (@matInvCheck.availableInventory and @matInvCheck.matUoM) from the dataStore having the inventory value and its unit of measure from the service output, as shown in Figure 14. Add the two variables in two different Speak Items and set the Type as SpeakAs with SpeakAs Type as Digit and AlphaNumeric for the inventory quantity and its unit of measure respectively.

Figure 14
Configure the Speak element for Informing Available Inventory
Finish the Voice Application Storyboard
At this point in the development of your voice application, you can end the process or can ask the user for a new input, if required. Add another Route element and prompt the user to select an option. Define the process flow either to an End Point element or to the Listen element to accept the plant/material number input. The final model will look like what is shown in Figure 15.

Figure 15
Process model of the voice application
Note
You can add a Log element to log the user calls to the application itself. You can add the Log element after the last Speak element and specify there whether to log the message in SAP NetWeaver BW or the Java server log. There are also few more elements available that you can use as follow:
- Record. Record a voice input to an audio file in the server using this element.
- Transfer. Transfer the control to a URL (referring to a voice application) or another phone number.
- Process. Set any variable value, or create, change, or find a row in a table in the Visual Composer model.
Now that you have developed your voice application you need to know how to configure and deploy the voice application to execute from a phone or computer using voice input.
Configure the Voice Application
Your voice application needs to be compiled and deployed in SAP NetWeaver AS Java. First, you need to configure the application’s properties.
Click the Configure tab on the rightmost panel of the design time story board to open the Configure Voice Application dialog (Figure 16). Select Voice from the drop-down in the Runtime property to specify that the application will use the voice runtime instead of the Web Dynpro runtime used by Visual Composer applications by default. Also, set the Runtime as Voice for each of the service element used in the application as well, by selecting them and opening the Configure view. In addition, you need to have a voice gateway installed in your client through which you can invoke this application. There are various third-party voice gateways available. For our example, we chose Voxeo Prophecy, which can be used for the voice input and output. Next, select the voice gateway (Voxeo Prophecy Voice Platform 7.0 in this example) as the Driver, and select Voice+DTMF as the Input mode so both speech and numeric inputs are acceptable from the users.
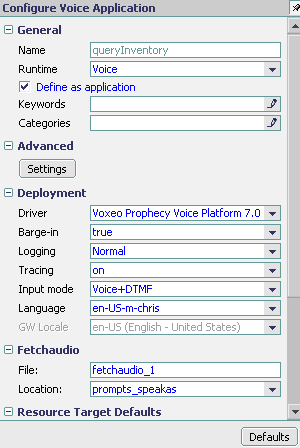
Figure 16
Configure a voice application
Note
The version of the Voxeo Prophecy gateway used for this article is a trial version.
Save the settings, and then click the Deploy tool (Figure 3). Click the Compile button, which compiles the voice application and creates the deployable file, and then click the Deploy button.
The application link appears in the Deploy configuration tab after successful compilation. Click the link and then copy the voice application URL displayed in the pop-up window. You can open the gateway client (in this case, the Voxeo Prophecy gateway) and paste the URL there to invoke the voice application. Then specify the input by either microphone connected to your PC or the simulated phone console provided by the voice gateway client. You can also use other voice gateways and invoke the application from a phone by dialing a number provided by the voice gateway.
When you run the application, you are prompted to enter the employee number and PIN, which will be validated by calling the back-end service. Then, if successful, you are prompted for the plant and material number you want to query. Once you specify the valid plant and material number, the enterprise service is executed and the current material stock quantity is provided to you as voice output. See Figure 17 for a sample execution of the voice application.
|
Application: Welcome to Material Inventory Query application.
Application: Please enter the user number
User: 009237 (by key press or voice)
Application: Please enter the user PIN
User: 6273 (by key press or voice)
Application: Thank you for the information. Please enter the plant
User: 1000 (by key press or voice)
Application: Please enter the material number
User: 001826
Application: The available inventory is 293 KG. Thank you.
|
| Figure 17 |
An example of a voice application |
Tilak Mitra
Tilak Mitra is an enterprise architect and service-oriented architecture (SOA) subject matter expert. He helps clients to define their complex enterprise architectures and to determine how SOA should be used with different vendor products. He is also the author of two books on SOA.
You may contact the author at tmitra@us.ibm.com.
If you have comments about this article or publication, or would like to submit an article idea, please contact the editor.

Dipankar Saha
Dipankar is an IT architect working in IBM India. He has more than 12 years of experience in the IT industry and experience in implementing several SAP MII-based solutions globally. Dipankar is the coauthor of a book on SAP MII published in 2009. He is also an IBM-accredited IT architect and an SAP-certified associate enterprise architect.
You may contact the author at dipankar.saha@in.ibm.com.
If you have comments about this article or publication, or would like to submit an article idea, please contact the editor.


