SAP BW has all the tools necessary to deploy a dynamic dashboard that shows custom content for each user. Discover some of the concepts inherent to making a dashboard successful and how you can use BEx Query Designer to deliver them.
Key Concept
You can personalize single variables or all variables in a Web application so that you do not need to manually update your variable settings. For example, this is helpful in situations in which you want a value automatically assigned to a variable based on the user ID. You assign the variables to a value permanently or temporarily until you remove the personalization.
Dashboards are great data visualization tools for an executive leadership team (ELT). However, each ELT user is going to see the same data with a different perspective. Personalization is a great way to store each user’s information in the system and show data values specific to that user when he enters the dashboard.
Using variables allows you to wait until the Web application that has the variable is displayed in the Web browser before you add values to a query. Personalization allows you to pre-fill the value of a variable.
Many applications can help you create personalized dashboards. However, we can show you how to develop these personalized dashboards right in BEx Query Designer. See how to create a custom dashboard that depicts KPIs to enable quick decision making with a top-down view using multiple levels and detailed link to transaction data. Although this article is based on SAP BW 3.5, the concepts also apply to SAP NetWeaver BI Service Pack 15.
Set Up Personalization
Create a regular query in BEx Query Designer with a variable and execute it to see the screen in Figure 1. Right-click the personalization icon  and select Personalize to save a parameter to your user ID. Next time you run this query, that box will be pre-populated.

Figure 1
Standard variables entry screen for a BEx query
Behind the scenes, personalization is then loaded into the Business Content DataStore object (DSO) 0PERS_VAR. For dashboard purposes, you can create a flat file DataSource and load personalization for users directly into the DSO using the Business Content DSO 0PERS_VAR to store personalization data. Table 1 shows key fields in this DSO.
| TCTUSERNM |
ID of user used to log into the system |
| TCTVARNM |
Variable name from the query |
| TCTLOW |
Value of the variable that you want to use for personalization |
|
| Table 1 |
Noteworthy fields from 0PERS_VAR |
Use the Table Interface Class
The table interface class is an integral tool to the development of our dashboard. Whether it’s adding a BW value to a JavaScript variable or customizing the way your data looks in tables, effective use of the table interface class can add function and value to your dashboard. The table interface class expands a developer’s ability to deliver customized Web templates to the users.
Use standard SAP class interface CL_RSR_WWW_MODIFY_TABLE to create a custom class for your Web template. This allows the developer a much larger toolset for customizing how data is displayed in SAP BW. The class contains the following methods shown in Figure 2:
- ATTRIBUTE_CELL: Modifies the attribute data properties
- CAPTION_CELL: Modifies the header row over characteristic data
- CHARACTERISTIC_CELL: Modifies the characteristic data properties
- DATA_CELL: Modifies the key figure data properties

Figure 2
The four methods you use to create the custom class
Create a Link to Transaction Data
You can use the table interface class CHARACTERISTIC_CELL to help create the URL within the dashboard (Figure 3). In our example, the dashboard application we want to create is related to Project System (PS). The transaction data is related to resources in cProjects, which has a URL with the parameter Project ID as standard configuration.
 IF I_X = 3.
 DATA:
 s_current_system_id TYPE string,

 CASE s_current_system_id.
 WHEN 'DB1'. s_server_to_call = 'https://url id'.
 WHEN 'QB1'. s_server_to_call = 'https://url id'.
 WHEN 'PB1'.
 s_server_to_call = 'https://url id'.
 ENDCASE.
|
| Figure 3 |
Example code in table interface class CHARACTERISTIC_CELL to assist in creating a hyperlink connecting to another SAP transaction system |
Create a Window to an External Application Server
In our example, we want to link comments from the project manager to the dashboard to provide real-time feedback on a project’s status. This external data is an ASP.NET/ SQL application server that contains a table with strings that are too long (>60 characters) to load into SAP BW. Using the table interface class with other SAP BW tools helped us accomplish our goal.
The page we want to show in our SAP BW environment is dynamic. Therefore, we must pass some parameters to the ASP.NET/SQL application server — in our example, only a project number is required. Using the table interface on one of our tables of SAP BW data, we implemented a JavaScript call to save a specific key figure (in our case, the project number) to a JavaScript variable, which acts as an identifier to launch the page (Figure 4).
CONCATENATE C_CELL_CONTENT '' into C_CELL_CONTENT
|
| Figure 4 |
JavaScript call to save the key figure to a JavaScript variable |
On the ASP.NET/SQL side, we created a new, minimalist-style Web template to match the style of the calling template (Figure 5). This makes the ASP.NET/SQL application seamless with the SAP BW application (Figure 6). It is important to simplify the template as much as possible so that your external data matches the objects around it. For example, the IFrame allows you to specify the dimensions and coordinates of the viewing window, but under certain circumstances the frame may scroll if the underlying page is larger than the frame size, even with scrolling disabled.

Figure 5
A simple ASP.NET/SQL Web template
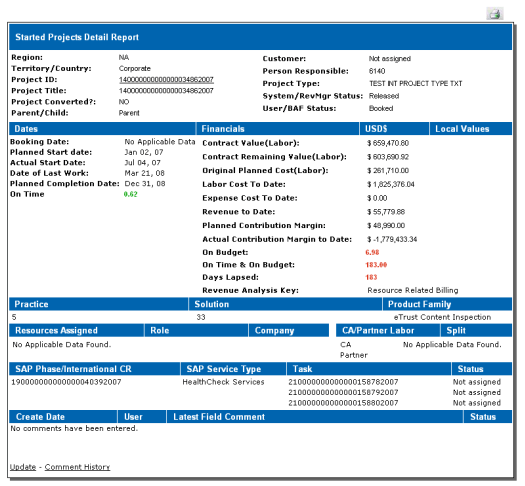
Figure 6
The final Web template
An IFrame is an HTML device, similar to a frame that allows you to view data from another Web page within the same window. This means that while it appears that you’re looking at just one Web page, the browser is reading HTML code from two separate locations. By using the IFrame, you can simply launch the external data next to the BW data and the end user never knows the difference. We scripted the creation of this IFrame so that we could dynamically select the called subordinate template based on the unique identifier (project number, in our case) discussed above.
When you have finished this setup, it is time to generate the IFrame on the calling template. We created a JavaScript function to use the document.write function with the HTML code to pair the URL string stub with the identifier (Figure 7). We then call this function wherever in the template we want our IFrame to appear. This location must be called sequentially (in the Web template HTML, top to bottom, left to right) after the table whose interface is saving the key figure value (Figure 8).
function createIframe(int){ var url="https://www.url.com/template.aspx?currentItem="+int;
 document.write('frameborder=0 marginwidth=0 marginheight=0 scrolling="no">'); }
|
| Figure 7 |
IFrame code to launch external data with the BW data |
<SCRIPT LANGUAGE="JavaScript">createIframe(projNum);</SCRIPT>
|
| Figure 8 |
Function to create your IFrame where you want it on the page |
Exception Reporting with Text Colors in the Dashboard
For some purposes, the table interface might not be enough. However, you can still use this functionality with a scripting language that can do further manipulation. For instance, it’s simple enough to color a numerical key figure, or even the cell containing a numerical key figure, based on its value with an exception. However, if you want to do much more than that, you’ll need another way.
By using JavaScript imbedded in our table interface class, we can do virtually anything. In Figure 9, we use a numerical key figure to populate the third column with a text key IF I_X = 9. For this particular requirement, the specific number isn’t important — it is important into which category this number falls. We were able to show just what bucket this piece of data falls into by using a script imbedded into our table interface class, as shown in Figure 10. By doing so, we can control that cell using the original value with a script built into the template. This can be a good option for a variety of reasons, because while the ways you can manipulate the data cell can be constrained somewhat in the table interface, JavaScript allows you virtually unlimited access to the cell, the table, and the various structures therein.
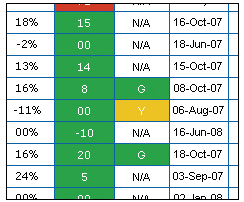
Figure 9
Key figures are assigned both text values and exception reporting capabilities
 concatenate '' into C_CELL_CONTENT.

 ENDIF.
|
| Figure 10 |
Code to add the text key IF I_X=9 |
Select Multiple Filter Values Before Executing a Query
Applying key non-SAP BW technologies can be important in developing a highly customized dashboard. In the previous section we discussed how scripting could bring value to your dashboard. You can improve this further by using standard HTML coding.
Creating your own filters, whether using standard HTML objects or customized JavaScript, can improve the look, feel, and usability of your dashboard. The goal we had was to give users the ability to select values from multiple filters and only then execute the query. By default, SAP BW executes the template with every filter selection, which can be problematic and time-consuming if you want to make several selections at once.
We created a JavaScript object that allows for multiple selections per InfoObject on which we filtered. Although the coding of such an object is out of scope for this article, we will discuss how to pass information through the URL string to the application server, and allow you, the coder, to decide how to use this information.
First, start with HTML. You can build the entire URL string without using HTML, but we found that using HTML form components made for easier integration with the HTML that SAP BW produces. When using a form with method GET, all elements of that form appear in the URL string as &name=value. SAP NetWeaver Application Server (SAP NetWeaver AS) knows to look for these commands and interprets them according to a predefined set of rules.
To begin, we created our form with some initial information that SAP NetWeaver AS needs to know to get back to this page (Figure 11).
<form id="form1" name="form1" method="get" action="/sap/bw/BEx" >
<input type="hidden" name="TEMPLATE_ID" value="MY_TEMPLATE"></input>
<input type="hidden" name="CMD" value="LDOC"></input>
<input type="hidden" name="DATAPROVIDER" value="DP1"></input>
|
| Figure 11 |
The header information needed to initialize filters |
The data provider input is best set to the data provider you are using to generate your filters. Set the target data providers in the filter properties. Also notice the use of type="hidden" for all the inputs in Figure 11. Hidden inputs do not show up on the rendered final page, although in some cases they may cause a vertical space to be entered. Figure 12 shows the final view. Note that the hidden inputs do not appear.
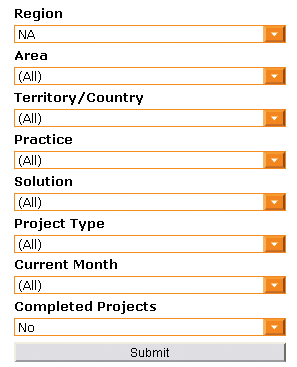
Figure 12
Multiple filters work together. The system applies them when you click on the Submit button.
You can work around this by simply placing the inputs in your HTML next to some text or object that takes some vertical space. Hidden inputs are preferred for anything you don’t want your users to change or see.
Next, name the InfoObjects that correspond to each of the filters (Figure 13). The value of each input is equal to the name of the corresponding filter. The number following FILTER_IOBJNM_ corresponds with the number following the FILTER_VALUE_ in Figure 14.
<input type="hidden" name="FILTER_IOBJNM_1" value="0OBJ1" ></input>
<input type="hidden" name="FILTER_IOBJNM_2" value="ZOBJ_A" ></input>
<input type="hidden" name="FILTER_IOBJNM_3" value="ZOBJ_X" ></input>
|
| Figure 13 |
Filter information for the object IDs |
<select id="0OBJ1" name="FILTER_VALUE_1">
<object>
         <param name="OWNER" value="SAP_BW"/>
         <param name="CMD" value="GET_ITEM"/>
         <param name="NAME" value="DROPDOWNBOX_1"/>
         <param name="ITEM_CLASS" value="CL_RSR_WWW_ITEM_FILTER_DDOWN"/>
         <param name="DATA_PROVIDER" value="DROPDOWN1"/>
         <param name="BORDER_STYLE" value="NO_BORDER"/>
         <param name="GENERATE_CAPTION" value=""/>
         <param name="IOBJNM" value="0OBJ1"/>
         <param name="BOOKED_VALUES" value="Q"/>
         <param name="SHOW_LABEL" value=""/>
         <param name="ONLY_VALUES" value="X"/>
         <param name="TARGET_DATA_PROVIDER_1" value="DP1"/>
         <param name="TARGET_DATA_PROVIDER_2" value="DP2"/>
         ITEM:            DROPDOWNBOX_1
</object>
</select>
|
| Figure 14 |
An example of the SAP-generated code for a filter with ONLY_VALUES selected, surrounded by user-added <select> tags. FILTER_VALUE_1 should correspond with FILTER_IOBJNM_1. |
To break down this code segment, it is important to understand what is generated by the SAP system, what is entered by the user, and to which variables to pay particular attention. All the <input> tags shown in Figure 13 must be entered by the user. The data passed in these tags is entered onto the URL string when the form is submitted. It lets the application server know that there is filter information for the specified InfoObject and tells it to associate that object with a filter number.
Next, in Figure 14 we have encapsulated an <object> tag within the <select> tags. The SAP NetWeaver BW system generates the information in the <object> tag (not an actual HTML tag, but a meta tag which is read and interpreted by Web Application Designer [Web AD] prior to runtime) when you create a filter object. The select tag’s filter number associates the object with it and encapsulates it with a filter number, which is also passed to the application server via the URL string. The application server determines which InfoObject to associate with this value and applies the filter.
As mentioned, there are many values within the object tags. Some of these values are customization from our work, such as the ID in the select statement being the same as the InfoObject name. This allows a custom JavaScript to identify the correct select box from which to pull values. (This is not necessary for most applications, but was for ours.) Many of the other values here are just what Web AD enters when you create the object, such as the item class. The important selections here are the following:
- ONLY_VALUES: Indicates that you do not want Web AD to create the full filter, but instead only list the <option> values for your select box. Leaving this unchecked gives you all the code provided in Figures 13 and 14, but in such a way that it is very difficult to customize.
- FILTER_VALUE_: This should be the same as the number following FILTER_IOBJNM_ for the corresponding object. The system indicates this both as the value of the hidden input and in the drop-down object.
You should add a similar object for each InfoObject that you want to use as a filter. When all the filters are in place, close up the form using a </form> tag. At this point, you can create a Submit button that sends all the information the users have selected (Figure 15). Figure 16 shows the final output.
You do not need to enclose this object within your form — it can sit virtually anywhere on your page.
<input type="button" value="Submit" name="Submit" onclick="form1.submit();”>
|
| Figure 15 |
Code for the Submit button |
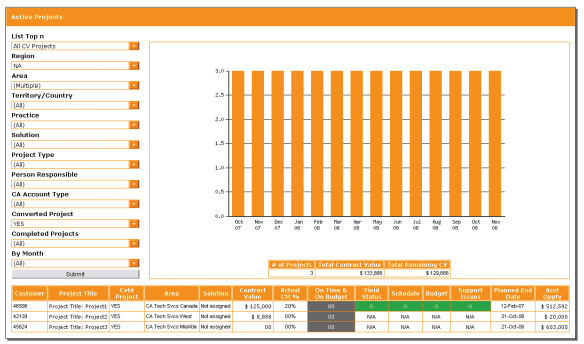
Figure 16
How the final dashboard appears
Rajeev Kapur
Rajeev Kapur is an SAP NetWeaver BI executive from BSI (an independent software vendor with BI expertise) with more than eight years of experience on SAP NetWeaver BI and 13 years overall with SAP. Rajeev’s core competences include experience as a BI manager and architect to implement SAP NetWeaver BI as an Enterprise Data Warehouse, performance tuning of BI systems, and as an SAP NetWeaver solutions architect at various client sites. He has taught BI and presented at BI conferences. He also holds an MBA in management information systems.
You may contact the author at rajeev@BSI-IT.com.
If you have comments about this article or publication, or would like to submit an article idea, please contact the editor.

Alexander Thomas
Alexander Thomas is an applications developer. He has been working with SAP NetWeaver BI for the past two years, with prior Web application design and Web design experience of more than eight years. Alex was a part of CA’s global information services team for more than four years and holds a bachelor’s degree in computer science from SUNY Stony Brook.
You may contact the author at alexander.j.thomas@gmail.com.
If you have comments about this article or publication, or would like to submit an article idea, please contact the editor.


