Learn how to get the best out of your SAP Business Suite on HANA with these step-by-step guidelines. A comparison of five methods of reporting shows how to take advantage of the in-memory database in ABAP applications.
Key Concept
Upgrading to SAP Business Suite on HANA makes your existing applications run faster compared with the traditional disk-based database with row-based data storage. On a high level, SAP HANA is similar to any other database, only faster because of its in-memory functionality with column-based data storage. It understands SQL and has Java Database Connectivity (JDBC) and Open Database Connectivity (ODBC) libraries. After making the switch to the SAP HANA database, you can run all your existing applications without making any changes. However, to leverage the full potential of the SAP HANA database, some design changes are needed.
SAP HANA is a lot more than just a database. It offers a full-blown application development platform. This presents a radical paradigm shift from traditional SAP application development where all the data is fetched from the database layer, and logic resides in the application layer to do computations and analysis. In this new paradigm, all the data-intensive operations can be pushed to the database layer and only the results are passed back to the application layer. This eliminates the need to transfer huge amounts of data from the database layer to the application layer and also takes advantage of the built-in parallel processing capabilities of SAP HANA. This results in a significant performance boost.
However, existing applications do need some redesign to take full advantage of the capabilities of SAP HANA. We show how to leverage the different capabilities of SAP HANA and transform an ABAP application designed and developed to run on a traditional database into an application that uses all the potential of SAP HANA.
Candidates for Redesign
Ideal candidates for redesign would be business critical programs or reports that deal with high volumes of data. Running performance traces on these applications reveals the percentage of time spent in the database and ABAP layers.
Consider a simple ABAP report written in SAP Customer Relationship Management (CRM) that takes the posting date range as an input parameter. Though this example is in CRM, the contents of this article apply to any module running on SAP HANA. The report shows all products sold during that period along with information such as the sold-to party name and the net price. The header of the report shows the sold-to party with the highest sales amount. This report retrieves data from large tables including Order Header, Order Item, Partner Functions, and Pricing.
The objective of the report is to show incremental performance gains as the code is pushed down from the ABAP layer to the database layer. The program can be run in five modes. The first mode uses traditional ABAP coding patterns, and the subsequent modes push the code from the ABAP layer to the database layer incrementally without any change in the business logic so that the report output remains the same.
- Traditional ABAP – Uses traditional ABAP coding patterns
- With attribute view – Uses attribute views exposed as ABAP external views
- With analytic view – Uses analytic views exposed as ABAP external views
- With calculation view – Uses calculation views exposed as ABAP external views
- With database procedure – Accesses via ABAP database procedure proxy
Traditional ABAP
Following is the high-level technical design of the traditional ABAP mode:
- Retrieve header details from table CRMD_ORDERADM_H based on the posting date
- For the HEADER GUID, get the items from CRMD_ORDERADM_I
- The pricing information for the items is available in table CRMD_PRICING_I
- Using CRMD_LINK, get the link GUID for partner and fetch sold-to party information from CRMD_PARTNER
- For the sold-to party, get the name information from BUT000 and concatenate
- Loop through the header and item info to prepare the output table
- Loop through the output table and aggregate the net sales by product and by sold-to party
- Display the sold-to party with highest sales in the report header and all product details in the SAP List Viewer (ALV) report output
The source code is provided in the file ZINC_TRADITIONAL_ABAP.
Run a performance trace for the report in traditional ABAP mode. Use transaction code ST12 to run the trace. ST12 is a combination of SE30 (ABAP Runtime Analysis) and ST05 (SQL Trace). Open transaction ST12 (Single Transaction Analysis) and click the Current mode button in Figure 1, which takes you to Figure 2.
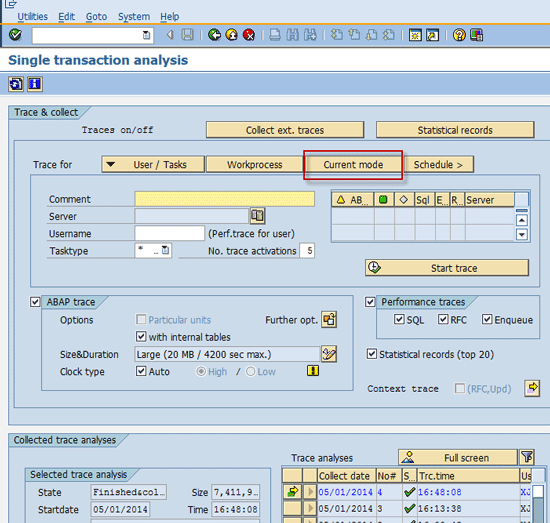
Figure 1
Run a performance trace in traditional ABAP mode
In the next screen, enter the name for the trace in the Comment field and the program name in the Program field. Click the Execute / start trace button (Figure 2) to go to Figure 3.

Figure 2
Enter the trace name and program name
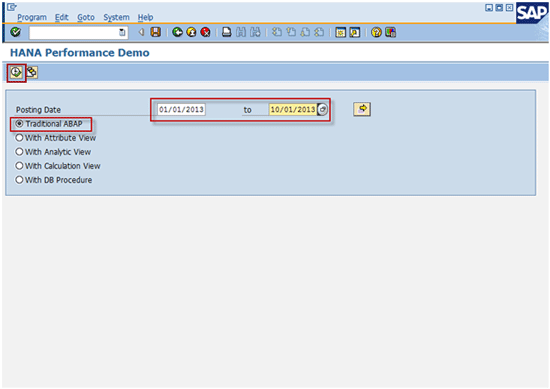
Figure 3
Enter selection criteria
The system launches the selection screen of the program. Enter the selection criteria by specifying a date range for the Posting Date fields and select the Traditional ABAP mode radio button (Figure 3). Click the execute icon or press F8 to run the program. The output of the report is shown in Figure 4. The time taken is 68 seconds.
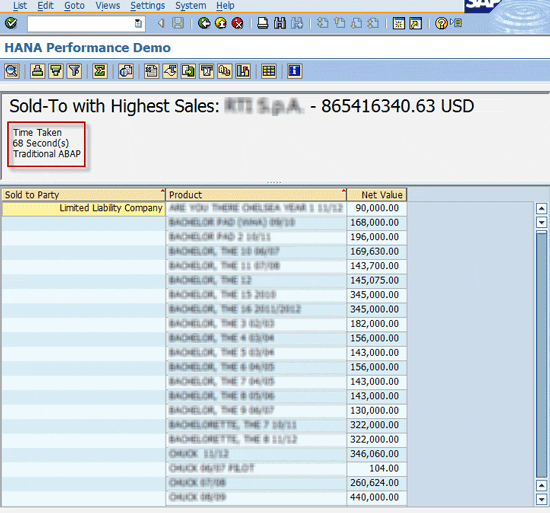
Figure 4
The report output and the time taken to execute it
Click the back icon to navigate back to the transaction code ST12 screen. The system ends the trace collection. Clicking the Full screen button in Figure 5 takes you to the trace results shown in Figure 6.

Figure 5
Go to the trace

Figure 6
Evaluation of the trace
Click the ABAP trace button to evaluate the trace (Figure 6). The trace results in Figure 7 show that most of the time is spent on SQL queries fetching item and pricing data. These queries can be combined into attribute views. The queries on tables CRMD_ORDERADM_I, CRMD_PRICING_I, CRMD_ORDERADM_H, and CRMD_LINK can be combined into attribute views.

Figure 7
Trace results for the traditional ABAP mode
Traditional ABAP programming guidelines recommend avoiding joining huge database tables. Instead, SQL queries are split and application layer logic is used to map and merge the required data in the ABAP layer. With HANA, no such constraints apply and tables with millions of records can be joined. Let’s start with creating a few attribute views for all the database tables used in the program.
Attribute View
Following is the high-level technical design for replacing SQL queries with attribute views:
- Create an attribute view AT_ORDER_H_PARTNER to retrieve the header and sold-to party information by joining CRMD_ORDERADM_H, CRMD_LINK, and CRMD_PARTNER tables
- Create an attribute view AT_ORDER_I_PRICING to retrieve product or item and net price by joining CRMD_ORDERADM_I and CRMD_PPRICING_I tables
- Create an attribute view AT_BUT000 to retrieve the concatenated name of sold-to party
- Expose the attribute views as external ABAP views – ZAT_ORD_H, ZAT_ORD_I and ZAT_BP
- Retrieve the header and sold-to party information from the ABAP view ZAT_ORD_H
- Retrieve the product and net price from the ABAP view ZAT_ORD_I
- Retrieve the concatenated sold-to party name from the ABAP view ZAT_BP
- Loop through the header and item info to prepare the output table
- Loop through the output table and aggregate the net sales by product and by sold-to party
- Display the sold-to party with highest sales in the report header and all product details in the ALV report output
The source code is provided in the file ZINC_ATTRIBUTE_VIEW.
Go the Modeler perspective in SAP HANA Studio using menu path Window > Open Perspective > Modeler. Create an attribute view in the Modeler perspective by right-clicking the Attribute Views folder and clicking the New… button (Figure 8).
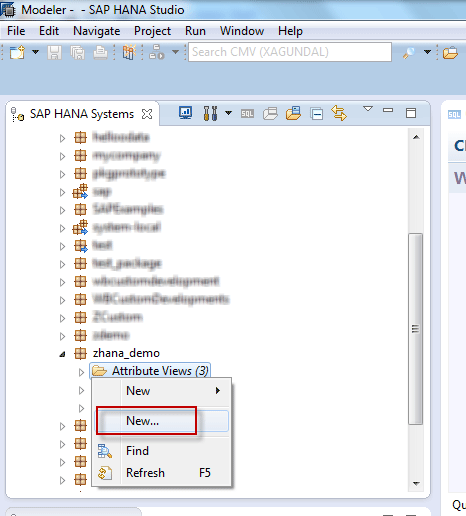
Figure 8
Create an attribute view
Enter the Name and Description as AT_ORDER_H_PARTNER and click the Finish button (Figure 9). This takes you to Figure 10.
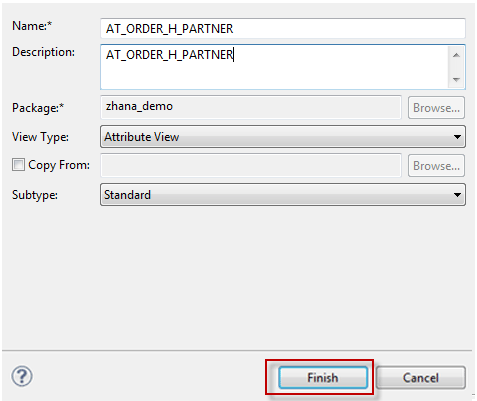
Figure 9
Name the view
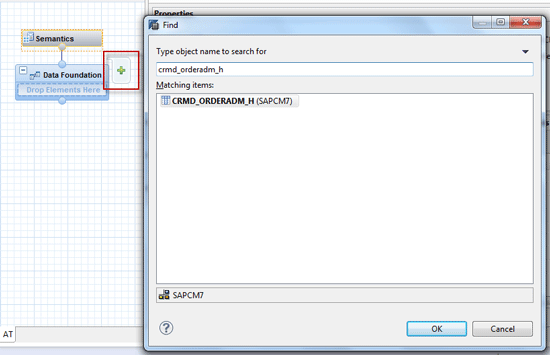
Figure 10
Add two tables
Add tables CRMD_ORDERADM_H, CRMD_LINK and CRMD_PARTNER by clicking the + icon (Figure 10). Create inner joins between the tables by dragging and dropping the key fields from one table to the other, which results in connecting the join fields (Figure 11).
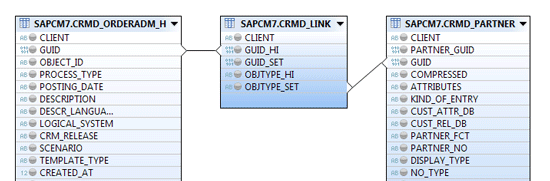
Figure 11
Drag and drop to connect the join fields
Create a filter on the PARTNER_FCT field by right-clicking it and selecting the Apply Filter option (because only the sold-to party partner function is needed). In the pop-up, enter the filter Value 00000069 (sold-to party) as shown in Figure 12. Similarly, apply a filter for OBJTYPE_SET with the value 07 (partner set).
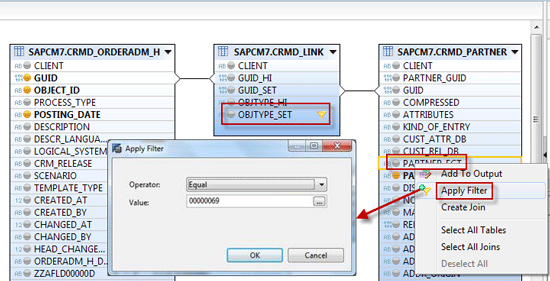
Figure 12
Apply filters
Add columns that are required to output by clicking the toggle lights next to the fields as shown in Figure 13. (Figure 13 is a zoomed out view of Figure 12.) Once that is done the fields appear in the Output pane under the Columns folder. Right-click the Calculated Columns folder in the Output pane and click the New… button to create a calculated column as shown in Figure 13. This takes you to a pop-up screen (Figure 14).

Figure 13
Add output columns and create a new calculated column

Figure 14
Specify the name and convert the 32-character field to a 16-digit GUID format
Enter the name of the column in the Name field. In the Expression Editor, convert the PARTNER_NO field, which is a 32-length character field, into a 16-digit GUID field using the hextoraw() function (Figure 14). This conversion is needed to make this field compatible with the field PARTNER_GUID in table BUT000.
Similarly, create another attribute view AT_ORDER_I_PRICING and add tables CRMD_ORDERADM_I and CRMD_PRICING_I. Create an inner join between the GUID fields by dragging and dropping from one table to the other (Figure 15).
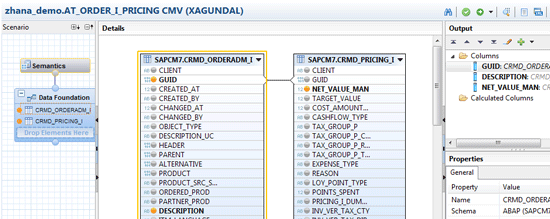
Figure 15
Create an attribute view, add tables, and create an inner join
Create another attribute view AT_BUT000, add the table BUT000, and create a calculated column by right-clicking the Calculated Columns folder in the Output pane. Click the New… button (Figure 16). This opens a pop-up screen (Figure 17).
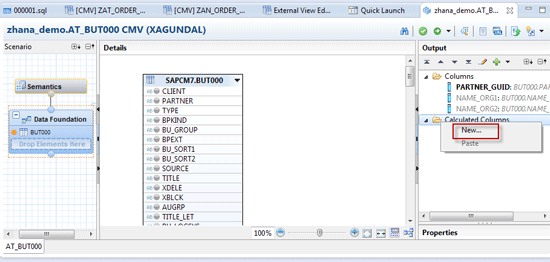
Figure 16
Add a table and create a calculated column
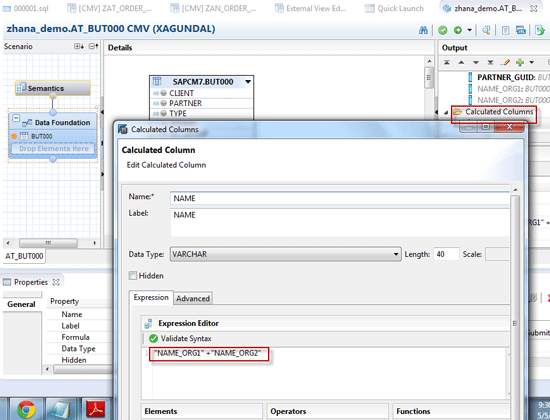
Figure 17
Create the concatenated Name field
Enter the name of the column in the Name field. In the Expression Editor, enter the formula to concatenate the NAME_ORG1 and NAME_ORG2 fields into the NAME field as shown in Figure 17.
The next step is to expose the attribute views as external views that can be accessed in ABAP programs. Go to the ABAP perspective in SAP HANA Studio using menu path Window > Open Perspective > ABAP. Click the Other… button (Figure 18). This takes you to a pop-up screen (Figure 19).
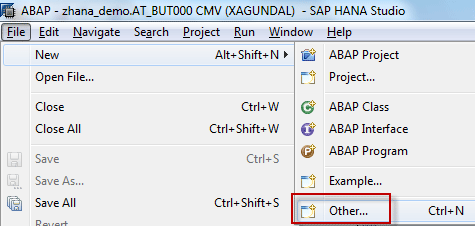
Figure 18
Create an external view
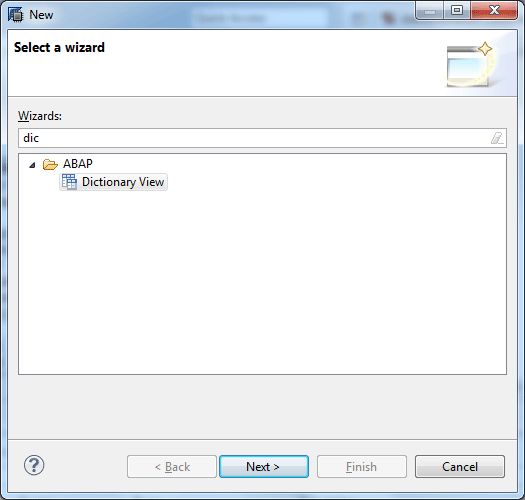
Figure 19
Go to the Dictionary View
Click the Dictionary View option and then click the Next button in Figure 19. This takes you to a pop-up screen where you create a new ABAP external view that can be accessed in the ABAP program (Figure 20).
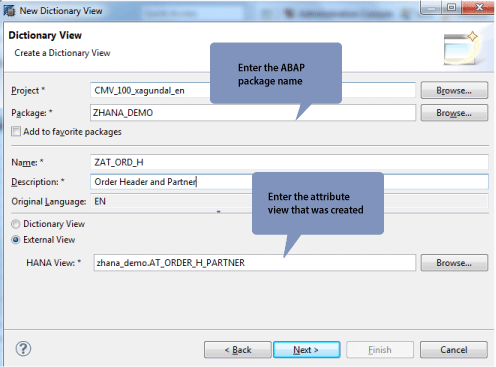
Figure 20
Expose the attribute view as an external view so that it can be accessed in an ABAP program
Enter the Project, ABAP Package name, Name, and Description. Select the External View radio button and enter the attribute view name in the HANA View field as shown in Figure 20. Clicking the Next button takes you to the next screen (Figure 21).
Tip!
Package names should be lower case to avoid errors while creating ABAP
views. If upper case is used, the package is not recognized and the
system throws an error.
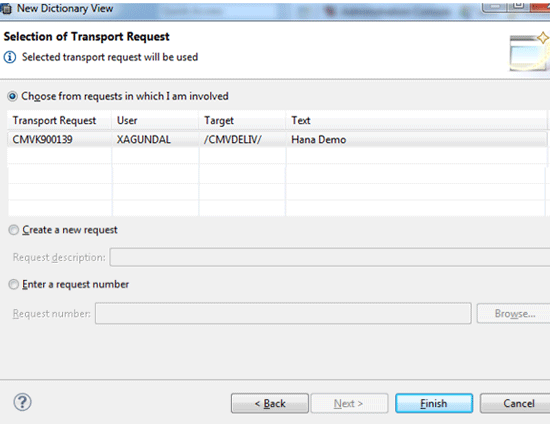
Figure 21
Select the ABAP transport
In the screen in Figure 21, click one of the available ABAP transports and click the Finish button.. A new transport can also be created by selecting the Create a new request radio button. In SAP GUI, go to transaction code SE11 and activate the view by clicking the activate icon in Figure 22.

Figure 22
Activate the view
Similarly, create external ABAP views for the attribute view AT_ORDER_I_PRICING as ZAT_ORD_I and AT_BUT000 as ZAT_BP. Run the trace using transaction ST12 and name it ATTRIBUTE VIEW as shown in Figure 23.

Figure 23
Run the ATTRIBUTE VIEW trace
Enter the same date range used before and select the With Attribute View radio button as shown in Figure 24. Click the execute icon or press F8 to run the program.
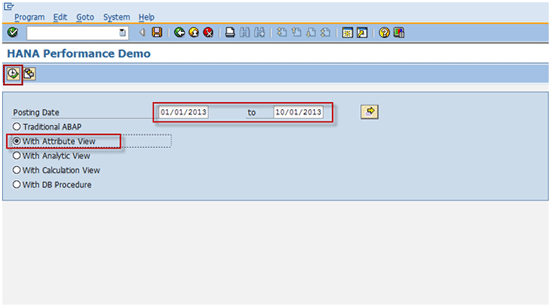
Figure 24
Enter the selection criteria and use the same date range
The output of the report is shown in Figure 25. The time taken is 20 seconds, which is a big improvement as compared with 68 seconds in the traditional ABAP mode (Figure 4).

Figure 25
Report output
Figure 26 shows the trace results sorted by the column Net time in % for the With Attribute View mode.
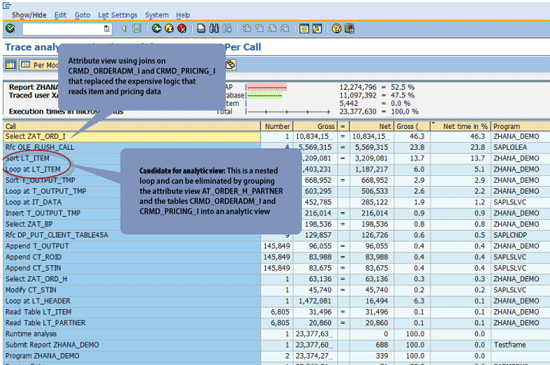
Figure 26
Trace results for the attribute view mode
As shown in Figure 26, the nested loop on the internal table LT_ITEM can be eliminated by grouping the attribute view AT_ORDER_H_PARTNER (ABAP view ZAT_ORD_H) and the tables CRMD_ORDERADM_I and CRMD_PRICING_I into an analytic view. This is explained in the next section.
Analytic View
Following is the high-level technical design for creating an analytic view:
- Create an analytic view AN_ORD_AGG using CRMD_ORDERADM_I and CRMD_PRICING_I as the data foundation and join with the attribute view AT_ORDER_H_PARTNER
- Expose the analytic view as an external ABAP view named ZAN_ORD_AGG
- Retrieve the header, item, partner, and net price information from the ABAP view ZAN_ORD_AGG
- Retrieve the concatenated sold-to party name from the ABAP view ZAT_BP
- Loop through the combined header or item info table and prepare the output table
- Loop through the output table and aggregate the net sales by product and sold-to party
- Display the sold-to party with highest sales in the report header and all product details in the ALV report output
The source code is provided in the file ZINC_ANALYTIC_VIEW. Go to the Modeler perspective in SAP HANA Studio using menu path Window > Open Perspective > Modeler. Create an analytic view AN_ORD_AGG by right-clicking the Analytic Views folder and clicking the New… button as shown in Figure 27. This takes you to Figure 28.
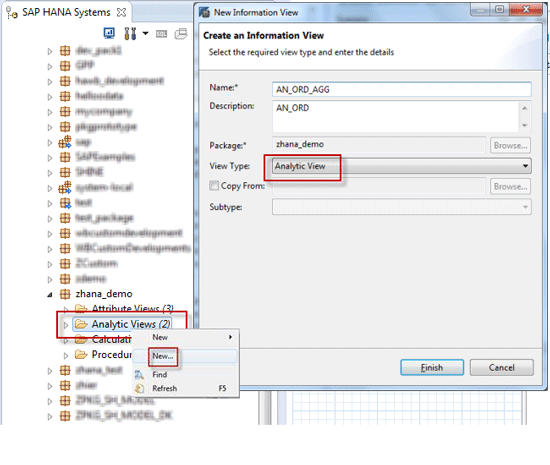
Figure 27
Create the analytic view

Figure 28
Add the attribute view
Add the attribute view AT_ORDER_H_PARTNER to the Logical Join node by clicking the + icon as shown in Figure 28.
Tip!
An analytic view cannot contain more than one attribute view.
Figure 29Figure 30
Figure 29
Add tables
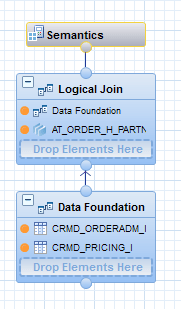
Figure 30
Tables are added
After the tables are added, the result looks like Figure 30. Click the Data Foundation node and create an inner join between the GUID fields. Toggle the three fields for output as shown in Figure 31.
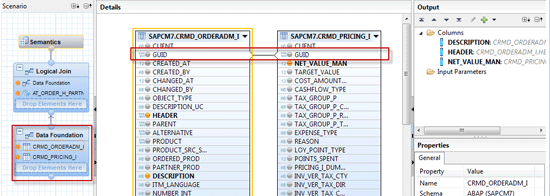
Figure 31
Create an inner join
Click the Logical Join node and create a join between the attribute view and the two tables for the fields GUID and HEADER as shown in Figure 32.
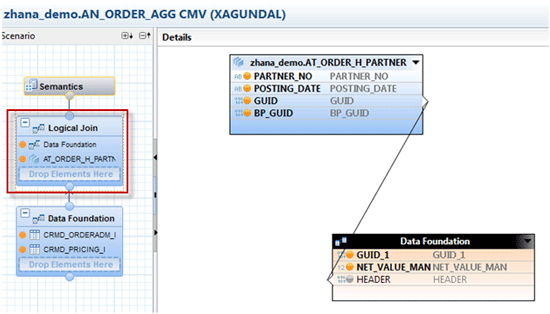
Figure 32
Join the attribute view and the two tables
Double-click the Semantics node. Mark the field DESCRIPTION as an attribute and NET_VALUE_MAN as a measure with the aggregation type as SUM. You do that by selecting the drop-down values in the Type and Aggregation columns (Figure 33).
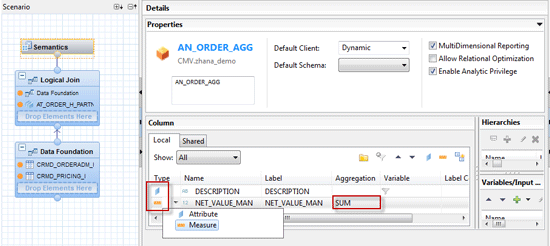
Figure 33
Mark the fields as Attribute and Measure
Create the external ABAP view ZAN_ORD_AGG for the Analytic View AN_ORD_AGG following the steps shown earlier in Figures 18 to 22. The External ABAP view needs to be created so that it can be accessed in the ABAP program. Figure 34 shows the external view created for the analytic view in transaction code SE11.
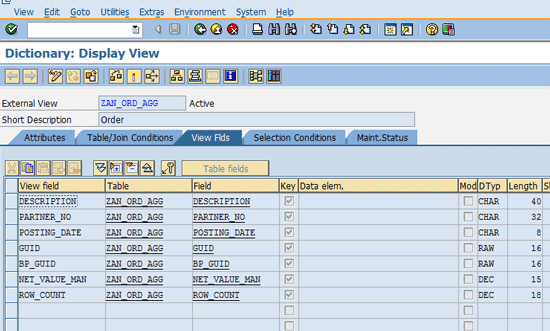
Figure 34
External ABAP view for the analytic view
Run the trace again using transaction ST12 and name it ANALYTIC VIEW (Figure 35).

Figure 35
Run the ANALYTIC VIEW trace
Enter the same date range used before and select the With Analytic View radio button (Figure 36). Click the execute icon or press F8 to run the program.

Figure 36
Enter the selection criteria and use the same date range
The output of the report is shown in Figure 37. The time taken is 6 seconds compared with 20 seconds in the With Attribute View mode.

Figure 37
Report output
Figure 38 shows the trace results sorted by the column Net time in % for the With Analytic View mode.
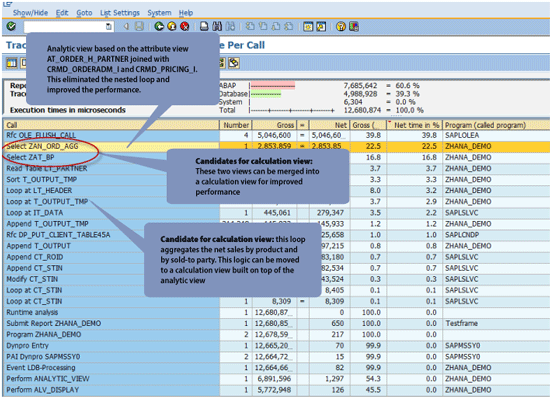
Figure 38
Trace results for the analytic view mode
Further performance improvement can be achieved by creating a calculation view that combines the analytic view ZAN_ORD_AGG and the attribute view ZAT_BP. In addition to that, the aggregation by product and sold-to party can be moved from the ABAP layer to the calculation view.
Calculation View
Following is the high-level technical design for creating a calculation view:
- Create a calculation view CA_ORDER_BP by combining the analytic view AN_ORDER_AGG( ABAP view ZAN_ORD_AGG) and the attribute view AT_BUT000 (ABAP view ZAT_BP)
- Expose the calculation view as the external ABAP view ZCA_ORDER
- Retrieve all the fields required for the output from the ABAP view ZCA_ORDER and use the Order By clause to get the aggregated output by product and sold-to party
- This eliminates all the loops as the aggregation is done in the calculation view
The source code is provided in the file ZINC_CALCULATION_VIEW.
Following are the steps to take to create the calculation view. Go to the Modeler perspective in SAP HANA Studio using menu path Window > Open Perspective > Modeler. Create a calculation view by right-clicking the Calculation Views folder and clicking the New… button. Name it CA_ORDER_BP in the pop-up (Figure 39). Clicking the Finish button takes you to Figure 40.

Figure 39
Create a calculation view
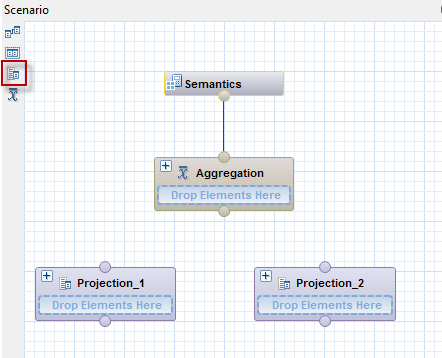
Figure 40
Create two projection nodes
Create two Projection nodes by clicking the projection icon highlighted in Figure 40 and dragging it onto the canvas below the Aggregation node. Projection nodes are used to hold the analytic and attribute views created earlier and also to select a subset of available fields. This is shown in subsequent steps.
Add the analytic view AN_ORD_AGG to the first Projection node and attribute view AT_BUT000 to the second Projection node (Figure 41).

Figure 41
Add the analytic view and attribute view
Select each Projection node and click the toggle light to add the required fields for output (Figure 42), which is an enlarged view of Figure 41.
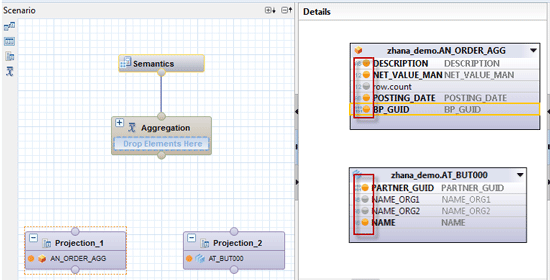
Figure 42
Toggle the required fields
Add a Join node by dragging and dropping the highlighted join icon and link the Projection nodes to it (Figure 43). The Join node is needed to join the views in the Projection nodes.
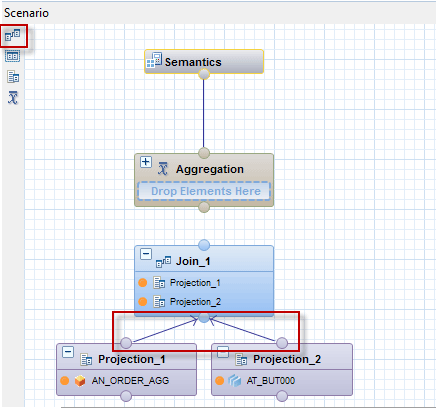
Figure 43
Add a join node and link the projection nodes
Select the Join node and create a join between the two Projection nodes on the BP_GUID and PARTNER_GUID fields (Figure 44).
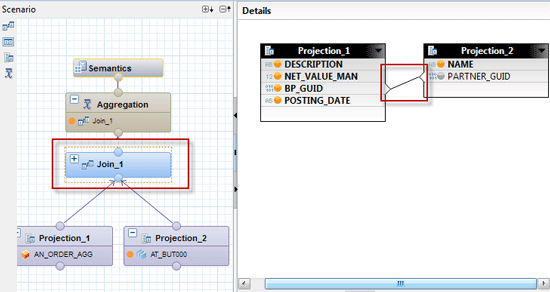
Figure 44
Create a join
Connect the Join node to the Aggregation node (Figure 45).
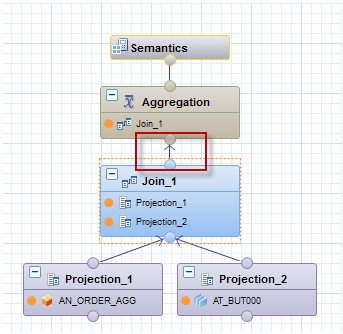
Figure 45
Connect the join node to the aggregation node
Select the fields that need to be part of the final output by clicking the toggle light next to the fields (Figure 46). Click the Save and Activate icon.
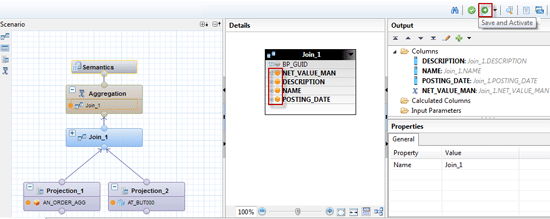
Figure 46
Select the output fields
Create the external ABAP view ZCA_ORDER_BP for the calculation view CA_ORDER_BP following the steps shown earlier in Figures 18 to 22. The external ABAP view needs to be created so that it can be accessed in the ABAP program. Figure 47 shows the external view created for the calculation view in transaction code SE11.
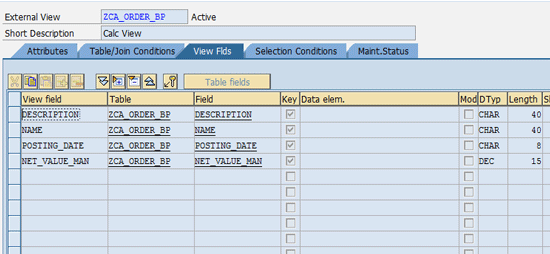
Figure 47
External ABAP view for the calculation view
Run the trace again using transaction ST12 and name it CALCULATION VIEW (Figure 48).
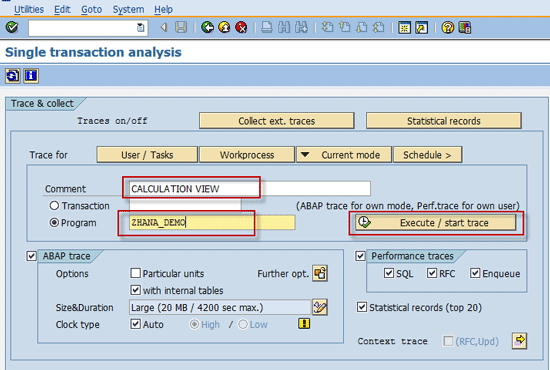
Figure 48
Run the CALCULATION VIEW trace
Enter the same date range used before and select the With Calculation View radio button (Figure 49). Click the execute icon or press F8 to run the program.
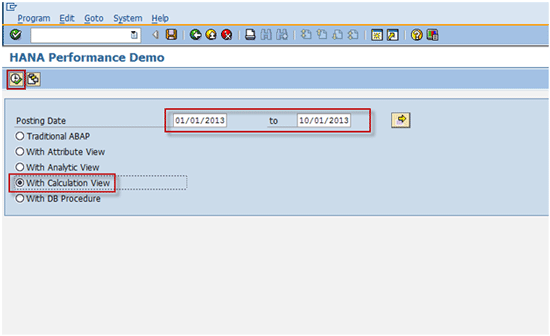
Figure 49
Enter the selection criteria and use the same date range
The output of the report is shown in Figure 50. The time taken is 3 seconds, which is better than 6 seconds in the With Analytic View mode (Figure 37).
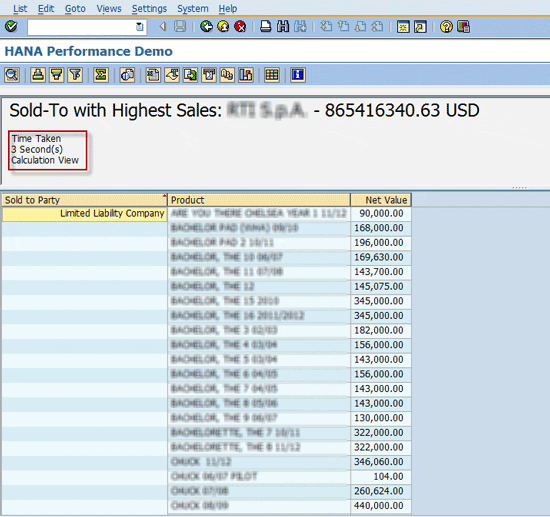
Figure 50
Report output
Figure 51 shows the trace results sorted by the column Net time in % for With Calculation View mode. The two highlighted queries in Figure 51 retrieve and aggregate all the necessary data in the calculation views with all the ABAP processing pushed to the database layer.
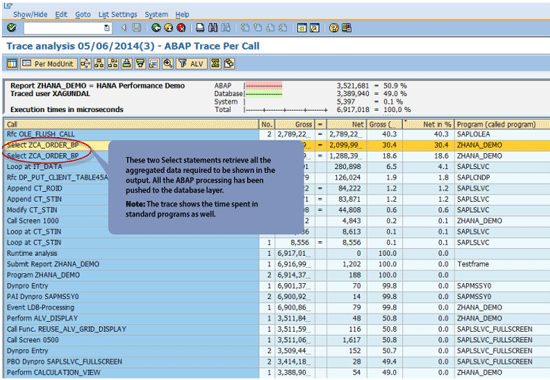
Figure 51
Trace results for the calculation view mode
Similar or more optimization can be achieved by creating a procedure in the database layer and consuming it in ABAP using a database procedure proxy.
Database Procedure
Following is the high-level technical design for the database procedure:
- Create a database procedure with an input parameter as a string and output parameters as tables for report output and aggregated output at sold-to party level
- Use built-in Calculation Engine functions to retrieve and aggregate data using the calculation view developed in the earlier section
- Create a database procedure proxy that can be called from the ABAP program
- Consume the database procedure proxy in the program by passing the posting date selection criteria in the form of a where clause as the input parameter
Follow these steps to create the database procedure and the proxy. Create a database procedure in the Modeler perspective in SAP HANA Studio by right-clicking the package and selecting New > Procedure (Figure 52). This opens the pop-up screen shown in Figure 53.

Figure 52
Create the database procedure
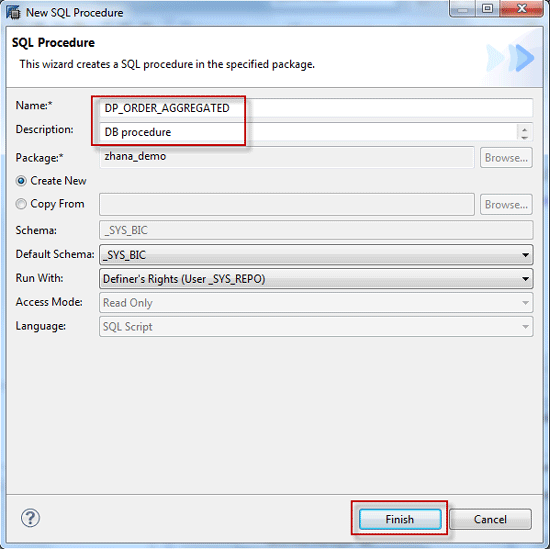
Figure 53
Name the procedure
Enter the Name and Description and click the Finish button (Figure 53).
Create an input parameter WHERE CLAUSE by right-clicking the Input Parameters folder and selecting New Scalar Parameter (Figure 54). Applications calling the procedure use this parameter to pass the selection criteria to the procedure. Clicking the OK button creates the parameter.

Figure 54
Create an input parameter
Similarly, create an output parameter table to hold all details to be returned by the procedure by right-clicking the Output Parameters folder and clicking the New button… (Figure 55). Name the output parameter, define the columns, and click the OK button.

Figure 55
Create an output parameter table
Similarly, create another output parameter table to hold the aggregated sales value by sold-to party by right-clicking the Output Parameters folder and clicking the New… button (Figure 56). Name the output parameter, define the columns, and click the OK button.
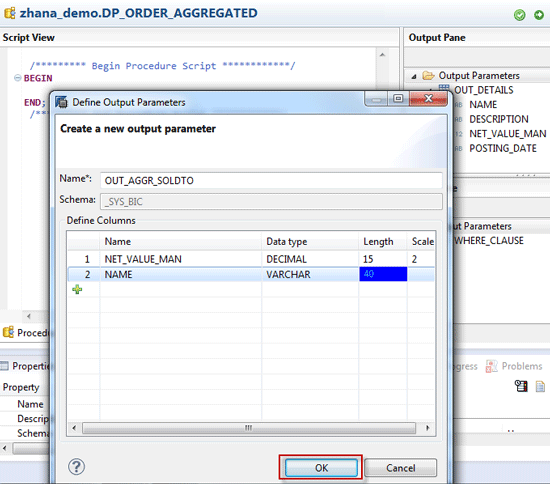
Figure 56
Create a table for the aggregated sales value
Create an output parameter table to hold report output details (Figure 57).
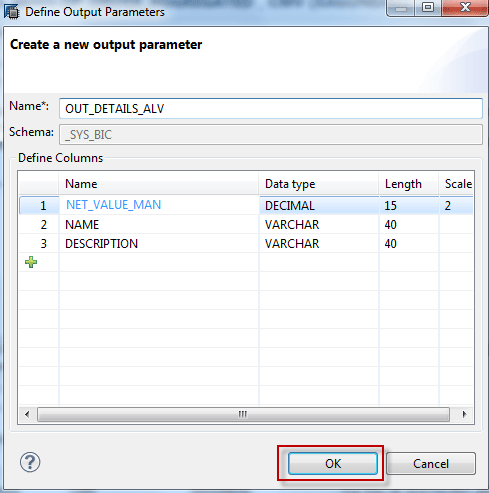
Figure 57
Create a table for output details
Use Calculation Engine functions in the procedure to retrieve data (Figure 58).

Figure 58
Retrieve and aggregate data
CE_CALC_VIEW is used to fetch data from the calculation view CA_ORDER_BP. APPLY_FILTER is used to filter data by the selection criteria passed to the procedure via the input parameter WHERE_CLAUSE. CE_AGGREGATION is used aggregate the net price by product and by sold-to party.
Tip!
SQL statements can also be used in the procedures. To avoid performance
issues, do not use a combination of calculation engine functions and SQL
statements in the same procedure.
A proxy needs to be created for this procedure so that the ABAP program can invoke it. Go to the ABAP perspective in SAP HANA Studio using menu path Window > Open Perspective > ABAP. Create a Database Procedure Proxy by right-clicking the Dictionary folder and selecting New > Database Procedure Proxy (
Figure 59). This opens a pop-up screen (
Figure 60).
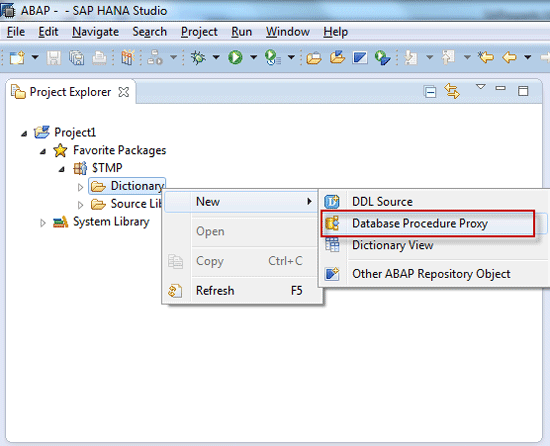
Figure 59
Create a database procedure proxy

Figure 60
Name the proxy
Enter the name for the proxy and the procedure created earlier and click the Next button (Figure 60). The system generates the Database Procedure Proxy and the ABAP interface (Figure 61).

Figure 61
Proxy and ABAP interface generated
The code to call the database procedure proxy from the ABAP program is shown in Figure 62. The source code is provided in the file ZINC_DB_PROCEDURE.

Figure 62
Code to call the proxy
Tip!
If the proxy is not activated and the program shows syntax errors, run
the standard program DBPROC_ACTIVATE_PROXIES to activate the proxy.
Run the trace again using transaction ST12 and name it DB PROCEDURE (
Figure 63).
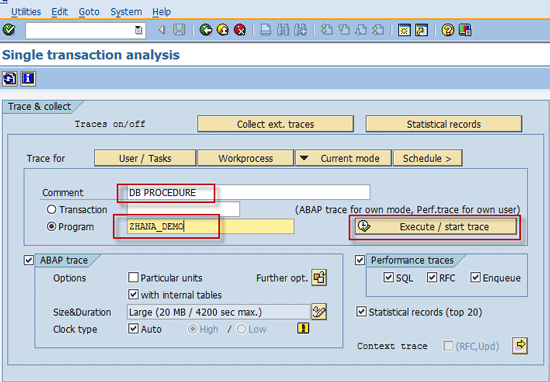
Figure 63
Run the DB PROCEDURE trace
Enter the same date range used before and select the With DB Procedure radio button (Figure 64). Click the execute icon or press F8 to run the program.
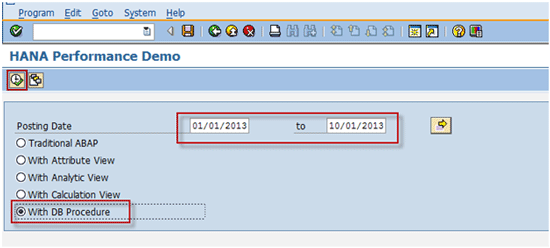
Figure 64
Enter the selection criteria and use the same date range
The output of the report is shown in Figure 65. The time taken is 3 seconds, which is the same as the time taken in the With Calculation View mode (Figure 50).
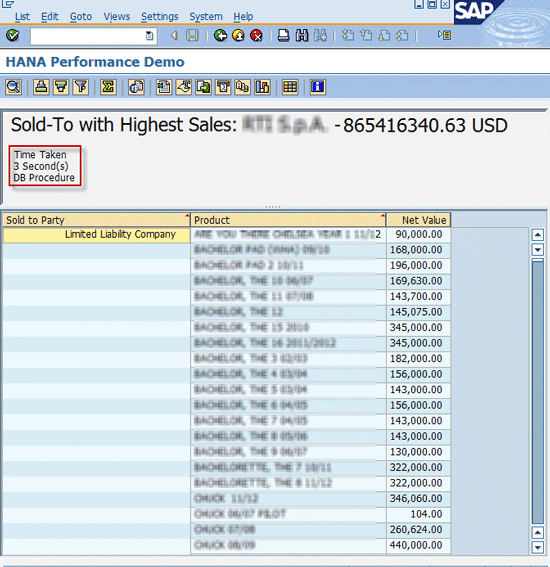
Figure 65
Report output
Figure 66 shows the trace results sorted by the column Net time in % for the With DB Procedure mode. All the processing in the ABAP program has been pushed to the database layer.
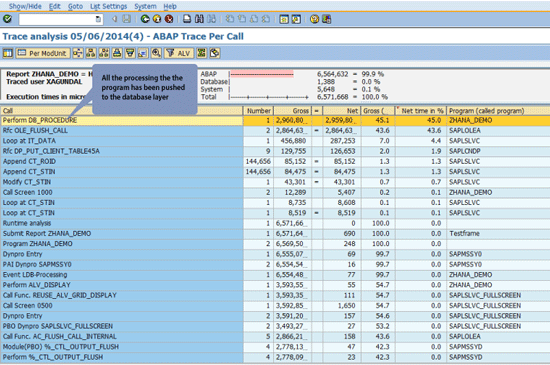
Figure 66
Trace results for the DB Procedure mode
Following is the summary of the performance statistics in each mode:
- Traditional ABAP – 68 seconds
- Using attribute views – 20 seconds
- Using a combination of analytic and attribute views – 6 seconds
- Using a calculation view embedded with analytic and attribute views – 3 seconds
- Database procedure with calculation engine functions applied on a calculation view – 3 seconds
Abhishek Gundala
Abhishek Gundala is a manager at Capgemini and has more than 10 years of experience in SAP CRM and ECC. He has strong expertise in CRM WebClient UI, Object Oriented ABAP, and HANA. His experience includes multiple full life-cycle SAP implementations including upgrades to HANA spanning the Media, Services, and Defense industries. Over the years, he played multiple roles as a developer, team lead, technical architect, and project manager.
You may contact the author at agundala@gmail.com.
If you have comments about this article or publication, or would like to submit an article idea, please contact the editor.

Bharath Nagaraj
Bharath Nagaraj is a senior consultant with Capgemini SAP Service line. Bharath has been working as an SAP CRM consultant for the past seven years. His areas of expertise are SAP CRM Marketing, Sales and Service, and CRM Web Client UI. He is knowledgeable about ABAP on HANA, HANA modeling, UI5, and SAP FIORI.
You may contact the author at bharath.nagaraj@capgemini.com.
If you have comments about this article or publication, or would like to submit an article idea, please contact the editor.