SAP solutions require a considerable amount of end-user training. Navigating through a large collection of training material can be daunting for a new SAP end user. By aligning the training to the business processes and to specific jobs, SAP Solution Manager Learning Maps can make accessing training more streamlined.
Key Concept
By using the Business Process Hierarchy and the SAP HR organization structure available in SAP Solution Manager, you can better manage the organization and delivery of training. The SAP HR organization structure can be leveraged to align training to job roles.
Learning Maps are SAP Solution Manager’s way for you to build training materials for your users without having to undertake buying and installing a learning management system (LMS). Rather than having to acquire an LMS and then train your users on it, you can use this feature within your already implemented Solution Manager system and a Web browser. This feature enables you to produce training materials that users can follow more easily without incurring further cost.
The objectives for using Solution Manager Learning Maps are as follows:
- Provide collections of end-user training that are aligned to end users’ jobs
- Enable “train before access,” which allows access to the training without access to the SAP systems
- Provide for training alignment to business process
- Identify training needed by job role
To deliver on the objectives, you need to use the following Solution Manager features as enablers:
- Solution Manager HR organization structures
- The Business Process Hierarchy (BPH) Training Materials and End User Roles tabs
- Solution Manager Learning Maps
Note
The content of this article is based on Solution Manager 7.1 Support Package (SP) 05. However, the features I describe have been available in Solution Manager since version 4.0 SP 15. The HR systems I refer to are SAP HR 4.6C and higher.
I’ll start by explaining some setup steps that you have to perform and then show you how to build a sample Learning Map.
Preparation and Setup
You need to perform three preparation steps:
- Solution Manager HR organization structures: Create jobs for use on the End User Roles tab in the BPH
- Assign jobs to business process steps in the BPH
- Assign training materials to business process steps in the BPH
To create Learning Maps, follow this procedure:
- Set up the navigation structure
- Establish a look and feel
- Build the maps by role
- Build chapters and units within the roles
- Preview the maps in a Web browser to check the look and feel
- Publish the maps for use
- Receive and review feedback
End-User Jobs
To provide training collections or curriculum that are aligned to particular job roles, you must first set up the job roles in Solution Manager. Solution Manager delivers the CRM HR organization model that matches the HR organization model that is provided in the central SAP ERP HCM system. In fact, if you have SAP ERP HCM set up, you can synchronize your existing HR organizational model to Solution Manager. For details about how to distribute your existing HR organization model, see
this SAP Help page.
Solution Manager uses four key organizational model types.
- Job
- Organizational unit
- Position
- User
If you don’t have a central HR system, you need to set up the organization elements directly in Solution Manager.
Note
If you have a central HR system, you can leverage the HR Organizational Model via a synchronization capability in Solution Manager. For details see
this SAP Help link.
For this article, I focus on the use of the job only. The other organizational model types are valuable for further grouping and representing the company’s reporting hierarchy. You can also use them to create more elaborate Learning Maps, such as common learning for an entire department. For this reason, I show you how to set up these other structures, but I build the Learning Map only using the job.
To better understand how the above organizational model types work together, you need to take a look at one of the default evaluation paths in the HR functionality. The evaluation path defines how the system recognizes the relationships among the different organization model types. The standard evaluation path OFFICE establishes the following relationships between the above referenced types:
- The organization unit incorporates the position. For example, you can set up the organization unit Accounts Payable Department that can incorporate the positions Accounts Payable Manager and Accounts Payable Clerk.
- A job describes a position. For example, the job Payables Clerk describes the position Accounts Payable Clerk, whereas the job Payables Manager describes the position Accounts Payable Manager.
- A user is a specific named user in the system. In the OFFICE evaluation path, a position holds a user. Because the job describes the position and the position holds the user, the system can determine the relationship between a job and a specific user.
Although this may sound a bit complicated, it’s important for Solution Manager to be able to align end users to jobs so that you can communicate to users which Learning Maps apply to them. When you publish your final version of the Learning Map, Solution Manager can notify the end users if you have these relationships established. This feature can be useful when releasing new or updated training when rolling out new functionality or preparing to release an upgrade. It requires that you set up a more complete organizational structure than I explore here.
However, this approach is not advantageous if your business requires users to take training before getting their system access. In this situation, you need to set up the job definitions, align the training to the job definitions, and build the Learning Maps. When the Learning Maps are complete, you can create an email with the URL to the Learning Map and send it to the end users who need training prior to getting system access.
Now I’ll explore how to maintain the organizational structure. For these purposes, the primary organizational object type I’ll use is job. You can create jobs as independent objects that are not assigned to a higher level organizational structure. This method is the easiest way to align training to job roles. At the end of the article I’ll take a brief tour of how jobs can be related to organizational units for further grouping.
Using transaction PPOMA_CRM you can create jobs without having to assign them to specific organizational structures. In
Figure 1, you see the initial screen for PPOMA_CRM.

Figure 1
The initial screen for transaction PPOMA_CRM
Follow menu path Edit > Create Jobs to bring up a pop-up screen (
Figure 2). Create a new job called Accounts Payable Approver. You can also see other jobs that I created here previously.
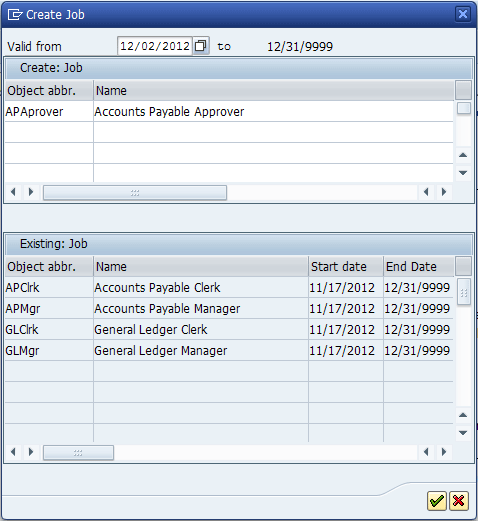
Figure 2
Create the new job Accounts Payable Approver in the Create Job pop-up screen
These types of jobs align the training materials for the end-user community, but what about during the implementation project itself? There are a lot of job roles in a typical SAP implementation (e.g., project managers, team leads, solution documentation authors, designers, configuration team members, and developers). Each team member needs some sort of training for the project even if it’s just reviewing project standards and procedures. Because Solution Manager is one of the first systems you build in an SAP project, it’s a perfect place to store project training.
Figure 3 shows some jobs for the project team. You create these jobs by following the same steps I described earlier for creating other jobs.

Figure 3
Jobs for the SAP project
After you create the jobs, you can begin assigning them to the business processes that are in scope for the individual jobs. Although Solution Manager supports assigning jobs to all levels of the BPH (scenario, process, and step), I recommend that you assign the jobs at the lowest level, the step. This level provides you with better flexibility to tailor the scope of the job and reduces the risk of having segregation of duties (SoD) conflicts if the same person does not perform multiple steps in a single process.
Now you are ready to assign the jobs to the BPH. For this example, I’m using a BPH that I built for setting up Solution Manager for the project.
Figure 4 shows the section of the BPH related to blueprint definition.

Figure 4
BPH for setting up Solution Manager — blueprint scenario
You can assign the jobs to the BPH in either transaction SOLAR01 or SOLAR02. However, you can assign the training materials only in transaction SOLAR02 by default. If you’d like to assign training materials in the blueprint phase, you can activate the Training Materials tab in transaction SOLAR_PROJECT_ADMIN.
In the next section, I’ll briefly describe the steps for assigning job roles and training materials. For more details on this process read Rohan Parikh’s article,
“Host Training Material or Documentation Internally or Externally from SAP Solution Manager.”
In
Figure 4 you can see that I assigned the Project Manager role to the business process step of finalizing the business blueprint. In
Figures 5 and
6, you can see that I assigned the project team leads and project team members to the other activities in the process Business Blueprint Definition.

Figure 5
The project team lead assigned to defining the processes and interfaces

Figure 6
The project team member assigned to describing the processes
To assign these roles navigate to the BPH node and click the End User Roles tab (
Figure 7). Click the Type dropdown menu and select Job to bring up the screen shown in
Figure 8.
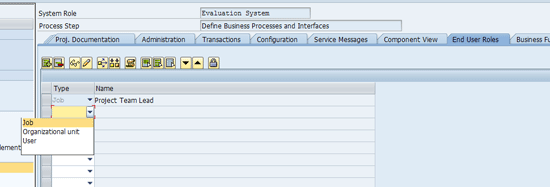
Figure 7
Assign the job in the End User Roles tab

Figure 8
Select Job to search for the jobs defined in the system
Repeat this process until you have all the jobs assigned to the appropriate nodes on the BPH. Then you need to assign the training materials to the business process. This step is similar to creating and assigning a document to the General or Project Documentation tab.
First, use transaction SOLAR02. Navigate to the BPH node in which the training material is to be stored. Click the Training Materials tab (
Figure 9).
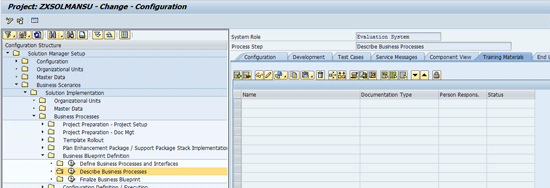
Figure 9
The Training Materials tab
Click the insert icon

to create, assign, or upload the training materials.
Next, use the SOLAR_LEARNING_MAP techniques described in Rohan’s article to build the basic Learning Map. I’ll pick up with the user role filtering and show how the work I did earlier can be used to align the materials by job role.
Once you build the basic structure of the Learning Map, you can add training content by job role. In
Figure 10 you can see a partially built Learning Map that houses project team training. You want to add some additional training material to the map for the project team members. All project team members need to have this training.

Figure 10
The project team training Learning Map
Click the refresh icon

in the lower-right window of the screen to show the training that is available in your project.
Figure 11 shows the refreshed content window. Now filter the list by job role so that you can find the training that is assigned to the project structure nodes that are also assigned with the job role for Project Team Member.

Figure 11
Learning content from the project available for assignment of the Learning Map
Click the Filter by Roles button

and select the indicator for Project Team Member (
Figure 12). Click the green check mark icon or press Enter.

Figure 12
Select the Project Team Member job role
The content list has been filtered down to only those training materials that need to be provided for project team members (
Figure 13).

Figure 13
Training materials associated with the Project Team Member job role
Now you can drag and drop the training materials to the appropriate locations on the Learning Map to finish building the map for the project team member. Note that in
Figure 14 I added some additional training material to the Daily Activities unit of the project team member chapter.

Figure 14
Create documents in Solution Manager training documents added to the Project Team Member — Daily Activities unit
The description of the material is included in the comments associated with the documents. To maintain these comments click the Document Attributes button. Enter descriptions of the material in the Comments tab of the pop-up screen that appears (
Figure 15).

Figure 15
Comments tab of document attributes
To add information about the duration of this particular training item, click the General Tab. You can find the duration only by using transaction SOLAR_LEARNING_MAP and clicking the General tab of the document attributes pop-up screen. The other document attributes are accessible and maintainable in transactions SOLAR01 and SOLAR02 by using the attributes icon.
Figure 16 shows the General Attributes tab from within transaction SOLAR_LEARNING_MAP. Note the duration attribute field named Time Required (Min). In my example I use 60 minutes as the duration of the training provided.

Figure 16
General document attributes with the Duration attribute
Repeat these steps until you’ve assigned all the training material to the Learning Map.
You can preview what the map looks like in your browser by clicking the Open in Web Browser button in
Figure 14.
Note
You must set your computer to use Internet Explorer as the default browser for the Learning Map to display properly. To set Internet Explorer to the default, open it and follow menu path Tools > Internet options. Click the Programs tab and click the Make default button if it is not already selected.
Figure 17 shows what the Learning Map looks like in the Web browser.
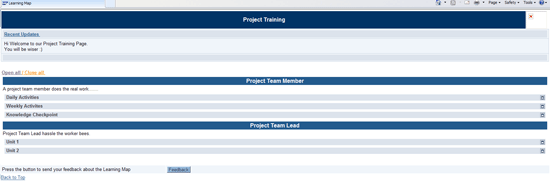
Figure 17
The Learning Map in a Web browser
Let’s take a closer look at the newly created Learning Map. At the top you see the map header (
Figure 18).

Figure 18
The Learning Map header
You can see the title of the Learning Map and the text that you typed into the Header section of the Learning Map while you were building it. Note the Recent Updates link. This link is a handy feature for your trainees. It enables them to see what’s new at a glance so they can save time by going straight to the new training.
Figure 19 shows you what the Recent Updates page looks like.

Figure 19
Recent Updates page
If the trainee clicks the item listed under the Changed Documents heading, the Learning Map opens that unit of the training material immediately without the trainee having to navigate to it on the Learning Map.
Figure 20 shows the first chapter of the Learning Map. Note the Open all and Close all links. You use these links to expand the chapter and show the units and training materials contained within the units.
Figure 21 shows the first chapter fully opened.

Figure 20
The first chapter of the Learning Map

Figure 21
Project Team Member chapter fully opened
Note the different areas of
Figure 21. The training materials themselves are shown on the left side of the view with their respective titles underlined. Clicking the title opens the training material.
Near the middle of the screen you can see the Feedback button. This button is used for the trainees to provide feedback to the training team on how effective the training is and also to provide comments. This feature enables you to hear back from your trainees so that you can continuously improve your training.
When trainees take the training, Solution Manager keeps track of how many times each piece of training material is opened and stores this data in the Training Analysis view in Solution Manager. This data can provide valuable insight into which training is more popular and which training is not being leveraged fully by the trainees. Again, this is useful for your continuous improvement efforts.
Figure 22 shows an example of a trainee entering feedback on one of the pieces of training within the Project Team Member chapter.
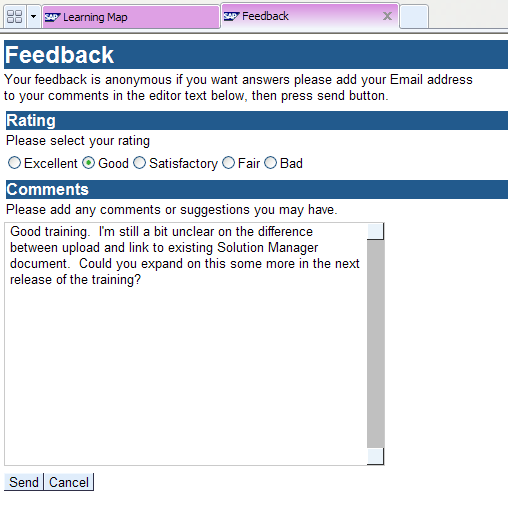
Figure 22
A trainee’s feedback
As the owner of the Learning Maps, you need to run the analysis regularly to monitor how the training is being used and review the feedback that the trainees provide. I recommend that you do this daily for the first few weeks when new training is rolled out. Then as you get the materials fine-tuned, follow a review cycle of once a week.
To view the analysis, select the Learning Map in transaction SOLAR_LEARNING_MAP and click the Analysis button (
Figure 23).

Figure 23
SOLAR_LEARNING_MAP with a Learning Map selected to prepare to view the analysis
Figure 24 shows the analysis view for my example Learning Map. Note that it shows you the number of times each piece of training material is accessed as well as information on the ratings from the feedback. It also calculates an overall rating based on the average of the ratings received.
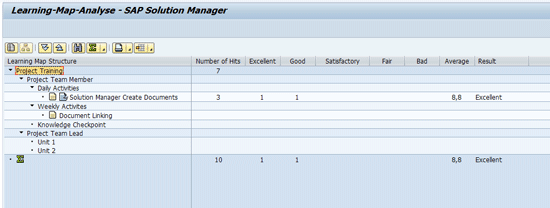
Figure 24
Ratings analysis for the Learning Map
To view the details of the feedback, click the Feedbacks icon

to the left of the training document’s title (
Figure 25).

Figure 25
Access feedback about material
Figure 26 shows the detailed feedback for the Solution Manager Create Documents training item.

Figure 26
Learning Map feedback
The facts that Solution Manager generates Learning Maps to be accessible in a standard Web browser and that you don’t have to train anyone on using a learning management system make the functionality valuable. I haven’t covered every feature in this article, but the content that I provided enables you to get started with this functionality and begin using Learning Maps on your own.
D. Russell Sloan
D. Russell Sloan is a specialist in project and program governance for IBM. He focuses on the use of SAP Solution Manager for global rollout projects for IBM’s largest customers, having worked with SAP software since 1996. Russell has degrees in accounting and information systems and has been a team and project leader for SAP projects for more than 14 years. He has been developing and deploying software systems for over 30 years.
You may contact the author at
solmanruss@gmail.com.
If you have comments about this article or publication, or would like to submit an article idea, please contact the
editor.