Learn how to create a custom back-end service for SAP Processes and Forms. Back-end services make your forms more dynamic. Some benefits provided by back-end services are:
• Data is from the back end, so users don’t have to add data that is already available in the back end for the employee
• The ability to look for data in the back end, based on the input contained inside the form
• The ability to get data from outside the back end, based on the input inside the form
• Complex calculated data based on the input that is filled inside the form
Key Concept
SAP Processes and Forms is used to create custom forms for employees, managers, and HR administrators in a portal or with the SAP NetWeaver Business client. Most companies use paper forms to inform their HR departments of an employee’s address change. Using SAP Processes and Forms, this can be done electronically. Using workflow, the forms are automatically transferred to the next processor—either a manager for final approval or to an HR administrator for processing. Once a form is approved and processed, the employee receives a confirmation notification.
SAP Processes and Forms is a framework for users to fill in forms that are then transferred via workflow to the next processors of the forms. For instance, an employee fills in a declaration for travel expenses, which is transferred to their manager for approval. After approval, it is automatically sent to the HR department to check if it is a valid declaration. When the declaration is approved, it is automatically transferred to the SAP back end.
Note
The functionality discussed in this article is available from SAP ERP Central Component version 5.0.
I show you how to create a custom back-end service to get the street name and city of an employee by entering their Zip code and house number. With this functionality, the user only has to fill in two fields rather than four. This reduces the time and effort involved, and also the likelihood of mistakes caused by input errors. Furthermore, the data input for the street and city names are always exactly the same, which makes it easier when querying them later.
Note
The street name and city can be achieved by calling third-party Web services, but this is not covered in this article as many countries use different Zip codes and there are too many variables to cover. Because I am not calling a third-party Web service, I use hard-coded entries for the street name and city in my example scenarios.
In addition, I do not address the creation of a process or scenario as this is something I assume you are able to do.
Create a New Custom Back-End Service
Follow these easy steps to create a new custom back-end service.
Step 1. Select the Form
Start transaction HRASR_DT (Figure 1). In this example, there are two back-end services: one for the display of old address values (Figure 2) and one for the new ones (Figure 3). Click the relevant back-end service to get from one to the other.
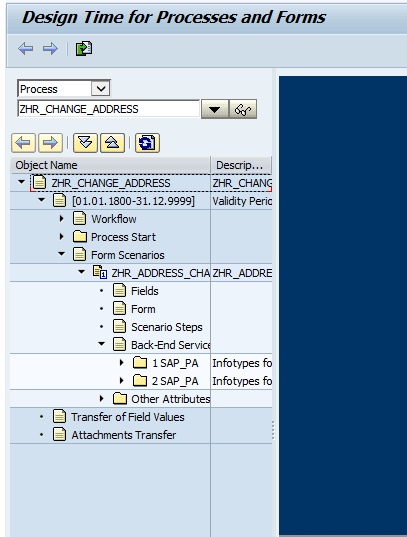
Figure 1
Design the processes and forms
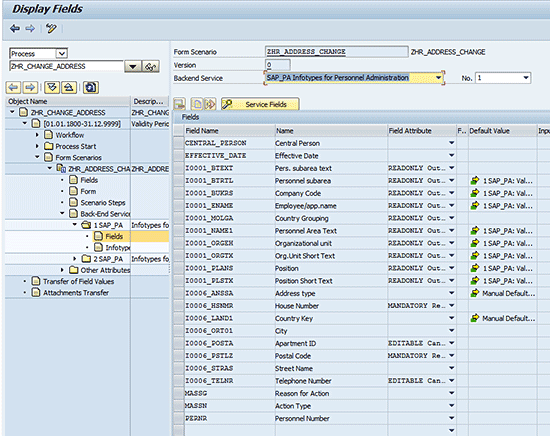
Figure 2
Create back-end service for the new address data fields
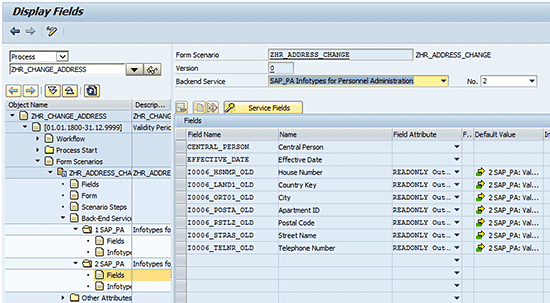
Figure 3
The back-end service for the old address data fields
Step 2. Create the New Back-End Service
Double-click the Back-End Services object name folder (highlighted in Figure 4). On the right side you see the list of already available back-end services provided by the SAP system.
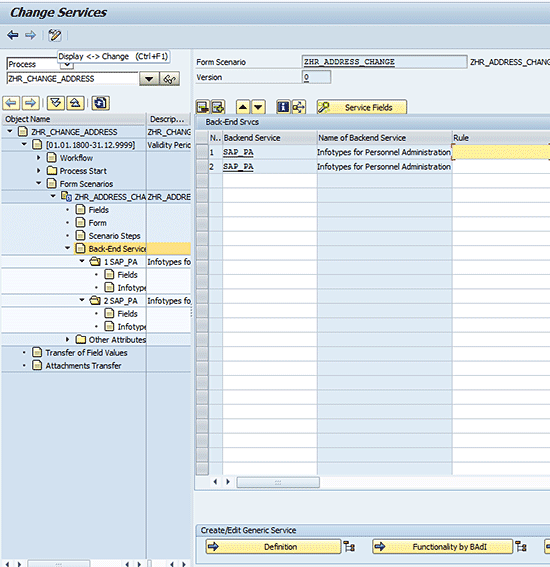
Figure 4
Select the back-end service map
Click the Definition button and then the New Entries button to create a new definition. The screen in Figure 5 appears.
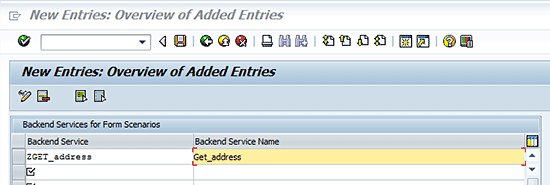
Figure 5
Create a new definition
Enter Z_GET_address in the Backend Service column and click the save icon  . Then click the back icon
  twice, which takes you to the screen shown in Figure 6. You have created a new back-end service definition, which you will use in your form. Make a note of the name of the definition as you’ll need it in the next step.
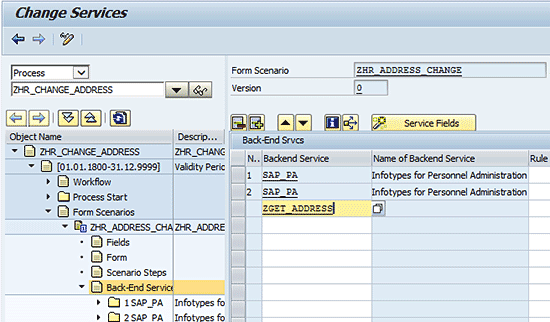
Figure 6
Create a new back-end service
Fill in the name of the newly created back-end service under the Backend Service column in Figure 6 and click the save icon.
Step 3. Create a Field Group
Now you have to create a field group that can be attached to the back-end service.
Note
You can define several areas for a form. Each area corresponds to a field group with several fields. For each area you can provide a push-button that triggers an operation. The operation checks, for example, the field contents of the area and simultaneously initializes the fields of the subsequent area. During the initialization, based on the field contents of the previous areas, the system provides information for the subsequent area, such as default values and input help.
To create a field group, follow customizing SPRO menu path Personnel Management > HR Administrative Services > Configuration of Processes and Forms > Configuration of Forms > Create Operations for Groups of Form Fields. The screen shown in Figure 7 appears.
Figure 7
Create a field group
Click the Cont. button. In the screen that appears (Figure 8), select your form scenario (ZHR_ADDRESS_CHANGE in my example) by clicking the look-up icon  (not shown) or by typing the name in the Form Scenario field. Leave the Version field blank (this is version 0).
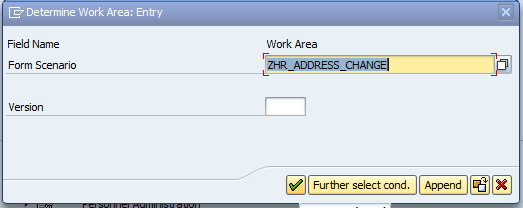
Figure 8
Enter a form scenario
Click the enter icon  , which results in Figure 9.
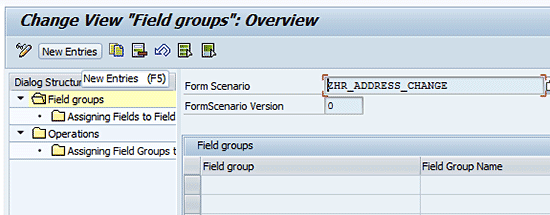
Figure 9
Adding a field group
Click the New Entries button. This results in the screen in Figure 10, in which you manually type in GET_ADDRESS_FIELDS in the Field group column and a description of the new field in the Field Group Name column (Get_Address_fields).
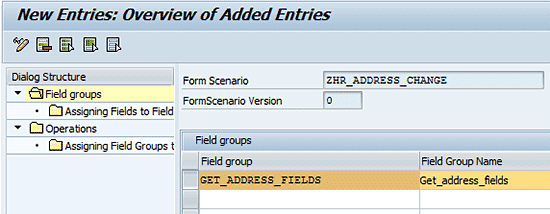
Figure 10
An added field group
Click the gray cube to the left of the Field group name (Figure 10). In the screen that appears (Figure 11), double-click the Assigning Fields to Field Groups folder and then the New Entries button, and then select the look-up icon next to the Field Name column.
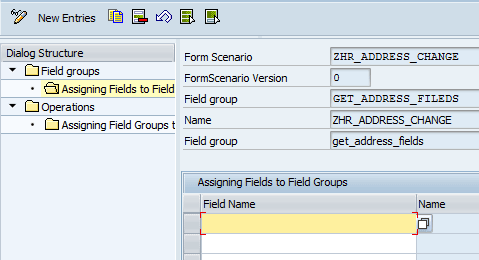
Figure 11
Assign fields to a field group
A complete list of all the fields available in your form scenario appears (Figure 12).

Figure 12
A list of fields
Choose field name I0006_HSNMR by double-clicking it. The field name is automatically entered in the screen in Figure 13 that appears. Select the look-up icon next to the Field Name column (Figure 13) again. Perform the same actions for field names I0006_PSTLZ, I0006_STRAS, and I0006_ORT01.

Figure 13
An overview of added fields to field group
Double-click the Operations folder on the left (Figure 13), and in the pop-up screen that appears, click the New Entries button. Fill in GET_ADDRESS_FIELDS in the Operation for Form column and a description in the Operation Name column. You have created an operation, which is now attached to the field group Get_ADDRESS_CHANGE. This results in the screen in Figure 14.
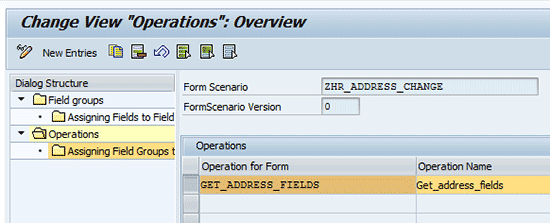
Figure 14
An added operation to a field group
Click the gray cube to the left of the Operation for Form column, and then click the Assigning Field Groups to Operations folder on the left. The screen in Figure 15 appears.

Figure 15
Assign field groups to operations
Fill in the name GET_ADDRESS_FIELDS in the Field group column and click the save icon (Figure 15). You have now successfully created an operation and attached it to a field group filled in with the four required address fields
Step 4. Create a Generic Service
The next step is to create a generic service ZGET_ADDRESS in the implementation of Business Add-In (BAdI) HRASR00GEN_SERVICE_BASIC. Start transaction code SE19 and Figure 16 appears.
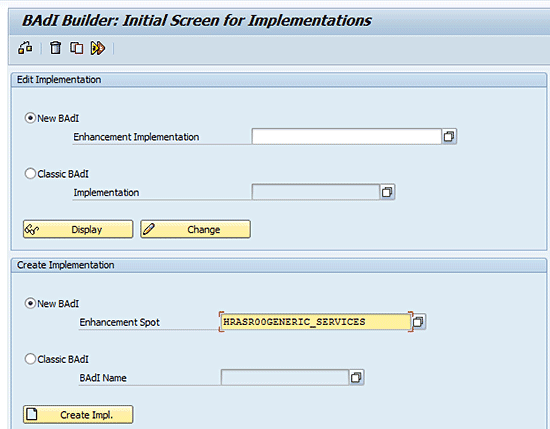
Figure 16
Building a new BAdI
Enter HRASR00GENERIC_SERVICES in the Enhancement Spot field, then click the Create Impl. button. Next, fill in ZGET_ADDRESS in the Enhancement Implementation field and Get address fields in the Short Text field (Figure 17).

Figure 17
Create enhancement implementation ZGET_ADDRESS
Click the enter icon. In the screen in Figure 18, fill in ZGET_ADDRESS in the BAdI Implementation column, ZCL_GET_ADDRESS in the Implementation class column, and HRASR00GENERIC_SERVICE_BASIC in the BAdI Definition column. The Short Text column is automatically prepopulated based on your selections.
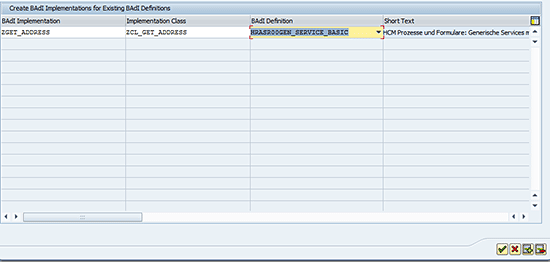
Figure 18
Create BAdI implementations in class ZCL_GET_ADDRESS
Click the enter icon and the next screen appears (Figure 19).
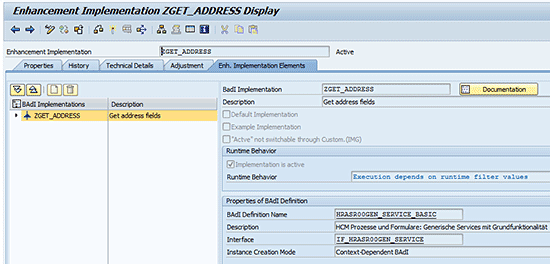
Figure 19
Change enhancement implementation ZGET_ADDRESS
In the left pane of Figure 19, click the up arrow in front of ZGET_ADDRESS. Figure 20 appears.

Figure 20
Filter value for ZGET_ADDRESS
Double-click Filter Val. (Figure 20) and then click the Combination button. A new filter is added (Figure 21) which ensures that this BAdI implementation is only used for a service ID that is in the filter.
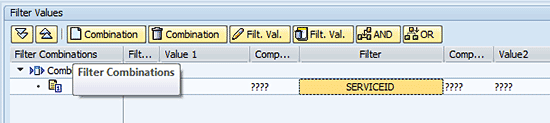
Figure 21
Filter value for ZGET_ADDRESS
Double-click SERVICEID in the Filter column and fill in the fields as shown in Figure 22.

Figure 22
Change filter value for ZGET_ADDRESS
Click the enter icon and then the activate icon  . This results in the pop-up screen shown in Figure 23.
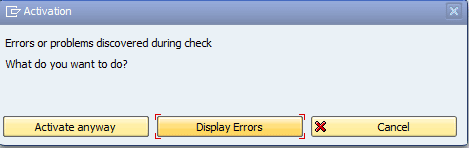
Figure 23
Activate the enhancement
Click the Activate anyway button. SAP activates one object after the other. When objects depend on sub-objects from another object, they may not be activated yet. When you select Activate anyway, all the objects are activated without checking the dependencies. When all dependent objects are already activated, this pop-up window is not displayed and the object is activated.
Step 5. Create the Three Methods
The next step is to implement some methods to get the actual street name and city from the Zip code and house number entries. Under the Enh. Implementation Elements tab, click the arrow to the left of ZGET_ADDRESS in the BAdI Implementations column (Figure 24). In the options that appear below ZGET_ADDRESS, double-click Implementing Class.
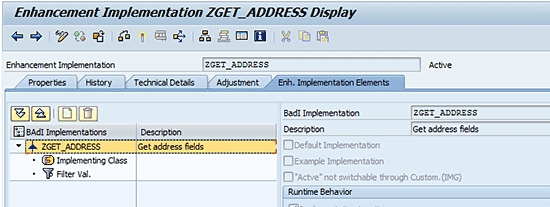
Figure 24
Enhancement implementation ZGET_ADDRESS display
A screen appears that looks like Figure 25.
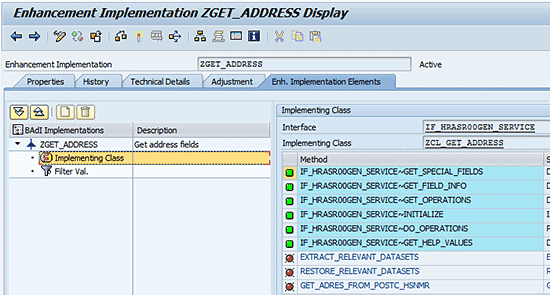
Figure 25
Enhancement implementation ZGET_ADDRESS display
Double-click the IF_HRASR00GEN_SERVICE~DO_OPERATIONS line in the Method column. When the pop-up window appears (Figure 26), click the Yes button to implement the interface method.

Figure 26
Create a method implementation
Click the edit icon  (Figure 24) to switch to edit mode. A list of code appears.
In the editable screen that appears (Figure 27), cut and paste the following code (Figure 28) in the method between Method-endmethod.
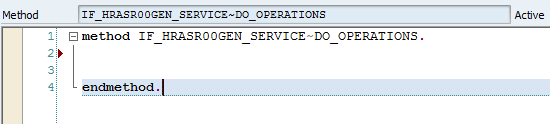
Figure 27
Add code to the method
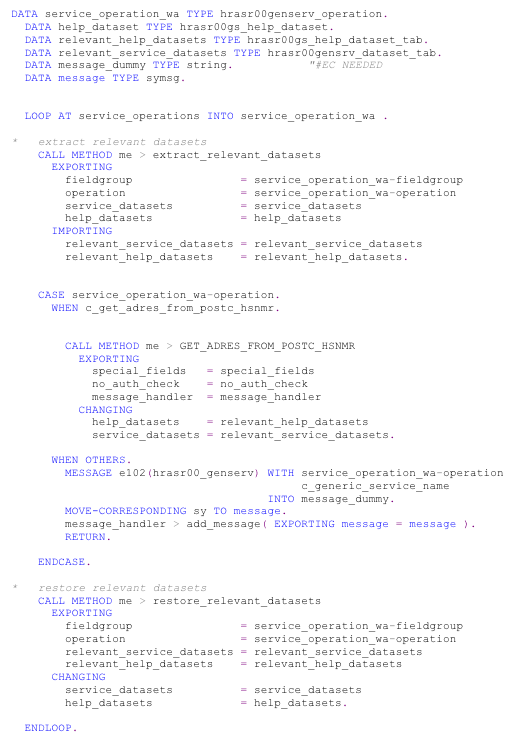
Figure 28
Code of method DO_OPERATIONS
Click the save icon.
The code uses three methods that you have to create:
- extract_relevant_datasets
- GET_ADRES_FROM_POSTC_HSNMR
- restore_relevant_datasets
Double-click the new method Me > extract_relevant_datasets, which is in the code you just pasted between Method-endmethod.
In the pop-up screen that appears (not shown), click the Yes button. A screen like Figure 29 appears.

Figure 29
Create method EXTRACT_RELEVANT_DATASETS
Fill in a method Description (Extract_relevant_datasets). (The Class and Method fields are auto-populated based on your earlier entries.) Then click the Parameters tab and fill in the values as shown in the screen in Figure 30.

Figure 30
Method parameters of EXTRACT_RELEVANT_DATASETS
Click the Create button (Figure 31), which returns you to the DO_OPERATIONS method screen (Figure 28).

Figure 31
Create the new method
Click the method me > GET_ADRES_FROM_POSTC_HSNMR, which is in the code you just pasted between Method-endmethod. In the pop-up screen that appears (Figure 26) click the Yes button. In the next screen (Figure 32), fill in GET_ADRES_FROM_POSTC_HSNMR in the Description field.
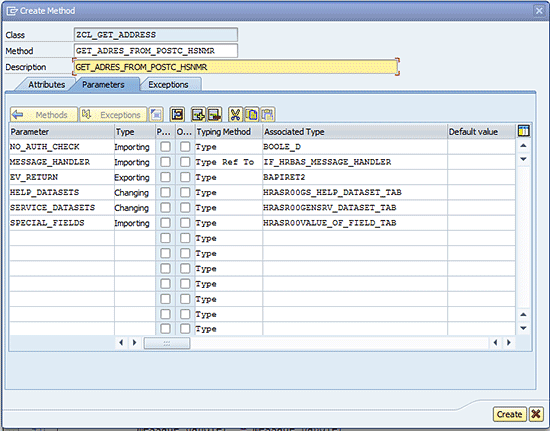
Figure 32
Create method parameters
Click the Parameters tab again and fill the fields that appear with the information shown in Figure 32. You must repeat these steps for every method in order to maintain the right set of parameters.
Click the create button and then the save button. This returns you to the DO_OPERATIONS method.
Click method me > restore_relevant_datasets, which is in the code you just pasted between Method-End Method.
Click the Yes button in the pop-up screen that automatically appears when you double-click the method. In the next screen, fill in a method Description (Restore_relevant_datasets) and click the Parameters tab (Figure 31). Then fill in the information as detailed in Figure 32.
Click the create icon, then the save icon, and then the back icon. You have now created your three new methods.
Step 6. Entering Code in the New Methods
The next step is to enter code into the methods, but first you have to create some attributes for the methods. In my scenario, I am adding two attributes to my three methods:
1. C_GET_ADRES_FROM_POSTC_HSNMR
2. C_GENERIC_SERVICE_NAME
Click the Attributes tab and fill in the information as shown in Figure 33.

Figure 33
Create attributes for the new methods
Click the save icon, then go to the Methods tab.
Double-click the IF_HRASR00GEN_SERVICE~DO_OPERATIONS method (Figure 34) and look for the method me > GET_ADRES_FROM_POSTC_HSNMR. Double-click it and a list of code appears. Copy and paste the code shown in Figure 35 between Method-endmethod.

Figure 34
Methods overview
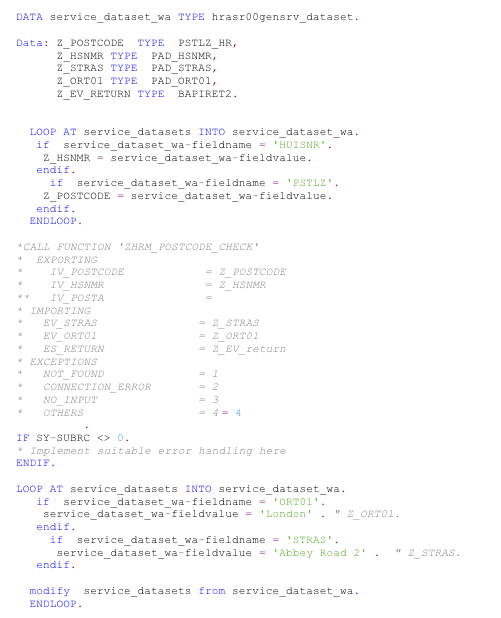
Figure 35
Code for method GET_ADRES_FROM_POSTC_HSNMR
Note
In this example, the function module ZHRM_POSTCODE_CHECK is not called because the postal code check is different for all countries. This is simply an example of how to use a custom back-end service. In my example, I hard-coded the street and city. When you implement a back-end service and use this code, put in your own functionality to achieve your goals.
Click the save icon and then the back icon.
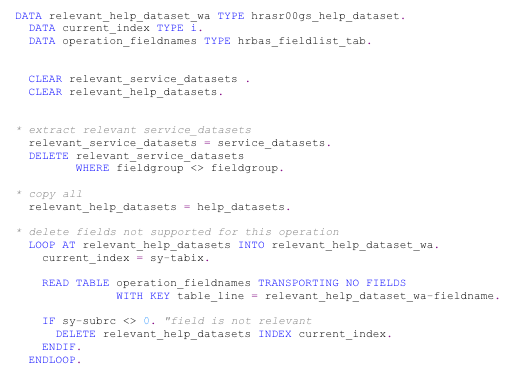
Figure 36
Code for method EXTRACT_RELEVANT_DATASETS
Click the save icon and then the back icon.
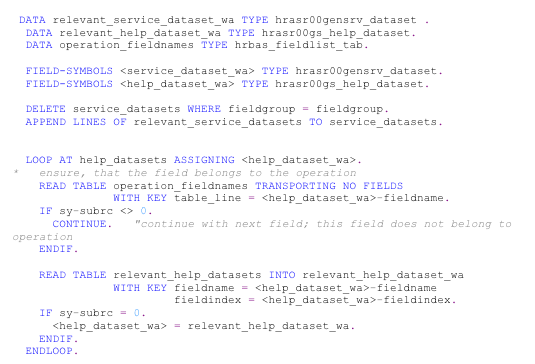
Figure 37
Code for method RESTORE_RELEVANT_DATASETS
Click the save button and then click the back button twice to save the new method and return to the screen in Figure 25.
Click the activate icon to activate the enhancement implementation. A pop-up screen shows all inactive objects (Figure 38).
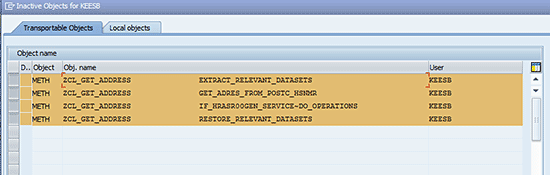
Figure 38
Inactive objects
Select all the objects by clicking the gray squares to the left of every line, then click the enter icon. Once a line is selected, it turns brown (the screen in Figure 38 shows just some of the inactive objects).
Click the Activate anyway button (Figure 39), and the SAP system activates one object after the other.
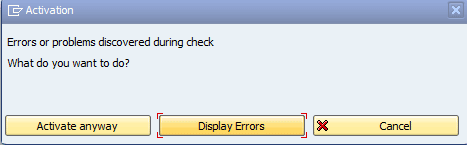
Figure 39
Activation
Step 7. Attach the New Form Scenarios to the Back-End Service
The next step is to attach the form scenarios to the back-end service. Start transaction SPRO and follow menu path Personnel Management > HR Administrative Services > Configuration of Processes and Forms > Configuration of Forms and start the From Scenario for Generic Services process. Figure 40 appears.
Figure 40
Attach the new form scenario to the back-end service
Click the Cont. button. In the Form Scenario field, type in ZHR_ADDRESS_CHANGE (Figure 41) and click the enter icon.
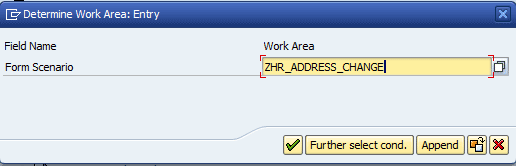
Figure 41
Determine work area for zhr_address_change
Click the gray square to the left of the first line (it appears empty, but the version number is 0) and double-click the Operations folder (Figure 42) to open it.
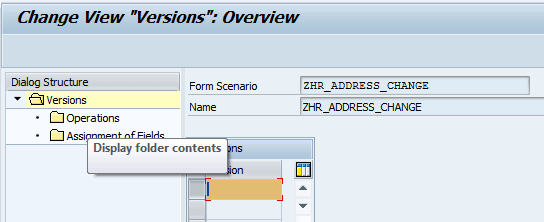
Figure 42
Attach the new form scenario to the back-end service
In the next screen, click the New entries button and fill in the information as shown in Figure 43.
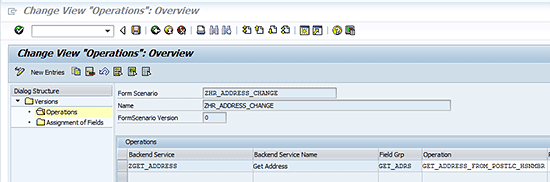
Figure 43
Attach the new operation to the backend service
Click the save icon, and exit the application by pressing the back icon twice.
Start transaction HRASR_DT and open the Back-End Services folder ZGET_ADDRESS (Figure 44).
Figure 44
Change fields in the back-end service
Click the Fields icon below the open folder. On the right side a sub-screen appears where you can add the fields relevant for the back-end service. Fill in the information shown in the screen in Figure 45.

Figure 45
Create new fields for the back-end service
Click the save icon.
You now have three new back-end services. Two are standard SAP and one is customized for you.
Step 8. Re-Order and Attach the New Back-End Services Fields
When the same fields appear in two or more back-end services, the back-end service that changes the content needs to be listed first. If it’s not the first one listed, the fields will not be filled. To make sure your new customized back-end service is the first one listed, double-click the Back-End Services map (Figure 46).

Figure 46
Change the order of the back-end service
Click the gray square to the left of the ZGET_ADDRESS line (in the Backend Service column) and click the up-arrow icon  to move it to the top of the column list (Figure 46).
To make sure that the found street and city are in the correct fields, you have to attach these fields to the back-end service fields.
Open the 3 ZGET_ADDRESS folder and click the Fields icon that appears below it (Figure 47).
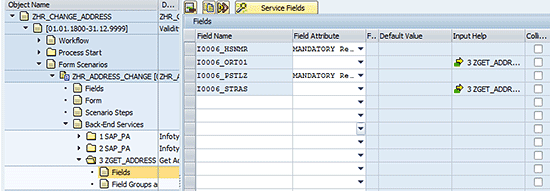
Figure 47
Attach fields to the back-end service
Double-click the I0006_ort01 Field Name line and select the 3 ZGET_ADDRESS line in the Input Help column (Figure 48). Click the enter icon.

Figure 48
Change field 0006_ORT01
Repeat these actions for the I0006_STRAS Field Name line to attach these fields to the back-end service fields, and click the save icon.
Step 9. Test Your New Methods
To test your scenario, use transaction code HRASR_TEST_PROCESS, and fill in the fields as shown in Figure 49. Use a Personnel number that is available in your system.
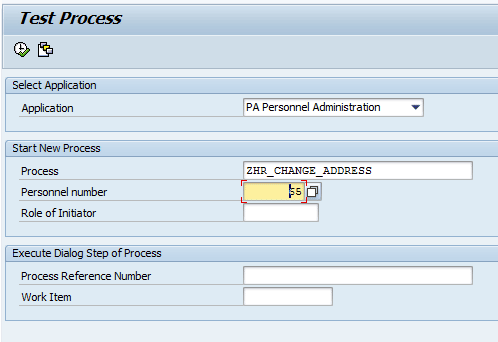
Figure 49
The test process
Click the execute icon  and the following screen appears (Figure 50).
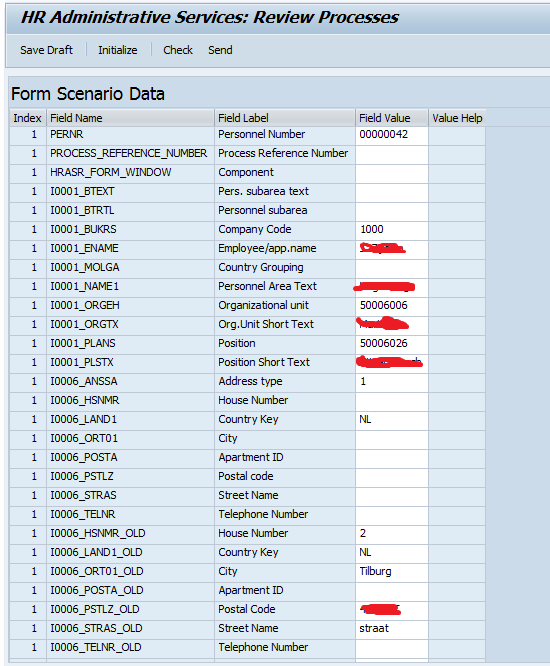
Figure 50
Input screen
At the bottom you see the old values of the address (Figure 50). Fill in the new house number and Zip code in the blank fields and click the Check button. The program executes the code you just created and returns the new values for the street name and city (Figure 51).
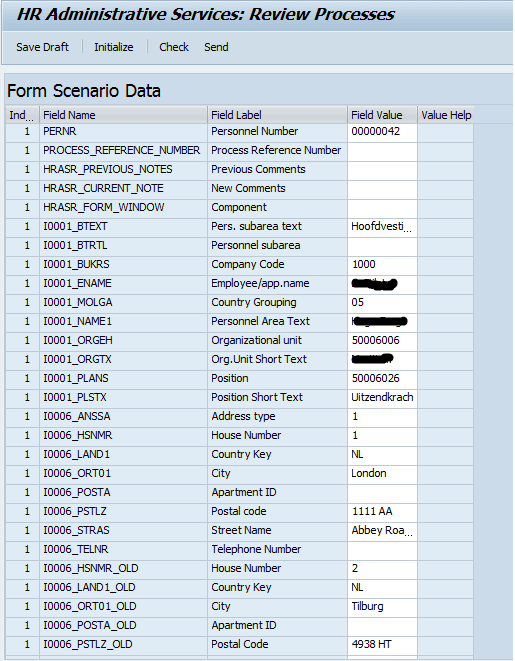
Figure 51
The end result
Kees Bond
Kees Bond is a senior HCM consultant and ABAP consultant with 17 years of experience with SAP. He followed an HBO education in Amsterdam and lives in the Netherlands.
He started his SAP career in the first Dutch hospital to implement SAP. He was responsible for the implementation of the HCM module components PA, OM, time, and payroll. Currently, Kees is working as a principal consultant for CIBER Netherlands BV.
You may contact the author at kees.bond@ciber.nl.
If you have comments about this article or publication, or would like to submit an article idea, please contact the editor.