By adding links to other SAP BusinessObjects documents in your SAP BusinessObjects Web Intelligence reports, you can provide drill-through capabilities to reports and significantly cut down on the time it takes to analyze a dataset. Learn the details about how to create and edit links to reports.
Key Concept
The OpenDocument application provides the capability of writing syntax statements that launch, refresh, and pass parameters to other published BusinessObjects reporting documents through a URL.
The need for more detailed information is a common request from business analysts and decision makers when analyzing company data. Performing an exhaustive root cause analysis on a subject is often the most successful strategy for identifying problems and pinpointing areas to maximize profits. However, this process can be time-consuming for business users as they sift through rows of extraneous results to get to relevant information. Even when information is compiled from multiple universes and data sources, comprehensive analysis generally means studying several reports before making important decisions.
Note
As a prerequisite to understanding this article, readers should be familiar with the concept of publishing and sharing enterprise reports and the need for linking — and connecting — related reports that provide different and sometimes more detailed information.
A powerful method for resolving this type of business problem is to link SAP BusinessObjects Web Intelligence (also known as WebI) reports to other SAP BusinessObjects documents, creating an integrated business intelligence reporting solution rather than a series of stand-alone reports. Report writers and ad-hoc users alike have the capability of producing a guided analysis for the report-viewing audience by connecting reports with hyperlinks. This approach returns only the needed and pertinent information, with a hyperlinked report passing values to a prompted query filter in a separate Web Intelligence document.
An example of this type of analysis occurs when analyzing company spend by region. While reviewing the data, it’s discovered that the highest spending patterns continually occur in the southeast region. Analysts know they need to investigate several different types of spending in the southeast to get a complete understanding of the situation. They also know that the data exists in several different Web Intelligence reports. What’s not known is exactly which reports contain the data needed to perform a thorough analysis.
Instead of requiring analysts to return to the InfoView portal, locate each report individually, and filter the data set to only show the southeast region, links can be created that pass the selected value — in this case, southeast — to a prompted filter in a linked report that only returns data related to the southeast region. The report is launched with a single click and the needed information is returned to the analysts quickly and accurately.
Linking to Other Documents and Reports
The quickest way to add a link to another published report is accomplished in InfoView, and while in view mode rather than edit mode. When viewing a report, you can add a hyperlink in three easy steps:
- Right-click on the row, column, or cell designated for the hyperlink
- Select Hyperlink from the list of available options (Figure 1)
- Choose the report that you’d like to connect to

Figure 1
Steps to add a hyperlink
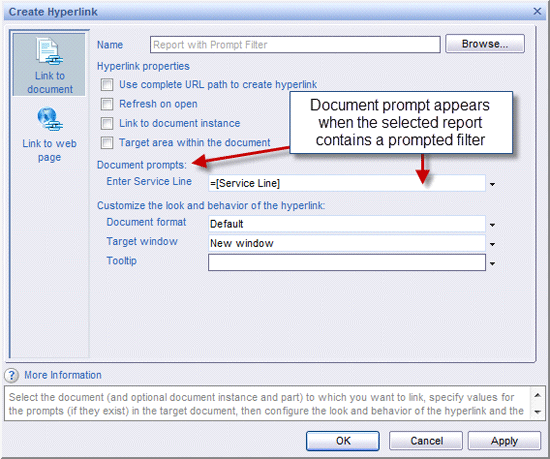
You can add new hyperlinks that connect to published BusinessObjects documents or to Web pages. Figure 2 shows the screen opened when creating a new hyperlink.

Figure 2
Choose a document or Web page to link to
Click Browse to select a published report as the target of the hyperlink. The list of available options appears after a link to the document has been set. A list of document prompt options displays if you link to a Web Intelligence report that contains prompted query filters. Additionally, the following options are available as hyperlink properties for customizing the behavior of the report:
- Use a complete URL path to create a hyperlink
- Check this option if you need to see the fully qualified URL of the hyperlink
- This option is very helpful because it reveals the full URL of the hyperlink (use this method as a guide for manually writing hyperlink URLs in Edit mode)
- Refresh on open, which forces the query of the linked document to refresh when opened
- Link to a scheduled document instance rather than the published instance
- Target an area within the document
- Allows hyperlinks to target specific report parts rather than entire reports
Further, you can look into the following options to customize the look and behavior of a hyperlink:
- Document format – Defines the format of the linked report
- Default – Web Intelligence format
- HTML
- PDF
- Excel
- Word
- Target window – Window in which the linked document will open
- Current window
- New window
- Tooltip – Choices available for setting up an optional tooltip
- Manually write in a tooltip
- Select an object to be used as a tooltip
- Build a formula to be displayed as a tooltip
The various hyperlink properties and options described above are shown in Figure 3. Also displayed in Figure 3 is the Document prompts property, which appears only when a link has been created to a report containing a prompted query filter.
This option is convenient when creating a hyperlink on a column that contains the same data as in the prompted filter of the linked document. Options for binding values to the document prompt include the following:
- Select object
- Build formula
- Enter constant
- Prompt user at runtime
- Use document default

Figure 3
A review of hyperlink properties available to you
Using the Complete URL
The first option shown in Figure 3 is available to display the complete URL of the hyperlink using the OpenDocument construct. By selecting this option, the basic URL syntax becomes viewable in the formula toolbar with the Enterprise server name and port along with the openDocument syntax.
The URL syntax generated uses the following parameters to connect to another Web Intelligence report when creating a hyperlink in View mode:
- iDocID – By default, this parameter is assigned the unique 23-character ID of the target report
- sIDType
- Also by default, the sIDType parameter is included in the hyperlink and set to CUID
- The sIDType parameter is used in conjunction with iDocID in order to ensure the identity of the linked report
- sType
- File type of the target document
- wid represents Web Intelligence document
- rpt represents a Crystal Report
- sRefresh – Set to either Y or N to indicate whether the report should be refreshed when loaded
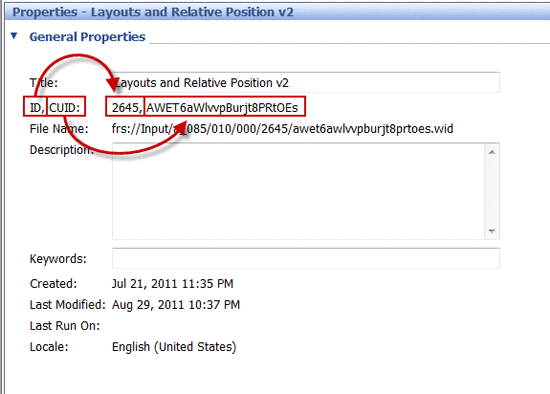
To view a Web Intelligence document’s unique ID and CUID values, right-click the document title in InfoView (as shown in Figure 4) and select Properties.

Figure 4
Viewing the ID and CUID values
Below are the first two properties of a report, followed by a screenprint of the complete set (Figure 5):
- Title – With proper permissions, this is where you can edit the report title
- ID and CUID – The four- or five-digit ID is displayed first, followed by the 23-character CUID that uniquely identifies a reporting document

Figure 5
Properties of a Web Intelligence report
Figure 5 Properties of a Web Intelligence report
Note
The default combination of iDocID, sIDType, and sType can be replaced by a different group of parameters when writing hyperlinks manually. These are sDocName and sPath.
Instead of identifying the target document by its 23-character iDocID, the sDocName can be used as the sole parameter for linking to a published reporting document. However, the sDocName parameter should only be used alone when the enterprise system contains only one instance of a report with the requested document name. As a precaution, when preparing the hyperlink URL manually, it’s good practice to also include the sPath parameter (for identifying the folder path location) along with the sDocName.
Even though you can use the iDocID parameter with the InfoObjectID (or ID as it’s listed in the report properties) instead of the 23-character unique identifier and sIDType=CUID combination, the addition of the sIDType parameter and CUID value is recommended if not using sDocName and sPath. The benefit of using sDocName and sPath is that they can be easier to write than using iDocID.
Hyperlink URL Syntax
To replace the default parameters and values with a different set of parameters, it’s important to understand every part of the full hyperlink URL. The basic and extended syntax of a hyperlink are listed below.
- Basic Syntax – https://<servername>:<port>/OpenDocument/opendoc/<platformSpecific>?
- Extended Syntax – https://<servername>:<port>/OpenDocument/opendoc/<platformSpecific>?<parameter1>=<parameter1_value>&<parameter2>=<parameter2_value>&<parameter3>=<parameter3_value>
Below are working examples of the basic syntax in Java and .NET deployments:
- Java deployments – https://jhbXI31:8080/OpenDocument/opendoc/openDocument.jsp?
- .NET deployments – https://jhbXI31:8080/OpenDocument/opendoc/openDocument.aspx?
Here is a working example of a full hyperlink URL syntax for a Web Intelligence report:
- https:// jhbXI31:8080/OpenDocument/opendoc/openDocument.jsp?sDocName=Report with Prompt Filter&sPath=[Report Samples]&[Report Data]&nbPrompts=1&lsSEnter Service Line=Accommodation&sRefresh=Y
Now let’s dissect the above hyperlink URL:
- Basic syntax = https://jhbXI31:8080/OpenDocument/opendoc/openDocument.jsp?
- Servername = jhbXI31
- Port = 8080
- openDocument.jsp = Java platform
- Document name = Report with Prompt Filter
- Path = Report Samples / Report Data
- In this example, Report Data is a subfolder of the Report Samples folder
- Number of prompted filters = 1
- Prompt text of the connecting prompted filter = Enter Service Line
- Be sure to leave the spaces between words when manually writing the link.
- Value passed to the prompted filter = Accommodation
- Refresh Y or N = Y
Notice that in the full hyperlink above, the value Accommodation is passed as a hardcoded value to the prompted filter. This defeats the purpose of a dynamic hyperlink if the value itself is not dynamic. For a dynamic hyperlink, pass in the field name rather than a specific value.
Syntax Generated When a Hyperlink is Added
After adding a hyperlink to a report, the statement generated appears in HTML form. You can view the syntax in the formula toolbar or in the variable editor. You’ll notice that the syntax looks different than previously described. In order for the link to be active, the “read cell contents as” display format of the cell containing the hyperlink is changed by default to the Hyperlink setting. Below is the syntax of the same working hyperlink example as previously described. Hyperlinks appear in the format below while viewing a report.
="<a href="https://jhbXI31:8080/OpenDocument/opendoc/openDocument.jsp?iDocID=Ab6YpzjxNW9OhEIBbRo07l4&sIDType=CUID&sType=wid&sRefresh=N&lsSEnter%20Service%20Line="+URLEncode(""+[Service Line])+"" title="" target="_blank" nav="doc">"+[Service Line]+"</a>"
Adding Hyperlinks in Edit Mode
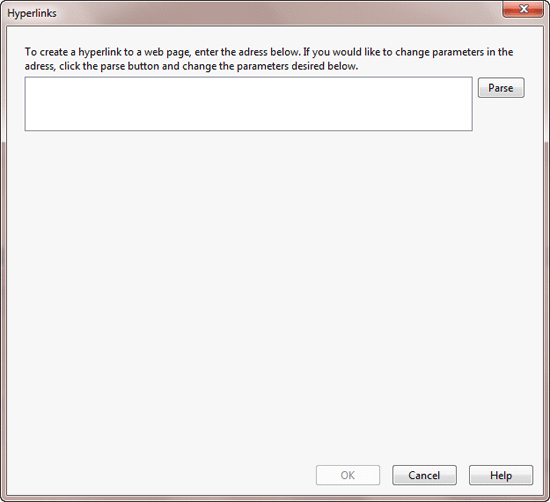
Once you’re comfortable with the syntax of hyperlinks in Web Intelligence, you’re ready to move on to manually writing hyperlinks in Edit mode. You’ll need to be able to write the full syntax statement to add a link in Edit mode. Figure 6 shows the hyperlinks window launched when choosing to add a new hyperlink while editing a report.

Figure 6
A window to create a new hyperlink
When adding a hyperlink while editing a report, you have the opportunity to either write or paste a previously written statement in the box available. Click the Parse button to test the syntax of the URL.
If the syntax parses successfully, the screen transforms to resemble the screen in Figure 7. The syntax is evaluated and then separated into modifiable parameters. The system interprets the hyperlink URL in three major categories.
- Main – Basic syntax
- Dynamic elements of the URL – Parameters used to call a specific report or to pass values to prompted filters
- Visual and interaction properties – Properties for including a tool tip for the object containing the hyperlink and the type of target window of the linked report
When the URL parses successfully, the URL is broken down into the three primary categories beneath the full statement: Main, Customize the following dynamic elements of the URL, and Customize the visual interaction properties of the hyperlink (Figure 7).

Figure 7
A Web Intelligence document’s URL broken down into modifiable parameters
To change the lsSEnter Service Line parameter to accept a dynamic value rather than passing in a hardcoded value as described above, click the drop-down to the right of the parameter value and select the object to supply data to the parameters.
A good example is to select the =[Service Line] object instead of passing in Accommodation. Figure 8 shows how the syntax is modified when an object is selected. You can select the [Service Line] field by using the drop-down located to the right of the lsSEnter Service Line parameter.
Ideally, the configured hyperlink pictured in Figure 8 is placed on a column in a data block that contains the [Service Line] object. This allows any [Service Line] value to be passed to the prompted query filter containing a prompt text of Enter Service Line when clicked.

Figure 8
A successfully parsed URL with configurable options
Rules for Manually Writing Hyperlink URLs
Use the following tips to manually write hyperlink URLs:
- Begin with the basic syntax using the OpenDocument construct associated with your deployment
- …openDocument.jsp? for Java deployments
- … openDocument.aspx? for .Net deployments
- Separate all parameters with the ampersand symbol as listed below
- sDocName=Report1&nbPrompts=1&lsSMy State Prompt=Alabama&sRefresh=Y
- Include spaces in parameters and parameter values, such as:
- sDocName=Report with Prompt Filter
- lsSEnter Service Line=Accommodation
- The sPath parameter values should be encapsulated with brackets
- sPath=[Auditor]
- sPath=[Report Samples]&[Report Data]
Setting Up a Prompted Query Filter in the Query Panel
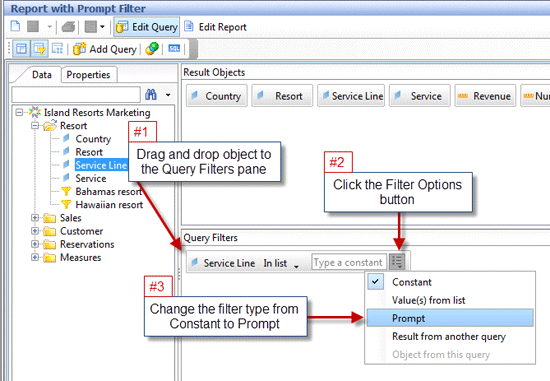
Now that I’ve discussed adding hyperlinks to a report in either View mode or Edit mode, let’s set up a prompted query filter to receive the parameter value passed to it. Figure 9 shows the steps for creating a prompted query filter.
Click Edit Query to enter the Query Panel to begin setting up a prompted query filter. Proceed with the steps below once you’re in the Query Panel:
- Drag and drop an object to the Query Filters pane
- Click the Filter Options icon
- Change the filter type in the drop-down from Constant to Prompt

Figure 9
Using the Query Filters pane to create a prompted query filter
The verbiage appearing in the text box of the filter is known as the prompt text. This is the value needed when passing a value to the prompted filter. The prompt text is editable and should be written to guide a user to the correct input when prompted. Anyone with edit rights to the document can write and edit the prompt text. Figure 10 shows the additional characters added to the prompt text by default that might be confusing when setting up the hyperlink. By default, all prompted filters contain a prompt text beginning with Enter value(s) for, which precedes the object name. Edit this statement to a simpler phrase for easier link creation.

Figure 10
Default prompt text wording
In my hyperlink URL example, I change the default prompt text from Enter value(s) for Service Line: to Enter Service Line for an easier hyperlink set-up (Figure 11).

Figure 11
New prompt text wording
Save the document to the enterprise and you’re ready to link to it and pass values to the prompted filter. Set the target report to “sRefresh=Y” so the query is refreshed when the document is opened. Doing so allows the new value passed in to be included when the SQL statement is generated and the query is executed.
Hyperlink Parameter Variations
Several variations are available when setting up hyperlinks to documents in Web Intelligence, Crystal Reports, or SAP BusinessObjects Dashboards. Below are three parameters that you can include in your hyperlinks to provide additional functionality to users:
- Pass in multiple values to a prompted filter
- Change the lsS[Prompt Text] to lsM[Prompt Text] in the URL in edit mode
- Re-parse the hyperlink
- Separate the hard-coded values being passed in with a semicolon (e.g., Accommodation;Recreation) as shown in Figure 12
- Be sure that the prompted filter in the target document is set to IN LIST and not to Equal (if it’s set to Equal, only a single value can be accepted by the filter rather than multiple values)

Figure 12
Passing multiple values to a prompted filter
- Require users to select a value when linking to a report containing a prompted filter by changing the prompt value to a question mark (Figure 13)
- Add lsEnter Service Line=? to the URL in edit mode
- Re-parse the URL
- The lsSEnter Service Line element will contain: ?, which forces the users to make a selection when the hyperlink activates and the target document launches

Figure 13
Adding a question mark as a prompt value to require user input when a document launches
- Load the latest instance of a target report (Figure 14)
- sInstance=User, which returns the latest instance of the report owned by the current user
- sInstance=Last, which returns the latest instance of the document
- sInstance=Param, which returns the latest instance of the document with matching parameter values

Figure 14
Setting the sIntance field to Last instance


