Many of the communications that you wish to send to your employees do not warrant a formal letter. You can create a payslip message to inform your employees of short but important messages using infotype 0128, which allows you to print messages on your employee payslips.
Key Concept
The HR Form Editor, transaction PE51, allows you to copy, create, and edit forms. It works with many applications and consists of a central GUI in which you develop HR forms.
HR departments communicate with employees primarily via formal letters. Some messages, however, require only a line or two to inform either all or some of the workforce. For example, you could tell employees who their HR contacts are, warn them of the last dates to sign up for a particular benefit, or wish them “Happy Holidays.”
Formal communications are too cumbersome for these messages, so the HR department often overlooks them. However, all versions of SAP provide a simple means of distributing this information using infotype 0128 (notifications) and payslip messages. This is standard SAP functionality available to anyone who uses the HR Form Editor (transaction PE51) to configure payslips.
I’ll show you how to configure a general notifications area on your payslip to use in conjunction with infotype 0128 when you want to send a message to a group of employees. The finished payslip looks like Figure 1.

Figure 1
A sample payslip notification click here for a larger version of this image
Configure a Message Area
To configure a new window to display a message area on your payslip, access transaction PE51 or follow IMG path Payroll>Country Specific Payroll>Forms>Remuneration Statement>Set Up Remuneration Statement. This brings you to the screen in Figure 2. Specify your Country grouping (08, Great Britain in this example) and the form name of the payslip you wish to configure (ZFXX in my example).
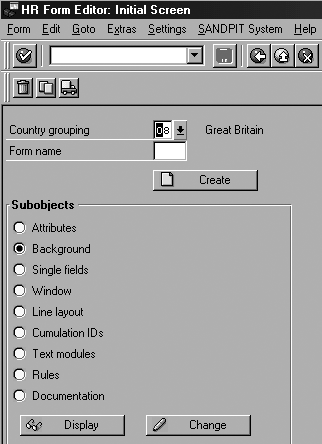
Figure 2
Select Line layout in the HR Forms Editor screen
Step 1. Add a line. Choose the Line layout option in the Subobjects section and select the Change button. This brings up the screen shown in Figure 3, where you click on the add line  icon. On this new line, enter
 01 in the line type (LT) field and X in the column type (CT) field.
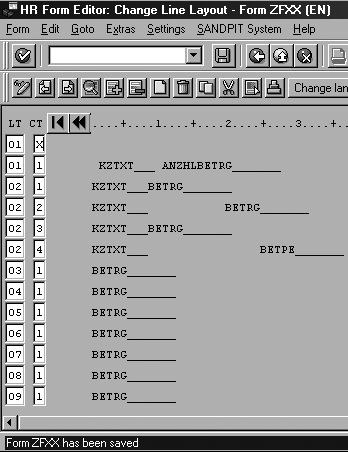
Figure 3
Change line layout
Step 2. Insert a field into the line. Click on the create icon to get to the screen in Figure 4. Specify the following details:
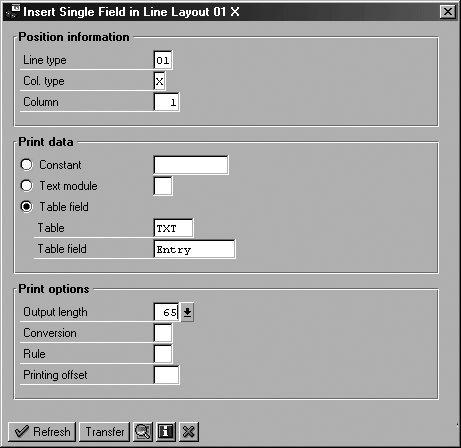
Figure 4
Insert a field in the line layout
• Column: 1
• Table: TXT
• Table field: Entry
• Output length: 65
Click on the Transfer button and then click on the save icon.
Click on the back icon to go back to the HR Form Editor initial screen.
Step 3. Add a window. From the main menu, select the Window subobject. On the Create Window screen, position your cursor at the top left corner where you want the box to appear. Click on the create icon and a message appears at the bottom of the screen asking you to mark the opposite corner. Click where you wish the box to end (you can change it later so you don’t have to be exact) and click on the select end of block icon  . An input box appears — type a name for the window (in this case Z1) as shown in Figure 5.
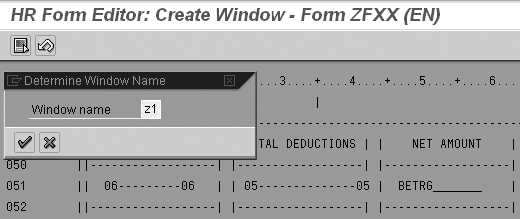
Figure 5
Create the window
You can amend the settings by choosing Goto>Window Overview (Figure 6).
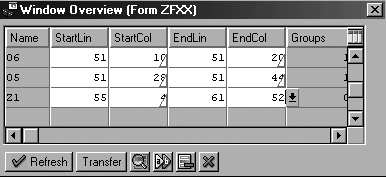
Figure 6
Window Overview screen for window Z1
Step 4. Change the layout. Position the cursor on line Z1 in the overview screen (Figure 6) and select the details icon  . In the details screen, click on the add line icon. Enter
 01 in the Groups column. That takes you to the screen shown in Figure 7, where you add the following details:

Figure 7
Enter details in Change Layout of Group 01 screen click here for a larger version of this image
• Subgroup (Sgr): 01
• Table: TXT (notifications)
• ID: 1 (this setting populates the Long text field with General notifications)
• Line type (PType): 01
• Column type (CTy): X
Click on the Transfer button to return to your original window, then click on save.
Tip!
You can configure your payslip to display a personal notification for individual employees. This allows you to enter the text directly on infotype 0128, subtype 2, rather than creating a standard text as in the example. To configure this type of message, select ID 2, which populates the Long text field with Personal notifications, rather than the ID 1 used in Figure 7.
Create a General Notification
To add a message, create the message text. Then, assign the message to the correct employees using infotype 0128.
Step 1. Create the standard text. Transaction SO10 takes you to the screen shown in Figure 8. Name your text beginning with Z to create it in the customer namespace, such as Z_HAPPY_THANKSGIVING, in the Text name field. Enter the Text ID of HR_G and specify the correct language (EN in this example). Next, select the Create button, which takes you to the text editor shown in Figure 9.
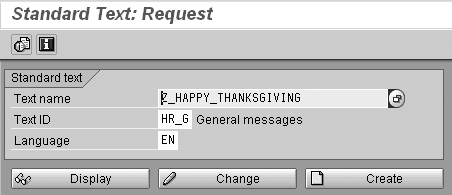
Figure 8
Create standard texts using transaction SO10 click here for a larger version of this image
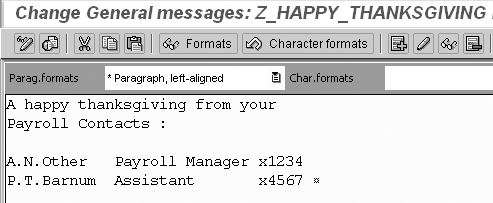
Figure 9
General message text editor click here for a larger version of this image
Step 2. Enter your message. Type the message into the general message text editor. Remember the size of the text box you created on the payslip in the “Configure a Message Area” section and tailor your message to fit the same number of characters per line, 65 in this example. Once you are satisfied with the text and layout, save the message.
Step 3. Title your message. Follow menu path Goto>Header and type a short but descriptive title for the text message. The overview screen and selection list for the notifications infotype will display this title.
Now, assign your message to the appropriate employees. You could either use transaction PA30 to create infotype 0128 for individuals or use transaction PA70 (fast entry). Let’s use PA70.
Note
The decision about whether to use fast entry or PA30 hinges on the number of people involved. If you’re sending a message to one person, use PA30. If the message goes to more than one employee, use fast entry. This option lets you select a number of employees (using various selection criteria, which makes it extremely flexible) and batches the update.
Assign the Message Using Fast Entry
Step 1. Use fast data entry to assign your payslip message. Enter transaction PA70 to see the screen in Figure 10.
In the Direct selection tab, enter Notifications and Subtype (STy) 1 for General notifications. Select the Period button in the Period tab and enter the dates for which the message will appear. Ensure these dates coincide with the payslip run in which you want the message to appear.
In the Enter Personnel Numbers tab, you can specify how to select the employees to which your message applies. In my example, I’m using the Preselect using report button. Enter the SAP standard report RPLFST00. The Save Option tab allows you to decide whether to create the new notifications infotypes directly on the screen or to create a batch input session to create the infotypes offline. Which of these options you select depends on the number of users and the performance of your system. With a large number of employees, the direct method could consume more system resources and tie up your session for a long period.
Step 2. Choose the employees to whom you want to send your message. Select the create with proposal icon to see the selection screen for report RPLFST00, as shown in Figure 10.

Figure 10
Fast Entry screen click here for a larger version of this image
Select the employees you wish to apply the message to using any of the selection options available (as you would for any HR report selections). Click on the execute icon on the report selection screen to populate the fast data entry personnel number selection screen shown in Figure 11.

Figure 11
Select the appropriate employees click here for a larger version of this image
Once you are satisfied with the list of employees selected (you can use the add line and delete line icons to amend the list), select all the employees (Figure 12) and use the create with proposal icon to prompt the Notifications selection screen in Figure 13.
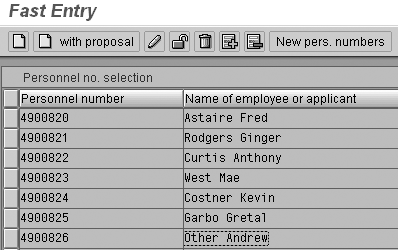
Figure 12
Employees selected
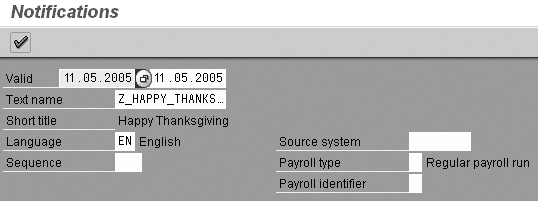
Figure 13
Select general text click here for a larger version of this image
Step 3. Select your text. In the Notifications screen, the initial PA70 screen populates the selection dates. You can use the drop-down menu to select the text you created in the “Create a General Notification” section. Once you click on the save icon, R/3 displays a list of all the infotype 0128 records that are created when you execute the update (Figure 14).

Figure 14
R/3 could not lock one personnel number click here for a larger version of this image
At this point, R/3 performs a validation check to ensure that it can update the personnel numbers selected. If the system fails to lock some personnel numbers (for example, if another user has the personnel record open for update at the time the system tries to carry out your update), it excludes them from the list and displays a count of the failures at the bottom of the screen.
Step 4. Create your infotype. From the screen in Figure 14, click on the save icon to create the infotypes online or make a batch input session for update offline at a later date, depending on the option you chose in Figure 10. If you selected the Save records directly option, the system displays a count of the records created at the bottom of the screen in Figure 15.

Figure 15
List of six records R/3 created click here for a larger version of this image
If you examine infotype 0128 using transaction PA20 for any of the personnel numbers you updated, you see the new notifications infotype (0128) as shown in Figure 16.

Figure 16
Notifications infotype 0128 click here for a larger version of this image
Step 5. Run a payslip simulation. If you run a payslip simulation for the employee in Figure 15 for November and select the amended payslip, you would see the payslip shown in Figure 1.
Ian Moogan
Ian Moogan has 15 years of SAP R/3 experience, covering configuration, ABAP, and Basis. For the past two years, he has worked as a consultant for ROC, providing HR and Payroll support to many clients in a variety of industries.
If you have comments about this article or publication, or would like to submit an article idea, please contact the editor.