Learn how to configure packing instruction determination and implement determination strategies to optimize a delivery process using packing instruction determination records.
Key Concept
Packing is one of the stages in the delivery process that has an impact on how long it takes to process a delivery. With packing instruction determination functionality, the delivery process is optimized, enabling the system to automatically select predefined packing proposals based on different requirements such as a customer’s specific packing requirements during a delivery process. Packing is a sub-component of the delivery and shipping process within SAP Logistics.
Packing is a vital part of the order fulfillment process because it helps to protect and prevent damages of goods during transportation. It also provides relevant information that may be required by customers, freight companies, and custom agencies about the product or material. It can be used for security by making items tamper resistant to prevent theft or to prevent harm from hazardous items.
Packing can be done with materials such as cans, boxes, cartons, crates, bags, or pallets and can be used to properly differentiate goods for delivery to customers. With the packing instruction determination strategy, different customer and product packing requirements are fulfilled with less time and fewer mistakes.
I explain how I configured packing instruction determination with strategies to fulfill different customer and product packing requirements for clients in the production business sector. Note that the scope of this article is limited to packing in the delivery process.
An Overview of Packing Instruction
In the packing process certain requirements are necessary, such as the packing materials that should be used to pack specific products, the products and quantity required to be packed per packing material, and what products may be allowed to be packed together. Without a packing instruction, the search time and rate of mistakes in selecting appropriate parameters to pack a delivery item are usually high, but with the use of packing instruction master data, specific characteristics required for packing materials are stored and generate proposals for handling units based on the already defined packing instructions during packing transactions.
Just as with all master data, packing instructions make data entry for packing more convenient and also provide automatic packing requirement proposals for handling units on delivery items using packing instruction determination. With the packing instruction determination, time spent on packing delivery items and mistakes due to a mismatch of packing requirements are reduced. Consequently, you can define different packing strategies and rules for the system to automatically search and generate accurate packing proposals for handling units based on business requirements in a shorter time, thereby optimizing the delivery process. The packing instruction determination works with automatic packing.
Packing instructions contain characteristics such as packaging materials, materials to be packed, quantity to be packed per packing material, text items, subordinate packing instructions, and rules concerning rounding, minimum quantities, and definition of a check profile. (I discuss this topic in more detail later in the article.) Below is an example of a packing instruction. A packing instruction can be single- or multi-level.
An Example of a Single-Level Packing Instruction
Single-level packing instruction means that only one packing instruction is used in the process of delivering a product. For example, a chemical company that produces chlorine as one of its products stores it in units of 100-liter plastic containers. During the delivery process in SAP sales and distribution (SD), the 100-liter plastic containers with chlorine are loaded onto a truck for delivery. The packing instruction in this case is single level with the truck as the packing material (the 100-liter plastic containers packing had already been done in production, and they are used as storage packing material, but the truck is used in the delivery process).
An Example of a Multi-Level Packing Instruction
The multi-level packing instruction is an instruction that has packing material and subordinate packing instructions. For example, a company produces household consumable products that are packaged in cartons, and the cartons are packed in pallets before being loaded onto a truck. In this case, apart from the first packing instruction for the truck, there will be subordinate packing instructions for pallets and cartons.
How to Configure Packing Instruction Determination
To configure packing instruction determination, the packing instruction to be determined must have been created. There has to be a clear-cut strategy before implementing the packing instruction determination.
You need to answer some of the following questions before creating a packing instruction and packing instruction determination:
- What criteria are required to fulfill general packing requirements?
- What are the criteria required to fulfill a customer’s specific packing requirement?
- What material needs to be packed?
- What quantity of the material is required to be packed per packing material?
- What packing material or materials are required for specific materials?
- Is there a need for mixing the material with another material?
- Is there a need to control the maximum weight or volume of the materials?
These are some of the considerations that need to be made before implementing the packing instruction determination. Certain parameters also must have been defined as prerequisites for packing instruction determination:
- Material groupings for packaging materials have been defined and rightly assigned to relevant packing material types in the Allowed Packaging Materials
- The packaging material types have been defined and rightly assigned to relevant material groupings for packaging materials in the Allowed Packaging Materials
- The appropriate material groupings for packaging materials are assigned to the delivery items (in the Matl Grp Pack.Matls field under Sales:General/Plant Data view in the material master record) that require packing using packing instruction determination
- The appropriate packing material type is assigned to the packing materials (in the Packing mat. type field under Sales:General/Plant Data view in the material master record) that are used for packing with the application of packing instruction determination.
Now, I show how to check the material grouping for packaging materials. To complete this step, use transaction code VEGR or follow IMG menu path Logistics Execution > Shipping > Packing. Under Packing, click the execute icon (the clock) beside Define Material Group for Packaging Materials to display the screen in
Figure 1.

Figure 1
The Material Group of the Packing Materials list
Also, to check the Packing Material Type
, use transaction code VHAR or follow IMG menu path Logistics Execution > Shipping > Packing. Under Packing, click the execute icon beside Define Packaging Material Types to display the screen in
Figure 2.

Figure 2
Packing Material Types Overview list
To check if the packing material type has been assigned to a material group for packaging materials
, use transaction code VHZU or follow IMG menu path Logistics Execution > Shipping > Packing. Under Packing, click the execute icon beside Define Allowed Packaging Materials to display the screen in
Figure 3.
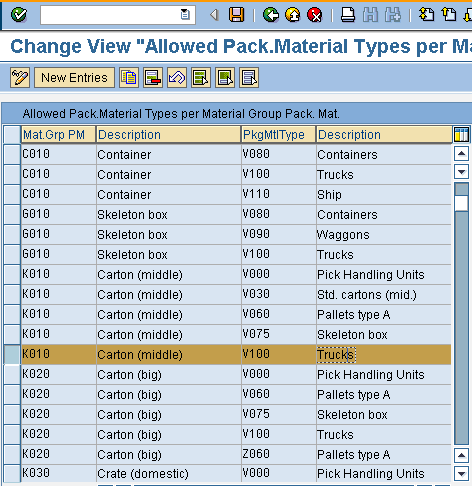
Figure 3
List of assigned packing material types with material groups for packing materials
At this point, I show the step-by-step configuration of the packing instruction determination. The first step is to create the characteristics combination for the search key. This table is used to create the required search keys used for packing instruction determination. For instance, in my example, you need a strategy whereby a particular material can have different packing instruction proposals based on the customer and shipping point.
Therefore, if customer A orders a particular material, the system automatically proposes the packing materials based on customer A’s peculiar requirements and peculiar shipping points (customer A may have different packing materials for air transportation [express] from that of rail transportation). On the other hand, the system also proposes a different packing requirement to customer B, C, or another customer without the interference of the user.
I use the above scenario as the packing instruction determination use case for customer A. The first step is to check if there is any existing combination of Material/Ship-to-party/Shipping point characteristics.
Display the List of Already Defined Characteristics Combination for Search Key
To display the list of already defined characteristics combination for search key, use transaction code OFP7 or follow IMG menu path Logistics > General > Handling Unit Management > Automatic Packing > Determination of Packing Instructions. Under Determination of Packing Instructions, click the execute icon beside Define Key for Packing Instruction Determination to display the screen in
Figure 4.
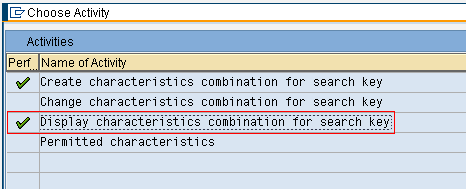
Figure 4
Click Display characteristics combination for search key
In
Figure 4, double-click Display characteristics combination for search key to open the display condition table (not shown). Put your cursor in the Table field and press the F4 key on your keyboard to display the list of already defined characteristics combinations as shown in
Figure 5. In
Figure 5, note that the required characteristics combination for my example (Material/Ship-to-party/Shipping point) is not available. Therefore, I need to create a new characteristics combination that fulfills the requirement. Next, I show you how to create a characteristics combination for a search key.
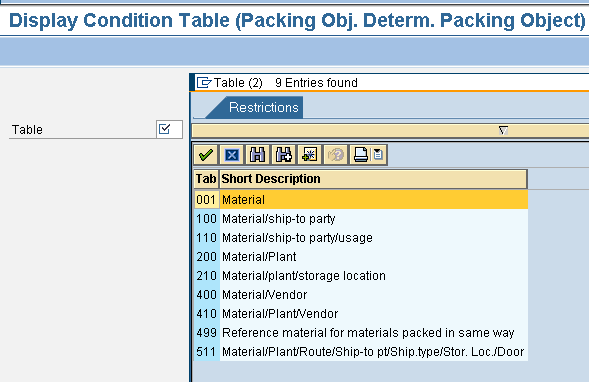
Figure 5
Display the list of already defined characteristics combinations
Create a Characteristics Combination for a Search Key
To create a characteristics combination for a search key using the above requirement (Material/Ship-to-party/Shipping point), use transaction code OFP5 or follow IMG menu path Logistics > General > Handling Unit Management > Automatic Packing > Determination of Packing Instructions. Under Determination of Packing Instructions, click the execute icon beside Define Key for Packing Instruction Determination to display the screen in
Figure 6.
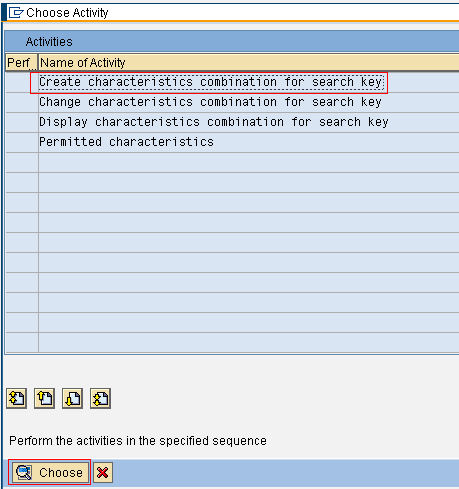
Figure 6
Define a key for the Packing Instruction Determination
In
Figure 6, double-click Create characteristics combination for search key, and the Create Condition Table screen then appears (
Figure 7). Enter the new table number (for this example, use 501. (Tables from 1 to 500 are reserved for standard requirements by SAP, while 501 to 999 are reserved for users.)
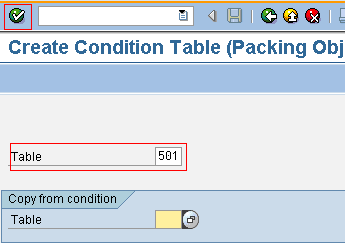
Figure 7
Create a characteristics combination
After you have entered the table number in
Figure 7, click the enter icon (highlighted in the upper left corner of
Figure 7) to display the screen in
Figure 8. In
Figure 8, double-click the relevant fields to select them for the combination. For my example, select the Material, Ship-to-party, and Shipping point/Receiving Pt fields. After you select these fields, click the generate icon (highlighted in the upper left corner of
Figure 8) to generate the table.
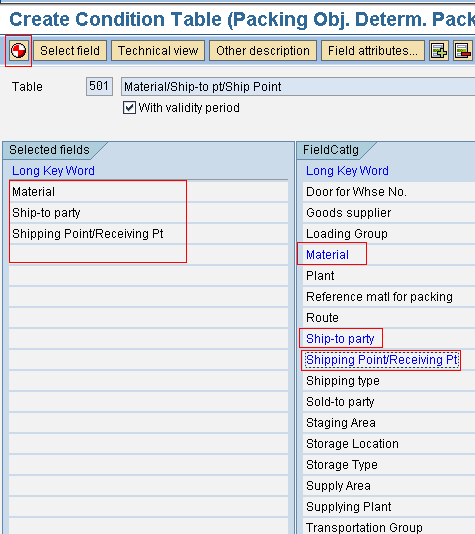
Figure 8
Select fields for the combination table
After you click the generate icon, a pop-up screen appears (
Figure 9) in which you click the Yes button to generate the table.

Figure 9
Generate the condition table
The system then prompts you to indicate the appropriate program package (in my example, enter test in the Package field as shown in
Figure 10). (Note that Person Responsible field is populated by default.) Click the save icon to save the table (
Figure 10).
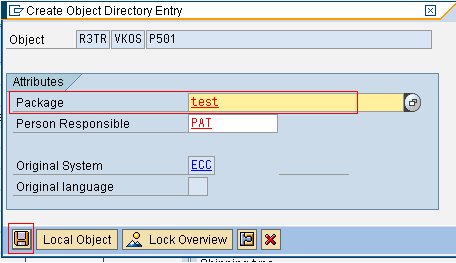
Figure 10
Enter the package program name in the Package field
This action generates a log as shown in
Figure 11.

Figure 11
The created field combination table log
Finally, the required field combination table has been defined, and you can now go ahead to use this field combination to define an access sequence for packing instruction determination and assign the access sequence to a determination type for packing instruction.
Define an Access Sequence for Packing Instruction Determination
To define an access sequence for packing instruction determination, use transaction code OFP2 or follow IMG menu path Logistics > General > Handling Unit Management > Automatic Packing > Determination of Packing Instructions. Under Determination of Packing Instructions, click the execute icon beside Define Access Sequence for Packing Instruction Determination to display the screen in
Figure 12.
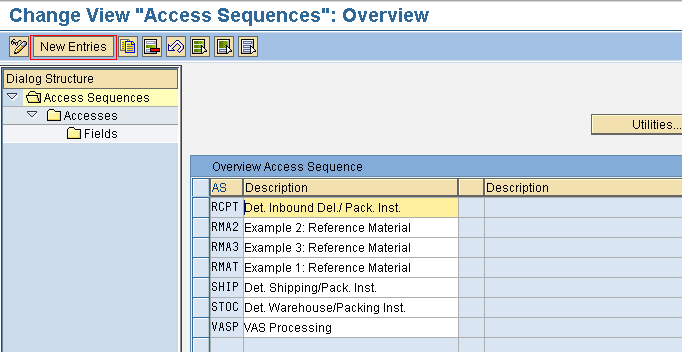
Figure 12
A list of access sequences for packing instruction determination
Note: The system displays a message that the table is cross-client. Click the continue icon.
To define a new access sequence, click the New Entries button. This action displays the screen in
Figure 13. In the AS (access sequence) column enter the access sequence number and description. For this example, enter Z001 (Mat/SH-Party/Shipping Point). Click the save icon to save the configuration.
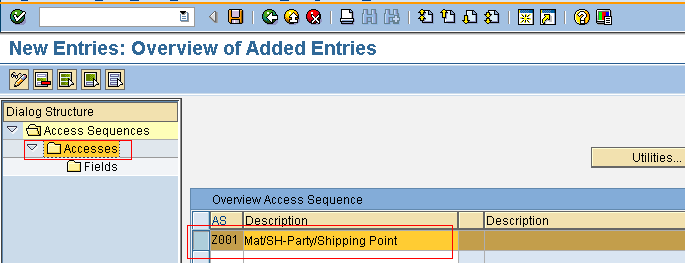
Figure 13
Define a new access sequence for packing instruction determination
Figure 14 shows that the new access sequence has no field combination table assigned to it yet. To assign a field combination table to this access sequence, click the New Entries button.
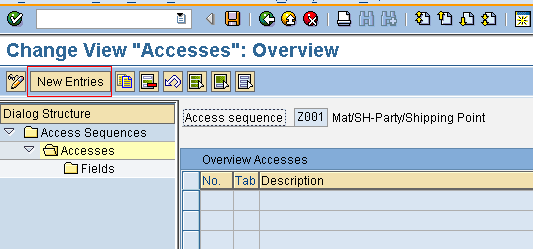
Figure 14
Access sequence with no field combination table
This action makes the fields in the No. (access number) and Tab (table) columns editable (
Figure 15).
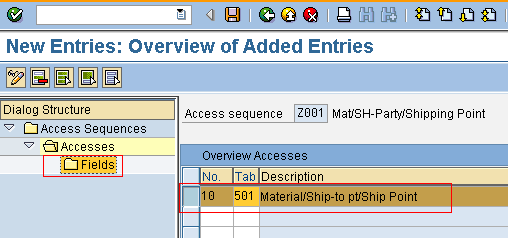
Figure 15
Assign a field combination table
In
Figure 15 enter an access number and select the appropriate table in the No. and Tab columns, respectively. For this example, enter 10 as the access number and assign the field combination table 501 created earlier in this article. To confirm the fields in this field combination table 501, select it and click the Fields folder in the left pane.
Figure 16 then shows the same field selected earlier in
Figure 8.
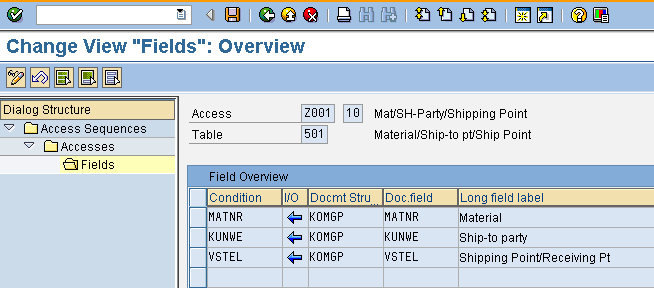
Figure 16
Fields in table 501
Now, go back to the list of access sequences (to go back to this screen follow the instructions before
Figure 12) and click the Utilities button while the access sequence Z001 is selected to generate the access sequence for Z001 as shown in
Figure 17.
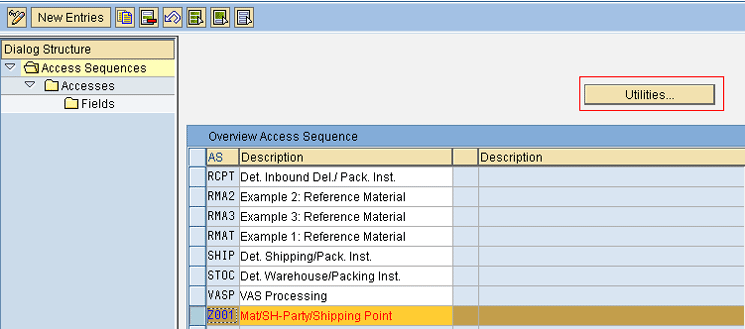
Figure 17
Generate the access sequence for Z001
In the Generate Access Sequences screen (
Figure 18), check to ensure that the populated data is correct. Then click the execute icon.
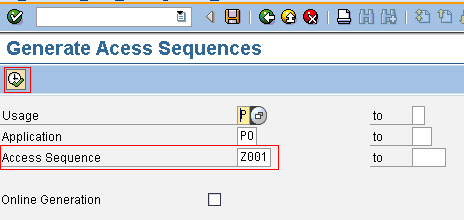
Figure 18
Check data in the Generate Access Sequences screen
When you click the execute icon, the system generates a log for the generated access sequence as shown in
Figure 19.
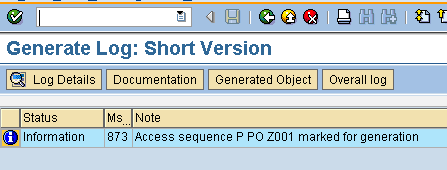
Figure 19
The generated access sequence log
Use the back icon to return to the access sequence overview screen (
Figure 17) and click the save icon (not shown) to save your configuration.
Define a Determination Type for Packing Instruction
To define a determination type for packing instruction, use transaction code OFP3 or follow IMG menu path Logistics > General > Handling Unit Management > Automatic Packing > Determination of Packing Instructions. Under Determination of Packing Instructions, click the execute icon beside Define Determination Type for Packing Instruction to display the screen in
Figure 20. To define a new determination type, click the New Entries button.
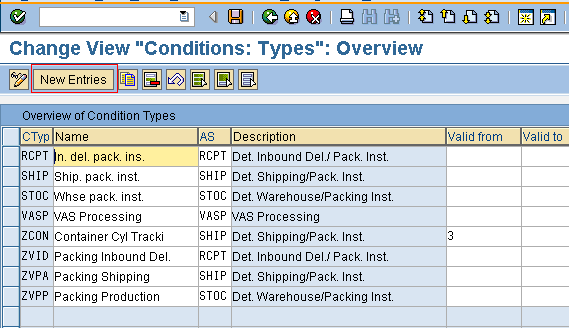
Figure 20
A list of defined condition types with assigned access sequences
After you click the New Entries button, the system displays the screen in
Figure 21. In the CTyp (condition type) column enter a condition type number and in the Description column enter a text description. In the AS column assign an appropriate access sequence. For this example, I use Z00Z (Mat/SH-Party/Sh-P) as the condition type and assign the access sequence defined earlier in this article, Z001 (Mat/SH-Party/Shipping Point).

Figure 21
Define condition types with assigned access sequences
Now click the back icon to go back to the list of defined condition types. The newly defined determination type is part of this list (
Figure 22). Click the save icon to save your configuration.
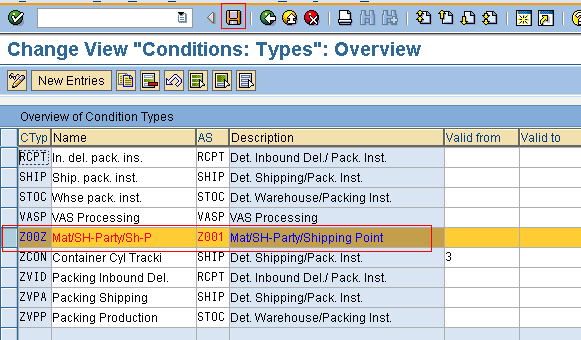
Figure 22
The newly defined access determination type is displayed in the list of defined condition types with assigned access sequences
Now I have shown you how to define a field combination table based on my example. I have explained how to use the table to set up an access sequence and assign the access sequence to a new determination type. The next step is to assign the required determination types in a determination procedure.
Define a Procedure for Packing Instruction Determination
To define a procedure for packing instruction determination, use transaction code OFP4 or follow IMG menu path Logistics > General > Handling Unit Management > Automatic Packing > Determination of Packing Instructions. Under Determination of Packing Instructions, click the execute icon beside Define Procedure for Packing Instruction Determination to display the screen in
Figure 23.
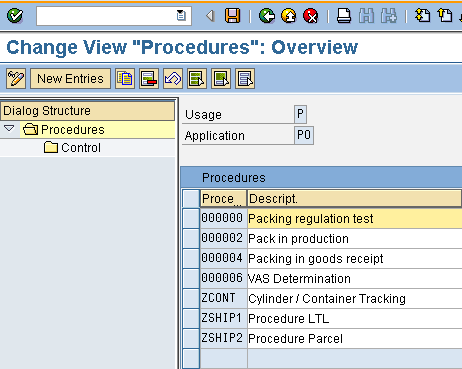
Figure 23
A list of defined procedures for packing instruction determination
To define a new procedure, click the New Entries button. This action opens the screen in
Figure 24.

Figure 24
Define a new procedure
In
Figure 24, enter a procedure number and description in the Proce… and Descript columns, respectively. For this example, enter Z0010Z (Mat/SH-Party/Shipping Point). Click the save icon to save the configuration.
After you save the configuration, use the back icon to return to the list of defined procedures for the packing instruction determination screen. Select the new procedure and click the Control folder in the left pane to assign appropriate determination types (
Figure 25).
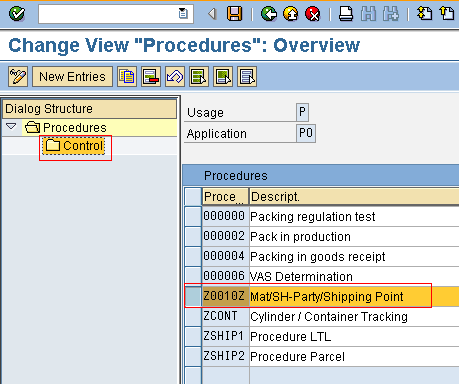
Figure 25
A list of defined procedures for packing instruction determination
When you click the Control folder, the system displays the screen in
Figure 26. Enter the step numbers and assign the determination type. For this example, assign determination type Z00Z (Mat/SH-Party/Shipping Pt) on step 10 and ZVPA (Packing Shipping) on step 20. Click the save icon to save the configuration.
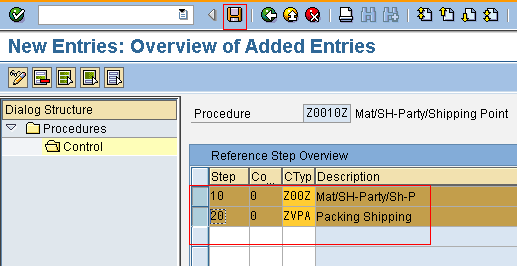
Figure 26
Assign determination types to procedure Z0010Z
At this stage, the packing determination configuration is complete. The next step is to use the combination of packing instructions and packing instruction determination records to create packing strategies to automatically generate packing proposals for handling units during the delivery process.
How a Packing Instruction Is Determined to Speed Up the Delivery Process Using Packing Instruction Determination Records
With the functionality of the packing instruction determination records, packing instructions are automatically selected for a material based on defined business requirements by assigning the defined packing instruction to the packing instruction determination records. This step reduces the time required to select packing materials and speeds up the delivery process.
In this section, I show you how the packing instruction determination is applied to optimize the delivery process. I demonstrate this using a business scenario in which single-level and multi-level packing instructions are required.
A Business Scenario
In this scenario, I explain how to apply the determination configuration I demonstrated earlier using the Material/Ship-to-Party/Shipping Point field combination. A company’s customer requires that whenever that customer places an order, a smaller part of the items should be delivered expressly via air to buffer the customer’s stock while the larger delivery should be made via rail. To fulfill this requirement, the company has to define two packing instructions for air and rail delivery, respectively. The company also creates a packing instruction determination record to define the strategy for how the system will always automatically propose the right packing requirement for the delivery material depending on the shipping point.
The first step is to create different packing instructions for these different packing requirements. Then you assign the packing instructions to a packing instruction determination record and run the delivery process to see how it works. Note that the emphasis in this demonstration is on how the packing requirements are automatically proposed for delivery items to speed up the delivery process, reducing the time and eliminating the use of manual searching of appropriate packing materials for delivery items by users—a manual step that is rife with possibilities of mistakes.
An Example of How to Create a Packing Instruction
To create the packing instructions, use transaction code POP1 or follow menu path Logistics > Central Functions > Handling Unit Management > Master Data > Packing Instructions. Under Packing Instructions, click the POP1 – Create node to display the screen in
Figure 27. Click the enter icon.
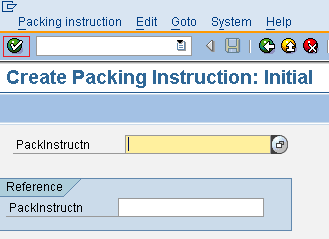
Figure 27
Click the enter icon
When you click the enter icon, the system displays the screen in
Figure 28. The system generates a document number (an internal number assignment). Enter the description of the packing instruction in the Short text field and then enter the materials in the Component field. In this example, the product is CP_5002 (chocolate chip cookies) that is packed in a big carton (10 PCs/big carton). Three cartons will also be packed per pallet. This is the packing instruction for the large delivery by rail.

Figure 28
Enter details for the packing instructions for component CP_5002
You may also consider adding some more parameters depending on your requirements. For example, you could assign an inspection profile under the Admin. data tab, or you could also add some dimension parameters under the Dim. tab. In this example, additional parameters are not required, so click the save icon to save the packing instruction. The system then displays the following message in the status bar: Packinstructn 253 saved successfully. This message confirms the packing instruction has no error. This is just the basic step in creating a packing instruction.
I now explain how to create the second packing instruction for the express delivery via air transportation. This delivery should be lighter and it is packed with just cartons in smaller units.
Follow the above steps to create the packing instruction (see the instructions before
Figure 27). In the screen in
Figure 29, enter the materials in the component field. In this example, the chocolate chip cookies will be packed into cartons (6 pieces [PCs]/carton), so in the Target quantity column, enter 1 and 6 for one carton and 6 PCs per carton.

Figure 29
Enter details for second packing instructions for component CP_5002
Click the Admin. data tab to assign an inspection profile. For this example, enter 01 in the Check profile field as shown in
Figure 30.
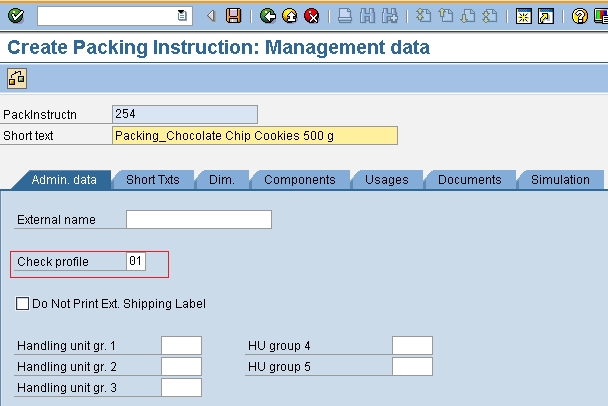
Figure 30
Assign an inspection profile
Click the Dim. (dimension) tab (
Figure 31). Note that the value in the Allowed load.wgt. (allowed load weight) field is 50, indicating that the allowed weight per carton is 50 kg. This means if the total of 6 PCs of chocolate chip cookies is more than 50 kg, this packing instruction cannot be saved.
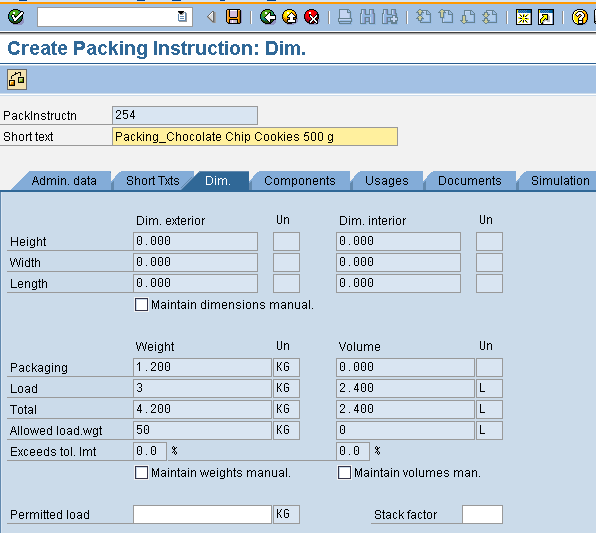
Figure 31
Dimension for the packing instruction
After you click the save icon to save the packing instruction, the system displays the following message in the status bar: PackInstructn 254 saved successfully.
Note
The following item categories are used when creating packing instructions:
I – Subordinate Packing Instruction
M – Material
P – Packing Material
R – Reference Material
T – Text
Create a Packing Instruction Determination Record
The packing instruction determination record is used to implement the configuration done for determining packing instructions for packing of delivery items.
To create the packing instructions determination record, use transaction code POF1 or follow menu path Logistics > Central Functions > Handling Unit Management > Master Data > Packing Instruction Determination Records. Under Packing Instruction Determination Records, click the POF1 – Create node to display the screen in
Figure 32. Enter the appropriate Determination type based on your requirements. For this example, use the determination type Z00Z (Mat/SH-Party/Sh-P) you configured earlier in this article. Click the Key… button.
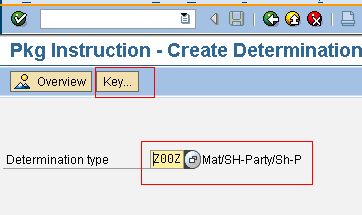
Figure 32
Select a determination type
After you click the Key… button, the system displays the screen in
Figure 33. Select the field under Key Combination and click the continue icon.
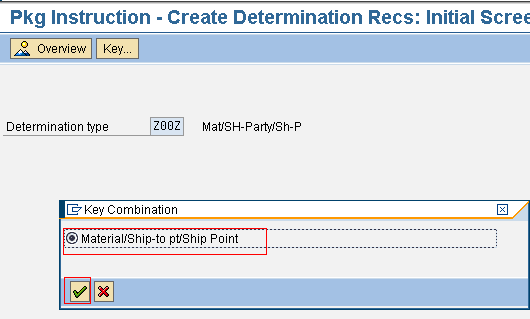
Figure 33
Select a key combination for packing instruction determination
After you click the continue icon, the system displays the screen in
Figure 34. Enter the Material number, Ship-to-Party (Customer) number, and Shipping Point number and assign the Packing instructions accordingly. In this example, the number you enter in the Material field is CP_5002 (chocolate chip cookies weighing 500 g). In the Ship-to Pt (ship-to party) column, the ship-to-party number is T-L63A01 (Sildiok), and in the Shi… column, the shipping point numbers are 009X [Shipping Point 2 (Rail)] and 1100 [Shipping Point (Air)]. In the Packing instruction column, enter the numbers for your packing instructions (for this example, enter 253 for the rail shipping instructions and 254 for the air instructions). You can confirm the packing instructions by selecting the particular item line and clicking the Packing instruction button.

Figure 34
Enter details for the packing instruction determination record
With this strategy as shown in
Figure 34, the system proposes the packing instruction 253 for handling units whenever material CP_5002 (chocolate chip cookies weighing 500 g), customer T-L63A01 (Sildiok) have delivery items to be packed for rail transportation, while packing instruction 254 is proposed for handling units if the same delivery is by air.
Click the save icon to save the packing instruction determination record.
In this next section, I show you how to create outbound delivery documents to run the packing process referencing two already created sales orders due for delivery for the material CP_5002 (chocolate chip cookies weighing 500 g) and customer T-L63A01 (Sildiok), but different shipping points 009X [Shipping Point 2 (Rail)] and 1100 [Shipping Point (Air)]. These transaction examples are to test the packing instruction determination to automatically propose packing requirements based on the defined strategy.
An Example of How to Create an Outbound Delivery Document
To create an outbound delivery document, use transaction code VL01N or follow menu path Logistics > Sales and Distribution > Shipping and Transportation > Outbound Delivery > Create > Single Document. Under Single Document, click the VL01N – With Reference to Sales Order node to display the screen in
Figure 35. Enter a number in the Shipping Point field, and in the Order field, enter the sales order to be referenced. In the Selection date enter a date and then click the enter icon.
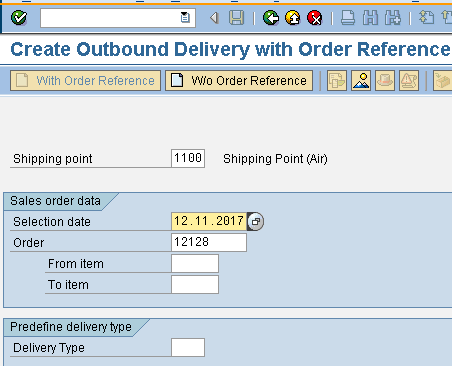
Figure 35
Enter values in the Create Outbound Delivery initial screen
When you click the enter icon, the system displays the screen in
Figure 36. Note that the delivery item quantity is 60 PCs of chocolate chip cookies weighing 500 g and the total weight is 30 kg. Now click the save icon to save the outbound delivery document.

Figure 36
Create an outbound delivery document
After you click the save icon, the system displays this message in the status bar: Delivery 80015201 has been saved.
Usually, the next step would be to do the picking, but for the purpose of this example, I show directly how the packing instruction determination proposes packing requirements.
An Example of How to Create Packing
To do packing of the delivery item, use transaction code VL02N or follow menu path Logistics > Sales and Distribution > Shipping and Transportation > Outbound Delivery > Change. Under Change, click the VL02N – Single Document node to display the screen in
Figure 37. In the Outbound Delivery field, enter the number of the newly created delivery document and click the packing icon (highlighted in
Figure 37) to run the packing transaction.
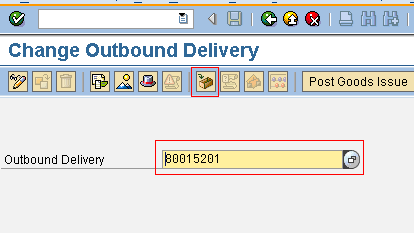
Figure 37
Enter the number of the newly created outbound delivery document
After you click the packing icon, the system displays the screen in
Figure 38. This screen shows information about the delivery item (60 PCs of chocolate chip cookies weighing 500 g).
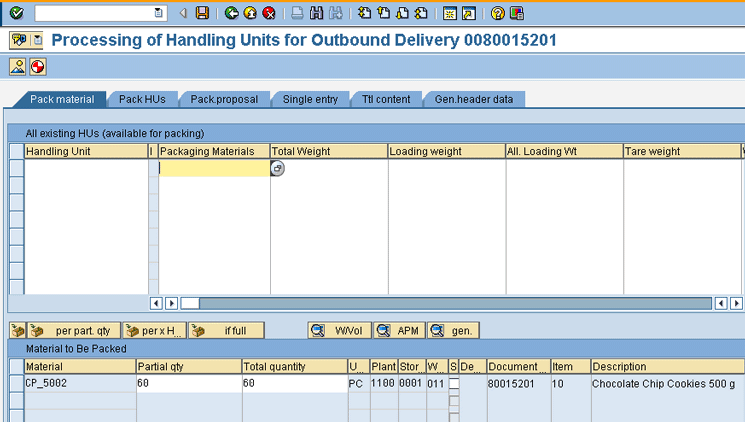
Figure 38
Processing of handling units
Click the Pack proposal tab. Note that the accurate packing requirement for the delivery item is proposed by the system based on the packing instructions and the determination strategy (
Figure 39). In the PackInstructn (packing instructions) column, you see the determined packing instruction number 254 (refer back to
Figure 29) that has 6 PCs of chocolate chip cookies weighing 500 g to be packed in a carton. Therefore, 60 PCs of chocolate chip cookies weighing 500 g will be packed in 10 cartons. Now click the generate icon to execute the automatic packing.

Figure 39
Determined packing proposal for handling unit
Click the Ttl (total) content tab, to view how the packing has been done (
Figure 40). Note that the packing instructions are for 6 PCs/carton, so you have a total of 10 cartons for the 60 PCs of chocolate chip cookies weighing 500 g.
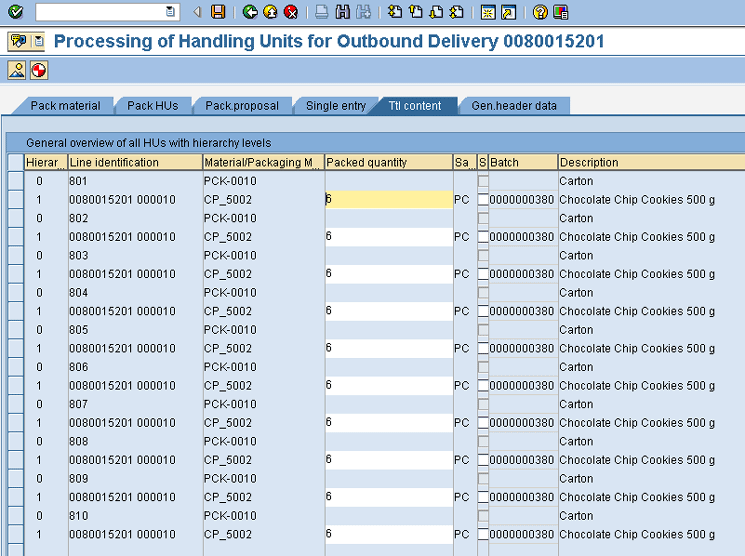
Figure 40
General overview of the handling units
Click the Pack material tab to view the handling unit numbers for the packed delivery items (
Figure 41). Now, the delivery item is fully packed without having to waste time manually searching for the right packing material and other packing requirements. Click the save icon to save the packing instructions.
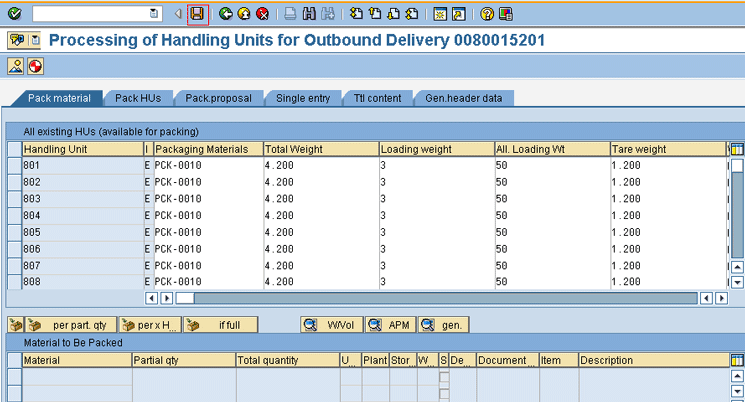
Figure 41
Handling units for the packed items
After you save the packing transaction, the system displays this message in the status bar: Delivery 80015201 has been saved. The system also returns you to the Change Outbound Delivery Screen (
Figure 37). In the Change Outbound Delivery Screen, click the header icon (the hat) of the delivery document to display the document header as shown in
Figure 42. You can see that the Pack status is C (completely packed).
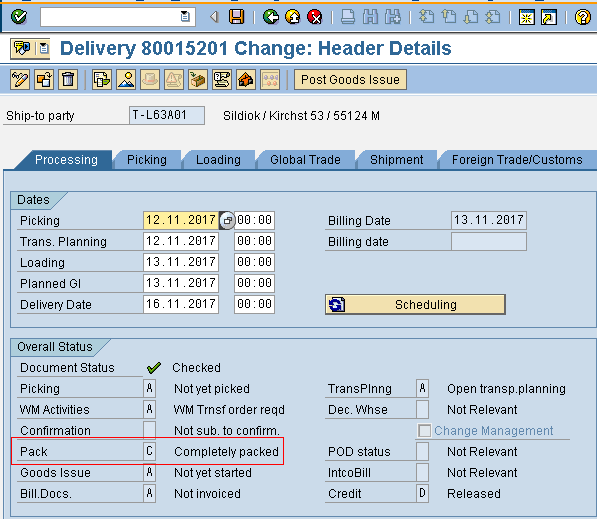
Figure 42
Outbound delivery document header data
A Second Example of How to Create an Outbound Delivery Document
In this section, I show you how the packing requirement for the second shipping point 009X for rail is determined. To achieve this, repeat the procedure used above to process the shipping point 1100.
To create an outbound delivery document, use transaction code VL01N or follow menu path Logistics > Sales and Distribution > Shipping and Transportation > Outbound Delivery > Create > Single Document. Under Single Document, click the VL01N – With Reference to Sales Order node to display the screen in
Figure 43. In the Shipping point field, enter 009X, and in the Order field, enter the sales order to be referenced (12129). In the Selection date field enter the date and then click the enter icon.
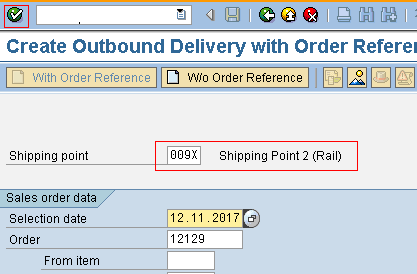
Figure 43
Create an outbound delivery document
After you click the enter icon, the system displays the screen in
Figure 44. Note that the delivery item quantity this time is 600 PCs of chocolate chip cookies weighing 500 g and the total weight is 300 kg. Now click the save icon to save the outbound delivery document.
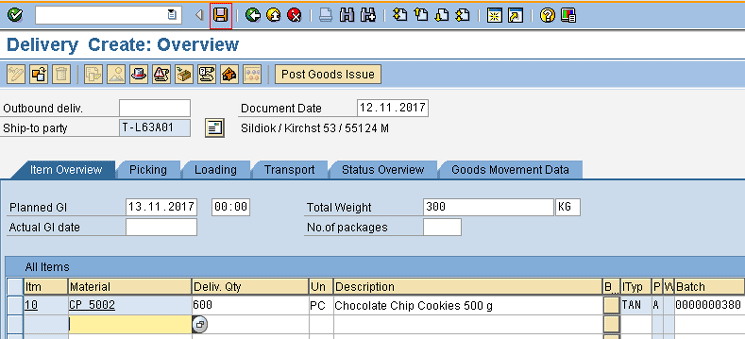
Figure 44
View details for the newly created outbound delivery document
After you click the save icon, the system displays this message in the status bar: Delivery 80015202 has been saved.
A Second Example of How to Create Packing
To create the packing of the delivery item, use transaction code VL02N or follow menu path Logistics > Sales and Distribution >Shipping and Transportation > Outbound Delivery > Change. Under Change, click the VL02N – Single Document node to display the screen in
Figure 45. Enter the number of the newly created delivery document and click the packing icon to run the packing transaction.
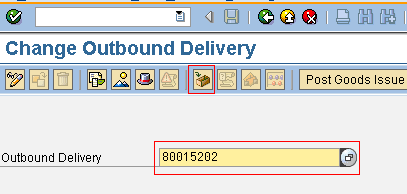
Figure 45
Enter the number of the newly created outbound delivery document
In this packing transaction,
Figure 46 shows a packing proposal that 30 PCs of chocolate chip cookies weighing 500 g will be packed in three cartons (10 chocolate chip cookies weighing 500 g/carton). Also, three cartons shall be packed in one pallet. The system this time determined a different packing requirement because of the shipping point difference. In the PackInstructn (packing instruction) column, you can see that the determined packing instruction number is 253 (refer back to
Figure 28).

Figure 46
Determined packing proposal for handling unit
Now execute the automatic packing by clicking the generate icon.
After you click the generate icon, the system displays this message: The list of auxiliary packg.mat. you entered includes packing material. Click the continue icon to continue the transaction.
Click the Ttl content tab to view how the packing has been done (
Figure 47). Note that the instructions indicate that 30 PCs of chocolate chip cookies weighing 500 g are packed in three cartons (10 PCs/carton) also three cartons/pallet. So with this packing proposal, the handling unit is always guided on the correct packing requirement.
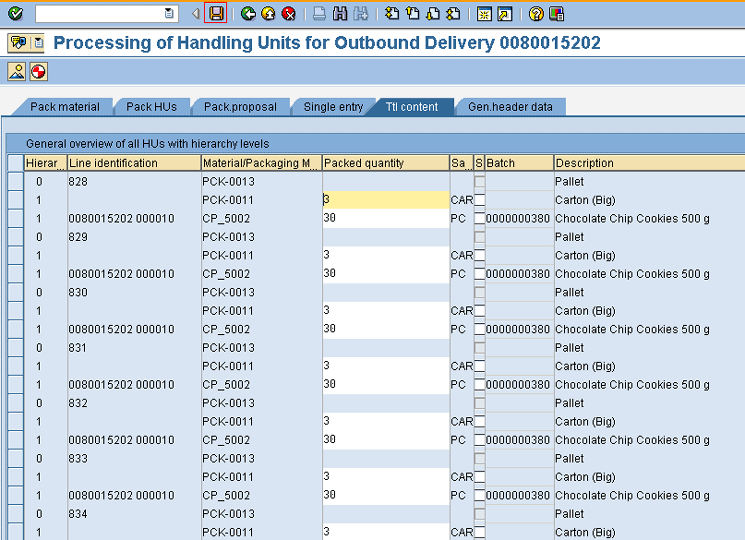
Figure 47
General overview of the handling units
Click the save icon to save the packing. After the packing proposal is saved, the system displays a message in the status bar (Delivery 80015202 has been saved) and returns you to the Change Outbound Delivery Screen (refer back to
Figure 45).
Now I explain how to set up a multi-level packing instruction and process packing using the same material, but different ship-to-party (customer) and shipping point.
A Third Example of How to Create a Packing Instruction
Follow the previous process in creating packing instructions as explained earlier in this article.
Figure 48 shows the Create Packing Instruction overview screen for a new packing instruction for 12 PCs of chocolate chip cookies weighing 500 g/carton (medium). In this example, the proximity of the customer’s delivery location is close and so road transportation is used to deliver items to this customer. A different shipping point dedicated to road is used for this delivery. The main objective of this demonstration is to show how a multi-level packing instruction is set up and proposed automatically for handling units during packing in the delivery process.
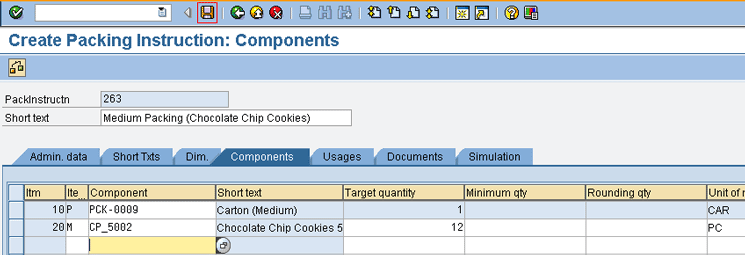
Figure 48
Create Packing Instruction overview screen
Click the save icon to save the packing instruction. The system then displays the following message in the status bar: PackInstructn 263 saved successfully.
Follow the same procedure to create another packing instruction and assign the packing instruction 263 as a subordinate packing instruction in the new packing instruction. This makes the packing instruction multi-level.
Figure 49 shows the Create Packing Instruction overview screen for another packing instruction, 271, but this time, the data is for a multi-level packing instruction. The previous packing instruction, 263, is assigned in this new packing instruction as a subordinate packing instruction. It shows that 400 cartons of chocolate chip cookies weighing 500 g will be packed in one truck. Moreover, in the packing instruction 263, 12 PCs of chocolate chip cookies weighing 500 g are set to be packed in one carton; this data implies that 4,800 PCs of chocolate chip cookies weighing 500 g can be packed in the truck. Note that a minimum load of 200 cartons of chocolate chip cookies weighing 500 g is also indicated in this instruction. Note also that this multi-level packing instruction is relevant here because the truck is a Means of Transport category while carton is a Packing material category.
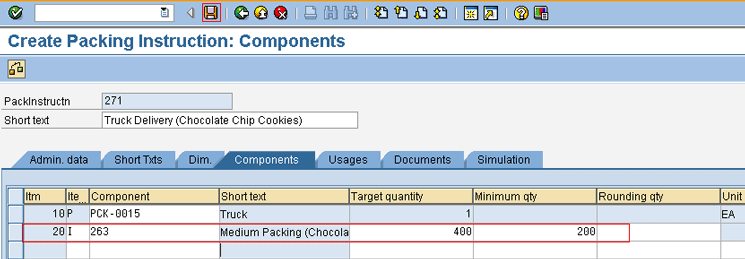
Figure 49
Multi-level packing instruction
After you click the save icon to save the packing instruction, the following message appears in the status bar: PackInstructn 271 saved successfully.
Change the Packing Instruction Determination Record
Now, I explain how to assign this new packing instruction, 271, which has a subordinate instruction to the packing instruction determination record that I showed you how to create earlier in this article (see
Figure 34). To do this, use the Change transaction.
To change the packing instruction determination record, use transaction code POF2 or follow menu path Logistics > Central Functions > Handling Unit Management > Master Data > Packing Instruction Determination Records. Under Packing Instruction Determination Records, click the POF2 – Change node to display the screen in
Figure 50. Enter the appropriate Determination type based on the requirement. For this example, use the determination type Z00Z (Mat/SH-Party/Sh-P) I. Click the Key… button.
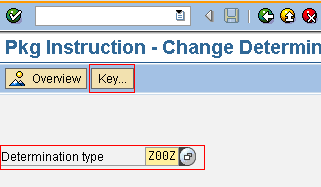
Figure 50
Select the Determination type
After you click the Key… button, the system displays the screen in
Figure 51. Select the field under Key Combination and click the continue icon (highlighted in
Figure 51).
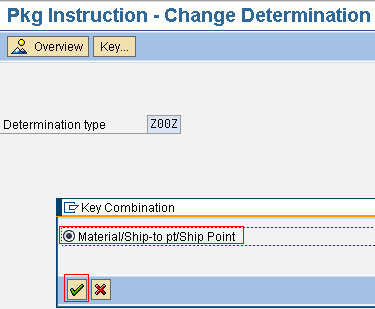
Figure 51
Select the Key Combination for packing instruction determination
After you click the continue icon, the system displays the screen in
Figure 52. In the Material field enter the material number and in the Ship-to party field enter the ship-to-party (customer) number. In the Valid On field the system proposes a date, but it can be changed if necessary. After you enter your data, click the execute icon.
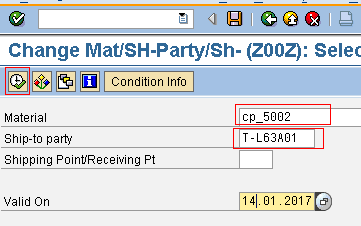
Figure 52
Change packing instruction determination record
In the packing instruction determination record overview screen in
Figure 53, enter the Ship-to-party number, shipping point, and the packing instruction. For this example, enter ship-to-party UR-0001 (Dicome), 1200 (Shipping Point [Road]), and the new multi-level packing instruction. This strategy automatically proposes the packing instruction 271 and the subordinate packing instruction 263 whenever chocolate chip cookies weighing 500 g are delivered by road to the ship-to-party UR-0001 (Dicome).
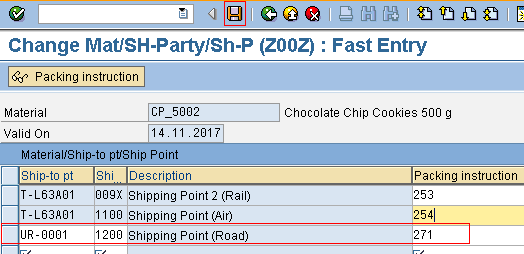
Figure 53
Enter details in the Packing Instruction Determination Record overview screen
Click the save icon to save the updated packing instruction determination record.
A Third Example of How to Create an Outbound Delivery
To create an outbound delivery document, use transaction code VL01N or follow menu path Logistics > Sales and Distribution > Shipping and Transportation > Outbound Delivery > Create > Single Document. Under Single Document, click the VL01N – With Reference to Sales Order node to display the screen in
Figure 54. Enter the shipping point 1200 [Shipping Point (Road)], the sales order to be referenced, and the date. Then click the enter icon.
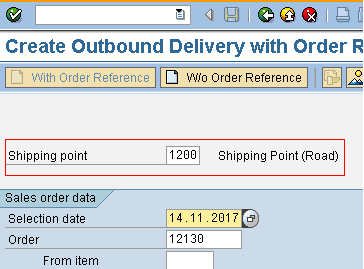
Figure 54
Create Outbound Delivery
After you click the enter icon, the system displays the screen in
Figure 55. Note that the delivery item quantity is 4,800 PCs of chocolate chip cookies weighing 500 g, and the total weight is 2,400 kg. Now click the save icon to save the outbound delivery document.
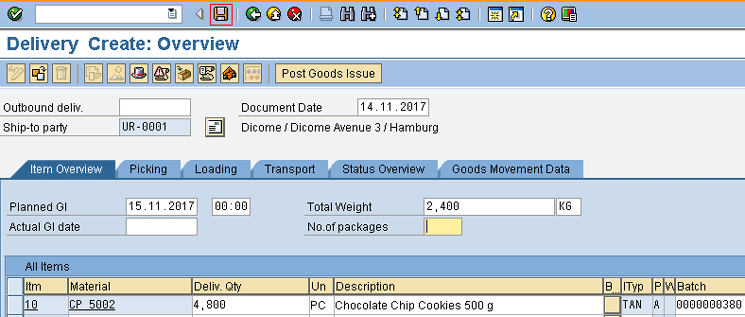
Figure 55
Create the outbound delivery document
After you save the outbound delivery document, the system displays this message in the status bar: Delivery 80015204 has been saved.
A Third Example of How to Create Packing
To do packing of the delivery item, use transaction code VL02N or follow menu path Logistics > Sales and Distribution > Shipping and Transportation > Outbound Delivery > Change. Under Change, click the VL02N – Single Document node to display the screen in
Figure 56. In the Outbound Delivery field, enter the number of the newly created delivery document and click the packing icon to run the packing transaction.
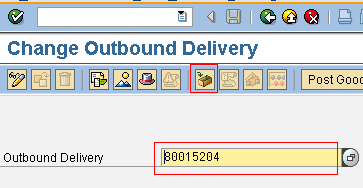
Figure 56
Enter the number of the newly created delivery document
After you click the packing icon, the screen in
Figure 57 appears. This screen shows information about the delivery item 4,800 PCs of chocolate chip cookies weighing 500 g that will be packed in 400 cartons with 12 PCs/carton. The 400 cartons will be packed in a truck. Note that the HU proposals (handling unit proposals) has two levels because this is a multi-level packing instruction.

Figure 57
The packing instruction proposal
Click the generate icon to execute the packing proposal.
Figure 58 shows an overview of the handling units of 12 PCs/carton in one truck.
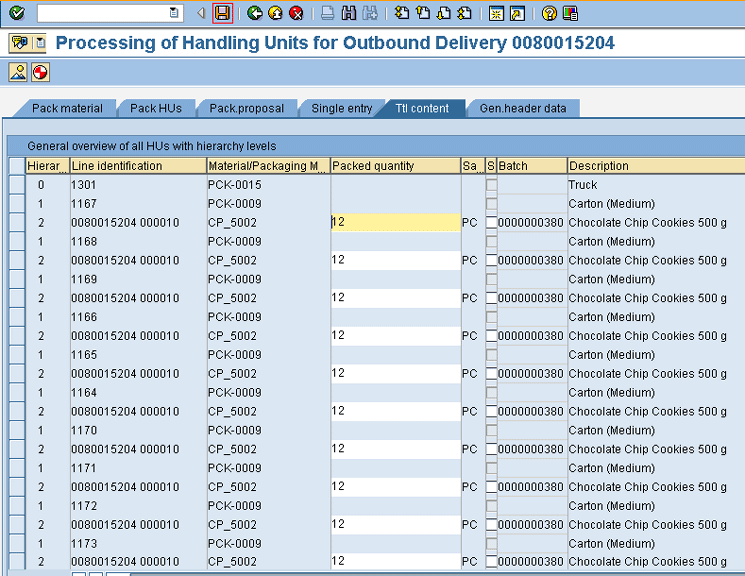
Figure 58
The handling unit overview screen
After you click the save icon to save the packing, the system displays a message on the status bar (Delivery 80015204 has been saved) and then returns you to the Change Outbound Delivery Screen (refer back to
Figure 56).
Imagine how cumbersome it could be to search manually for packing materials to pack hundreds of different delivery items with single and also multiple packing materials. The packing instruction determination eliminates mistakes and speeds up the delivery process.
Patrick Imhen
Patrick Imhen is a business analyst and a certified SAP ERP consultant with proficient knowledge, skills, and experience in Materials Management (MM), Sales and Distribution (SD) and Plant Maintenance (PM) gathered from successful SAP implementations projects, support, training, business process analysis, modeling, unit testing, and integration testing. He has profound understanding of the supply chain process across industries and helps organizations cut the cost of operation and improve process optimization. He has more than 10 years’ experience in the business environment and six years’ experience in the SAP domain.
You may contact the author at
patrick.imhen@zocoderesources.com.
If you have comments about this article or publication, or would like to submit an article idea, please contact the
editor.


