Manager
Learn the essentials of digital signature configuration in this overview and basic guide to digital signature setup in SAP Solution Manager.
Key Concept
A digital signature is an electronic signature that is part of a document header. It enables users to transmit digital documents and official signatures without physically signing the document. The digital signature includes information such as the signer’s first and last names, the time at which the document was signed, and other technical information per the public key infrastructure (PKI) framework. When a digital signature uses encryption, the signature credentials are transmitted in an encrypted manner and can be verified by the receiver for authenticity. Similarly, the author of the signature cannot refute the authenticity of his or her digital signature.
Given the advantages of using digital signatures and the growing trend of performing more and more transactions electronically, it shouldn’t come as a surprise that SAP has provided digital signature capability in some shape or form since some of its earlier releases. SAP NetWeaver provides a framework for encrypting and transmitting digital signatures. Today, several SAP applications and components, including SAP Solution Manager, provide the ability to use this technology.
I’ll review the main steps for configuring secure digital signatures in SAP Solution Manager. Before you begin, it’s essential to know that a digital signature is an artifact with legal implications. Digital signatures can be configured to use cryptography and are transmitted through electronic media (e.g., email or fax messages). Using public-private key pair functionality, which I explain later in this article, the document’s recipient can verify that the digital signature is indeed that of the person sending the document.
Note
Digital signatures are not “one size fits all.” Different regulatory agencies and national standards sometimes have different digital signature needs in terms of encryption and verification. You should research this before setting out to configure digital signatures.
Before You Begin
Several configuration activities are required for SAP Solution Manager users to digitally sign and transmit documents. Before you begin configuring your system for digital signatures, you should have a solid digital signature strategy. An example of this kind of strategy is one that considers factors such as the overall user or regulatory needs for digital signatures, the groups of employees that can share the same signing privileges, and the possibilities and limitations imposed by your technical infrastructure.
SAP supports three different approaches for verification: system signatures with authorizations controlled by the users’ credentials, signatures with external (third-party) product with verification, and signatures with external (third-party) product without verification. Note that third-party products provide additional functionality, such as digital envelopes and alternative encryption technologies. They require additional hardware that the system signature method does not. When considering your organization’s choice for an approach, there is a cost/functionality trade-off. From the SAP Solution Manager standpoint, I recommend the system signature option — provided that the exchange of documents is limited to internal users of the system and you would like to keep costs down.
The clearer your requirements are, the easier it is for you to decide which configuration options you should choose and which values you or your SAP NetWeaver (or Basis) administrator enters for them. Note that most of these configuration values should be entered by your organization’s SAP NetWeaver or Basis administrator.
The configuration activities can be grouped into two categories: system activities and application activities. System activities are all the activities that need to be carried out to ensure your system is ready to support digital signature processing. They can be found under the Basic Settings for Digital Signature IMG node in SAP Solution Manager. Application activities are all the activities that allow you to customize digital signatures for your specific needs and are in the Signature Strategy IMG node. Several of these activities, such as those under the Basic Settings for Digital Signature node, are highly technical in nature and must be carried out by an SAP NetWeaver administrator. However, I’ll still discuss them so that you have a general understanding of the configuration, regardless of your technical role.
Configuring Digital Signatures in SAP Solution Manager 7.0
Now I’ll begin to walk you through the important IMG configuration steps that you need to take to enable SAP Solution Manager users to implement a digital signature framework. First, in the IMG, navigate to SAP Solution Manager > Scenario-Specific Settings > Implementation > Optional Activities > Document Management > Digital Signature > Basic Settings for Digital Signature.
Note
Because this article is meant to be a basic configuration guide, I will not go into every detail of each configuration activity. If you perform the steps in this article and your Basis team and security administrators perform their assigned duties, the general configuration of digital signatures will be complete. Additional configuration activities depend on how many levels of approval are needed at your company, your document management policies, and the complexity of your digital signature strategy.
A public key is part of the public key infrastructure (PKI) that enables users in an unsecured network, such as the Internet, to securely transact sensitive information using a public-private key pair that is obtained from a trusted authority and shared through the unsecured network. Digital signatures are also part of this PKI framework. The PKI key combination serves as a guarantee that a particular digital signature has been generated from a particular SAP system and user.
First, select the Activate Personal Security Environment (PSE) node in the IMG and navigate to the Trust Manager activity (Figure 1). Here you must ensure that your system has the capacity to generate digital signatures using the system’s public key information, which is contained in the PSE. Make sure the system name has a green square next to it in the Trust Manager screen. This means it is active. If a red X appears instead of a green square, you can switch it to active mode from the IMG menu by highlighting the line that includes the red X, right-clicking to bring up the context menu, and activating it from this context menu.

Figure 1
PSE is activated
One of the questions I’m asked most frequently when I talk to users about digital signatures is whether an organization has control over who can use digital signatures. The answer is yes, an organization can limit the ability to digitally sign documents to a particular set of users by using the appropriate authorization objects. I’ll show you how to do that next.
A key consideration in your digital signature configuration strategy should be defining the people or groups that will have the ability to digitally sign documents. This configuration activity enables you to create authorization groups based on function. You can start to define authorization groups by opening the Signature Strategy node in the IMG and opening the Define Authorization Groups node.
The screen shown in Figure 2 appears. Note that when you configure authorization groups for the first time, the table in this screen is unlikely to show any entries. To create a new entry, click the New Entries button. In Figure 2, I created a new authorization group called GRP1 that groups together all the functions and responsibilities of the owners of the Business Blueprint documents.

Figure 2
Maintaining authorization groups for digital signatures
After you create the authorization group, you must assign it to the appropriate authorizations in user maintenance. This is an activity that your SAP Security Administrator should carry out.
Once you have defined your authorization groups, you are ready to tie them to individual signatures. Execute the configuration activity Define Individual Signatures, which is found under the Signature Strategy node in the IMG. You’ll see a screen similar to the one shown in Figure 3, but without any entries if you are configuring signatures for the first time. By clicking the New Entries button, you can create individual signatures, enter an appropriate description, and map them to the authorization group you created. Users that are part of a particular authorization group can now carry out signature-related activities per their individual signature. For the sake of my example, I have created two individual signatures (ZUSER1 and ZUSER2) and assigned them to the authorization group I created (GRP1).

Figure 3
Create individual signatures
Click the Signature Strategy IMG node and select the Define Signature Strategy node that appears beneath it. To create your signature strategy, click the New Entries button. This takes you to a screen where you can create a signature strategy, provide a description, choose the appropriate signature method, and make a few additional selections. The values I entered are displayed in Figure 4. I entered the name ZTEST in the SigStrat column and a suitable description, Test signature strategy.

Figure 4
Define your digital signature strategy
The most important column is the Signature Method column. When you click the drop-down menu in this field, you can select from three options. The second and third options (which are User Signature options) are only feasible if you have an external, third-party security product plugged into your SAP system. If you do not have this kind of product, you must select the first option, System Signature with Authorization by SAP User ID/Password. I have done this in my example.
Once you have selected your strategy, you need to assign the individual signature or signatures that you created in the previous configuration activity to this strategy. To do so, highlight the signature strategy entry and then double-click the Assign individual signatures folder under the Dialog Structure shown in Figure 4). In the next screen, click the New Entries button and enter the signature(s) that will participate in this strategy.
As you can see in Figure 5, I assigned the individual signatures ZUSER1 and ZUSER2 to ZTEST. Note that the only data you can enter on this screen is the individual signatures. The counter field (column Ctrln) is generated by the system, but this does not mean that it is necessarily the sequence in which the signatures can be executed. That is controlled by another configuration activity, which I’ll explain next.

Figure 5
Assign individual strategies to a signature strategy
In Figure 4, you can see two buttons on the right side of the screen, labeled Signatures and Release. Highlight the displayed line in Figure 4 (your signature strategy) and click the Signatures button. A pop-up window is displayed, and here you can specify the sequence in which the individual signatures must be executed (Figure 6). I have specified that signature ZUSER1 must be executed before ZUSER2.
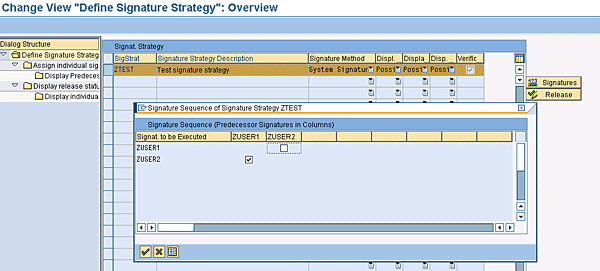
Figure 6
Specify the individual signature sequence
Note
If your organization has numerous users who need to sign off on documents (as opposed to the two in my example), it is practical to have a document or matrix available in advance that lists this sequence. This will save you a lot of time during the configuration.
If you click the Release button with your signature strategy highlighted, another pop-up window is displayed (Figure 7).
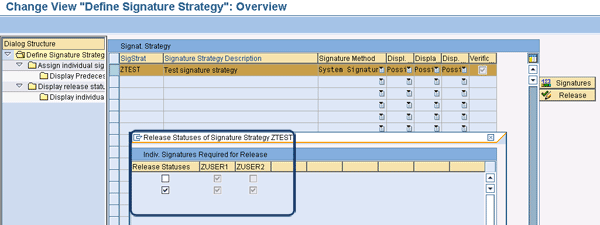
Figure 7
Set the release strategy for a signature strategy
In this screen, you can specify which combination of individual signatures you want to use as a release status. It’s useful to understand the concept of a release status. Each release status is used to group the individual signatures (or a combination thereof) that need to participate to complete the digital signature process. In Figure 7, there are two release statuses. In the first, the signature process is complete when the ZUSER1 individual signature is executed. Notice that I did not check the box in the first column because many organizations prefer to have another level of approval to sign off. The second release status is complete only when both ZUSER1 and ZUSER2 are executed in that sequence. It is likely that you only want to flag the second release status, especially if you have two levels of approval and you want the second level (ZUSER2) to approve only after the first level (ZUSER1) has done so. That’s why I flagged the second release status box in the first column. This tells the system that, for this signature process to be complete, both ZUSER1 and ZUSER2 must be executed and in that order.
Next, click the Basic Settings for Digital Signature IMG node and then open the Maintaining the Application-Dependent SSF Information node to see a screen similar to the one shown in Figure 8 for Secure Store and Forward (SSF) parameters. This screen may look quite different for you if prior configuration has taken place (e.g., for alternative use of digital signatures). The configuration activities in this screen should be carried out by your SAP NetWeaver or Basis administrator, so I do not dwell on every parameter but instead focus on the important ones.

Figure 8
Initial screen for setting SSF information
Click the New Entries button. You are taken to the screen shown in Figure 9. Open the drop-down menu in the SSF Application field and select your desired option. For my example, I selected the Standard Application option. This is the option you should select for using digital signatures in SAP Solution Manager.
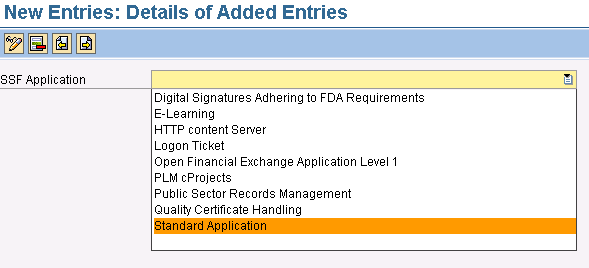
Figure 9
Choose the Standard Application option
Press the Enter key. This takes you to the screen shown in Figure 10. Here, you see the default values that your SAP NetWeaver or Basis administrator set in the Maintaining the Application-Dependent SSF Information node (Figure 8). Depending on your role at your organization, you may not need to know the implications of these parameters. As I mentioned earlier, configuring these parameters is an activity that should be carried out by the administrator, and you should confer with this person if you need to understand one or more of these parameters. For my example, I’ll accept the defaults shown in Figure 10.
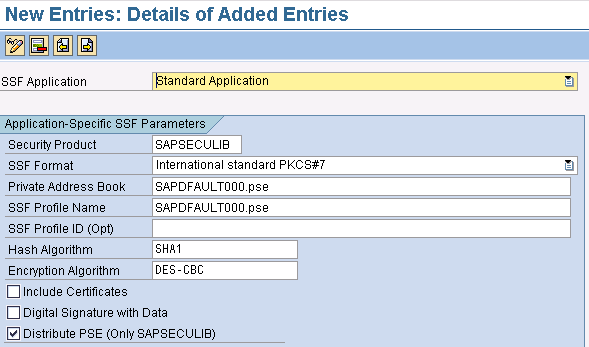
Figure 10
SSF defaults for Standard Application digital signatures
Return to the main IMG. In the Define Basic Settings for Digital Signature node, you can provide the elements of a user’s digital signature (e.g., his or her complete name and time zone) so the signature represents his or her individual digital persona. When you open this node, it takes you to the user maintenance transaction SU01 (Figure 11). Alternatively, you can also access this screen by entering transaction SU01.
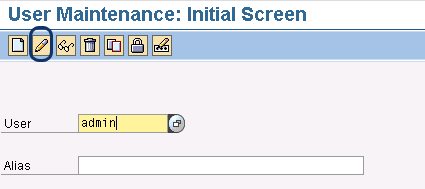
Figure 11
Figure 11 Initial user maintenance screen
Click the change icon, circled in Figure 11, after you have entered the user’s ID in the User field. In the screen that appears, you can ensure that certain signature-related fields, such as first name, last name, and time zone, are populated for the users that will participate in digital signing (Figure 12). Enter the last name and first name in the Address tab, and then enter the time zone in the Defaults tab. Entering this information is vital because when you use the system signature method (which is the one we chose earlier in this article), the system picks up the specific user information from this area.
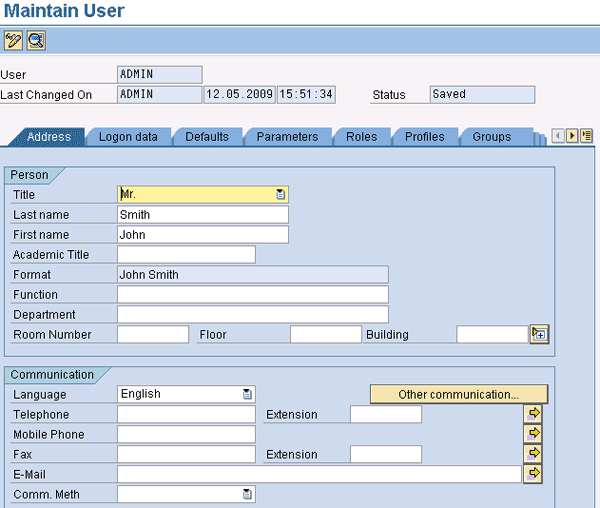
Figure 12
Populate the user information
Now you have the basic configuration set up, and you are ready to start using digital signatures.
Note
To learn more about digital signatures and encryption in SAP, check out this
SAP Help link. For more information, an overview of digital signatures in SAP Solution Manager can be found at this
SAP Help link. In the frame on the left, navigate to Implementing and Upgrading SAP Solutions > Projects > Document Management > Digital Signature.
Anurag Barua
Anurag Barua is an independent SAP advisor. He has 23 years of experience in conceiving, designing, managing, and implementing complex software solutions, including more than 17 years of experience with SAP applications. He has been associated with several SAP implementations in various capacities. His core SAP competencies include FI and Controlling FI/CO, logistics, SAP BW, SAP BusinessObjects, Enterprise Performance Management, SAP Solution Manager, Governance, Risk, and Compliance (GRC), and project management. He is a frequent speaker at SAPinsider conferences and contributes to several publications. He holds a BS in computer science and an MBA in finance. He is a PMI-certified PMP, a Certified Scrum Master (CSM), and is ITIL V3F certified.
You may contact the author at Anurag.barua@gmail.com.
If you have comments about this article or publication, or would like to submit an article idea, please contact the editor.


