Risk Terminator provides the framework that ensures that role provisioning to users and role maintenance (including creation) activities are subjected to proper risk analysis in a scenario in which such activities are performed directly in the plug-in system. Follow this comprehensive step-by-step procedure to learn how to configure and use Risk Terminator productively and efficiently in your SAP BusinessObjects Access Control 10.0-based system landscape.
Key Concept
The Risk Terminator is a service that runs in the SAP ABAP back-end system and generates exceptions when defined segregation of duties (SoD) access risks are violated.
SAP BusinessObjects Access Control 10.0 comes bundled with functionalities that are capable of meeting all user access control, risk analysis, role management, emergency access assignment, and periodic review challenges in an enterprise. Although it is a best practice to adopt all these functionalities to provide an integrated risk-free and strictly controlled business environment, it is not impossible to have circumstances when only the risk analysis feature is implemented for a specific reason, such as budget constraints, resource availability, or project prioritization.
The capability to analyze and manage risk is one feature of SAP BusinessObjects Access Control 10.0. Risk Terminator is a functionality that is tightly integrated with the access risk analysis capability of SAP BusinessObjects Access Control 10.0. As a matter of fact, the risk analysis feature provides the framework for the implementation of the Risk Terminator tool. The tool seeks to enforce access control when profile maintenance or user role assignment is performed directly in the plug-in system. Risk analysis and reporting are performed when a role is maintained via transaction PFCG (Profile Generator) and user roles are assigned or maintained via transaction SU01 (User Maintenance) or SU10 (Mass User Maintenance) directly in the back-end system.
For the purpose of understanding this step-by-step guide, I first distinguish between two system types; namely:
- GRC system: This system runs the SAP BusinessObjects Access Control 10.0 system.
- Plug-in system: This system is the satellite system on which the plug-in (formerly Real Time Agents [RTAs]) is installed. It can also be referred to as the back-end system.
Configuration
The risk analysis functionality is the bedrock on which the Risk Terminator works. The risk analysis functionality must be properly configured to leverage this functionality. Therefore, I discuss the following activities that support the effective delivery of the Risk Terminator service:
- Maintain Rule Set
- Maintain Function
- Maintain Access Rule
- Generate Access Rule
- Maintain Configuration Settings in the GRC System
- Maintain Configuration Settings in the Plug-in System
Maintain Rule Set
Generally, a rule set defines the category (or group) of access risk that is used when performing access risk analysis. The defined access risk forms the source of information for the analysis report displayed when using Risk Terminator.
To define a rule set, log on to the front-end tool (SAP NetWeaver Business Client or portal) and follow menu path Setup > Access Rule Maintenance (Figure 1).
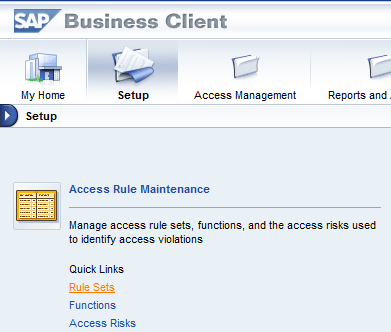
Figure 1
Access Rule Maintenance Quick Links
Click the Rule Sets quick link and then click the Create button (Figure 2).
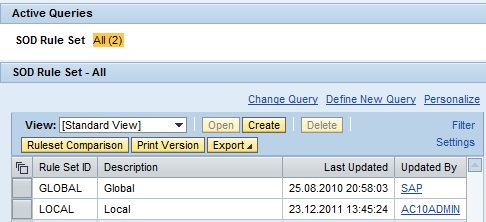
Figure 2
Create a rule set
Enter a value in the Rule Set ID field (e.g., RISKTERM). Enter a Value in the Description field (e.g., Rule Set for Risk Terminator). Press the Save button (Figure 3).
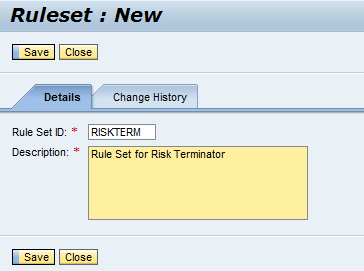
Figure 3
Enter values for the rule set
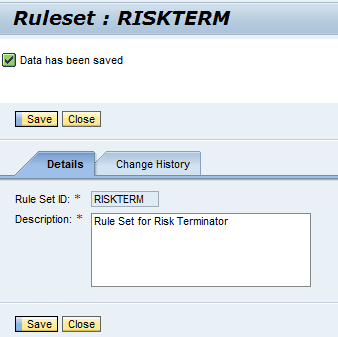
Figure 4
Status message
A status message appears (Figure 4). Now press the Close button.
Maintain Functions
Functions constitute one or more actions and permissions that are needed by a user to perform a complete task in the SAP system. Actions represent transaction codes, whereas permissions represent the authorizations for the corresponding transaction codes. For your business scenario, create two functions for maintaining the supplier’s master data and maintaining a purchase order.
To create a function, log on to the SAP NetWeaver Business Client or Portal and follow menu path Setup > Access Rule Maintenance. Press the Functions link (refer back to Figure 1) and then click the Create button (Figure 5).

Figure 5
Create a function
Enter the following information under the Details tab (Figure 6):
- Function ID: F_RT1
- Business Process: Procure to Pay. Use the drop-down button for selection.
- Analysis Scope: Single System
- Description: Maintain Supplier’s Master Data
In the Action Tab enter the following information:
- System – GECCLNT800
- Action – XK01 and XK02
- The Description field is auto-populated when you press the Enter key
- Status - Active
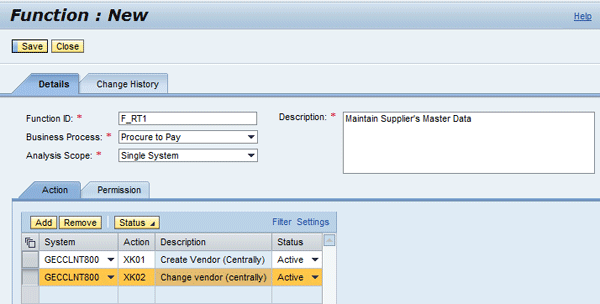
Figure 6
Enter values for the function
Choose the Permission tab (Figure 7).

Figure 7
Values in the Permission tab
Change the settings from Inactive to Active in all the records listed in rows in which a value appears under the Value From column heading (Figure 8).

Figure 8
Settings changed from Inactive to Active
After you press the Save button in Figure 8, a status message appears (Figure 9).
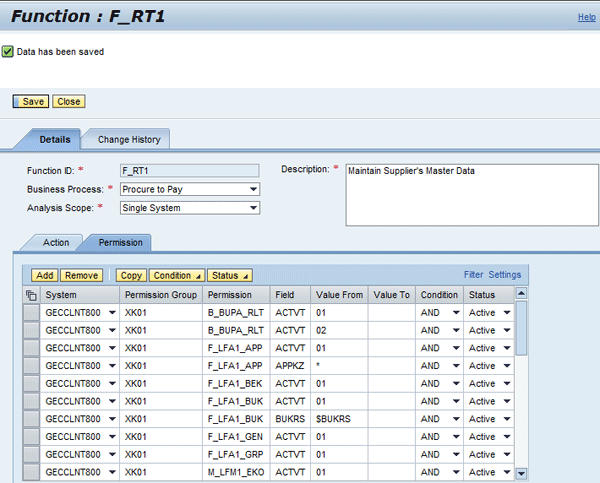
Figure 9
Status message for creation of a function
Repeat the steps for creating function F_RT1 for another function named F_RT2 with the following parameters.
- Function ID – F_RT2
- Business Process – Procure to Pay
- Analysis Scope – Single System
- Description – Maintain Purchase Order
- Action – ME21N and ME22N
- Permission – Set the status to Active for all permission records that have values in the Value From field
The Action tab for function F_RT2 should look like the screen shown in Figure 10.

Figure 10
The Action tab
The Permission tab should look like the screen shown in Figure 11.

Figure 11
The Permission tab
Maintain Access Risks
Access risks are objects used to define possible access issues that users might encounter in an enterprise. It is usually made up of at least two functions. In your business scenario, you create an access risk that poses a segregation of duties (SoD) conflict for the functions of maintaining a supplier’s master data and purchase order.
To define access risk, log on to the front-end tool (SAP NetWeaver Business Client or portal) and follow menu path Setup > Access Rule Maintenance. Choose the Access Risks quick link (refer back to Figure 1). Now choose the Create button (Figure 12).

Figure 12
Create access risk
Enter the following information in the Details tab as shown in Figure 13.
- Access Risk ID: AR_RT1
- Risk Type: Segregation of Duties
- Business Process: Procure to Pay
- Description: Create or Change Fictitious Supplier and Create Purchase Order for the Supplier
- Risk Level: High
- Status: Active
Enter the following information in the Functions tab. Add Function IDs F_RT1 and F_RT2 (created above).
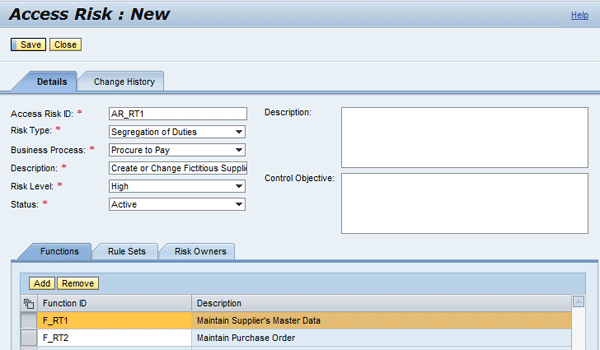
Figure 13
Enter values for access risk
Now select the Rule Sets tab (Figure 14).

Figure 14
The Rule Sets tab
Enter the Rule Set ID, RISKTERM (created in the “Maintain Rule Sets” section) as shown in Figure 15.

Figure 15
Enter values for the Rule Set ID and the Description
After you click the Save button, a status message appears (Figure 16).

Figure 16
Status message for the access risk
Generate Access Rules
After defining an access rule, you need to generate the SoD risks for your system. To generate access rules, log on to the GRC back-end system and follow menu path SPRO > SAP Reference IMG > Governance, Risk and Compliance > Access Control > Access Risk Analysis > SoD Rules > Generate SoD Rules (Figure 17).

Figure 17
The initial screen to generate access rules
Enter the value AR_RT1 (created in the “Maintain Access Risk” section) in the Risk Id field (Figure 18).
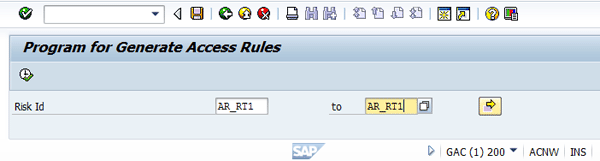
Figure 18
Generate an access rule
After you click the execute icon a status message appears (Figure 19).

Figure 19
Status message for generating an access rule
Maintain Configuration Settings in the GRC System
To prepare the systems in your landscape for leveraging Risk Terminator, you need to maintain appropriate parameters in the GRC system. The following configuration parameters can be maintained in the GRC system to control the availability and behavior of the Risk Terminator:
- Parameter 1080: Connector enabled for Risk Terminator – This parameter defines the connector (RFC Destination) of the plug-in ABAP system. By default, this value is empty. Note that multiple connectors can be defined here.
- Parameter 1081: Enable Risk Terminator for PFCG Role Generation – This parameter defines whether a risk violation exception is triggered in the event of a risk violation when maintaining roles via transaction PFCG in the defined plug-in back-end system. The default value is NO, which inactivates this functionality. To activate the risk terminator for PFCG, set the value to YES.
- Parameter 1082: Enable Risk Terminator for PFCG User Assignment - This parameter defines whether a risk violation exception is triggered in the event of risk violation when assigning roles to users via PFCG in the defined backend system. The default value is NO, which inactivates this functionality. To activate the risk terminator for user role assignment via PFCG, set the value to YES.
- Parameter 1083: Enable Risk Terminator for SU01 Role Assignment - This parameter defines whether a risk violation exception is triggered in the event of risk violation when assigning roles to users via transaction SU01 in the defined back-end system. The default value is NO, which inactivates this functionality. To activate the risk terminator for user assignment via transaction SU01, set the value to YES.
- Parameter 1084: Enable Risk Terminator for SU10 multiple user assignment – This parameter defines whether a risk violation exception is triggered in the event of risk violation when performing mass user role assignment via transaction SU10. The default value is NO, which inactivates this functionality. To activate the risk terminator for PFCG, set the value to YES.
- Parameter 1085: Stop role generation if violation exists – Setting this parameter to YES prevents role generation if risks are generated by any modification or transaction codes that are added to the role.
- Parameter 1086: Comments are required in case of violations – Setting this parameter to YES implies that a comment box pops up when SoD risk is encountered during role maintenance and user role assignment.
- Parameter 1087: Send notification in case of violations – Setting this parameter to YES implies that an email message is sent to the role owner when there is risk violation.
- Parameter1088: Default report type for risk terminator – The input help can be used to display possible values.
- Parameter1089: Enable authorization logging – This parameter is defined to activate logging for missing authorizations in transaction SLG1 in the GRC system.
To maintain the appropriate parameters, follow menu path SPRO > SAP Reference IMG > Governance, Risk and Compliance > Access Control > Maintain Configuration Settings (Figure 20).

Figure 20
Maintain configuration settings
Press the New Entries button and select a parameter group using the drop-down button under the Parm Group column (Figure 21). For example, choose Risk Analysis – Risk Terminator. Select the Parameter ID corresponding to the selected parameter group (e.g., 1080). Enter a value for the parameter (e.g., GECCLNT800). The description is auto-populated.

Figure 21
Select a parameter group
If the aforementioned details are entered, you end up with a screen similar to the one shown in Figure 22.
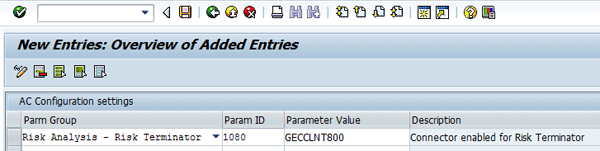
Figure 22
New entries
After you save your data a status message appears (Figure 23).
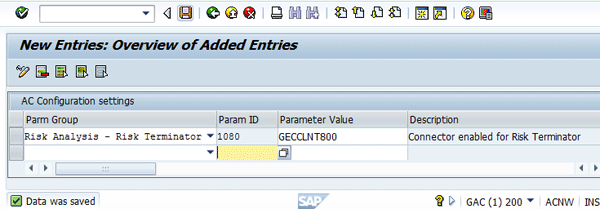
Figure 23
Status message for maintenance of configuration settings
A typical configuration setting defined in the GRC system is shown in Figure 24.
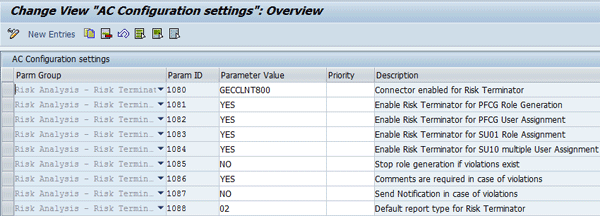
Figure 24
Typical configuration settings maintained in the GRC system
Maintain Configuration Settings in the Plug-in System
To prepare the systems in your landscape for leveraging Risk Terminator, you need to maintain appropriate parameters in the plug-in system similar to the parameters maintained in the GRC system.
The following configuration parameters can be maintained in the plug-in system to control the availability and behavior of the Risk Terminator:
- Parameter 1000: Maintain Plug-in Connector – This parameter is the connector of the plug-in back-end ABAP system.
- Parameter 1001: Maintain GRC connector – This parameter is the connector of the GRC system.
- Parameter 1002: Maintain Ruleset – This value is the rule set group that the risk terminator uses as a basis for access risk violation analysis. Provide the rule set that you created earlier in the “Maintain Rule Set” section (i.e., RISKTERM) here.
- Parameter 1081: Enable Risk Terminator for PFCG Role Generation
- Parameter 1082: Enable Risk Terminator for PFCG User Assignment
- Parameter 1083: Enable Risk Terminator for SU01 Role Assignment
- Parameter 1084: Enable Risk Terminator for SU10 multiple User Assignment
- Parameter 1085: Stop role generation if violation exist
- Parameter 1086: Comments are required in case of violations
- Parameter 1087: Send Notification in case of violations
- Parameter 1088: Default report type for risk terminator
To maintain the appropriate parameters, follow menu path SPRO > SAP Reference IMG > SAP Customizing Implementation Guide > Governance, Risk and Compliance (Plug-in) > Access Control > Maintain Plug-in Configuration Settings (Figure 25). Choose New Entries.
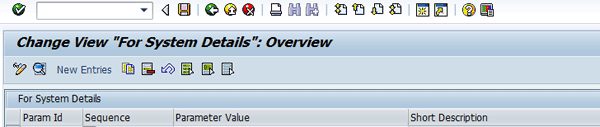
Figure 25
Maintain configuration settings in the plug-in system
Enter the following information as shown in Figure 26:
- Parameter Id – 1000
- Sequence – 1
- Parameter Value – GECCLNT800
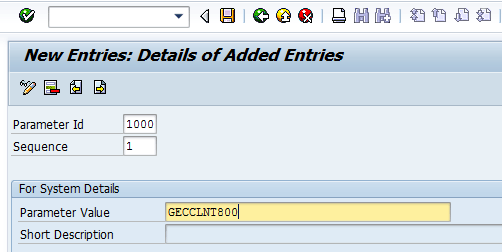
Figure 26
Maintenance of configuration settings in the plug-in system
After you click the save icon, a status message is displayed (Figure 27).

Figure 27
Status message for maintenance of configuration settings in the plug-in system
A typical configuration setting defined in the plug-in system is shown in Figure 28.
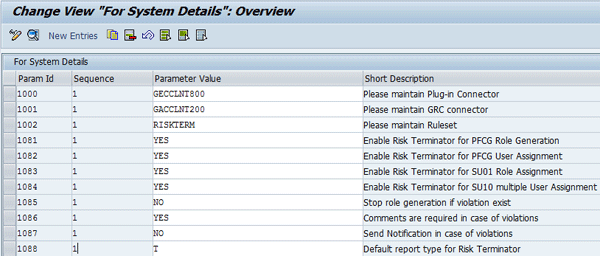
Figure 28
A typical configuration setting maintained in the plug-in system
Kehinde Eseyin
Kehinde Eseyin is a security architect. He holds a bachelor’s degree in computer science. He has about 12 years of IT security, governance framework, IS risk, and compliance experience gained by working in numerous global organizations. Over the years, he has demonstrated competencies in security design, information assurance, cyber security, data privacy, threat and vulnerability management, penetration testing, business architecture, project management, IT audit, IS controls framework, and identity and access management.
You may contact the author at eseyinok@gmail.com.
If you have comments about this article or publication, or would like to submit an article idea, please contact the editor.