Find out how to simply implement user-definable inputs that can be used within SAP BusinessObjects Web Intelligence reports so users can take advantage of dynamic values needed for more interactive reporting.
Key Concept
Input controls are a feature that BusinessObjects introduced in version 3.1, Service Pack 2, that allow users to interact with report and charts through widgets. Users can choose between single option and multiple option widgets such as text fields, radio buttons, and list boxes. The out-of-the-box concept for input controls is to simply restrict datasets without the need to refresh the data, and there are also ways to expand on this functionality.
When working with business reports there can be a requirement to have elements within the report manipulated by the users. For example, if the production costs of a product are cut by 5 percent, it is useful to determine how a division’s quarterly forecasts react. Or perhaps a sales director wishes to apply varying thresholds for alerters to highlight differing sales representatives’ performances.
The ability to create this interactivity is not available through out-of-the-box content. However, with creative universe planning and standard SAP BusinessObjects Web Intelligence (also known as WebI) coding, those users with a basic understanding of Web Intelligence and universes can accomplish this interactivity to great effect, taking Web Intelligence reports to a new level. Let’s find out how to do this without affecting the existing dataset.
In this article I look at two methods:
- Using input controls, which may not be available to all – This method is achievable by a report writer with basic knowledge of creating variables
- Using dummy measures and prompts to allow a user to input values during the refresh stage of running a report – This method is more in depth and aimed at those of you with a version of Web Intelligence prior to version 3.1, Service Pack 2
Each method has its pros and cons to consider.
Using Input Controls
The first method of interactivity is using input controls, in which you aim to allow users to update their interactive figures during runtime (Figure 1). These are accessible via the Analysis panel, which can be accessed from the left side of reports. If you can’t see this pane, then you can choose the View menu on the top toolbar to add this onto your page. The most standard use of these widgets is to restrict the data in the report without the need for the user to refresh the dataset.
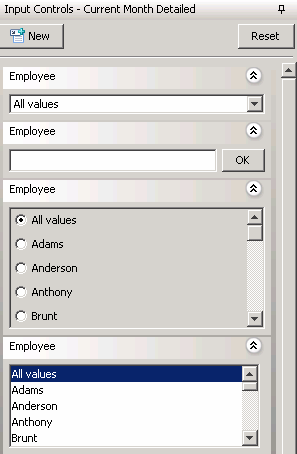
Figure 1
An example of input controls
This method is simple to implement. The only downside with this method is that some user education may be required about where the input controls reside.
The first step is to create a variable by selecting the Variable button from the top menu. If you are unable to see the Variable button, then you may need to select the Formula toolbar from the View menu. As an example, my new variable will hold a default number =10 (Figure 2).

Figure 2
Setting a definition for a new variable
Save this as a Measure, by selecting Measure from the Qualification drop-down menu. Now create a new control by selecting the Input Controls tab from your Analysis pane and choosing the New button.
You are now presented with the Input Controls wizard. Select the newly created variable as your source from the selection screen. Next choose the Input method by clicking it; doing so changes the options available below it. For this example, I use the Spinner, which allows users to enter a value of their choosing or use up and down arrows to select a value for the Spinner within the report. Within the wizard, you can also set by how much each click adjusts the value via the Increment option (Figure 3). You can also give the control a relevant business name or leave it as the default source name, which in my example is the variable name. This type of control also requires you to enter a default number into the wizard. There are other properties available, however, these are optional to use. Now you can complete the control by clicking the Finish button.
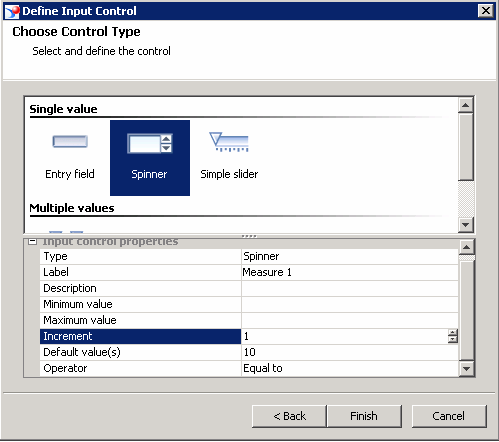
Figure 3
Use the Spinner to allow users to update a value
To test that the control works, add a table from the Templates tab, which is accessible from the Analysis pane. I add a horizontal table for my example. Now add the variable into the data field by dragging it from the Data tab. Using my earlier example, 10 is the variable, but you can choose any number for your example. Using the new input control, you can change the value by navigating back to the Input Controls tab and either entering a new number or using the up or down arrows to increase or decrease the value. In Figure 4, I increase the value to 11, and I add a second table with a calculation that uses the Input Control variable. The calculation is 10 multiplied by the variable, so 10 multiplied by 11 gives a result of 110.

Figure 4
By updating the Spinner object, the calculation in the report changes
Now you have your own interactive values that you can use. For some examples of how you could use this functionality, please see the sidebar below, “Examples of Applying User-Definable Inputs.”
As previously mentioned, input controls only became available in BusinessObjects XI 3.1, Service Pack 2, so this option may not be possible for some readers. In such cases, let’s look at another method.
Using Dummy Measures and Prompts
There is a workaround to create interactive values without input controls. This method has more steps, but the output still provides interactivity within a Web Intelligence report. The main difference between the methods is that rather than using input controls based on variables created within the report, you instead use prompts created over dummy measures created in a universe.
The first step is to create a new universe to hold your dummy measures. To keep universe work as simple as possible and less time consuming, copy a pre-existing universe. My universe of choice is the standard demo universe, eFashions. Open Universe Designer and import your eFashions universe. Now save this as a new universe using Save As.
Don’t be put off by all the different classes and objects, because you only require one measure. Choose a measure — I use Shop_facts.Quantity_sold and duplicate (if required) to create the number of inputs needed. Rename the measure to be relevant to your business situation. You can delete the rest of the universe objects.

Figure 5
Example of a dummy label and measures
The standard use of a prompt is to restrict your dataset. So what happens when you use a dummy prompt? If you only populate your query with a key figure, you receive a warning that states that the query is unable to find any data for the filters. There are methods of stopping this warning altogether; however, I suggest you stay away from these because warning messages are there for a reason. To stop this warning message appearing in just this report, all you need to do is add in a dummy label to the query. For this example, I use Article_Color_Lookup.Color_label and simply rename it Dummy Label – Do Not Use.
Now save and export your new universe. Open your Web Intelligence report and navigate to the query. From here, add the new universe to the query by selecting a new data provider.
Once selected you can bring across the new measures to the Query Filters area and turn the object filter into a prompt by selecting the drop-down button on the right side of the newly created filter and choosing Prompt (Figure 6). Your prompt is given a title in the text box. Change this title to something more memorable as you will use this later. You also need to add the dummy label to the Results Objects pane — this can be achieved by selecting the dummy label from the left hand side Objects pane and dragging it to the Results Objects on the right. When you run the report, you have a prompt for which you can enter a value that you can in turn use for additional reporting features.
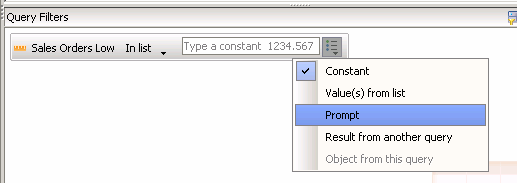
Figure 6
Setting a filter prompt
Now that you have populated your prompt, you need to be able to use it for reporting. To do this, create a new variable in the same manner discussed in the input controls section above. Set the Qualification field to Measure and give the variable a name relevant to its business purpose. Now in the Formula section, select the output from your input by using the function UserResponse(“Prompt Text”) (Figure 7).

Figure 7
A new variable to display the prompt value
Remember that Web Intelligence turns this prompt value into a string, so you need to encase the UserResponse() function within the ToNumber() function and save this as a new measure variable. See the example code below, and replace Prompt Text with the label in your prompt text box:
=ToNumber(UserResponse(“Prompt Text”))
To confirm this works, create a horizontal table and show the prompt value and a calculation. Figure 8 displays two horizontal tables: The first table shows the value from my example prompt, and the second table contains a calculation using the variable I created to capture the prompt “10 * Prompt Value”. In my example, 20 is the prompt value, so “10 * Prompt Value” gives you 200.
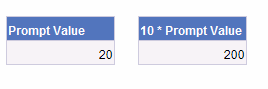
Figure 8
An example calculation using a prompt value
Now that the value is in a variable, you can also implement the input control method discussed earlier if you wish to manipulate the values without refreshing the data.
Examples of Applying User-Definable Inputs
Below are two applications in which user-definable inputs have proven beneficial:
Creating Editable Thresholds within an Alerter
The first time I came across a need for this interactivity within Web Intelligence was from a sales director of a manufacturing company. My client was implementing a target performance report so that the company could monitor its sales representatives and allocate bonuses as required. The sales director requested that he be able to alter the thresholds of the alerters used so that not all the sales representatives were judged on the same criteria (e.g., a more junior sales representative might be given lower criteria).
Using newly created user editable values, I can use the formula feature of alerters to call these variables. In the example, I create two variables: a low threshold and a high threshold. From there, I set the following:
- Red – Value is greater than the high threshold
- Amber – Value is between the low threshold and the high threshold
- Green – Value is less than the low threshold
The coding would look similar to:
= if(IsNull([Value]); 1 = 2; [Value] < [Measure])
This is a simple formula, which at the beginning takes into account whether the value you are measuring is empty. From here, you can become more creative using the new measure as a percentage – for example, for a what-if analysis.
Conducting a What-If Analysis
A what-if analysis is common within dashboards, but with user definable inputs, you can bring this functionality into Web Intelligence. By implanting one of the methods discussed above, you are already 90 percent there. At that point, it is simply a case of creating another variable.
The applications for this type of scenario are endless. A couple of examples include the following:
- If the organization saved X percent on the sourcing of Product A, how would this affect profit?
- If the organization increased its production of Product B by 10 units per day, how would this affect profit?
David Allison
David Allison is an SAP business analytics and technology consultant at Bluefin Solutions, a large independent SAP consultancy in the UK. He has six years’ experience within the sector in both support and project work through multiple life-cycles, focusing on both front-end report building and usability as well data modeling.
You may contact the author at David.Allison@bluefinsolutions.com.
If you have comments about this article or publication, or would like to submit an article idea, please contact the editor.