Discover a development in work in process (WIP) functionality called WIP revaluation. See how you can use this functionality to fully absorb material and activity type variances in actual costing.
Key Concept
SAP developed work in process (WIP) revaluation functionality in 2003 to address Brazilian legislation related to actual costing. It was not initially released for other countries. Since SAP R/3 4.7, Financials Extension 2.00 and higher, WIP revaluation is available and released for all countries.
Work in process (WIP) inventory is the calculation of the cost of unfinished products. You can determine it two ways: by calculating the difference between the actual cost charged to an order and the actual cost credited to the order, or by valuation of the yield confirmed to date for each reporting point less the relevant scrap. Both are based on standard values for consumed materials and activity types.
To bring WIP to actual costing, SAP has a special development you can add to the material ledger cockpit called WIP revaluation. If you are already using the material ledger and actual costing, WIP revaluation could be useful in these two scenarios:
- In the case of partial delivery from a production or process order, all variances of materials and activity types are rolled up only to the partially delivered product. This can lead to distortion of the actual costing of the product and the WIP therefore remains valuated at the standard price.
- If no product is delivered in the period, the variances cannot be rolled up and remain as not allocated in the material ledger, the materials price difference accounts, and on the cost centers of the activity types. (For more about this scenario, see SAP Note 908776.)
With the WIP revaluation functionality, in the case of partial delivery, all variances of materials and activity types are divided between delivered product and WIP. If no product was delivered in the period, all variances of materials and activity types go to WIP.
Many organizations, especially those with a long production lead time and consequently a relevant WIP value, find that it is more desirable to assign variances to the standard WIP calculated during the period-end closing process.
I’ll show you how to do this by following a simple example using CDs. Before I get to the example, I’ll review some prerequisites you need.
Prerequisites
To use WIP revaluation functionality you need these prerequisites:
- The business function Financials Extension (EA-FIN) is active
- The material ledger is active for the relevant plants
- Actual costing in the material ledger is active
- Configure the accounting determination (transaction OBYC) to assign transaction key WPM to a WIP revaluation account for materials and transaction key WPA to a WIP revaluation account for activity types. The accounts depend on your design, and you can even use the same WIP account assigned to the standard WIP in both cases.
- Configure the accounting determination (transaction OBYC) to assign transaction key PRM to the WIP reverse account for materials and transaction key PRA to the WIP reverse account for activity types. As with the previous item, the accounts depend on your design and you can use the same WIP account assigned to the standard WIP in both cases.
- Set the Activity Update Relevant to Price Determination indicator to 2 by following menu path Controlling > Product Cost Controlling > Actual Costing / Material Ledger > Actual Costing > Activate Actual Costing
Configure WIP Revaluation
You configure WIP revaluation in transaction OMXW (
Figure 1). This transaction is not available in the IMG path. The activation is by plant. If you want to use WIP revaluation in period 1, 2009, make sure you activate this functionality before the period starts. It assures that all the production historical data is properly saved.
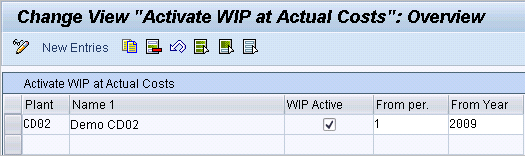
Figure 1
Activate WIP at actual cost
I use the following costing structure in my example to explain how WIP revaluation works: Blank CD and Label for CD for recording and labeling the finished goods Demo CD. The two work centers record and label the CDs. Each of the work centers is assigned to two activity types (Machine and Labor). Use transaction CK13N or follow menu path Accounting > Controlling > Product Cost Controlling > Product Cost Planning > Material Costing > Cost Estimate with Quantity Structure > Display to see the costing structure required to manufacture 1,000 pieces (PCs) of demo CDs (
Figure 2). The automatic cost estimate icon represents materials and the internal activity icon represents activity types.
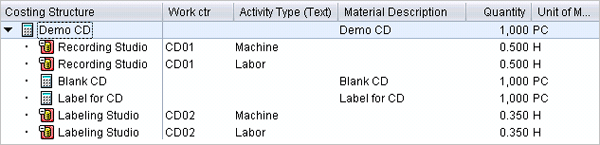
Figure 2
Costing structure to manufacture 1,000 PCs of Demo CD
You can capture the inventory of Blank CD using transaction CKM3 or by following menu path Accounting > Controlling > Product Cost Controlling > Actual Costing/Material Ledger > Material Price Analysis (
Figure 3). The cumulative inventory of Blank CD carries 200,000 PCs preliminarily valuated as US $240,000. It also carries US $5,000 of price differences that need to be assigned to Consumption and Ending Inventory in proportion to the inventory quantities in each category.
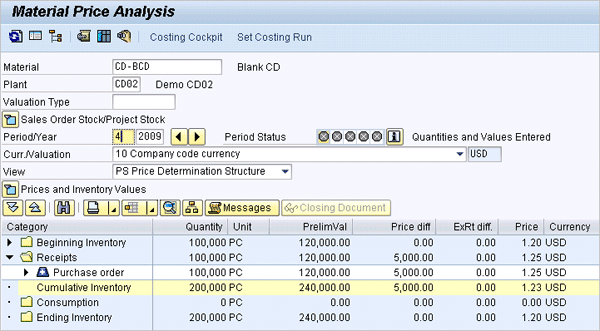
Figure 3
Initial inventory position for Blank CD
Then create a production order to produce 1,000 demo CDs. A thousand blank CDs and labels were issued to this production order.
Table 1 shows how the operations were confirmed. In the first operation, Recording, 1,000 PCs of Blank CD were issued along with 0.5 hours of activity types Machine and Labor. However, in the second operation, Labeling, only 600 PCs were confirmed as the final product using only 0.3 hours of activity types Machine and Labor.

Table 1
Quantities confirmed in the production order
In other words, the company consumed 1,000 PCs of Blank CDs but only 600 finished PCs, leaving 400 PCs and 0.2 hours in WIP.
Figure 4 shows the inventory of the finished product Demo CD after receiving the production of 600 PCs. You can access this by using transaction CKM3 or by following menu path Accounting > Controlling > Product Cost Controlling > Actual Costing/Material Ledger > Material Price Analysis.
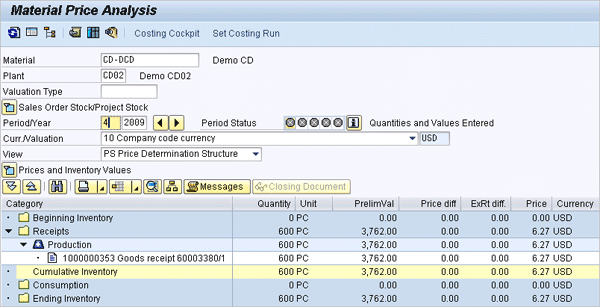
Figure 4
Demo CD inventory after goods receipts
Figure 5 shows the inventory of Blank CD in the same transaction after consumption of 1,000 PCs to the Demo CD production order.
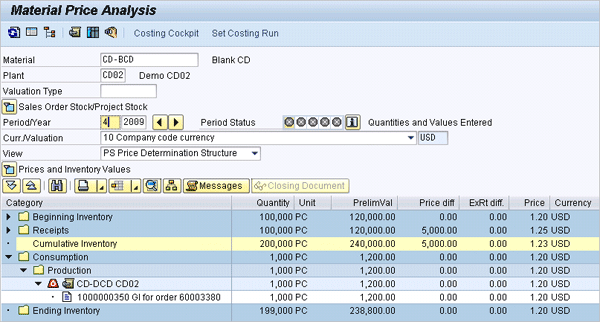
Figure 5
Blank CD inventory after consumption
Execute the WIP calculation via transaction KKAX or follow menu path Accounting > Controlling > Product Cost Controlling > Cost Object Controlling > Product Cost by Order > Period-End Closing > Single Functions > Work in Process > Individual Processing > Calculate as you normally do. The system posts the result of this calculation during the settlement process as you are used to seeing based on the WIP standard configuration. However, in the right side of the object list screen, you can see a new button called WIP Quantity Document (
Figure 6). With the WIP revaluation functionality, the system not only calculates the WIP value for the period, but it also creates a document with the materials and activity types that compose this WIP.
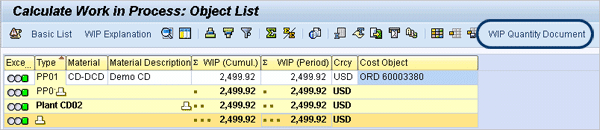
Figure 6
Result of the standard WIP calculation
Figure 7 shows the WIP quantity document for my example. Note that the production order has 400 Blank CDs, 400 Labels for CDs, and 0.2 hours of each activity type in WIP in period 4.
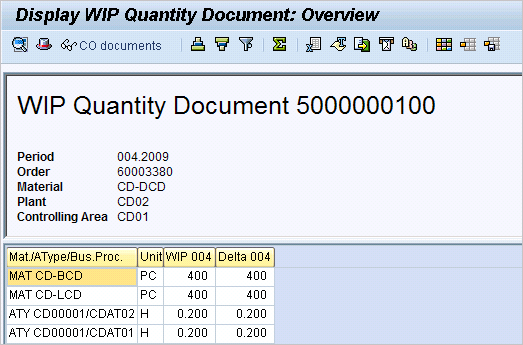
Figure 7
Materials and activity types in WIP
With WIP revaluation functionality, the WIP calculation creates a WIP quantity document for each production or process order. The WIP quantity document displays the WIP layer for the period and the changes to the WIP layer in comparison with the previous periods (delta). The WIP layer concept is important in understanding how the WIP reduction is calculated as well. WIP reduction is the reverse of the WIP revaluation when the order is finally delivered. The WIP reduction uses the periodic layer as first in first out (FIFO) logic; the layer that was created first (i.e., the oldest layer) is reduced first. For example, suppose you have a process order with WIP values that were calculated in periods 1, 2, and 3, where each period was related to 100 PCs of a product. If in period 4 you deliver 50 PCs to inventory, the system automatically reduces 50 PCs of period 1 because it was the first in the WIP layers.
Use transaction CKM3 again to see the material price analysis for the Blank CD (
Figure 8). Now after the standard WIP calculation, you can see that the material quantity in WIP was automatically moved from the process category Production to the process category WIP Production. The WIP Quantity Document number is shown in both process categories as well. Comparing
Figures 5 and
8, you can see that previously the system showed only the consumption of 1,000 PCs of Blank CD to the production order. Now after the WIP calculation using WIP revaluation functionality, the system shows that of the 1,000 PCs of Blank CD, 600 were used to deliver products from the production order and 400 pieces of Blank CD were issued to the production order, but the product was not finalized yet. Therefore these PCs are in WIP.
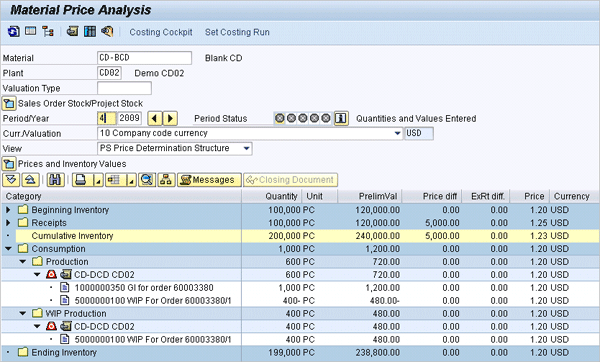
Figure 8
Demo CD inventory after standard WIP
Following the closing process, use transaction CKMLCP or follow menu path Accounting > Controlling > Product Cost Controlling > Actual Costing/Material Ledger > Actual Costing > Edit Costing Run. The only difference in the costing cockpit is that you now have a new step to perform called WIP Revaluation after Revaluation of Consumption (
Figure 9).
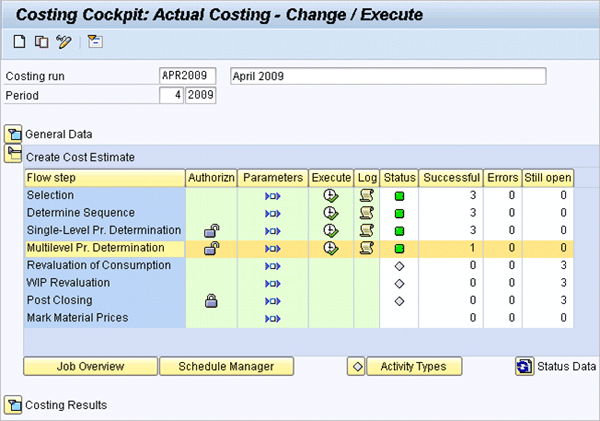
Figure 9
Flow steps for material ledger actual costing
Following the closing process in the costing cockpit you execute the steps Selection, Determine Sequence, Single-Level Pr. (price) Determination, and Multilevel Pr. Determination as usual. For each one of these steps you need to create the execution parameters and then click the execute icon.
Use transaction CKM3 or follow menu path Accounting > Controlling > Product Cost Controlling > Actual Costing/Material Ledger > Material Price Analysis to see the material price analysis after the multilevel price determination for the Blank CD material (
Figure 10). The multilevel process carried variances from this material to the next level of the structure. You can see the rollup of variances from the Blank CD material to the next level observing how the cumulative variances of US $5,000 were split between consumptions and ending inventory lines. The proportion of material used to finish the 600 Demo CDs received US $15 of the cumulative price difference. The other US $10 regarding the 400 units in WIP shows as not allocated. This variance of US $10 will be absorbed with the WIP revaluation functionality added to the material ledger cockpit.

Figure 10
Blank CD inventory after multilevel price determination
Going back to the material ledger cockpit, now it is time to run the WIP revaluation step by clicking the parameter icon in front of the WIP revaluation line and then clicking the execute icon (
Figure 9). Use transaction CKM3 to go back to material price analysis after the WIP revaluation process (
Figure 11). Now you can see that the price difference of US $10 that was not allocated before in
Figure 10 is now allocated to the WIP production process category.
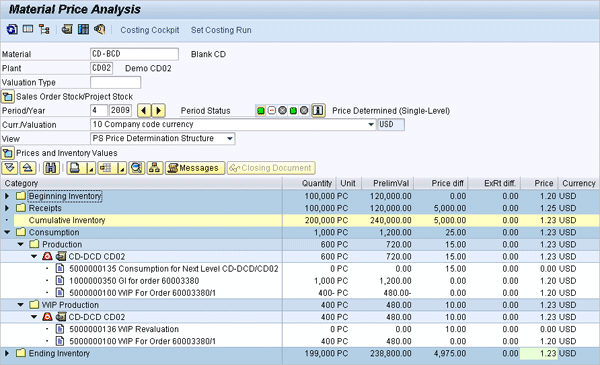
Figure 11
Blank CD inventory after WIP revaluation
You can see more information about the WIP revaluation document by selecting the document number on the screen and clicking the detail icon.
Figure 12 shows the WIP revaluation document.

Figure 12
WIP revaluation document
To see the document related to the activity types in WIP you run transaction CKMS. Enter WP (WIP Revaluation) in the ML transaction type field and click the execute icon.
Figure 13 shows the material ledger document for the activity types in WIP revaluation for my example.

Figure 13
Activity types in WIP for the Demo CD production order
The next step is to perform the Post Closing step in the material ledger cockpit. Go back to transaction CKMLCP or menu path Accounting > Controlling > Product Cost Controlling > Actual Costing/Material Ledger > Actual Costing > Edit Costing Run. Click the parameter icon in front of the Post Closing step, save your parameters, and then click the execute icon (
Figure 9). After the Post Closing step, you can see the financial document created for this process. You can find the closing document using transaction CKM3 for the Demo CD material and clicking the Closing Document button. The document line items relevant for my example are shown in
Figure 14. The US $10 for Blank CD (material CD-BCD) and US $20 for Label for CD (material CD-LCD) were credited in the Price Differences account and debited in the WIP account.
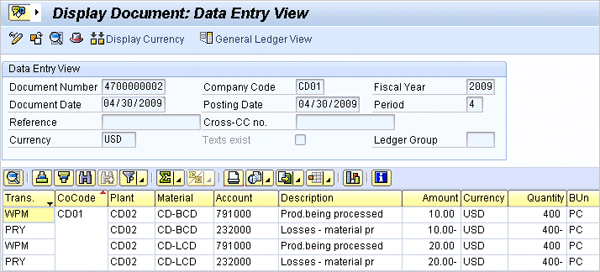
Figure 14
Closing accounting document 1 (components in WIP)
The values in this financial document are just the material part of the WIP value. To check the financial document created by the revaluation of activity types in WIP, you need to run transaction CKMS and select the material ledger transaction type AL.
Figure 15 shows the material ledger document in my example and the two activity types CDAT01 and CDAT02 and the respective quantities and price differences calculated by the WIP revaluation process.
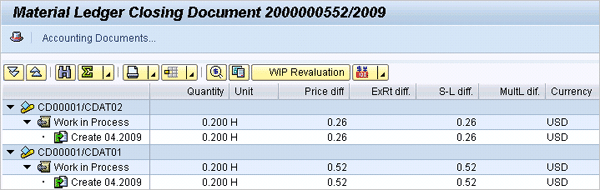
Figure 15
Activity types in the WIP document
By clicking the Accounting Documents button in the top left of the screen, you can see the financial document created by the WIP revaluation (
Figure 16). The document shows the credit in the cost center responsible for the activity type and the debit in the WIP account.

Figure 16
Closing accounting document 2 (activity type in WIP)
Two reports are especially important for the WIP revaluation process. Execute the first report by using transaction COMLWIPDISP. This report shows the WIP valuated at standard process, price difference, and total WIP per production or process order. Keep in mind that the WIP revaluation is not posted per production order in the accounting document and this report is the source of information of the WIP revaluation broken down to each order.
Figure 17 shows the WIP at actual costs report using transaction COMLWIPDISP for the production order used in this example. Note the detailed information for the WIP price difference. It shows all materials and activity types in WIP in the production order, price differences, and quantities.
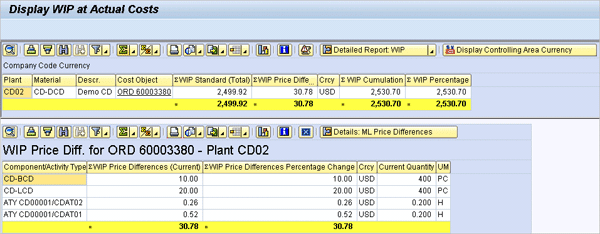
Figure 17
Report showing WIP at actual cost
Another important report is executed by transaction CKMACD. It shows the value flows of all activity types in the period.
Figure 18 shows the activity types used in my example. For each activity type and cost center combination, this report shows the activity type planned price, actual price, and price difference. The report also distinguishes in the WIP column which activity type is part of the WIP layer in the selected period (items with column WIP = X).
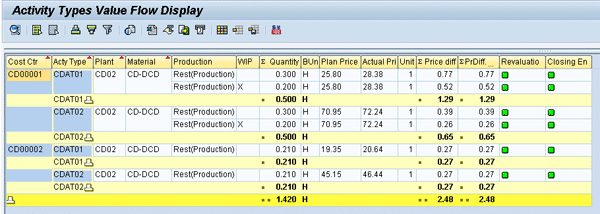
Figure 18
Report showing activity types value flow
Note
For more information about WIP revaluation, see SAP Note 608162.
Vanda Reis
Vanda Reis has been with SAP for five years and with SAP products since 1998. Her expertise is product costing and material ledger areas, where she has helped many organizations set up and optimize their processes. She has also worked in different areas within SAP, such as Catch Weight Management, SAP Solution Manager, and consolidations. Vanda holds a computer science degree with specialization in strategic management. She is member of PMI, holding an associate project management certification.
You may contact the author at
vanda.reis@sap.com.
If you have comments about this article or publication, or would like to submit an article idea, please contact the
editor.