Walk away with a basic understanding of how to use the SAP BusinessObjects Import Wizard, including a seven-step breakdown of how the wizard works.
Key Concept
The Import Wizard is a useful tool included in the SAP BusinessObjects BI suite that allows you to migrate content (user accounts, groups, folders, reports, universes, security, servers, and other objects) from one BusinessObjects Enterprise or SAP Crystal Reports environment to another, to export content to a Business Intelligence Archive Resource (BIAR) file, or to import content from a BIAR file.
This article was originally published on BusinessObjects Expert
The SAP Business Objects Import Wizard is commonly used to migrate content from a development to a production environment, and it includes a series of screens that guide an administrator through the process of migrating, importing, and exporting content. While the Import Wizard has improved significantly in the latest release of BusinessObjects, it is still a challenging tool to use effectively.
An administrator needs to have an understanding of the various component types that exist in Business Objects, and has to understand the impact of migrating components from one
environment to another. The administrator must determine the exact components to be migrated, whether components should be overwritten or copied, and whether security for the component should be migrated. Understanding how to choose the right options for components and how to review the import log is also important.
I describe some of the basic concepts for effectively using the BusinessObjects Import Wizard in version XI 3.1 and provide a number of best practices for highly-effective use of the tool.
Using the Import Wizard
The Import Wizard provides an administrator a useful wizard interface that includes a series of screens. These screens guide an administrator through the process of migrating, importing, and exporting Business Intelligence content such as user accounts, groups, folders, reports, universes, security, servers, and other objects. The wizard is fairly dynamic and various dialog boxes appear depending on the source environment and the types of information that you choose to select.
The overall process of using the import wizard is divided into seven general steps and sets of procedures:
- Select the source environment
- Select the destination environment
- Select the types of objects to migrate
- Select an import scenario
- Select incremental import options
- Select the specific objects to migrate
- Finalize the migration
1. Select the Source Environment
The first step in using the Import Wizard to migrate content is to specify an existing source environment and to enter logon credentials with administrator rights (Figure 1).
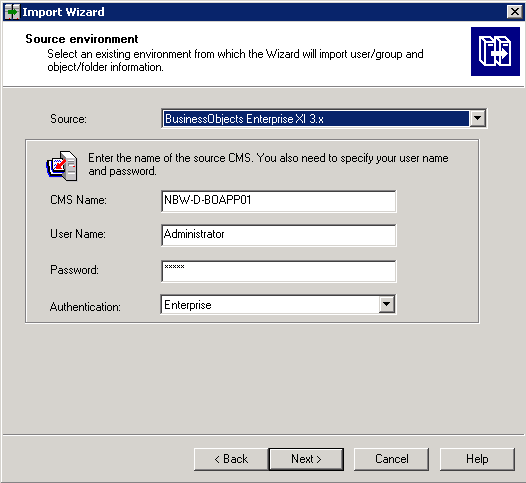
Figure 1
Source environment screen
Source systems can include content from the following types of environments:
- BusinessObjects Enterprise 5.x
- BusinessObjects Enterprise 6.x
- BusinessObjects Enterprise XI
- BusinessObjects Enterprise XI R2
- BusinessObjects Enterprise XI 3.1
- Crystal Enterprise 9
- Crystal Enterprise 10
- Business Intelligence Archive File (BIAR) File
- Text File
In addition you can use the following authentication modes to log on to the source system:
- Enterprise
- Lightweight Directory Access Protocol (LDAP)
- SAP
- Windows Active Directory (AD)
- Windows NT
2. Select the Destination Environment
The second step in using the Import Wizard to migrate content is to specify an existing destination environment and to enter logon credentials with administrator rights (Figure 2).

Figure 2
Destination environment screen
The destination environment selection is similar to the source environment selection as you can select the same types of environments and authentication methods. The main difference is the destination environment selection includes the target of the migration rather than the source of the migration.
3. Select the Types of Objects to Migrate
The third step in using the Import Wizard to migrate content is to specify the types of objects to be migrated from the source environment to the destination environment (Figure 3).

Figure 3
Selection of objects for import
Types of objects that can be selected to be migrated include:
- Users and user groups (including all sub-options). When you select Import users and user groups, five additional selections are automatically selected as well. You have the option of unselecting the following sub-options:
- Inbox documents
- Personal categories
- Favorite folders
- Application rights
- Root folder rights
- Corporate categories. Corporate categories provide an alternate way to classify public documents in addition to public folders. They enable users to locate information more easily regardless of where the information is stored within the BusinessObjects system. Subsequently corporate categories and public folders allow for public documents to be organized according to multiple types of criteria and can add additional level of security on the document.
- Folders and objects (including all sub-options). You have the option of unselecting these sub-options:
- Discussions associated with selected reports
- Application folders and options
- Events
- Server groups
- Repository objects
- Calendars
- Universes
- Profiles
- Encyclopedia objects, which are reference guides for documents (reports and queries). Encyclopedias include a panel that explains the purpose of a document, what questions it helps answer, how it is best used, and a glossary of synonyms and definitions used in the document.
- Custom access levels
- Remote connections and replication jobs
4. Select an Import Scenario
The fourth step in using the Import Wizard to migrate content is to specify the scenario for importing content into the destination environment (Figure 4). The scenario specifies how to determine whether an object already exists in the destination system and what to do with the object if it already exists.
There are two ways to determine if an object already exists in a destination system, plus three sub-options for each main option if the object does already exist within the destination.
The first method to use the object’s unique identifier. BusinessObjects uses the cluster unique identifier (CUID) as the key to identify universes or reports within the same cluster or environment (development, testing, and production). The CUID is a 24-bit key that the system automatically generates when the universe or report is first exported to the BusinessObjects repository. It is only used by the system and is not viewable to an administrator or user. The CUID may be in a different deployment environment (e.g., development, staging, or production).
- Update the destination object. In the case of name conflict, rename the source object.
- Update the destination object. In case of name conflict, do not import the source object.
- Do not import the source object.
The second method is to use the object’s name and path:
- Keep the destination object and import a renamed copy of the source object
- Update/overwrite the destination object with the source objects
- Do not import source object

Figure 4
Specify the scenario
Best practice: The option Use the object’s name and path and the sub-option Update the destination object is the most commonly used import scenario. That is because it is the only option that allows for destination objects to be overwritten by corresponding source objects and it allows the object to keep the same name.
Best practice: Matching objects by name and path is only supported for the following object types:
- Folders and objects under public folders and private folders
- Corporate categories
- Universes
- Universe connections
- Dashboards
- Profiles
- Schedules
All other object types use the matching by the unique identifier scenario.
Best practice: Matching objects by name and path is not an option when importing content from a BIAR file. When importing from a BIAR file, objects are imported using the unique identifier scenario.
5. Select Incremental Import Options
The fifth step in using the Import Wizard to migrate content is to determine incremental import options that specify the types of objects whose source contents will overwrite the corresponding destination contents if the destination object already exists (Figure 5). Options for overwriting destination content with source content include:
- Overwrite object contents
- Overwrite universe contents
- Overwrite connection contents
- Overwrite group and user membership
- Overwrite object rights

Figure 5
Select overwrite options
Best practice: When determining incremental options, the options Overwrite object contents and Overwrite universe contents are the ones that are most often chosen. They allow destination content to be overwritten without changing any security setting or environment database connection settings.
Best practice: The option Overwrite connection contents should rarely be chosen as it forces a change to the database connection that the corresponding universe is using and could change the source of data for the universe. Most of the time, it is wise to keep the current connection that the universe is already using in the destination environment.
Best practice: The options Overwrite group and user membership and Overwrite object rights should only be selected if security settings including group membership and object right settings were made in the source system and need to be propagated to the destination environment.
6. Select the Specific Objects to Migrate
The sixth step in using the Import Wizard to migrate content is to determine the specific objects to be migrated from source to destination. A unique screen type for selection of content appears corresponding to the choices selected in the Selection of Objects to Import step.
Select Users and Groups
If users and groups have been chosen to be imported then a Users and groups selection screen appears (Figure 6).

Figure 6
Select the user and group
An administrator then checks the users and groups to be migrated from the source environment to the destination environment by clicking the check boxes next to the users and groups. The administrator has the option of viewing the groups hierarchically or alphabetically by checking or un-checking the Show groups hierarchically check box. Additionally the administrator has the option of automatically selecting groups that contain selected users by checking the Select groups that contains selected users check box.
Select Universes
If universes have been chosen to be imported then an Import options for universes and connections option screen appears (Figure 7).

Figure 7
Select an import option from the universes and connections screen
When migrating universes, an administrator has to pick from one of three import options for universe objects:
- Import all universes and all connection objects
- Import all universes and only connection objects used by these universes
- Import universes and connections from the selected documents or select additional universes that are not used by any imported document
Best practice: The third option is the one that should be chosen almost all the time as it allows the administrator to manually pick the universes to be migrated. The universe choices appear on the next screen as seen in Figure 8. The other two options should only be used if all universes need to be migrated at the same time.
Additionally, the administrator has the option to migrate universe overloads with the universe chosen in the previous option. Universe overloads are security and row restrictions included in a universe that generate SQL that are applied above and beyond the SQL generated by the universe itself. This option should be chosen when the source universe does include overloads. Those overloads need to be migrated and will overwrite the destination universe overloads.

Figure 8
Select the universe folder and universe
7. Finalize the Migration
After an administrator has selected all the migration options for BusinessObjects content, the Ready to import screen appears (Figure 9).
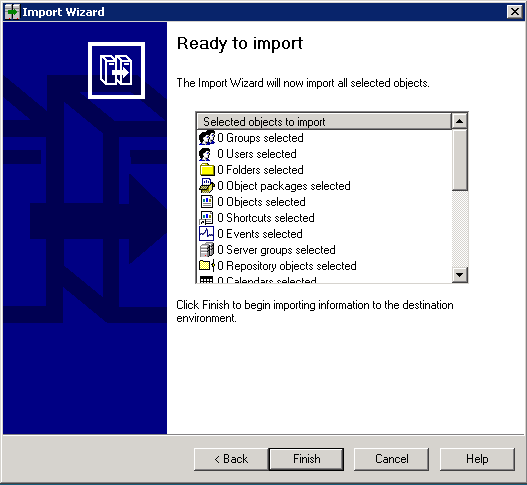
Figure 9
Ready to import screen
At this point, an administrator should review the displayed list to verify that it contains the selected content from previous screens. If not, the administrator should click the Back button and navigate to the appropriate previous screen to make the corrections on that particular screen. When the content is verified, the administrator should click the Finish button to begin migration of the content to the destination environment. The Import progress screen then appears showing the progress of the import and a summary of the migration events. Once the migration is complete, the import summary screen appears, displaying the results of the migration (Figure 10).

Figure 10
Import summary screen
Best practice: Upon completion of the migration, an administrator should view and confirm the content in the detail log. This can be performed by clicking the View Detail Log button. The Detail Log provides a summary of the content that has been migrated and allows an administrator to verify the success of the migration. In addition, the Detail Log includes a listing of the migrated objects, their status, and any migration errors that may have occurred.
Best practice: The information that appears in the Detail Log screen also appears and is written to a log file. The log file starts with the name ImportWiz, and is typically located in the C:Program FilesBusinessObjectsBusinessObjects Enterprise12.0Logging directory on the server or client machine that is running the import wizard. The log file contains a system-generated ID, a title that describes the imported information, and a description of the action taken by the Import Wizard.
Adam Getz
Adam Getz currently serves as a Manager, Business Intelligence for CGI Federal. In this position, he is leading a large business intelligence and data warehousing implementation for a federal client. He is a thought leader in the field of information technology and an expert in the deployment of leading business intelligence, database management, and data integration products. He has presented at a variety of local, national, and international events, including the 2006 BusinessObjects International Conference, 2007 Oracle BIWA Summit, 2008 Oracle Open World, and 2010 and 2011 ASUG SAP BusinessObjects User Conferences. In addition, Adam is the creator and main author of bi-insider.com, a website, portfolio, and blog that provides rich technical and functional content to business intelligence and data warehousing professionals. He has also published numerous technology white papers that have focused on various topics within business intelligence and data warehousing. Adam currently serves as the chairperson of the Washington DC Business Objects User Group.
You may contact the author at adagetz@yahoo.com.
If you have comments about this article or publication, or would like to submit an article idea, please contact the editor.