SAP NetWeaver Process Orchestration is a solution for modeling, running, and monitoring human-centric processes as well as integration scenarios within one environment. It combines SAP NetWeaver Business Process Management and the Java-only installation option of SAP NetWeaver Process Integration for a reduced total cost of ownership. However, one key question remains unanswered: How can you benefit from this new combination without error-prone configuration steps after deploying your business processes and activating the SAP NetWeaver Process Integration development objects? Follow a seven-step process to optimally use business processes with integration needs to SAP and non-SAP systems.
Key Concept
SAP NetWeaver Business Process Management can only integrate out of the box with external systems via Web services (SAP systems in addition can be reached via Remote Function Call [RFC]). More and more business processes (especially end-to-end processes) require additional integration capabilities. Integration in general is only covered by SAP NetWeaver Process Integration. Hence, companies that need both (freestyle process modeling and execution as well as integration) had to install two products with all the increased overhead and costs such a landscape involves. SAP reacted to the changing demand for a combined solution by offering SAP NetWeaver Process Orchestration, the integrated installation of SAP NetWeaver BPM and the Java-only installation option of SAP NetWeaver Process Integration in one Java Virtual Machine.
With SAP NetWeaver Process Orchestration 7.31, users can build and run business processes using SAP NetWeaver Business Process Management (SAP NetWeaver BPM) and at the same time integrate them with a multitude of external SAP and non-SAP systems via the Advanced Adapter Engine Extended (AEX), the Java-only installation option of SAP NetWeaver Process Integration (SAP NetWeaver PI). Both SAP NetWeaver BPM and AEX are collocated in one Java Virtual Machine (JVM), as I explained in my previous article, “Solve Business Process Implementation and Integration Problems with SAP NetWeaver Process Orchestration.” This new combination allows you to build completely new scenarios significantly faster and with less effort compared with a dual-stack installation (i.e., with SAP NetWeaver BPM and SAP NetWeaver PI deployed on separate physical boxes): Human-centric processes requiring integration capabilities are possible as well as integration scenarios requesting stateful message processing via a process engine.
However, one key question still remains: What do you as a developer have to do to actually benefit from this tight integration of SAP NetWeaver BPM and SAP NetWeaver PI? I show you a seven-step process for deploying an SAP NetWeaver BPM process and an integrated configuration object that communicate with each other without the need to configure communication parameters in SAP NetWeaver Administrator, the central configuration and monitoring tool for the Java Web application server:
- Define an inbound interface for SAP NetWeaver BPM as stateless (XI 3.0 compatible)
- Define an outbound interface for SAP NetWeaver BPM as stateless
- Assign the inbound interface in your SAP NetWeaver BPM process to the message start event and intermediate message event
- Assign the outbound interface to an automated activity
- Configure the service reference for the outbound interface
- Configure the channel from AEX to SAP NetWeaver BPM
- Configure the channel from SAP NetWeaver BPM to AEX
These steps are in stark contrast to the scenario I explained in my articles “Combine SAP NetWeaver BPM and AEX to Implement Powerful Integration Scenarios” and “Configure, Run, and Monitor Integration Scenarios in a Pure Java World.” In those articles, I described an integration scenario in which SAP NetWeaver BPM and AEX communicate with each other. Unfortunately, many administrative and configuration steps were necessary to get the scenario running. In addition, the connectivity between SAP NetWeaver BPM and AEX only fulfilled the quality of service Best Effort; in other words, the successful message transfer between the two could not be guaranteed. This process has changed, however, with SAP NetWeaver Process Orchestration. The quality of service Exactly Once is now supported so that the message delivery can be guaranteed. In addition, no configuration steps for setting up the communication between the two systems are necessary. This significantly reduces the total cost of ownership as well as the total cost of development.
I walk you through each of the steps in detail in the coming sections using the simple scenario shown in Figure 1.
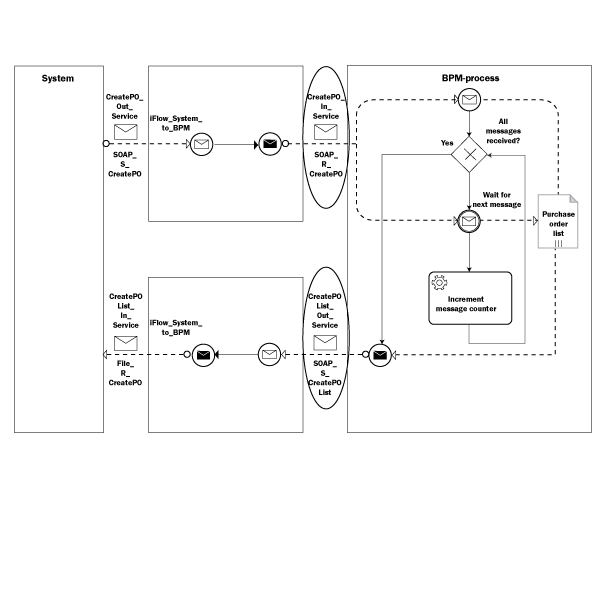
Figure 1
Demo scenario: Collecting messages inside an SAP NetWeaver BPM process
Figure 1 shows a typical integration-centric process (shown on the right side in the box named BPM process) collecting messages that are sent from the block named System on the left and delivered to the process via an integration flow. The integration flow is named iFlow_System_to_BPM and is represented by the upper box in the middle of the figure. Once a certain number of messages have arrived at the process, they are collected and sent out in one message. You need a second integration flow named iFlow_BPM_to_System, which is represented by the lower box in the middle of Figure 1, to send the collected messages back to the system on the left. The integration engine of the AEX executes the integration flows, whereas the BPM engine of SAP NetWeaver BPM executes the BPM process. For more details on integration flows and the scenario itself, read my previous articles “Solve Business Process Implementation and Integration Problems with SAP NetWeaver Process Orchestration” and “Configure, Run, and Monitor Integration Scenarios in a Pure Java World.”
The connectivity between the integration flows and the BPM process is highlighted by ellipses in Figure 1. Obviously, you need two interfaces and two channels. Let’s start with the interfaces.
Step 1. Define an Inbound Interface for SAP NetWeaver BPM as Stateless (XI 3.0 Compatible)
First, create an inbound interface that represents the message reaching the BPM process. In Figure 1, this interface is named CreatePO_In_Service and stands for an incoming message that contains enough information to create a purchase order. Interfaces are typically maintained in the Enterprise Services Repository (ESR). With SAP NetWeaver Process Orchestration, you no longer use the Swing client for the ESR. Instead, the Enterprise Service Browser (ES Browser) of the ESR perspective in SAP NetWeaver Developer Studio is used. (For details on how to use the ESR perspective, read my article “Build Integration Scenarios Entirely within SAP NetWeaver Developer Studio: the Enterprise Services Repository Perspective.”) Figure 2 depicts the service interface definition for CreatePO_In_Service.
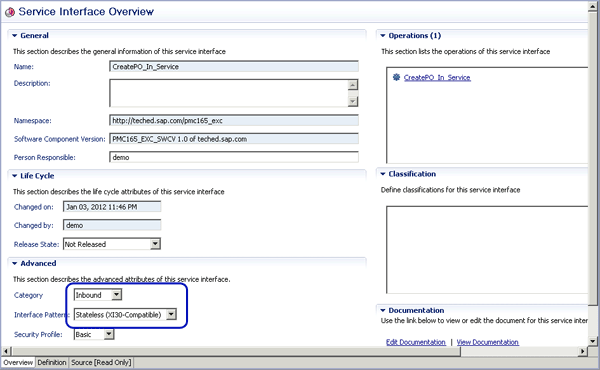
Figure 2
Service interface definition in SAP NetWeaver Developer Studio
Note the settings in the Advanced section highlighted in Figure 2. Set the Category to Inbound and the Interface Pattern to Stateless (XI30-Compatible). XI30-Compatible means that the interface can contain only one operation that has to have the same name as the service interface itself. You can verify this by looking at the Operations section of Figure 2. It contains only one operation and its name is identical to the service interface name. The use of XI30-Compatible is motivated simply by a convention for AEX and SAP NetWeaver BPM that was introduced with SAP NetWeaver Process Orchestration, and has to do with the way incoming messages are handled by SAP NetWeaver BPM. Calls from AEX are processed in SAP NetWeaver BPM by the Web services runtime. The Web services runtime was already part of SAP NetWeaver BPM before the new combination with AEX and took care of all connections based on Web services (as the name obviously indicates). How can SAP NetWeaver BPM distinguish normal Web service calls from the new AEX Web service calls? Because of the aforementioned convention, AEX Web services contain a marker of type XI30-Compatible (which the normal Web services don’t have).
You can drill down further into the details of the operation by clicking the operation link. The resulting view on the interface operation is shown in Figure 3.
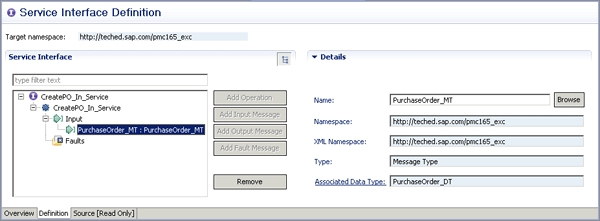
Figure 3
Associated service operation definition
This view consists of just one input message named PurchaseOrder_MT, indicating asynchronous communication. The message is connected to a data type containing the actual message contents. Click the Associated Data Type link to bring up the message details (Figure 4).
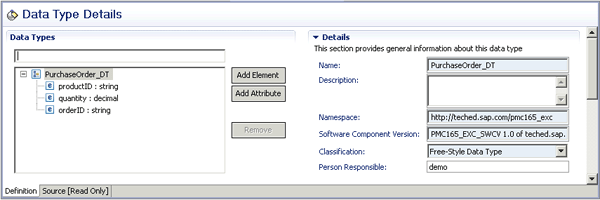
Figure 4
Details of the data type associated with the inbound message
The message payload is displayed on the left. The data type PurchaseOrder_DT represents a purchase order consisting of the productID to identify the ordered product, its quantity, and the field orderID to identify the order.
Step 2. Define an Outbound Interface for SAP NetWeaver BPM as Stateless
Now you define an outbound interface that represents the message leaving SAP NetWeaver BPM. In contrast to the procedure for defining the input interface, it is not necessary to specify the XI.30-Compatible interface pattern as this was only necessary for SAP NetWeaver BPM to distinguish different kinds of incoming Web service calls. Therefore, the outbound interface is much simpler (Figure 5).
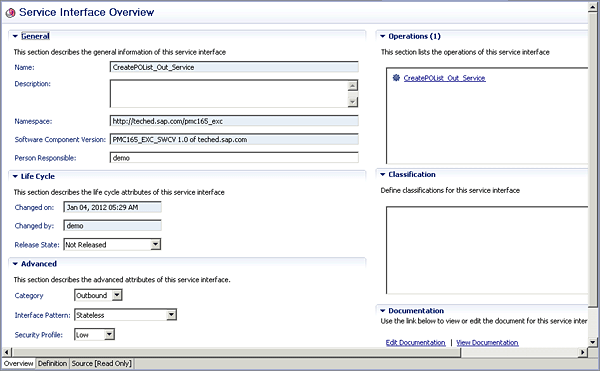
Figure 5
The outbound interface
It is only necessary to set the Category appropriately to Outbound. The associated data type is shown in Figure 6. The BPM process returns a list of PurchaseOrder_DT entries as the Max Occurs parameter has been set to unbounded (represented by the asterisk in the Max Occurs field).
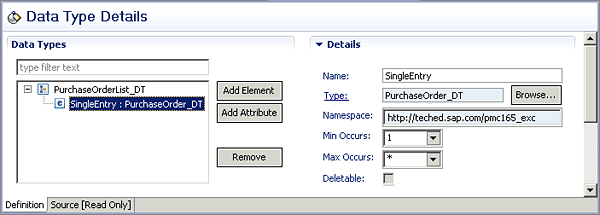
Figure 6
Details of the data type associated with the outbound message
Step 3. Assign the Inbound Interface in Your SAP NetWeaver BPM Process to the Message Start Event and Intermediate Message Event
Now assign the inbound interface to the start and intermediate message event of a BPM model. Note that this is not always the case — you can assign it to the start or intermediate message event of your BPM model in other scenarios. I assume that you have imported the interface from the ESR into the process modeling environment already. The procedure for assigning the interface is identical whether it is a start or an intermediate event. I use the intermediate message event ( ) as an example. Right-click it and choose Properties from the context menu. The Properties tab opens beneath your process model. On the Event Trigger subtab choose New… from the Trigger drop-down list (Figure 7).

Figure 7
Properties of the intermediate message event
The New Message Trigger dialog opens (Figure 8). Provide an appropriate name for your trigger. A trigger defines in essence the event the process is waiting for and is in this case identical with the inbound interface. In other words, the incoming Web service call triggers the event within your process. Once you’ve added the name, click Next to proceed.
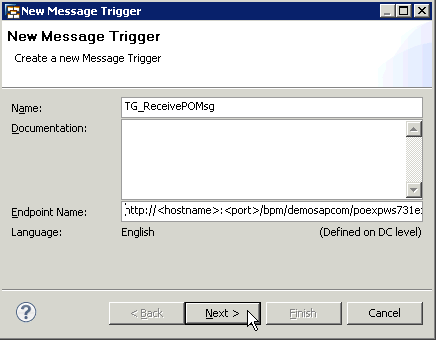
Figure 8
The wizard for creating a trigger in SAP NetWeaver BPM
During the second step of the wizard, you have to assign the service interface. From the Service drop-down list, pick the right Web service interface (Figure 9).
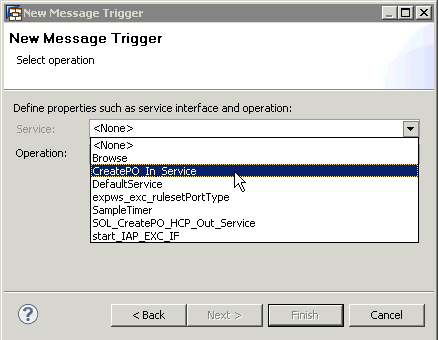
Figure 9
Select the interface for the trigger
Click Finish to close the New Message Trigger dialog, and your assignment is complete. Once you have created the trigger, you can reuse it for other message events. You don’t have to create new triggers if in the end you are pointing to the same interface.
Step 4. Assign the Outbound Interface to an Automated Activity
Now you need to assign the outbound interface to an automated activity. Again, import the respective interface from the ESR into the SAP NetWeaver BPM environment. This time make sure to assign a Service Reference while you are importing the interface. Figure 10 shows the step in the Import wizard. Select the Create new radio button and provide a meaningful name for your service reference (e.g., SG_PO_OUTBOUND). Once you have defined the service reference, click Finish to close the Import dialog. Service references encapsulate detailed information about how the communication should be handled during runtime when the imported interface is being called. Should it use an RFC connection or should it be handled via a Web service call? As I’ll show you in step 5, a new option is available for configuring the connectivity for SAP NetWeaver Process Orchestration.
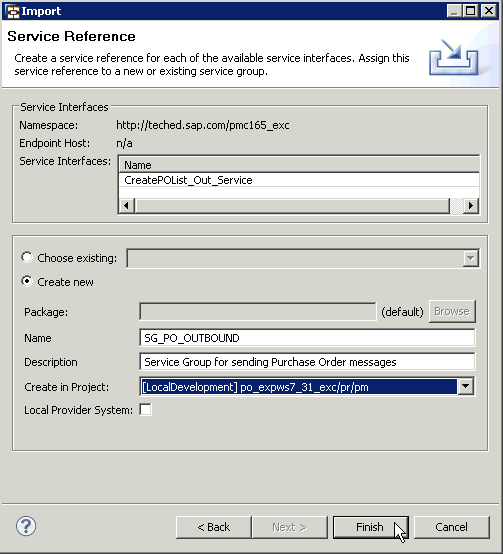
Figure 10
Create a service reference while importing the interface
Now you are ready to assign the outbound service interface to the automated activity. To complete this step, go to the associated Properties tab of the automated activity and select the right interface from the Service Interface drop-down list of the Interface subtab (Figure 11).

Figure 11
Assign the outbound interface to the automated activity
Step 5. Configure the Service Reference for the Outbound Interface
Now you need to configure the service reference you just created. Click the Service Reference link in Figure 11 to navigate to its details (Figure 12).
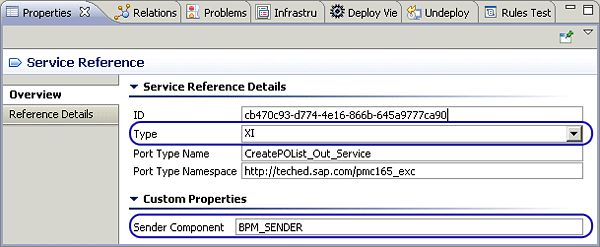
Figure 12
Details of the service reference
Note the fields named Type and Sender Component. The Type field binds the automated activity to a certain protocol. In previous releases of SAP NetWeaver BPM it was only possible to choose either RFC or WS (for Web service). Now there is an entry of XI, for the XI protocol. Select it, and then set the Sender Component value to a meaningful name that the AEX engine can later identify as the sender. This name plays an important role once you configure the associated integration flow (step 7).
Step 6. Configure the Channel from AEX to SAP NetWeaver BPM
Now I discuss the maintenance of the adapters in the new Process Integration Designer (PI Designer) perspective. For more information about this perspective, see my article “Build Integration Scenarios Entirely within SAP NetWeaver Developer Studio: The Process Integration Designer Perspective.”
As Figure 1 indicates, you have to maintain two integration flows: one from the system to SAP NetWeaver BPM and another one from SAP NetWeaver BPM to the system. For each of the integration flows, I only concentrate on the connectivity between the integration flows and BPM (marked by ellipses in Figure 1). Start with the connection from the integration flow to SAP NetWeaver BPM. An example of this flow is shown in Figure 13.

Figure 13
Integration flow connecting the system with SAP NetWeaver BPM
Double-click the connection from the integration flow to the BPM process. The channel editor opens (Figure 14).
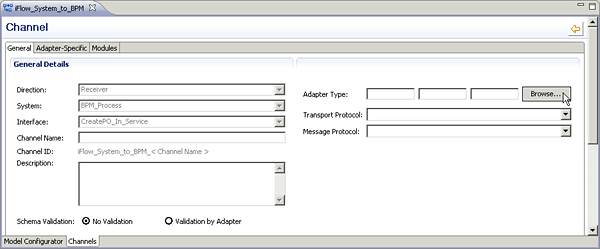
Figure 14
The channel editor
To assign an appropriate adapter, click the Browse… button to open the Choose Adapter dialog (Figure 15).
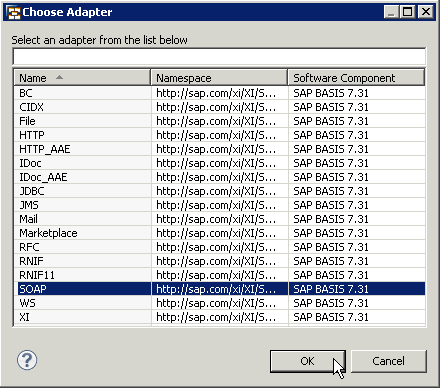
Figure 15
Choose an adapter
Pick the SOAP adapter and click OK to close the dialog. You are back in the channel editor. Now assign the right protocol that the SOAP adapter should take to communicate with SAP NetWeaver BPM. As discussed, AEX and SAP NetWeaver BPM talk to each other using the XI 3.0 protocol. Therefore, choose the associated entry from the Message Protocol drop-down list (Figure 16).
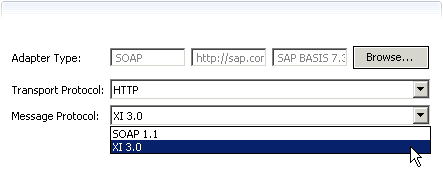
Figure 16
Choose the message protocol for the communication from AEX to SAP NetWeaver BPM
For outgoing calls, the SOAP adapter requires a URL as it is connecting to a Web address. Therefore, click the Adapter-Specific tab in the channel editor and set the fields shown in Figure 17.
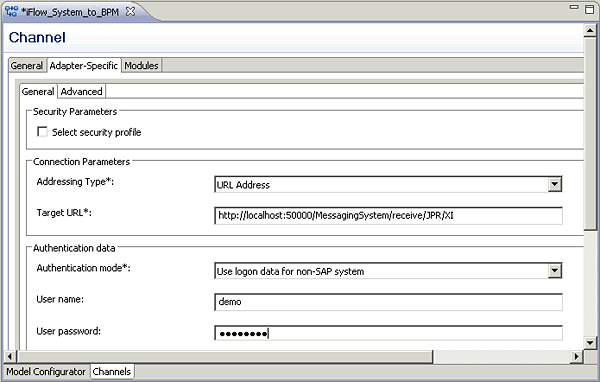
Figure 17
Adapter-specific settings in the channel editor
As Addressing Type, choose URL Address because SAP NetWeaver BPM can be reached under a well-defined address, https://localhost:<port>/MessagingSystem/receive/JPR/XI. Enter this URL enhanced by the port number of your Web application server installation in the Target URL field. AEX and SAP NetWeaver BPM are installed on the same physical machine, so you can use the localhost server address. In case of a cluster installation, you have to replace the localhost entry with the address of your Web dispatcher. In the Authentication data section, select Use logon data for non-SAP system from the Authentication mode drop-down list. Finally, specify the credentials for connecting to SAP NetWeaver BPM in the respective fields (User name and User password). Your configuration of the adapter is now complete.
Step 7. Configure the Channel from SAP NetWeaver BPM to AEX
Finally, you need to configure the channel from SAP NetWeaver BPM to AEX. It is important now for the AEX to recognize the sending system and the interface. Be sure to consider this point while configuring the connection from SAP NetWeaver BPM to AEX. After creating a new integration flow in the PI Designer, you can begin the configuration of the sending system. Figure 18 depicts the initial integration flow after its creation.

Figure 18
Add a new business component
Recall from the discussion during the configuration of the automated activity (step 5) that you provided a name for the sending system in the Sender Component field of the service reference (Figure 12). The name (BPM_SENDER) has to be the name of the sender in the screen in Figure 18. Therefore, create a new business component by right-clicking the header area of the box on the left (containing the text Sender 1) and pick New Business Component from the context menu. The New Business Component dialog opens (Figure 19).
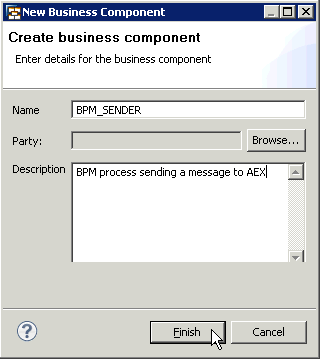
Figure 19
Create a new business component
Assign exactly the same name you have entered during the configuration of the service reference in SAP NetWeaver BPM or, in other words, the name of the sending Business Component in the integration flow has to be identical to the name of the Sender Component field of the associated service reference in the BPM process model. This procedure allows the AEX engine to unambiguously identify the sender. After you click Finish, the Business Component window opens automatically. So far, AEX is only able to identify the sender, but it cannot identify the interface yet. Therefore, use the Business Component window to specify the sending interface. In this case, click the Add button in the Sender Interfaces section of the window (Figure 20).
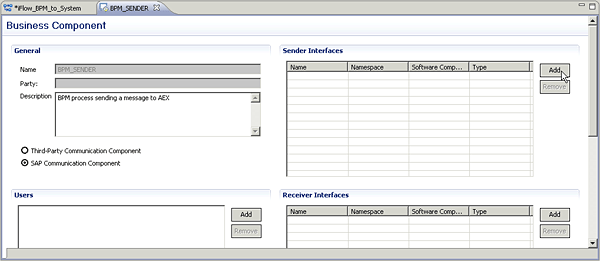
Figure 20
Add a sender interface to the business component
The Choose Interface dialog opens listing all the sender (or outbound) interfaces defined in the Enterprise Services Repository (Figure 21). Choose CreatePOList_Out_Service, the one that should be handled by your integration flow and that has been chosen in the associated automated activity during the configuration of the BPM process (see Figures 11 and 21). You could potentially add more sender interfaces in this dialog if the sender is able to send more than one message, but for this example, one interface suffices.
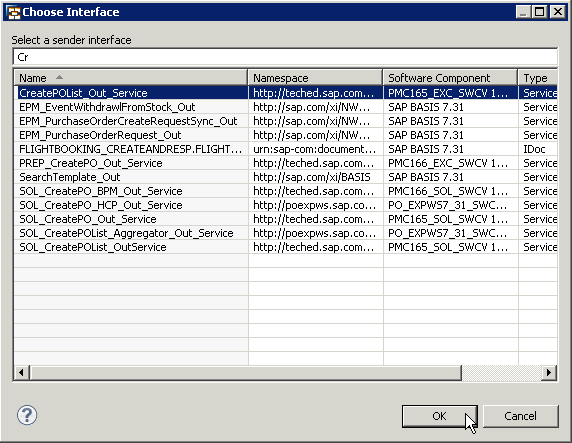
Figure 21
Choose the sender interface
Once you have defined the sending interface for the business component, it can be assigned in the PI Designer to the sender system (e.g., BPM_SENDER). Right-click the Interface rectangle within the BPM_SENDER box and choose Assign Interface from the context menu (Figure 22).
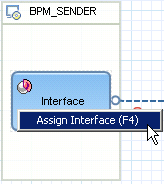
Figure 22
Assign the sender interface
The Choose Interface dialog opens. It lists those sender interfaces that are associated with the respective business component. In this case there is only one; select it and click OK to close the dialog (Figure 23).

Figure 23
The Choose Interface dialog
Selecting the sender interface ensures unambiguous identification of the sender and the interface. This step is also reflected in the PI Designer model (Figure 24).
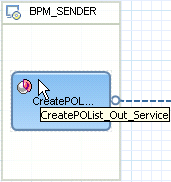
Figure 24
Definition of sender component and sender interface successfully finished
The only remaining step is defining the adapter to be used for the connection from the sender component to the integration flow. This step is very simple now, as you know already how to assign an adapter. Double-click the connection from the sender component BPM_SENDER to the start event ( ) of the integration flow to open the channel editor. For the Adapter Type, again choose the SOAP adapter (Figure 15). Select the XI 3.0 entry from the Message Protocol drop-down list as you did for the connection from AEX to SAP NetWeaver BPM (Figure 16). However, this time no additional adapter-specific parameters have to be maintained as the SOAP adapter is simply waiting for incoming calls.
Now you can activate and deploy the integration flows and the BPM process. The communication between the two components, BPM and AEX, works out of the box in both directions without further configurations, saving you a lot of administration and configuration effort.

Dr. Volker Stiehl
Prof. Dr. Volker Stiehl studied computer science at the Friedrich-Alexander-University of Erlangen-Nuremberg. After 12 years as a developer and senior system architect at Siemens, he joined SAP in 2004. As chief product expert, Volker was responsible for the success of the products SAP Process Orchestration, SAP Process Integration, and SAP HANA Cloud Integration (now SAP HANA Cloud Platform, integration service). He left SAP in 2016 and accepted a position as professor at the Ingolstadt Technical University of Applied Sciences where he is currently teaching business information systems. In September 2011, Volker received his Ph.D. degree from the University of Technology Darmstadt. His thesis was on the systematic design and implementation of applications using BPMN. Volker is also the author of Process-Driven Applications with BPMN as well as the co-author of SAP HANA Cloud Integration and a regular speaker at various national and international conferences.
You may contact the author at editor@SAPpro.com.
If you have comments about this article or publication, or would like to submit an article idea, please contact the editor.


