Avoid unexpected report results when you use hierarchy authorizations by taking these simple steps.
Key Concept
Reporting authorizations allow you to grant access according to specific values of reporting objects such as profit center or cost center. Hierarchy authorizations provide further flexibility to grant access by reference to nodes in associated hierarchies. For example, an organization can grant the director of a major division access to all of his or her profit centers through a single assignment. This not only simplifies the initial definition of roles; it also reduces future maintenance since the authorization automatically reflects the reassignment of profit centers following a company reorganization.
Graeme Smith’s article, “Prevent Users from Accessing Sensitive Data Using Authorization Restrictions,” in the BI hub of SAPexperts explained how to restrict data access with BW reporting objects. Continuing the theme, I’m going to describe how to reference hierarchy nodes in your authorizations. You will see how, under certain circumstances, using hierarchies in reporting can prevent your system from displaying authorized InfoObject values.
It is important to understand this interaction if you are planning to grant access at the InfoObject level, even if you don’t have any immediate intention to use reporting hierarchies in your queries. Discovering an adverse effect after you have implemented your authorization strategy could be very time consuming to rectify. As shown in the later examples, there are implications for BW data modelers, query developers, and those involved in SAP data access administration.
Note
I created the examples shown on Release SAP BW 3.1/BI Content 3.3 Add-On. The basic principles of reporting authorization and the techniques described in this article apply to all releases of SAP BW. Details related to using authorization variables do not apply to versions earlier than BW 3.0B. Refer to the relevant sections of the SAP documentation for the latest information about the system you use.
The article consists of three main sections, which you may prefer to read selectively depending on your familiarity with these topics:
- “Hierarchy Authorization Maintenance” describes how to define node-based authorizations with reference to the InfoProvider and data that appear in subsequent examples.
- “Common Pitfalls”’ describes how and why inconsistent query results can occur, and highlights some other potential pitfalls of maintaining authorizations on hierarchical data.
- “Flexibility in Reporting Authorization Maintenance” shows how you can avoid inconsistent query results and potentially simplify authorization maintenance.
Hierarchy Authorization Maintenance
Although SAP’s online help and the SAP paper, “How To… Work with Hierarchy Authorizations,” (available from SAP Service Marketplace, https://service.sap.com) describe hierarchy authorization maintenance, this section reviews the process and refers to the examples I use later.
The sample data set consists of integers 0 to 9. The hierarchies High & Low and Odd & Even provide two alternative groupings of these values. In the later examples I will show how to grant access using the nodes of the hierarchies and the effect of activating one, then the other, in reporting. The end user in my examples has access to all values except 5. Table 1 summarizes the method; the authorized values are highlighted in red. You can see that the authorizations refer to hierarchy nodes Low and Even, the leaf node Nine, and the InfoObject value 7. Figure 1 shows the hierarchy definitions.
| Value |
Leaf node |
Nodes of high and low hierarchy |
Nodes of odd and even hierarchy |
Authorization method |
| 0 |
Zero |
Low |
Even |
Nodes low and even |
| 1 |
One |
Low |
Odd |
Node low |
| 2 |
Two
|
Low |
Even |
Nodes low and even |
| 3 |
Three |
Low |
Odd |
Node low |
| 4 |
Four |
Low |
Even |
Nodes low and even |
| 5 |
Five |
High |
Odd |
None
|
| 6 |
Six |
High |
Even |
Node even |
| 7 |
Seven |
High |
Odd |
InfoObject value 7 |
| 8 |
Eight |
High |
Even |
Node even |
| 9 |
Nine |
High |
Odd |
Leaf node nine |
|
| Table 1 |
System of granting data access using hierarchy nodes and InfoObject values |

Figure 1
Two hierarchies based on the DIGIT InfoObject
Figure 2 shows the data model of the InfoCube DIGITS alongside its contents as seen in a report. This InfoProvider contains a key figure, characteristic, and navigation attribute with the same values, as shown in columns two, four, and five of the query result on the right. I maintain authorizations using the navigational attribute AUTHDIGIT, which is in other respects the same as the characteristic DIGIT. By including the two similar InfoObjects, I can show reporting behavior with and without authorizations.
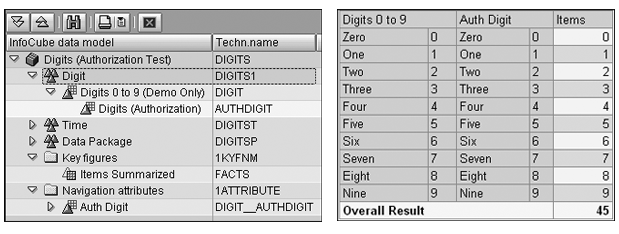
Figure 2
Data model of the InfoCube DIGITS and its contents
Process Overview
Hierarchy authorizations grant data access with reference to nodes in hierarchies of authorization relevant reporting objects. The steps to develop hierarchy authorizations are similar to those for standard reporting authorization objects. I’ll summarize the steps you’ll need to follow to set up hierarchy authorizations, and then describe them in detail.
Step 1. Set the Authorization Relevant indicator
Step 2. Create an authorization object that includes fields for both the reporting object and InfoObject 0TCTAUTHH
Step 3. Specify which InfoProviders are subject to the authorization object
Step 4. Create hierarchy authorizations
Step 5. Maintain the role
Step 6. Assign the role to users
Step 1. Set the Authorization Relevant indicator. To do this, enter transaction RSA1 (Administrator Workbench) and locate the indicator on the Business Explorer tab of the InfoObject maintenance screen. Activate the setting using the check box.
Step 2. Create an authorization object that includes fields for both the reporting object and InfoObject 0TCTAUTHH. Run transaction RSSM and create an authorization object by entering a name (which must begin with Y or Z) in the Authorization object field. Select the Object button and click on the create icon to the right. Enter a description in the pop-up window and confirm the entry to display the Maintain Authorization Fields screen. Select the required fields from the list of available authorization-relevant objects on the right. Include your reporting object and 0TCTAUTHH. If your authorization model requires complex assignments based on intersecting fields, add any other objects you require. Figure 3 shows the definition of ZDIGIT, which includes fields AUTHDIGIT and 0TCTAUTHH.
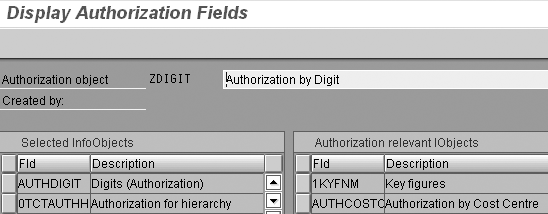
Figure 3
Authorization object definition
Step 3. Specify which InfoProviders are subject to the authorization object. Return to RSSM’s main screen and select Check for InfoCubes. Click on the change icon and you see a list of InfoProviders that contain the objects included in the authorization object. Select those you wish to include in the authorization object. Figure 4 shows the selection for the DIGITS InfoProvider.
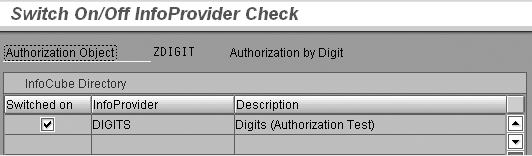
Figure 4
Specify the InfoProvider subject to the authorization object
Step 4. Create hierarchy authorizations. To create hierarchy authorizations in RSSM, select Authorization Definition for Hierarchies. Click on the change icon to display the Maintain Authorization for Hierarchy screen (Figure 5).

Figure 5
Hierarchy authorization definition for object called EVEN
Note
RSSM also allows you to assign the association from the perspective of an InfoProvider, which is specified in the Check for InfoProvider field.
You can select values not explicitly assigned to any node using the Not assigned node (REST_H). You can choose the root node (ROOT_H) by selecting the Top of hierarchy check box.
A hierarchy authorization corresponds to a node in a specific hierarchy of a named InfoObject. Enter a suitable name in the Technical Description field, then the name of the InfoObject (in this case AUTHDIGIT). Click on the Hierarchy field and press F4 (or click on the field help icon) to display the associated hierarchies, as shown in Figure 6. Make your selection and press Enter.

Figure 6
Hierarchy selection list
Figure 5 shows the hierarchy authorization maintenance screen. My first example grants access to the EVEN node in the ODDEVEN hierarchy of AUTHDIGIT. I gave it the same name as the node but this is incidental.
Click on the Nodes field and press F4 (or click on the field help icon) to display the node selection window. Drag a single node to the right of the screen (Figure 7). Click on the Continue button.
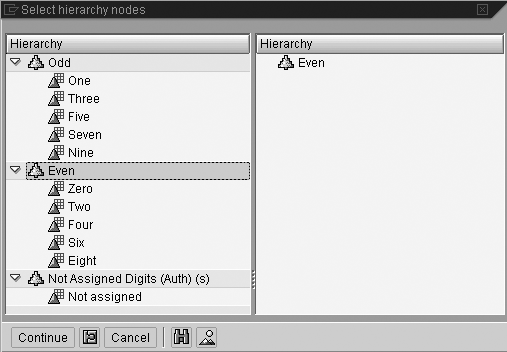
Figure 7
Select the node
Enter a value in the Type of authorization field, or select one from the field help (Figure 8). In all my examples I entered 1, which grants access to the node and all subordinate nodes. Options 2 and 4 allow you to limit the sub-tree down to an absolute level in the hierarchy or a level relative to the selected node. If you use either of these, enter the desired value in the Hierarchy level field shown in Figure 5.

Figure 8
Authorization type selection
The function of the Validity Period field in Figure 5 may not be apparent from the label. It allows hierarchy authorizations to apply to other hierarchies that contain a node with the same name. For hierarchies that are version or time dependent, you can optionally specify whether the date and version should also match (Figure 9). You can use this feature, for example, to permit data access based on the leaf nodes (those at the lowest level of the hierarchy). The leaf nodes correspond to the reporting object values, such as individual cost centers or profit centers, or in my example, digits. However, for large hierarchies, the maintenance overhead can be very high.

Figure 9
Applicability to other hierarchies
The Node variable default value check box makes the hierarchy authorization the default in an authorization variable that accepts a single value. Since BW 3.0B, authorization variables are no longer limited to a single value. Therefore, if you are using this type of variable, you can leave this option blank. The use of a variable filled by authorization is outlined in the section “Restrict Queries with an Authorization Variable.”
Hierarchy authorizations are defined for the LOW node of the High & Low hierarchy, and the EVEN node and leaf node NINE of the Odd & Even hierarchy. Figure 10 shows the definitions. Notice that NINE has option 3 set in the Validity Period field, meaning that it applies to all hierarchies in which it appears. Since NINE is a leaf node corresponding to the InfoObject value 9 at the lowest level in the hierarchy, it exists in any hierarchy based on AUTHDIGIT.
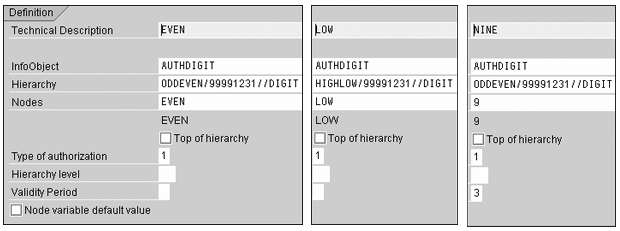
Figure 10
Hierarchy authorization definitions for EVEN, LOW, and NINE
Step 5. Maintain the role. Now that you’ve defined the hierarchy authorizations, add the authorization object to a role and assign values to the fields. The process is the same as for standard authorizations. Create a role via transaction PFCG. Maintain the authorization by clicking on Change Authorization Data from the Authorization tab. On the authorization maintenance screen, add your authorization object to the role by clicking on the button labeled Manually from the toolbar at the top of the screen. Enter its name into one of the Authorization object fields and click on the Continue button (or press Enter). This takes you to the authorization maintenance screen where you find your object within the SAP Business Information Warehouse – Reporting (RSR) authorization class.
Figure 11 shows the contents of my role with my authorization object expanded to show the field assignments. Figure 12 shows the field assignment pop-up windows for both AUTHDIGIT and 0TCTAUTHH (field names: 9AUTHDIGIT and TCTAUTHH, respectively). Access them by clicking on the change icon to the left of the fields. Figure 13 shows the field input help (F4) for TCTAUTHH listing the hierarchy authorizations.
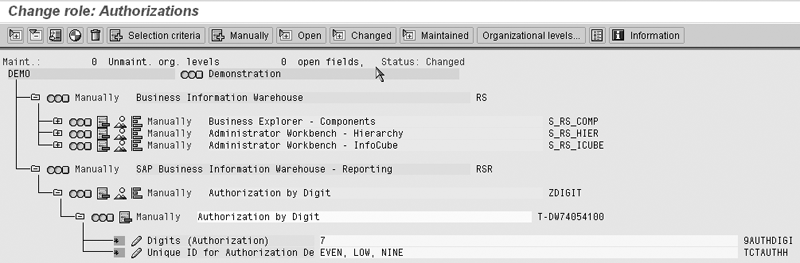
Figure 11
Role maintenance (PFCG) showing authorization field assignments within ZDIGIT click here to view a alarger version of this image
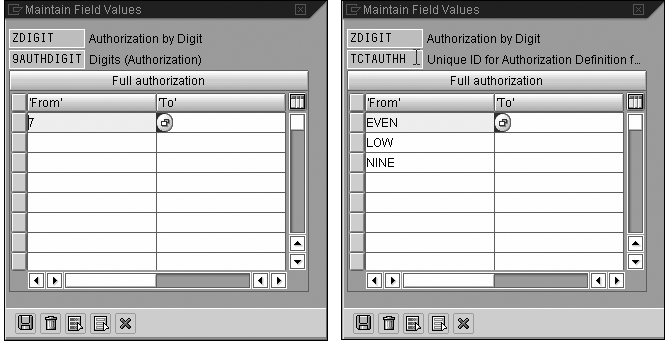
Figure 12
Authorization object field assignments for 9AUTHDIGIT and TCTAUTHH

Figure 13
Field input help for hierarchy authorizations
Step 6. Assign the role to users. The process is the same as for other roles, and a separate group often performs it in large organizations. Within PFCG you can add users to the role by adding their user IDs to the list on the User tab. Alternatively, you can assign roles to a single user with transaction SU01. Fill the User field and click on the change icon on the toolbar. Add the role to the list on the Roles tab.
Define a Query
Having maintained all the necessary authorization settings, you now can develop queries to display the data and observe the results under different conditions. Query DIGIT_Q001 includes just AUTHDIGIT as a free characteristic and the key figure called Items (technical name FACTS) in the columns. The query developer selected the High & Low hierarchy in the properties of AUTHDIGIT and activated it by selecting the check box.
Restrict Queries with an Authorization Variable
If you want to automatically restrict users’ results to their authorized values, you can do it with an authorization variable. You can easily create this variable using Variables Wizard. Launch it by selecting New Variable from the context menu of Characteristic Value Variables for the InfoObject shown in Figure 14. The wizard guides you through the steps so I am not showing them in detail. However, when you select the type of variable in this situation, choose Selection Option from the Variable Represents drop-down list on the Details screen. This type of variable supports multiple values and ranges that authorizations use (Figure 15).
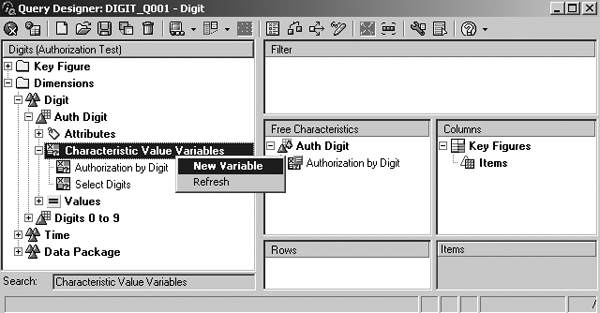
Figure 14
Launch Variables Wizard
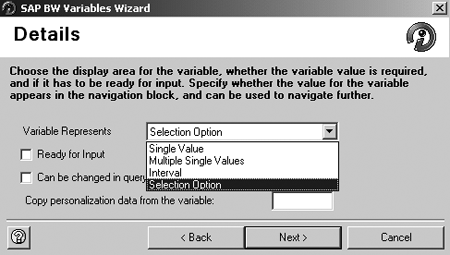
Figure 15
Choose Selection Option on the Details screen of Variables Wizard
Common Pitfalls
It may seem natural to assume that changes to report formatting would not affect the filtering of queries through authorizations. However, changes can occur in some circumstances. The activation of hierarchies is an example that I’ll demonstrate in the following report extracts.
In Figure 16, the values of the key figure Items total 40. In Figure 17, following a drill-down by Auth Digit, the sum is 19. Some authorizations do not have an effect when a hierarchy is active in a drill-down.

Figure 16
Initial display before drilling down
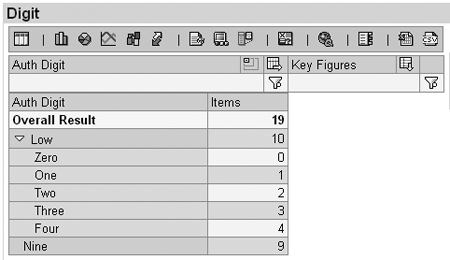
Figure 17
Effect of drilling down by Auth Digit
You can assign reporting authorizations with reference to the authorization-relevant object (e.g., profit center) or to nodes in an associated hierarchy. In general the rules governing the applicability of reporting authorizations are as follows:
- Authorizations assigned with reference to the object have an effect only when no hierarchy belonging to the object is active
- Authorizations assigned with reference to the a hierarchy node (hierarchy authorizations) have an effect when the containing hierarchy is active or when no hierarchy belonging to the object is active
SAP note 315094 states that “For performance reasons the system cannot read all hierarchies for which the user is authorized.” You should use caution when granting access through an authorization-relevant object alone (rather than associated nodes) if end users will ever need to use reporting hierarchies with the object. It is difficult to be sure that they never will. The authorizations won’t work when the hierarchy is active. It is preferable to assign authorizations using related hierarchy nodes. This is the conventional approach, but this, too, can be problematic in the following situations:
- If using multiple reporting hierarchies: You must maintain access with reference to the nodes of each one. This requires great care and effort to ensure consistency.
- When introducing a new reporting hierarchy: You must specify the access using the nodes of the new hierarchy
- When there is no reporting hierarchy: You must define a new hierarchy simply to use hierarchy authorizations, which requires additional initial effort and future maintenance
Authorization maintenance would be easier if it were possible to grant access using any node of any hierarchy, or the InfoObject itself. The section “Flexibility in Reporting Authorization Maintenance” shows how to achieve this.
Understand the Results
Let’s return to the results of this query shown in Figures 16 and 17. In Figure 16 the result (40) is the sum of the authorized values (i.e., 0, 1, 2, 3, 4, 6, 7, 8, and 9), as summarized in Table 2.
| Hierarchy nodes and InfoObject values |
Sum of the authorized values |
| Node LOW in hierarchy High & Low |
0, 1, 2, 3, 4 |
| Node EVEN in hierarchy Odd & Even |
0, 2, 4, 6, 8 |
| Node NINE in hierarchy Odd & Even |
9 |
| Value 7 of the InfoObject |
7 |
|
| Table 2 |
Hierarchy nodes and InfoObject values showing access granted |
In Figure 17,only LOW from the hierarchy in the active drill-down and NINE with the All Hierarchies option have taken effect. The system does not apply the access granted by the inactive hierarchy node or the InfoObject. Figure 18 shows the result of changing to the Odd & Even hierarchy. Only the even digits and nine are included. In Figure 19 the hierarchy is deactivated and all authorized values are listed.

Figure 18
Drilling down by Odd & Even hierarchy

Figure 19
Drill down without an active hierarchy
Notice that the authorization based on the InfoObject alone is only effective when no hierarchy is active. If I had implemented authorizations using only InfoObject values before identifying the need for reporting hierarchies, introducing hierarchies would require a complete redesign of the authorization strategy.
Unusual Aspects of Hierarchy Authorization Assignments
Special considerations when maintaining authorizations that include 0TCTAUTHH relate to the interplay between node assignments and assignments to the associated object.
For example, ZDIGIT includes two fields, TCTAUTHH and 9AUTHDIGIT, but both refer to the same aspect of the data, the values of AUTHDIGIT. This differs from most authorizations in which each field refers to a separate aspect of the data. Consider an authorization model that grants access to data related to colored shapes. You could use two authorization fields in combination to permit access. Table 3 shows several examples.
| Color and shape |
Meaning |
Color = *
Shape = triangle |
All triangles of any color |
Color = red
Shape = * |
Any shape that is red |
Color = red
Shape = triangles |
Only red triangles |
Color = *
Shape = * |
All shapes of any color |
|
| Table 3 |
Authorization field assignments for shape and color |
You can think of color and shape as separate dimensions of the data, as illustrated in Figure 20. Most SAP authorizations have this multidimensional structure, which gives enormous flexibility in controlling data access. The authorization for ZDIGIT appears to have the same form but is only one-dimensional, as illustrated in Figure 21. The two fields apply to the same InfoObject so the field assignments combine through union rather than intersection. Other rules are also specific to hierarchy authorizations. The consequence is that field assignments similar to those in Table 3 have different effects, as shown in Table 4.

Figure 20
Two-dimensional nature of shape and color
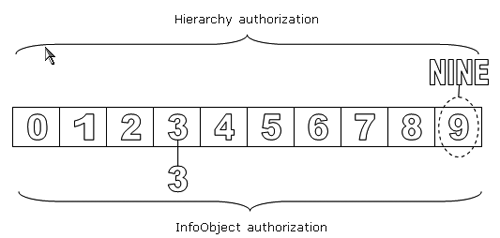
Figure 21
One-dimensional nature of hierarchy authorizations
| Field assignments |
Meaning |
TCTAUTHH = *
9AUTHDIGIT = 3 |
Digit 3 only, the asterisk (*) is not supported for 0TCTAUTHH but is treated as a colon (:), giving access at a summary level to queries that do not include this object |
TCTAUTHH = NINE
9AUTHDIGIT = * |
All digits regardless of hierarchy activation state |
TCTAUTHH = NINE
9AUTHDIGIT = 3 |
Digits 9 and 3 |
TCTAUTHH = *
9AUTHDIGIT = * |
All digits regardless of hierarchy activation state |
|
| Table 4 |
Authorization field assignments for hierarchy authorizations |
Flexibility in Reporting Authorization Maintenance
Clearly, developing end-user reports that may return inconsistent results has the potential to cause confusion. How is it possible to ensure consistent results that will not be affected by the creation of one or more reporting hierarchies, and their subsequent use in different query views?
If you duplicate the InfoObject and its contents within the InfoProvider, you can separate the authorization control and the reporting functions, ensuring that the reporting display has no impact on the filtering of the query result. In the second query DIGIT_Q002, the object that restricts data access (AUTHDIGIT) acts only as a filter. The characteristic DIGIT, which contains exactly the same values, is included as a free characteristic (Figure 22).
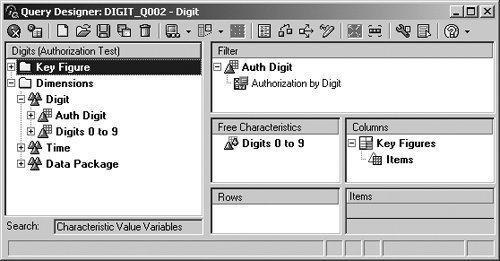
Figure 22
Separation of authorization and reporting functions in a query
This separation of the data access control and reporting functions means that the conditions that result in inconsistent results (e.g., a drill-down by AUTHDIGIT with an active hierarchy) do not occur. You are free to maintain authorizations with or without hierarchy authorizations and can use any node from any hierarchy in the authorizations. It does not matter if you introduce a new reporting hierarchy at a later date.
Another benefit is that you can add a variable to the object you use in reporting (e.g., DIGITS). For example, you could allow data selection from a pop-up window while automatically filtering the query based on authorizations. It is not possible to restrict a single InfoObject based on both an authorization variable and another type of variable.
Figures 23 and 24 show the results, including all authorized values, when the Odd & Even and High & Low hierarchies are active in the current drill-down.
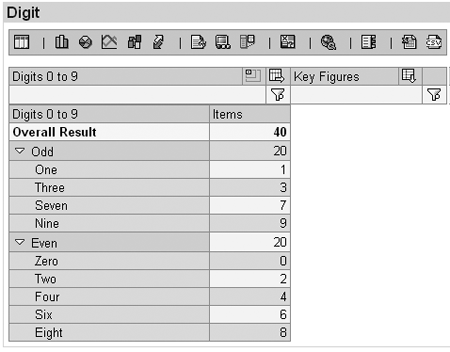
Figure 23
Odd & Even hierarchy showing all authorized values
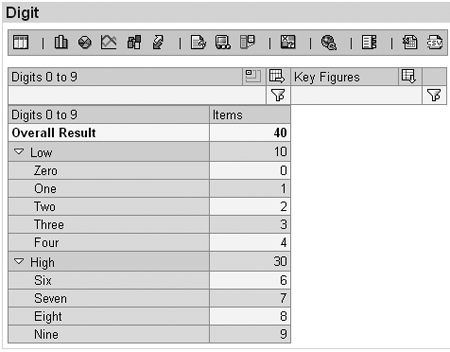
Figure 24
High & Low hierarchy showing all authorized values
Duplicating the authorization relevant object does not commit you to applying this technique in all your queries. You can continue to use just the original object where that gives the desired results. For example: Include only AUTHDIGIT if you wish to grant access to a node without its sub-tree. This approach gives you the flexibility to include either object, neither, or both. Use caution if you explore these possibilities:
- Avoid including the unprotected InfoObject in a query without its authorization-relevant partner if you assign the colon (:) to the authorization field. The colon permits access to information at a summary level in queries that do not include the authorization-relevant object. This prevents segmentation by individual values through filter or drill-down process. If you exclude the restricted object, the colon would grant full access through a query that included the unprotected InfoObject.
- Similarly, if granting access to individual nodes without the sub-tree, include only the authorization-relevant object in the query, since the object’s unprotected counterpart could expose the sub-nodes and leaves.
- Consider the implications of permitting end users to create or modify queries against InfoProviders that include an authorization-relevant object and an unrestricted object.
Apply the Technique to Profit Center
I’ll conclude by outlining the steps involved in applying this technique to profit center, an SAP-delivered field that is often used to restrict data access. Although the process affects a number of activities, including modeling, data loading, query development, and authorization maintenance, it is not particularly time consuming and does not require reloading existing InfoProviders.
All you have to do is to create a copy of the relevant object to allow yourself to separate authorization and reporting functions in queries, and then assign the same values to each during the data load. For example, if you add the duplicate object as a navigable attribute of the original, you can populate it in the transfer rules of the attribute master data. These steps are intended as a simple checklist so I have assumed that you are familiar with Info-Object maintenance using Administrator Workbench. Details of the steps related to hierarchy authorizations and the use of authorization variables are described in the earlier sections of the article.
Step 1. Create a characteristic using profit center as a reference. I’ll call the new object AUTHPCTR in the following steps.
Step 2. Add AUTHPCTR as an attribute of profit center. Select the Navigation Attribute option.
Step 3. Assign the source value of profit center to AUTHPCTR in the attribute master data transfer rules. This ensures that the two fields contain the same value.
Step 4. Make AUTHPCTR a navigation attribute within your individual InfoProviders.
Step 5. Create an authorization object that includes AUTHPCTR. Include 0TCTAUTHH if you intend to use hierarchy authorizations. If in doubt, include 0TCTAUTHH for possible use in the future, since you cannot modify authorization objects that are in use.
Step 6. Create any hierarchy authorizations you require.
Step 7. Associate your authorization object with relevant InfoProviders.
Step 8. Maintain any roles that include your authorization object.
Step 9. Add AUTHPCTR in the filter block of the required queries and add an authorization variable to restrict the results. Include profit center without authorization restriction as a reporting characteristic to permit drill-down and filter in your reports.
Robert Williams
Robert Williams has specialized in data warehousing and business intelligence for more than 10 years. He has worked with BW since Release 1.2, in which he obtained SAP certification in 2000. During this time he has led a number of technical teams. He has acted as project manager for large SAP BW projects and as technical lead on SAP implementation projects. Robert has experience in most aspects of SAP BW architecture, design, and development, including authorizations.
You may contact the author at editor@BWExpertOnline.com.
If you have comments about this article or publication, or would like to submit an article idea, please contact the editor.