Financials
Learn how to implement assets under construction (AUC) with the Investment Management module using work breakdown structure (WBS). Follow a detailed discussion of the settlement process.
Key Concept
A work breakdown structure (WBS) element with its assets under construction (AUCs) can be termed as an investment measure. In simple terms, an AUC is created to accumulate all the costs that belong to an asset during the construction phase. The cost is accumulated to a WBS and can then be transferred to an AUC. An AUC does not have any depreciation as these are considered partial assets and therefore are not capitalized. After the desired cost or value is transferred from the WBS to AUC, the value residing in the AUC can be transferred to a fixed asset that can then be capitalized.
The Investment Management module is closely linked to the FI/CO and Project System modules. Investment Management provides management of large-scale capital investments. It also provides simultaneous cost accounting and asset accounting sides of a capital investment. The investments are managed in the form of overhead cost (work breakdown structure [WBS]) and links to an asset under construction (AUC). These WBS elements are the primary controlling objects that can be settled on a periodic basis to AUCs.
Managing large-scale capital investment projects such as construction of a huge project that involves many phases can be handled using AUCs. For instance, consider a company that needs to create unique identification cards for the residents of a country. For this project, there would be many phases such as creation of IDs for one state first and then subsequent states of that country. AUC with investment measure is able to handle the accounting perspective right from the beginning until all the residents of that country obtain the ID cards.
Here are two major advantages of using investment measure and settling to an AUC:
- For reporting and analysis purposes you can capture the nature and type of original expenditure that went into creating the assets (for example, materials), whereas if you don't use the investment measure, the posting then happens directly to the balance sheet.
- You are provided with a clear picture of plan versus actual expenditure.
Create an Investment Measure Asset Class
Creating an investment measure asset class means that assets for this class cannot be created manually or directly using AS01, ABZON, or any other transaction code. Assets for this class can be created automatically only with a WBS of type AUC.
To create an investment measure asset class, execute transaction code OAOA or follow menu path SPRO > Financial Accounting > Asset Accounting > Organization Structures > Asset Classes > Define Asset Class. In the screen that appears (Figure 1), enter a number in the Asset Class field for the asset class that needs to be created and a description for it. Select an Account determination, enter a code for the screen layout in the Scr.layout rule field, and populate the Number range field. In the status of the AUC section select the Investment Measure radio button and click the save icon (not shown) to save the data.

Figure 1
Asset class configuration
Note
In account determination only balance sheet accounts are defined for this class, but no depreciation accounts are because depreciation is not charged to the AUC.
In the next screen (Figure 2) you need to set a depreciation key for your asset class. AUCs do not depreciate, and to make this happen, you need to have a depreciation key that charges zero depreciation and assigns this key to the various depreciation areas in the asset class as shown in Figure 2. Also, the layout, which defines which fields are mandatory and which are optional for this asset class, should be different from the layout for a normal asset class. SAP has a predefined layout for AUC classes.
This layout allows the cost to be collected and posted to a General Ledger (G/L) account, recognized as capital expenditures. The costs can be capitalized at the desired time.

Figure 2
Set the depreciation key
Create an Investment Profile
Creating an investment profile is another major step. This component controls the creation of AUC for investment measure. The investment measure asset class that you create is assigned to this investment profile. To create an investment profile, use transaction code OITA or follow menu path SPRO > Investment Management > Projects as Investment Measures > Master Data > Define Investment Profile.
In the screen that appears (Figure 3), click the New Entries button (not shown) and enter the Investment Profile that needs to be created, plus a description for it. Assign the Asset class created in Figure 1 and select the Manage AUC check box in the Investment Measure tab (this enables the system to create an AUC for each WBS automatically upon release of the WBS). Also, select the Line item settlement and list of origins check box so that the system can carry the settlement for WBS (Investment Measure) by line item. Click the save icon.
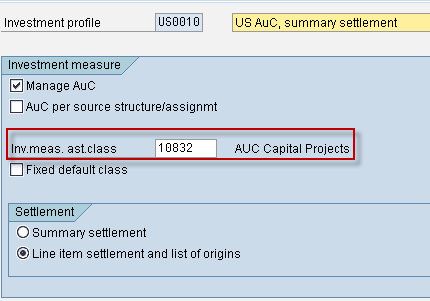
Figure 3
Investment profile setting
Maintain Allocation Structure
The Allocation structure decides which settlement cost element is the receiver when the cost is settled to an AUC — in other words, to which cost element and the corresponding G/L account the cost from the AUC WBS is transferred. Source and settlement cost element are the two major components in the allocation structure that are defined to handle this process.
Source and Settlement Cost Element
A source can be a range of cost elements or a cost element group. To define a source and settlement cost element group, execute transaction code OKO6 or follow menu path SPRO > Project System > Costs > Automatic and Periodic Allocation > Settlement > Settlement Profile > Create Allocation Structure (Figure 4).
To create a new allocation structure, click the New Entries button and enter a value for the Allocation structure and a description for it. Double-click the Assignments folder in the left menu, define an assignment, and provide a description for it. Click the save icon.
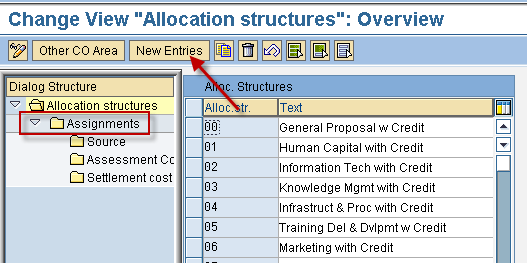
Figure 4
Create Allocation structures
Select Assignments and double-click the Source folder as shown in Figure 5. Enter a range or cost element group and click the save icon.

Figure 5
Define a source
Define a settlement cost element for the cost element group that you just defined (Figure 5). If the sender of the cost (cost element) lies in the cost element group defined in the preceding step, then the receiver of that cost is settlement cost element 79330000 as defined in Figure 6.
Select Assignments and double-click the Settlement cost elements folder as shown in Figure 6. Enter a number for a cost element and click the save icon. The settlement cost element is created as a profit-and-loss (P&L) account and a corresponding cost element is created with the cost element category of 22 (external settlement).

Figure 6
Settlement cost element
Maintain Source Structure
A source can have several source assignments, such as capital or expenses, and each one can have a range of cost elements or a cost center group that is settled using the distribution rules. For example, if there is more than one type of cost, then you need to have a source structure defined.
Note
If you need to generate more than one AUC for a WBS, execute transaction code OITA to return to the screen shown in Figure 3. Select the indicator AUC per source structure/assignmt.
To create a source, use transaction code OKEU or follow menu path SPRO > Investment Management > Projects as Investment Measures > Settlement > Maintain Source Structure. In the screen that appears (Figure 7) enter the source structure name and a description for it. Click the save icon.

Figure 7
Source structure
Select the source structure created in Figure 7, double-click the Assignments folder in the left menu, and click the New Entries button. Create assignments such as capital and expenses by entering an assignment number in the rows in the Assignments column and a description for it in the rows in the Text column (Figure 8). Click the save icon.
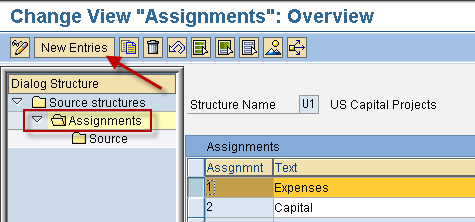
Figure 8
Create assignments
Now select any assignment created in the previous step (Figure 8) by clicking it (capital or expenses). Double-click the Source folder in the left menu (Figure 9). Assign a cost element range or a cost element group and click the save icon.

Figure 9
Cost element group defined for an assignment
Maintain a Settlement Profile and Assign the Allocation Structure
A settlement profile is mainly used to define distribution rules that can be used to determine the receiver asset (a fixed asset to which final settlement from AUC to fixed asset takes place) and the amount or percentage to be settled to that receiver. To maintain a settlement profile, use transaction code OKO7 or follow menu path SPRO > Project System > Costs > Automatic and Periodic Allocation > Settlement > Settlement Profile > Create Settlement Profile.
Click the New Entries button (not shown) and enter a code for a settlement profile and its description. Assign the Allocation Structure and Source Structure defined in Figures 5 and 7, respectively. You also need to enter the Default object type as FXA for asset. You can define other fields such as document type and valid receivers. In my example, I entered AA (asset) in the Document type field and selected settlement optional for the Cost center (Figure 10). To save your data, click the save icon.

Figure 10
Settlement profile configuration
Maintain a Project Profile and Assign an Investment Profile and a Settlement Profile
In this step, you link the WBS and the investment measure class. To assign the investment profile that you created earlier (Figure 3) to the project profile, execute transaction code OPSA or follow menu path SPRO > Project System > Structures > Templates > Standard Work Breakdown Structure > Settings for Standard and Operatable WBSs > Create Project Profile.
The investment measure assets class that is assigned to the investment profile links to the WBS with this assignment (Figure 11). Click the New Entries button and enter a name for the project profile in the Proj.Prof field and a description for it. In the Control tab enter the values for the optional fields, such as Field key, WBS elements in the Validation section, and WBS elements in the Substitution section.

Figure 11
Settings in the Control tab of project profile configuration
Now click the Controlling tab (Figure 12) and enter PROFT in the Object Class field for profit analysis, enter a value in the Planning profile and Budget Profile fields. Most importantly, in the Investment profile field, enter the name of the investment profile that you created in Figure 3 and in the Settlement profile field, enter the name of the settlement profile that you created in Figure 10. Click the save icon.
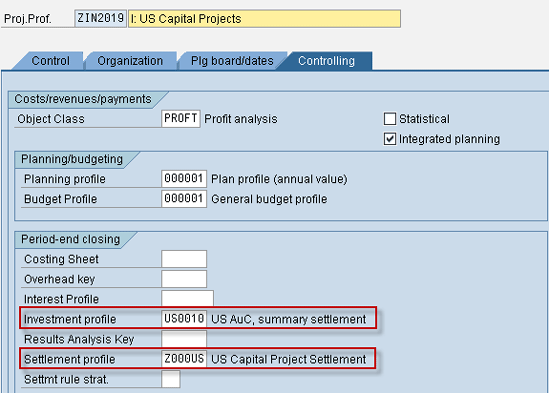
Figure 12
Settings in the Controlling tab of project profile configuration
Create Projects and WBS Elements of Type AUC with the Project Profile
Create a Project using the transaction code CJ20n or following the path SAP Easy Access > Accounting > Project System > Project > Project Builder. The WBS is created with the project profile created in Figure 11. When checked in the WBS master table PRPS, the investment profile is updated as the one created and the type of the WBS is AC (Asset under Construction. Type AC can be seen in the PRPS table). When this WBS is released (i.e., the status of the WBS changes to REL) automatically, an AUC is created linked to this WBS. This linkage can be seen in the asset master of this AUC in the Origin Tab of Asset display in transaction code AS03. You can see the AUC WBS that was released is defined in the Asset Master of the Asset under Construction.
After you execute transaction code CJ20N, the screen shown in Figure 13 appears. Create a new project by inputting a project definition number in the Project Def. field and entering a description for it. In the Organization section enter details such as Controlling area (CO area), Company code, and Profit Center. Click the Control Tab (Figure 14) and assign the Project Profile that you created in Figure 11. Click the save icon.
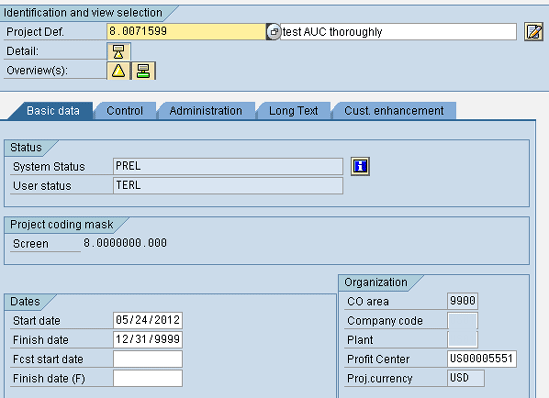
Figure 13
Create a project
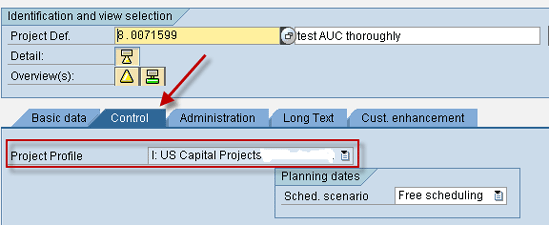
Figure 14
Assign a project profile
WBS can be created with the transaction code CJ20n or by following menu path SAP Easy Access > Accounting > Project System > Project > Project Builder. Right-click the project created in Figure 12 and go to Create WBS element (Figure 15). Enter a WBS element and a description for it. In the Basic Data tab select Asset under Construction as the project type and click the save icon.
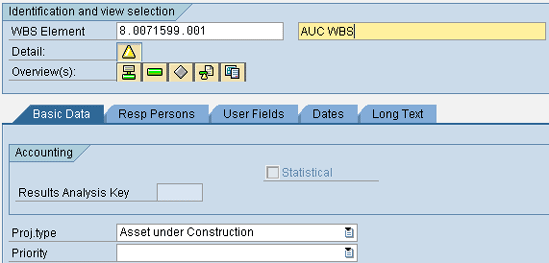
Figure 15
Create a WBS
To release the WBS, execute transaction code CJ02 or follow menu path SAP Easy Access > Accounting > Project System > Project > Special Maintenance Functions > Work Breakdown Structure > Change. Open the WBS in CJ02 and select Edit > Status > Release from the menu (Figure 16).
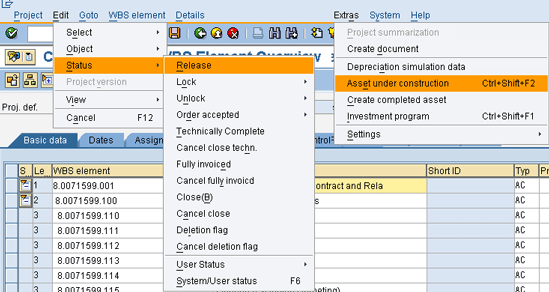
Figure 16
Release the WBS
As soon as the WBS is released an AUC is created and assigned to the WBS. Now open the WBS in CJ02 or CJ03 again. Select the record and select Extras > Asset under Construction from the menu. This action takes you to a screen that displays the WBS element and the AUC corresponding to it (Figure 17).

Figure 17
Asset created after releasing the AUC WBS
Booking Cost to the AUC WBS
Posting to the AUC WBS is done (i.e., various costs are booked to this CO object). The documents have one or more line items with this WBS of type AUC. To book costs to the AUC WBS, execute transaction code F-02 or follow menu path SAP Easy Access > Accounting > Financial Accounting > General Ledger > Posting > General Posting.
In the screen that appears (Figure 18) enter a G/L document that has the AUC WBS that you created in Figure 15 in at least one of the line items. After entering the values, click the save icon. The document is now posted.

Figure 18
Post documents to the AUC WBS
Settlement Process
The settlement process involves transfer of cost from one object to another; in other words, settlement shifts the cost sitting in a cost object that is termed as Sender to an AUC or fixed asset in my example, which is termed as a Receiver. I have explained the Automatic and Full Settlement of the Cost object (WBS in our case). In automatic settlement the cost from the Sender: WBS is transferred to the Receiver: AUC and in case of Full settlement, the value from Sender: AUC is transferred to the Receiver: Fixed Asset.
Maintain the Settlement Rule
The settlement rule is created for the WBS. The WBS includes fields such as:
- Category: Would be FXA (Fixed Asset)
- Fixed asset number
- Percentage of the value to be transferred to the fixed asset
The final settlement of WBS (i.e., settlement of AUC to a fixed asset) is done by using a distribution rule. To maintain a distribution rule use transaction code CJ02 or follow menu path SAP Easy Access > Accounting > Project System > Project > Special Maintenance Functions > Work Breakdown Structure > Change.
Open the WBS in CJ02 and select the Settlement Rule button in the bottom of the screen (Figure 19). In the next screen (Figure 20) you need to enter the settlement receiver (the fixed asset) to which you need to finally settle the costs from AUC. Enter the category as FXA (fixed asset). Under Settlement Receiver, enter the number for the fixed asset, and in the % (percentage of costs) column, you need to enter a percentage for the settlement type (in most cases it is 100 percent). The percentage of costs depends on your requirement for how much cost percentage you want to transfer to the fixed asset. Click the back icon and then click the save icon.
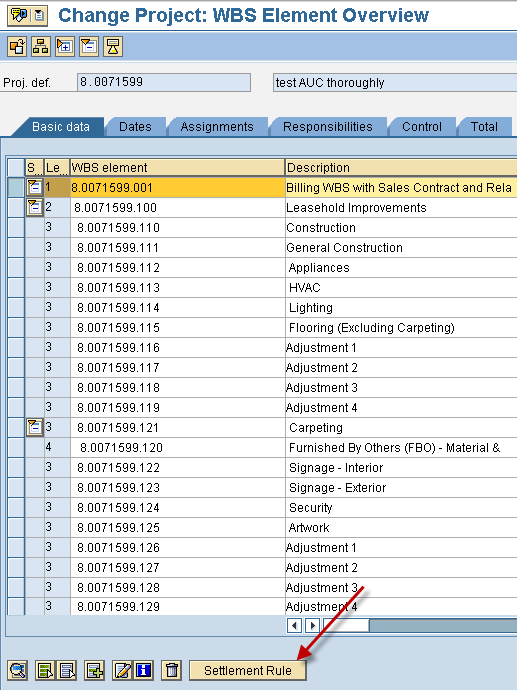
Figure 19
Select a settlement rule
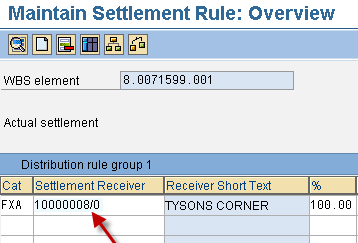
Figure 20
Enter a settlement receiver
The fixed asset that was entered as a receiver in Figure 20 can be seen in the asset master display by using transaction code AS03 or following menu path SAP Easy Access > Accounting > Financial Accounting > Fixed Assets > Asset > Display > Asset (Figure 21). Enter the asset number and the company Code and press Enter. The fixed asset defined in the distribution rule is displayed in the next screen (Figure 22).
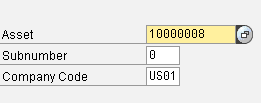
Figure 21
Fixed asset display
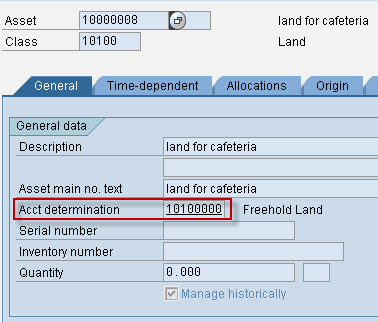
Figure 22
Fixed asset defined in the distribution rule
Automatic Settlement
The automatic settlement ensures that the value or cost sitting in the WBS is transferred to the AUC and actual posting of the documents takes place. Note that after the WBS is closed there won’t be any transfer of cost. To execute automatic settlement use transaction code CJ88 or follow menu path SAP Easy Access > Accounting > Project System > Financials > Period-End Closing > Single Functions > Settlement > Individual Processing (Figure 23).
In the WBS Element field enter the AUC WBS for which you need to do the settlement. You also need to enter a value in the Settlement period and Fiscal Year fields. Select Automatic from the list of options in the Processing type field and then execute by pressing F8.
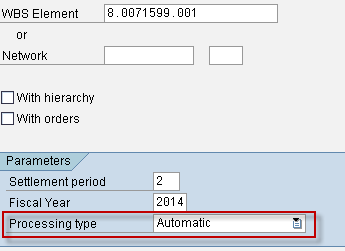
Figure 23
The screen for automatic settlement
After executing the automatic settlement, the output is displayed in the screen shown in Figure 24. In this screen you can see that the sender is the WBS element, and the receiver for automatic settlement is the asset under construction. Accounting documents or objects are created when the WBS is automatically settled. Note that the receiver is the settlement cost element defined in Figure 6.
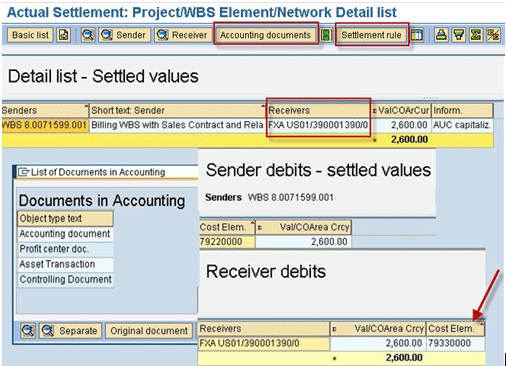
Figure 24
The output screen of the settlement
Click the Settlement Rule button shown in Figure 24 to view the Distribution Rules (Figure 25).
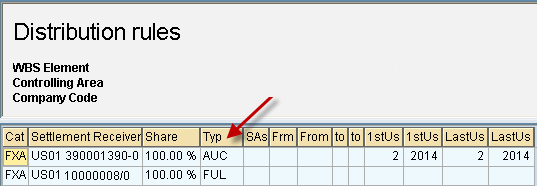
Figure 25
Distribution rules applied
Now click the Accounting documents button (Figure 24) to open a set of four documents as shown in Figure 24. Double-click the first one (Accounting document).
The first document (Figure 26) is an FI document that depicts how the cost is transferred from WBS to an AUC.
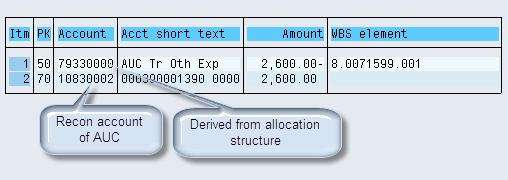
Figure 26
FI posting document after settlement
One of the line items is a debit to the reconciliation (Sub-ledger account) account of the AUC mentioned in the account determination of AUC asset class in Figure 1. The other line item is a credit from the account that is derived based on the allocation structure of settlement cost elements for WBS with Investment Measure (Figure 6). In the allocation structure different settlement cost elements are defined for a group or range of cost elements.
Let me cite an example to clarify this point. The G/L account mentioned in the line item having AUC WBS when the initial postings are done (Figure 18) on the WBS has a corresponding cost element. This cost element has a corresponding settlement cost element that is defined in the allocation structure (Figures 4 and 6). Therefore, this settlement cost element is picked and the G/L account corresponding to this settlement cost element forms the account from which the credit takes place. The document now has one debit line item to reconcile (Sub-ledger account) to the account of AUC, and the other is a credit line item from the GL account corresponding to the settlement cost element derived based on the allocation structure.
Double-click Profit center doc. from the Documents in Accounting list (Figure 24). This document (Figure 27) is a profit center document that updates the ledger balance corresponding to the profit center for the AUC type WBS. The profit center corresponding to the AUC type WBS can be seen from WBS master table PRPS.

Figure 27
A Profit Center document
Double-click Asset Transaction from the Documents in Accounting list (Figure 24). This document (Figure 28) shows the asset transaction having the transaction type used by which the AUC’s value is updated. In my example transaction type 116 (internal settlement to AUC) is used. This means that value from the WBS is transferred to the AUC.

Figure 28
An Asset Transaction document
Double-click Controlling Document from the Documents in Accounting list (Figure 24). This controlling document (Figure 29) demonstrates the primary cost posting for the controlling object, which is AUC type WBS in this case.

Figure 29
Controlling document
Full Settlement
After the AUC has the desired value or is completed, you can transfer the value or cost to a fixed asset with what is called full settlement. After this is executed, the value or cost sitting in AUC is transferred to the fixed asset based on the settlement rule that you already created (Figure 20) using transaction code CJIC/CJ02. Full settlement can be done using the transaction code CJ88 or following menu path SAP Easy Access > Accounting > Project System > Financials > Period-End Closing > Single Functions > Settlement > Individual Processing (Figure 30).
In the WBS Element field enter the AUC WBS for which you need to do the Final settlement. You also need to enter a value in the Settlement period field and Fiscal Year field. Select FULL Settlement from the list of options in Processing and then execute (press F8).
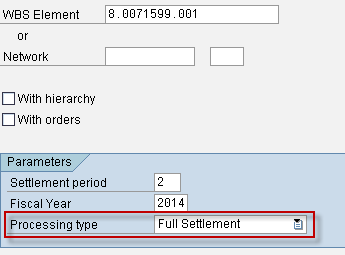
Figure 30
The screen for full settlement
After you execute the FULL Settlement, the screen shown in Figure 31 appears. This screen has the sender as the WBS element and the receiver for full settlement as the fixed asset defined in the settlement rule in Figure 20. Accounting documents or objects are created in FULL Settlement.
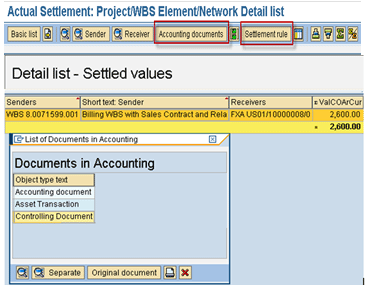
Figure 31
The output screen after full settlement
Click the Settlement Rule button shown in Figure 31 to get the distribution rules (Figure 32).
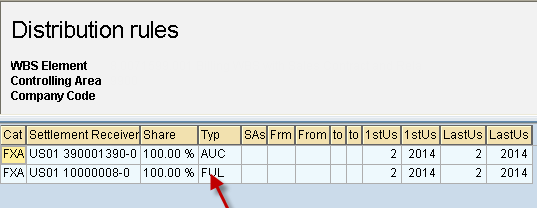
Figure 32
Distribution rules applied
Click the Accounting documents button to open a set of three documents as shown in Figure 31. Double-click the first one (Accounting document). This document (Figure 33) is an FI document that shows how the value is transferred from an AUC to a fixed asset.
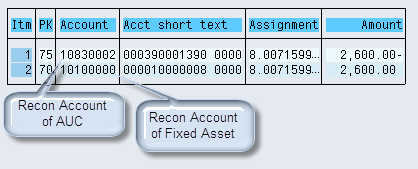
Figure 33
FI posting for full settlement
One of the line items is a debit to the reconciliation account of the fixed asset mentioned in the account determination of the fixed asset (Figure 22). The other line item is a credit from the reconciliation account of the AUC mentioned in the account determination of the AUC asset class.
Double-click Asset Transaction from the Documents in Accounting list (Figure 31). This document or object shows two asset transactions that have the transaction type used by which the AUC’s value is transferred to a fixed asset (Figures 34 and 35). In my example I use transaction type 336 (the amount is credited from the AUC) and 339 (the amount is debited to the fixed asset).

Figure 34
Amount credited from AUC

Figure 35
Amount debited to fixed asset
Double-click Controlling Document from the Documents in Accounting list (Figure 31). This document (Figure 36) is a controlling document that demonstrates the primary cost posting for the controlling object. Go to the Time dependent tab of the Asset using transaction code AS03 or following menu path SAP Easy Access > Accounting > Financial Accounting > Fixed Assets > Asset > Display > Asset. Enter the asset number and company code and click the Time-dependent tab. Check the Cost Center that is in the Controlling document in Figure 36.

Figure 36
The Controlling document
The controlling document is the default cost center in the asset master of the fixed asset as shown in Figure 37.
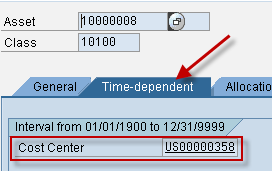
Figure 37
Default cost center of fixed asset
Reporting
In this section, I discuss some of the important reports in Assets, Project System, and Controlling. The asset reports show how the cost is transferred from WBS to AUC and then from AUC to fixed asset; the Project System report shows the transfer of cost from one cost element to another, and finally the controlling reports show Profit Center line items corresponding to the AUC WBS.
Asset Transaction Report
This report shows how the amount or value is transferred from one object to another. As seen in Figure 38 for AUC 390001390, two transactions are posted. The first one is the transfer of cost from WBS to AUC. The second one is the transfer of value from WBS to fixed asset. To access this report, execute transaction code S_ALR_87012048 or follow menu path SAP Easy Access > Accounting > Financial Accounting > Fixed Assets > Information System > Reports on Asset Accounting > Day-to-Day Activities > International > Asset Transactions.
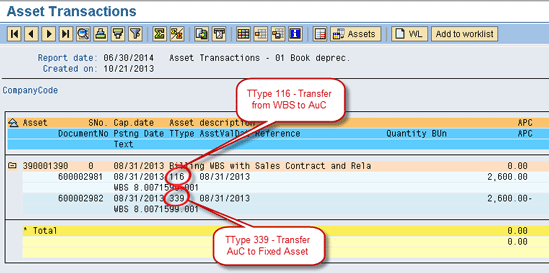
Figure 38
Asset transaction report for AUC
Figure 39 is the report for fixed asset 10000008 that shows the transfer of value from AUC to this fixed asset for the purpose of capitalization. To access this report, execute transaction code S_ALR_87012048 or follow menu path SAP Easy Access > Accounting > Financial Accounting > Fixed Assets > Information System > Reports on Asset Accounting > Day-to-Day Activities > International > Asset Transactions. Enter values in the Company Code, Asset Transactions, and Report date fields and execute (press F8).
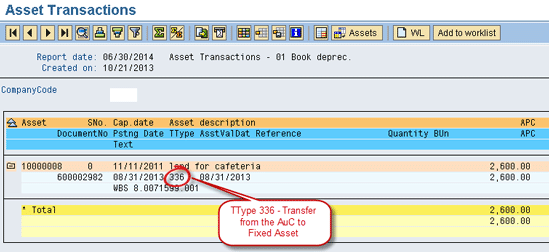
Figure 39
Asset transaction report for fixed asset
Actual/Commitment/Total/Plan in CO Area Currency
The selection screen to fetch the amounts based on AUC WBS is shown in Figure 40. To access this report, execute transaction code S_ALR_87013542 or follow menu path SAP Easy Access > Accounting > Project System > Information System > Financials > Costs > Plan-Based > By Cost Element > Actual/Commitment/Total/Plan in CO Area Currency. Enter the AUC WBS, controlling area, fiscal year, and period as shown in Figure 40 and then execute by pressing F8.
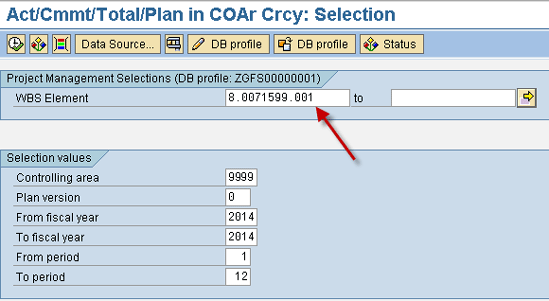
Figure 40
Actual/commitment/total/plan in CO area currency report
The output of the report shows the two cost elements that were posted during the process (Figure 41):
- One is the cost element that was posted during the initial posting on WBS shown in Figure 18.
- The other is the settlement cost element that was posted during the automatic settlement (Figure 26) based on the allocation structure defined in Figure 6.
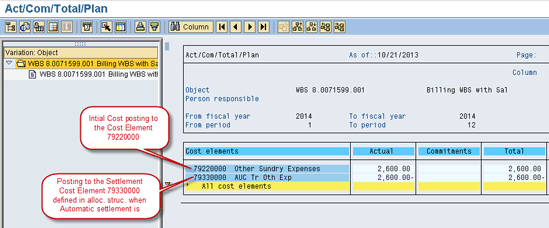
Figure 41
Output of total/plan in CO area currency report
Profit Center Actual Line Items Report
The report shown in Figure 42 shows the Profit center postings. The AUC WBS you have used belongs to the profit center US00005551 as shown in Figure 42. This report shows various transactions on this profit center based on the cost element. To access this report execute transaction code KE5Z or follow menu path SAP Easy Access > Accounting > Controlling > Profit Center Accounting > Information System > Reports for Profit Center Accounting > Line Item Reports > Profit Center: Actual Line Items.
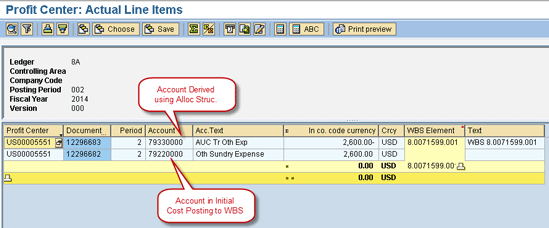
Figure 42
Profit Center actual line items
Figure 43 is the flow chart for the end-to-end process.
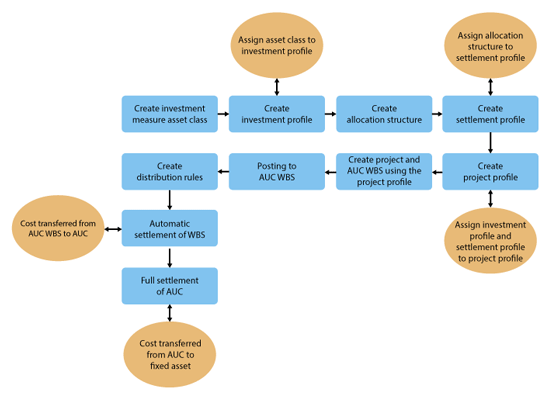
Figure 43
Investment measure class creation to full settlement of WBS
Darrick Arora
Darrick Arora is a consultant, SAP FI/CO, at Infosys Ltd. He has more than seven years of experience in SAP FI/CO and SAP Treasury and Risk Management. He also has worked in number of implementation and roll out projects for US as well as UK territories. He holds an MBA in finance as well as a bachelor’s degree in IT.
If you have comments about this article or publication, or would like to submit an article idea, please contact the editor.


