Delivery consolidation is a widely useful but largely undocumented procedure. Learn an expert-tested method to set up consolidated shipping for your customers.
Key Concept
I have been struggling with consolidated shipments. SAP seems to do a pretty good job defining the delivery process and how it is configured, but the use of shipments to group deliveries to a single location seems like a well-guarded secret. In R/3, the ability to control delivery splits is somewhat limited. Our customers are asking us to help them reduce shipping costs. We currently use order combination, but due to setup on an order-by-order basis, we can't always get the full consolidation to happen at the delivery level.
—Larry Peterson, ERP Track Lead, WI
I have been struggling with consolidated shipments. SAP seems to do a pretty good job defining the delivery process and how it is configured, but the use of shipments to group deliveries to a single location seems like a well-guarded secret. In R/3, the ability to control delivery splits is somewhat limited. Our customers are asking us to help them reduce shipping costs. We currently use order combination, but due to setup on an order-by-order basis, we can't always get the full consolidation to happen at the delivery level.—Larry Peterson, ERP Track Lead, WI
•
Reduction of
transportation
costs
• Reduction of
transportation cycle
time
• Reduction of
manual work
• Increase in
visibility of
shipments for
tracking/auditing
• Support for future
pre-clearance of
shipments
I have implemented
this functionality
for a few clients
and will
describe it so that
you can make use of
it at your company.
Since
this
functionality is not
well documented,
I'll provide the
steps required to
implement it. I will
walk you through
shipping
functions from the
consolidation point
of view and show you
how
to
model them in your
system.
I will
make use of the
Material Management
(MM),
Shipping/Transportation
in
Logistics Execution
(LE), and Sales &
Distribution (SD)
modules. You can use
it with R/3 version
4.0B and later, and
possibly
on
some older versions,
as well as ECC.
As you
probably know, the
shipping and
transportation
function
starts
with the creation of
an outbound
delivery. In the
logistics
execution module,
for example, the
process starts with
a sales
order
or a purchase order.
You pick the items
confirmed in the
delivery from the
physical location
and confirm them in
the system.
They
are then packed for
shipment. Once they
leave the door,
a
post-goods issue
confirms that they
are debited from
your inventory
from
the accounting point
of view.
As a
simple example, you
could consolidate
different customer
shipments to be
delivered to the
same end-destination
collection
point,
pack them as one
shipment, and, upon
reaching the
destination,
remove
the individual
shipments and have
them delivered to
the
customer.
The
flow chart in
Figure
1 includes
collective
processing of
documents due for
delivery with
warehouse
management, delivery
due
list, collective
processing with
transportation
planning,
collective picking,
manual or automatic
packing, and
post-goods
issue.
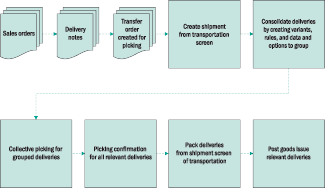
Figure 1
Consolidated shipment flow with WM
For
Figure 1, I used an
example of multiple
sales orders, for
which
multiple delivery
notes are created.
If you have R/3
Warehouse
Management (WM), the
next step would be
to create a transfer
order, which is
equivalent to a
request for picking.
Use
any of delivery
create transactions
(VL01,
VL04,
or
VL06)
for
delivery note
creation from sales
orders (or purchase
orders).
Based
on these deliveries,
use transaction
LT03 to
create the
transport order.
Collective Shipment
Processing
The
consolidation starts
with the shipment
creation. Collective
processing is
located in the
Shipment
create
option. The menu
path
is Logistics
Execution>Outbound
Process>Goods Issue
for Outbound
Delivery>Shipment>Create>Collective
Processing
(or use
transaction
VT04).
Figure
2 displays
the Create
shipments
in
collective
proc.
screen.
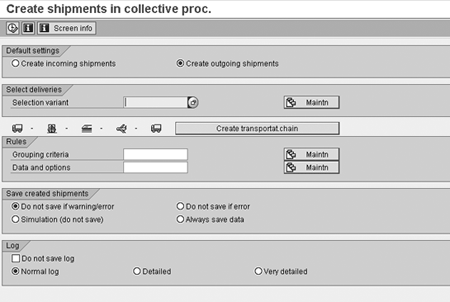
Figure 2
Enter details for collective shipment processing
The
collective
processing of
shipments can be for
inbound receipts
or
outbound deliveries.
In the flow chart in
Figure 1, outbound
deliveries are
created out of sales
orders.
In the
section
Select
deliveries
in Figure 2,
you
must maintain a
variant. Give the
variant a name (for
example,
TEST123) and
click on the
Maintn
button. The
selection
criteria for the
variant maintenance
appear
(Figure
3).
Pick
the selection that
best suits your
business needs, such
as Shipping
Point/Receiving Pt,
Ship-to
party, and
Route
Schedule.
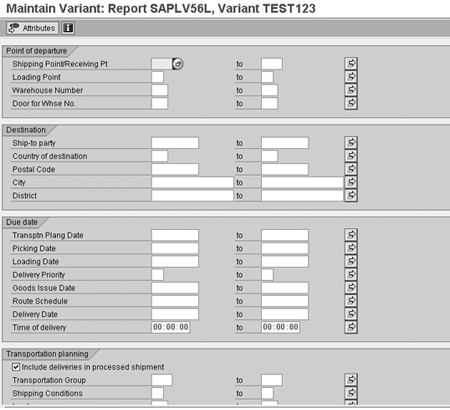
Figure 3
Maintain Variant selection for collective shipment
Referring back to
the Figure 2, under
the
Rules
section, you have
first the
Grouping
criteria
and then
the Data
and
options
fields.
For
Grouping
criteria,
specify which
criteria have to be
identical
in
the deliveries to be
considered for
collective shipment
(or
consolidation). For
example, you can
combine shipment
based on
common values for
shipping point,
ship-to, route, and
weight
of
the goods.
Figure
4 shows the
comprehensive
Grouping
criteria
selection.
You
can maintain a
grouping criterion
as a selection
variant
for
future collective
processing use.
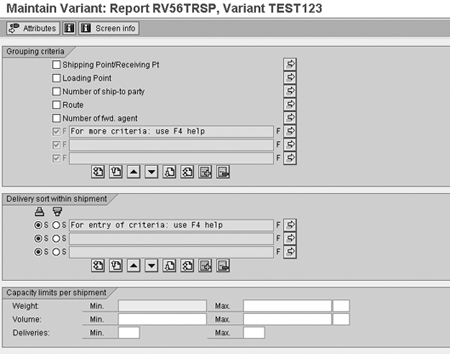
Figure 4
Grouping criteria for collective shipment
You
can specify the data
to be included in
the collective
shipment
document
(Figure
5). The
transportation
planning point
(TransportPlanPt)
and
Shipment
type are
mandatory. The rest
of the fields are
generally
maintained so that
they are available
in the general
header data
of
the collective
shipment document.
For example, you can
specify
a
Service
agent, pick
a Shipment
route, and
execute leg
determination
here.
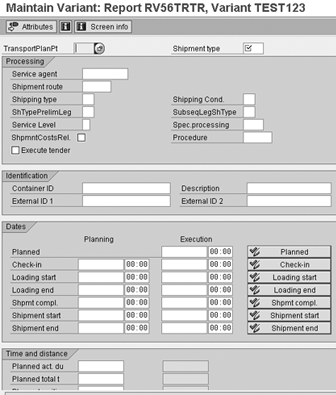
Figure 5
Data and options selection variant for collective shipment processing
Collective Picking
Grouped deliveries
then undergo
collective picking.
The items
from
several deliveries
are combined into
one picking list.
Several
individual items are
assigned to a single
collective item.
With
collective picking,
the picker avoids
multiple visits to
the
storage bin. Picking
for several
deliveries is
carried out
according
to
storage location and
material.
For
collective picking,
group deliveries
using the following
configuration
setup:
Step 1.
Initiate the current
number range
for
the warehouse
number.
Use the
IMG transaction
LN06.
Step 2.
Define groups, such
as collective
picking or packing
and shipping
units. Use
IMG
transaction
VOGL
(Figure
6).
Figure 6
Use VOGL to define groups for collective picking, packing, and shipping
Step 3.
Assign the loading
point to the
shipping
point. Use
transaction
OVX7
(Figure
7).
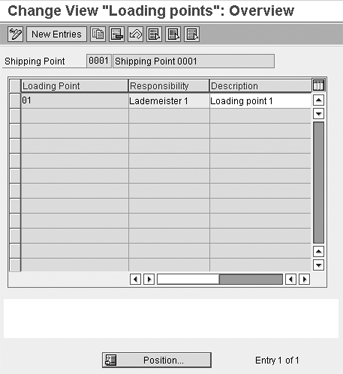
Figure 7
Use OVX7 to assign loading point to shipping point
Step 4.
Define the number
range for the
picking
request.
Use
transaction
SDPI.
Packing
Packing is the next
step for delivery
and shipment
processing.
Packing generally
includes placing
delivery or shipment
items
into
boxes and stacking
the boxes onto
pallets for delivery
to
the
customer. Packing
requires the
following
prerequisites for
master
data and
configuration steps:
Step 1.
Create the packing
material.
Use transaction
MM01 for
creating packing
material and select
the Basic
Data view.
The
material type for
packing materials is
VERP.
Record packing
material
values
— Gross
Weight, Net Weight,
Volume, and
Size/dimensions
— in the
material master
basic data view
(Figure
8).
In
the
Packaging
material
data
section, maintain
Matl
Grp
Pack.Matls
in
the configuration
and update values.
I'll explain the
configuration for
these values in step
2.
Figure 8
Updating values used to create packing materials
Select
the Sales:
General/Plant
tab by either
moving
to the next list of
tabs and selecting
it, using the right
arrow,
or select from the
list of views by
clicking the far
right
icon
 .
In the
Sales:
General/Plant
screen
(Figure
9), the
material group for
packaging material
(Matl
Grp
Pack.Matls)
is
prepopulated, so you
must update the
Packaging
mat.
type, Allowed pkg
weight, and
Allowed
pkg
volume.
.
In the
Sales:
General/Plant
screen
(Figure
9), the
material group for
packaging material
(Matl
Grp
Pack.Matls)
is
prepopulated, so you
must update the
Packaging
mat.
type, Allowed pkg
weight, and
Allowed
pkg
volume.

Figure 9
Update prepopulated packing attributes in the Sales: General/Plant view
Step 2.
Update the material
groups for packing
and
shipping
materials.
Maintain a material
group for packing
materials via
transaction
OMSF (Figure
10).
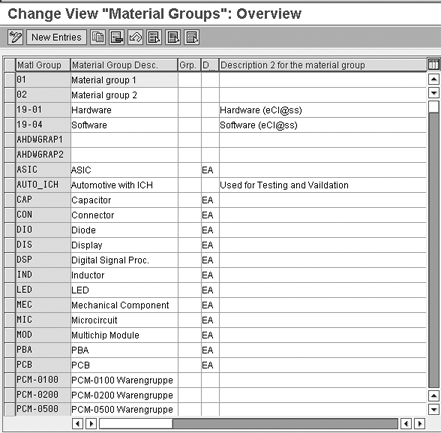
Figure 10
Use OMSF to choose a material group for packing material
Define
the
Packaging
Material
Types for
the packing
boxes
via transaction
VHAR (Figure
11).
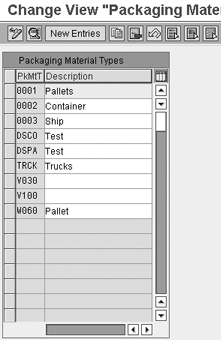
Figure 11
VHAR shows the packing material type configuration element
Maintain the
packaging type
material group via
transaction
VEGR
or
menu
path
Logistic
Execution>Shipping>
Packing>Define
Material Group for
Packing
Materials
(Figure
12).
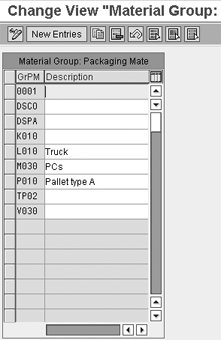
Figure 12
VEGR is used to maintain material group for packing materials
Step 3.
Packaging.
Having created the
packing material and
associated
configuration,
what's left is the
configuration for
packing
processes itself.
A
shipping unit is a
combination of
materials that is
packed
together in shipping
material. A shipping
unit in a delivery
is
made up of a
shipping unit header
and shipping unit
items.
Note
You must also create a parameter for the packing material for the sales organization, division, and distribution channel. When you select the Sales: General/Plant view in Figure 9, you see a pop-up window asking you to populate the plant, sales organization, and distribution channel fields. You can also see the organization level by clicking on the Organizational levels button.
You
need an internal
number for the
system to assign to
each
shipping unit when
goods are placed in
boxes. The number
range
for
packing is
maintained through
the transaction
VNKP.
The packing
number
is automatically
assigned.
With
the above steps, you
are now able to
consolidate the
deliveries
into
one shipment,
perform picking, and
pack them into
boxes.
You
may follow the
remainder of the
shipping process as
usual.
Rajen Iyer
Rajen Iyer is the cofounder and CTO at Krypt, Inc. Rajen has written several in-depth, best practice articles, white papers, patents, and best-selling books on SAP Logistics and SAP Global Trade Services, including Effective SAP SD and Implementing SAP BusinessObjects Global Trade Services. He is also an invited speaker at industry conferences.
You may contact the author at Rajen@kryptinc.com.
If you have comments about this article or publication, or would like to submit an article idea, please contact the editor.