You can improve your SAP and Ad Hoc queries by adding custom infotypes with these step-by-step instructions.
Key Concept
Dear HR Expert,
How do you add custom infotype fields or even standard SAP infotypes such as date specifications to the Ad Hoc Query?
— Lynn White, Senior Business Analyst, HR
Thanks for the question. You use the same process to add both custom and standard infotypes to the SAP Query and the Ad Hoc Query. Before I explain that process, I’m going to give you some background on reporting in R/3.
The most common data source that is used for HR and Payroll query-based reporting in R/3 is an InfoSet. InfoSets were known as functional areas in versions earlier than 4.6. The InfoSet is made up of a logical database containing all the infotypes that you would like to report on. Three logical databases are available within R/3 for HR and Payroll:
- PaP — HR Recruitment applicant master data
- PnP — HR Personnel Administration (PA) master data
- PcH — HR Personnel Development (PD) organizational data
The most common query reporting uses the PnP logical database because it includes the most frequently used PA infotypes such as 0000 (actions), 0001 (organizational data), 0002 (personal data), 0007 (work schedule), 0008 (basic pay), etc.
Adding Standard Infotypes
To add basic infotypes to an existing InfoSet for use with a query-based reporting tool, go to transaction code SQ02 (InfoSet initial screen). Select your existing data source that you use for your queries and click on the Change button. Follow the menu path Edit>Change infotype selection.
A box appears that lists all the infotypes available within the logical database from which you can select new ones to include. For example, your question mentions infotype 0041 (date specifications). You can add this by selecting it in the dialog box, as shown in Figure 1.
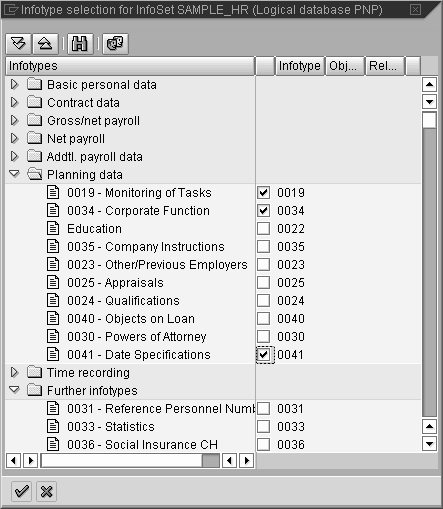
Figure 1
Select 0041 - Date Specifications
After placing a check mark next to the infotype that you wish to include, select the enter (green check mark) icon to proceed. When you return to the main screen, that infotype is listed at the bottom of the left side of the screen under Data fields.
It also is listed at the bottom of the Field Group/data fields section on the right side of the screen. By default, only some of the fields on the infotype are included and are made available for reporting. To see which ones are included, look at the Field Group/data fields part of the screen in Figure 2. In this case only two fields were added, Date type and Date for date type.
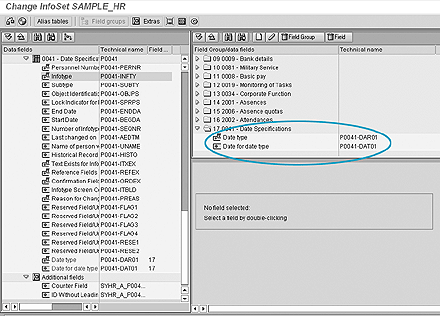
Figure 2
Fields included by default
To make additional fields available from this infotype (or any infotype included in your InfoSet), go to the window to the right of Date type and Date for date type, and position your cursor on the Field Group (infotype) to which you want to add fields. For this example, I’ll select infotype 0041 (date specifications) with my cursor. It appears highlighted.
Return to the left side of the window in the Field Group/data fields part of the screen and view the fields that are available for the selected infotype. When you see a field that you wish to include (and make available for query reporting) right- click on it and select Add field to field group (Figure 3). That field appears on the right side of the screen under the selected infotype and is available for reporting (Figure 4).

Figure 3
Select Add field to field group
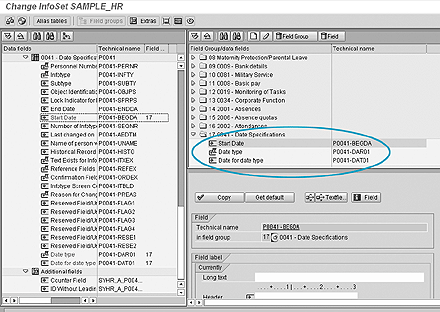
Figure 4
Date Specifications available for reporting
Be sure to add fields only to the appropriate infotype. For example, if a field such as birth date resides on infotype 0002, then you should not add it to infotype 0008.
Adding Custom Infotypes
Now to the other part of your question regarding the addition of custom infotypes to your queries. You can use the same process I described above. All custom infotypes that you create will be available in the Data fields window under the grouping Further infotypes. They will be listed in numerical order. If you build custom infotypes using the standard SAP method, then they will appear at the very bottom of the list of infotypes in that section. (If you create them without using the SAP standard custom infotypes that are designed for this purpose, then they will not.) You add them to your queries following the same procedure I outlined above.
The most important thing to note is that after making any change to an InfoSet, you have to save and generate the InfoSet before exiting. The save icon is on the application toolbar. The generate icon, which looks like a red and white beach ball, is used to check the consistency of the InfoSet. After saving and generating the infotype, you can now use these additional infotypes and fields in your new and existing SAP Queries and Ad Hoc Queries that use this InfoSet as the data source.

Danielle Larocca
Danielle Larocca is currently the Senior Vice President of Human Capital Management for EPI-USE Labs. Previously she was the Executive Vice President of Operations/Chief Knowledge Officer at a technology start-up. She has more than 20 years of strategic leadership experience in multi-national business, business process re-engineering, and project and people management. Danielle is an expert on SAP Human Resources (HR) and reporting and has authored four best-selling books on SAP. She is a regular speaker at numerous conferences around the world on topics such as HR, technology, change management, and leadership. She is an official SAP Mentor, a global designation assigned to less than 160 professionals worldwide, who serve as influential community participants in the SAP ecosystem. This group is nominated by the community and selected by the SAP Mentors’ Advisory Board to keep SAP relevant. Danielle also serves as an expert advisor for SAP Professional Journal.
You may contact the author at me@daniellelarocca.com.
If you have comments about this article or publication, or would like to submit an article idea, please contact the editor.