Manage Pending Hires is the transaction by which hirable applicants are queued up to be hired as employees within the Employee Central (EC) module. If you are using both Recruiting Management and Employee Central, certain applicant statuses are configured to manage the transfer of candidate data from Recruiting Management to EC. Learn how to configure the integration between Recruiting Management and EC so that you can use Manage Pending Hires.
Key Concept
The SAP SuccessFactors Recruiting Suite is an end-to-end talent-acquisition solution that enables companies to attract and engage top talent. This solution helps you select and hire the best-fit candidates. The Recruiting Suite is commonly referred to as REC. SuccessFactors Recruiting Management is one component of REC. SuccessFactors Employee Central is SAP’s cloud solution for core HR.
SAP SuccessFactors Manage Pending Hires is the transaction by which hirable applicants (also known as ready for hire) from SuccessFactors Recruiting Management are queued up to be hired as employees in the Employee Central (EC) solution. The Manage Pending Hires wizard can be populated only for companies that use both SuccessFactors Recruiting Management and/or Onboarding and Employee Central.
When configured, the cross-module integration aspect of the SAP SuccessFactors Suite provides a fluid workflow for all relevant HR functions. This cross-module integration also connects the employee life cycle across different HR departments and functions. The cross-module integration between Recruiting Management and EC is crucial because at this juncture an applicant or candidate becomes an employee. If configured properly, this integration reduces a lot of manual work.
There are three tabs in the Manage Pending Hires wizard: Recruiting Management, ONB (Onboarding), and Contingent Workers:
- Recruiting Management: This tab is for Recruiting Management-only users. The hirable applicants are shown in the tab relevant to Recruiting Management, if this integration is enabled.
- ONB: If a customer has implemented both Recruiting Management and Onboarding, the hirable applicants are shown in the tab relevant to ONB, if this integration is enabled.
- Contingent Worker: If a user has EC and Fieldglass integration active, the hirable contingent applicants are shown in this tab.
In this article, I focus on the Manage Pending Hires integration between Recruiting Management and EC only.
Prerequisites for Manage Pending Hires
The Manage Pending Hires functionality is available in an SAP SuccessFactors instance if both Recruiting Management and EC are configured. Here are few required settings necessary for this integration to work:
- Recruiting must be enabled and configured
- EC version 2 must be enabled and configured
- A hirable status is configured in Applicant Statuses
- The Manage Pending Hires list is populated based on Offer Approval information. A candidate must go through an approved Offer Approval process prior to being set to Ready to Hire (Hirable).
- Candidates with an approved Offer Approval in the Hirable status appear in the Manage Pending Hires workflow. Designating a status as Hirable creates an intermediate step for review before the candidate moves to a Hired status.
Note
Offer Approval populates the Manage Pending Hires table in Admin Tools.
If an applicant does not receive an offer approval that is approved
before entering the Ready to Hire (Hirable) status, the applicant does
not show up in the Manage Pending Hires list.
Step 1. Required Configuration in Admin Center
To enable the integration between Recruiting Management and EC and to populate the Manage Pending Hires table, complete the following configuration steps in the Admin Center in the instance.
Offer Approval Is Configured
Make sure the Offer Approval is configured at least for one talent status within the Applicant Talent Status pipeline. (Refer to the "Recruiting Implementation Guide" in the SAP Help portal for more information on Offer Approval configuration.)
I have enabled the Offer Approval in applicant status Contingent Offer in my demo system. Once it is enabled, you see a link for offer approval when a candidate record is selected under Contingent Offer status (or any other Applicant Status for which you have enabled Offer Approval). To enable the candidate record, click the Take Action button in
Figure 1. Then click the Offer button and the Offer Approval button.

Figure 1
Offer Approval configured in a Ready to Hire status
Offer Approval may go through an approval process, if it is configured as shown in
Figure 2. (The approval process is a different XML configuration and is not relevant to the scope of this article.)

Figure 2
Approval process for Offer Approval
Applicant Status Configuration
Configure the applicant status. In the Admin Center you need to define an applicant status as Hirable. To do so follow menu path Admin Center > Applicant Status Configuration to go to the screen in
Figure 3.

Figure 3
Applicant status configuration
Expand the Hirable – Ready to Hire status by clicking the Hirable option in
Figure 3. You can confirm that the Hirable status has been selected as shown in
Figure 4.
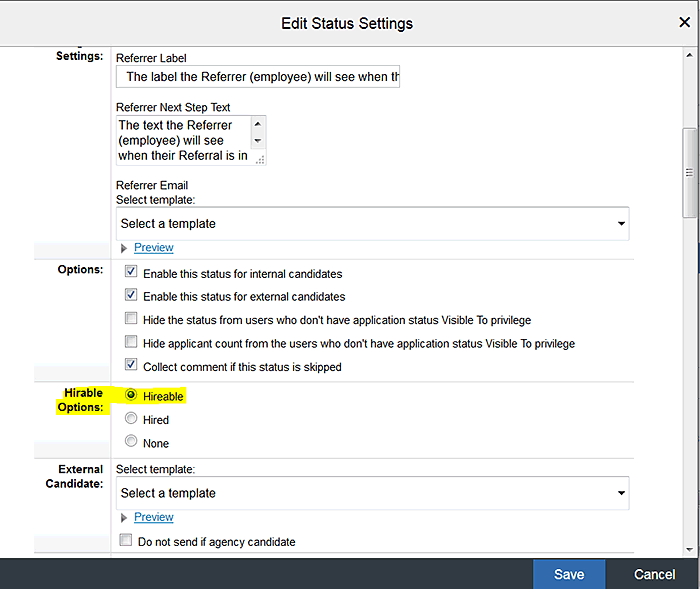
Figure 4
Hirable options configuration
Once these Admin Center settings are complete, the next step is to configure the transformation XML template.
Step 2. Configure the Recruiting Management to EC Transformation XML Template
Field mapping is configured in the Recruiting Management to EC Transformation XML template. Here are the steps:
- Follow menu path Provisioning > Managing Recruiting > Import/Export Candidate to Employee Integration Template to go to Figure 5.

Figure 5
Provisioning step
Following are some key XML configuration steps:
Declare Object-Mappings Element and Entity-Details-Mapping Element
The following elements and attributes must be declared at the top of the RCM-EC Transformation XML Template. The code in Figure 6 confirms that the field source is Recruiting Management, the target is EC, and the integration type is to convert Applicant/Candidate to Employee.
<object-mappings source = "RCM" target = "EC" integration-type = "CandiDateToEmployee"> <entity-details-mapping>
Figure 6
Confirmation of field source, target, and integration type
Declare the Mapping-Attribute Element
Declare one mapping-attribute element for every field that you intend to map from Recruiting to Employee Central (e.g., firstname in RCM is mapped to first-name in EC as shown in Figure 7.
<mapping-attribute>
<source refid="firstName" entity-type="application"/>
<target refid="personalInfo.first-name" /> </mapping-attribute>
Figure 7
Declare mapping attributes elements
Define the Source Element
Each mapping-attribute Element must contain one source Element. This declares the origin of the data in Recruiting Management.
Mapping for the Entity-Type Attribute
Each source element must also contain one entity-type attribute. This attribute declares which object the field data pulls from when it is sent to EC. Allowable values are application, jobrequisition, and offerletter. In Figure 8, firstname from ‘application’ XML has been mapped.
<source refid="firstName" entity-type="application"/>
Figure 8
Map firstname
Define the Target Element
Only certain EC objects can receive data from Recruiting Management:
- personalInfo
- personInfo (for date_of_birth)
- emailInfo
- phoneInfo
- imInfo
- recurringPayComponents
- nonRecurringPayComponents
- addressInfo (support only ONE type "home")
- jobInfo
- compInfo
- employmentInfo
- emergencyContactInfo
- nationalId
Step 3. Provide Role-Based (RBP) Permission and XML Permission
RBP Permission in Admin Center
To enable role-based permission go to Admin Center > Manage Permission Role (Figure 9). Go to the role meant for HR administrators (not shown). Click the Manage User option and then check the Manage Pending Hires check box.

Figure 9
Role-based permission for Manage Pending Hires
Enable XML Permission to the Target Role in the Job Requisition Template
Depending on the Target Roles defined in the Recruiting Management to EC integration, XML configuration determines which candidates at the Hirable status (who also have an approved offer approval) display in Manage Pending Hires?but only if the person with Manage Pending Hires permission also has permission to view the Target Role users in the EC Job Information.
Example 1:
Figure 10 is an example of target role configuration in the Recruiting Job Requisition XML template.
<role-mapping>
<target-roles>
<role>R</role>
</target-roles>
DE GOES HERE
Figure 10
Example of target role configuration
The above target-role configuration indicates that if the logged-in user (1.) has access to Manage Pending Hires and (2.) has been granted view permission to a recruiter’s (target-role R) EC Job Information data, then the user sees all the candidates at the Hirable status for that recruiter.
Here is some example data:
- Lorna Okomoto = Recruiter
- Yvette Williams = HR Administrator
- John Smith = Candidate
In the above example, Lorna has completed the recruiting process for John Smith. John accepted the offer from Lorna and now Lorna moves John to Hirable status in talent pipeline.
Yvette Williams has access to the Manage Pending Hires transaction and also has been granted view access to Lorna’s EC Job Information data. Yvette can now see John Smith (i.e., Lorna’s candidate) who has an approved offer and is in the Hirable status in the Manage Pending Hires wizard/table.
Enable XML Permission for the Manager Role in the Job Requisition Template
In the Job Requisition XML template, each mapping-attribute element must contain one manager-role element. This declares which requisition operator EC considers to be the manager role. Based on this operator, Recruiting Management identifies the manager and returns the manager's information to EC. Only one role should be specified in manager-roles as shown in
Figure 11. Role G is a Recruiting Management XML role.
<manager-roles>
 <role>G</role>
</manager-roles>
</role-mapping>
</object-mappings>
Figure 11
Example of manager role configuration
Tips
Role V is a special role in the Recruiting XML template. If V role is used in the Recruiting Management to EC transformation XML configuration, the role sees all pending hires from all requisitions, regardless of permissions. My advice would be to not use the V role.
Also it is advisable not to designate the recruiting operator role O (originator) as the target role. It can cause problems when the originating user is inactivated. The originating user cannot be changed by default and the process fails.
Step 4. End-to-End Process Flow with Recruiting Management to EC Integration
Once all the configurations as described in steps 1 to 3 are in place, you can follow the sequence below for an end-to-end process flow of candidates from Recruiting Management to EC via Manage Pending Hire transaction. You then can test all the configuration.
Make sure that the applicant or candidate has a completed and approved Offer Details record. You can see all Offer Approvals in the Recruiting Dashboard as shown in
Figure 12.

Figure 12
Offer approval in the Recruiting dashboard
When you click the Offer Approvals tab, you see all completed and approved offer approvals. In this example, the offer approval for Sarah Davis is visible as shown in
Figure 13.

Figure 13
Offer Approvals shown for Sarah Davis
You can click the details icon near Completed to see Offer Approval details (if needed), as shown in
Figure 14.

Figure 14
Offer approval details
Figure 15

Figure 15
Ready to Hire status
Proxy as an HR Admin or log back in to SuccessFactors instance with the credentials of an HR administrator who has access to the Manage Pending Hires wizard. In this example I logged in as RDS Admin. HR Admins with relevant role-based permissions can now see this applicant data under Manage Pending Hires > Recruiting as shown in
Figure 16.

Figure 16
Manage Pending Hires in the Admin Center
In this example, it’s an internal hire (i.e., from the same company). You see External Hire for an external candidate. Click the Internal Hire tab and you are redirected to the Hire Event in Employee Central as shown in
Figure 17.

Figure 17
Hire Event in EC
This is the Hiring transaction in EC. Complete the relevant details in this Hire screen and select the appropriate Event code. Click the Submit button (not shown). You receive a message as shown in
Figure 18 confirming that the Applicant was successfully hired into Employee Central.

Figure 18
Confirmation message

Rinky Karthik
Rinky Karthik serves as a Project Manager, HCM SuccessFactors, for the People LoB for itelligence and has 16 years of SAP HCM and SuccessFactors experience. This includes many global implementations, including support and upgrade of various SAP on-premise modules and SuccessFactors modules in diverse roles, like Solution Architect, Lead Consultant, and Project/Program Manager. Rinky has an MBA in Human Resources and she comes with a strong project management background; as such, she has managed a variety of global projects for clients in different domains. She has extensive experience with SAP SuccessFactors’ SAP Launch and SAP Activate implementation methodologies, and is a Certified SuccessFactors consultant in Recruitment Management, Recruiting Marketing, Learning Management Solution, and Employee Central. Rinky is a frequent contributor to SAP SuccessFactors blog forums,
HR Expert, and a regular speaker at a variety of SAP/SuccessFactors conferences.
You may contact the author at
rinky.karthik@itelligencegroup.com.
If you have comments about this article or publication, or would like to submit an article idea, please contact the
editor.