Learn about the processes involved in sales using Available-to-Promise (ATP) functionality. Read details about the main master data to be maintained in the system along with the main customizing settings available for this solution.
Key Concept
The Available-to-Promise (ATP) quantity is calculated from the warehouse stock, the planned inward movements of stock (production orders, purchase orders, planned orders), and the planned outward movements of stock (sales orders, deliveries, reservations).
An Available-to-Promise (ATP) check is performed dynamically for each transaction (i.e., warehouse stock, inward and outward movement of stocks), taking into account the relevant stock and planned goods movements with or without replenishment lead time. Planned independent requirements are not taken into account here.
The ATP can be done at the following organizational levels:
- Plant: The requirement of 1200 each (EA) can be completely covered by receipt 1 and plant stock. The plant stock can provide an ATP quantity of 300 pieces for future requirements.
- Storage location: Only 300 pieces are confirmed for requirement 2 of 500 EA.
- In case only one batch is entered, the check is carried out on two levels — first against the batch and then against the plant stock.
- If a batch and a storage location are entered, the check is carried out on four levels — first against the batch storage location, then against the batch, then against the storage location, and then against the plant stock. Just as with the check on storage location level, the organization level with the lowest ATP quantity determines the result of the check.
Note
This article can be used as a guideline during the realization phase of the project and during the pre-cutover to check that all the settings have been transported correctly.
I discuss the following topics:
- Implement ATP processes in SAP SD
- Master data preparation
- Material’s Views
- Condition Records
- Transactional Data
- Sales Order
- Perform the ATP check
- Outbound Delivery
- Good Issues
- Post Billing
- Verify the sales flow
- Customizing
- Configuration about ATP in Sales & Distribution
In
Table 1, you can find an example about the ATP logic using the plant or storage location as organizational levels.
| ATP-relevant elements |
Quantity received
|
Issue quantity
|
ATP quantity |
| Plant stock |
1,000 EA |
|
300 EA |
| Receipt 1 |
500 EA |
|
0 EA |
| Issue 1 |
|
1,200 EA |
|
| Storage 1 |
800 EA |
|
|
| Issue 2 |
|
500 EA |
|
| Storage 2 |
200 EA |
|
|
Table 1
ATP logic
Master Data Preparation
In this section, I introduce the main master data objects that are relevant and necessary to the sales department to post sales transactions to use availability to promise functionalties.
The MRP 3 View
In this step, you assign the availability check group to the material master of the finish product. To complete this step, execute transaction codes MM01 or MM02 or follow menu path Logistics > Materials Management > Material Master > Material > Create/Change > Immediately.
In the MRP 3 tab of the screen that appears (
Figure 1), you need to specify the Availability check value. For my example, use the value Z1. I describe this value in more detail in the customizing paragraph “Checking Rule.”
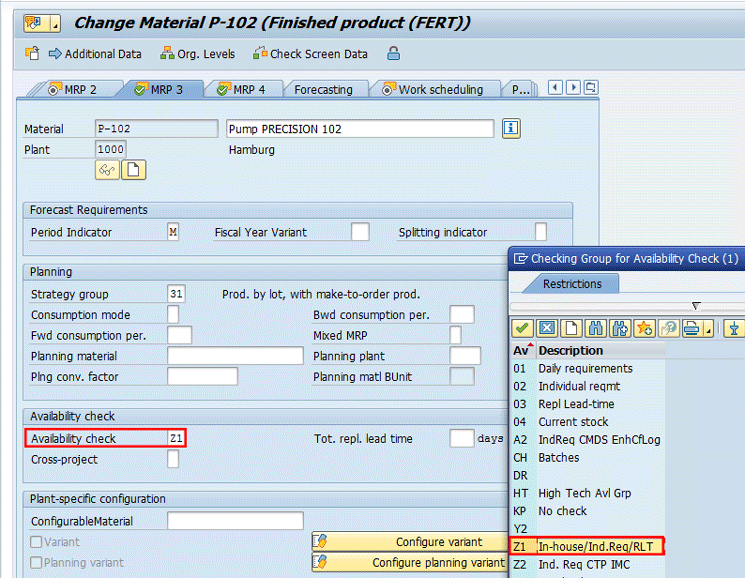
Figure 1
Assign an availability check group to the product
Sales Organization Views
In this step, you assign and verify the settings relevant for the Availability to Check in the sales organization views of the semifinished and finished products.
To complete this step, execute transactions codes MM01 or MM02 or follow menu path Logistics > Materials Management > Material Master > Material > Create/Change > Immediately.
In the Sales: sales Org. 1 tab of the screen that appears (
Figure 2), enter the plant code that you want to use to deliver the goods to your customer.
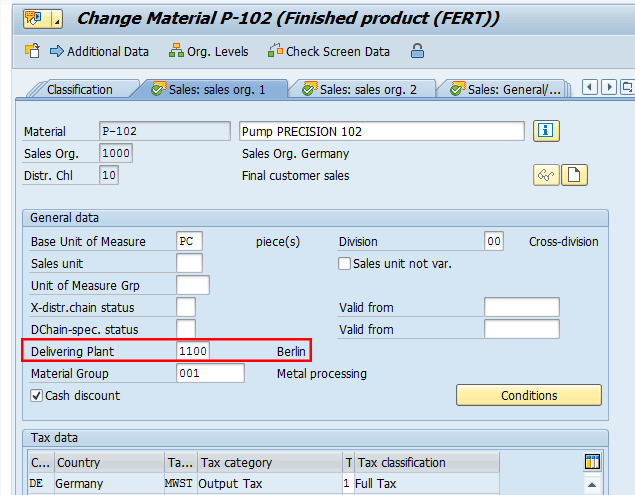
Figure 2
Enter a code for the delivering plant
Select the Sales: sales org. 2 tab (
Figure 3) and enter the Item Category Group relevant for your business. For my example, you need to enter the value ZA03.

Figure 3
Verify the availability check value
Now select the Sales: General/Plant tab (
Figure 4). In this screen, verify that the Availability check field contains the value entered in the MRP-3 tab in
Figure 1.

Figure 4
Verify the availability check value
Create Price Condition
The sales department should be responsible for creating a condition price.
To define it, execute transaction code VK31 or follow menu path SAP Menu > Sales and Distribution > Master Data > Conditions > Create. In the initial screen (not shown), choose the option: Prices > Material Price and select the condition table CnTy SOrg. DChl Material.
The system then displays the screen in
Figure 5. Enter the value PR00 in the field under the Co … (condition type) column, enter a material code in the Material column, along with price details and validity dates. Press Enter. Click the save icon

to save your data.

Figure 5
Create a price condition record
Transactional Processes
In the following steps, you can test the complete sales cycle performed after checking the ATP during the sales order document creation.
Create a Sales Order
In this step, the sales organization converts the quotation into a sales order. To create a sales order for your configurable material, execute transaction code VA01 or follow menu path Logistics > Sales and Distribution > Sales > Order > Create. In the screen that opens (not shown), enter the sales Order Type and the organizational data (the Sales Organization, Distribution Channel, and Division fields) and then press Enter. The system then displays the screen in
Figure 6.
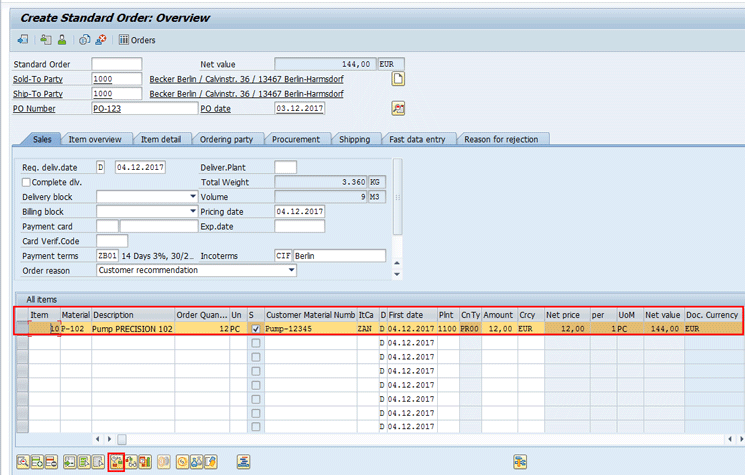
Figure 6
Create a sales order for your configurable material
Then enter the data as shown in
Figure 6.
Now select the line item and click the availability check icon (highlighted in
Figure 7) to trigger the availability check. The system then opens the screen in
Figure 7.
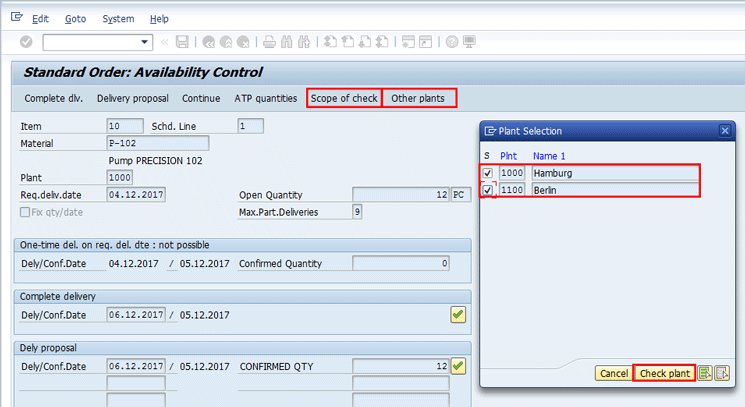
Figure 7
Select a line item and click the availability check icon
In
Figure 7, you can see the Availability Control screen as seen in the sales order. It has following options and buttons:
- One-time delivery. In the results of Availability Control screen, you have three options to choose from. This is case 1 when you can confirm the customer’s requested delivery date. The details of this are visible in the first subscreen of Figure 7.
- Complete dlv. This is case 2 when you can confirm the customer’s requested complete delivery at a future date. The details for this option are visible in the second subscreen of Figure 7.
- Delivery proposal. This is case 3 when you can confirm the customer’s requested delivery in partial quantities at future dates. The details for this option are visible in the third subscreen of Figure 7.
- Continue. If you select one of the above options, the same value is saved in the ATP results.
In
Figure 7, if you click the Scope of check button, the system shows the details about the stock and In/Outward elements that are taken into account during the ATP check as shown in
Figure 8.
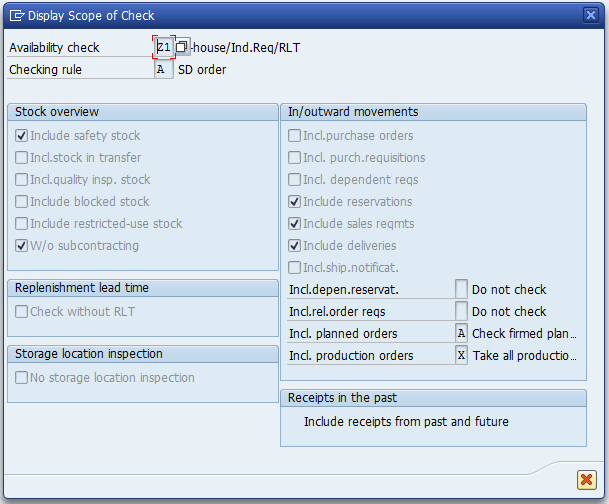
Figure 8
Display the scope of check associated to sales order line item
In
Figure 7, you can also check the availability of the goods in all plants that are allowed to deliver the required goods. To complete this task, use the Other plants option. In my example, there are two available delivery plants: 1000 and 1100. If you click the Plant button, the system opens the screen shown in
Figure 9.

Figure 9
Availability check across plants
In
Figure 9, you select the line item with the appropriate delivery plant. For my example select line item 1100 and then click the Plant button to adopt this value in the sales order line item. The system then opens the screen shown in
Figure 10.
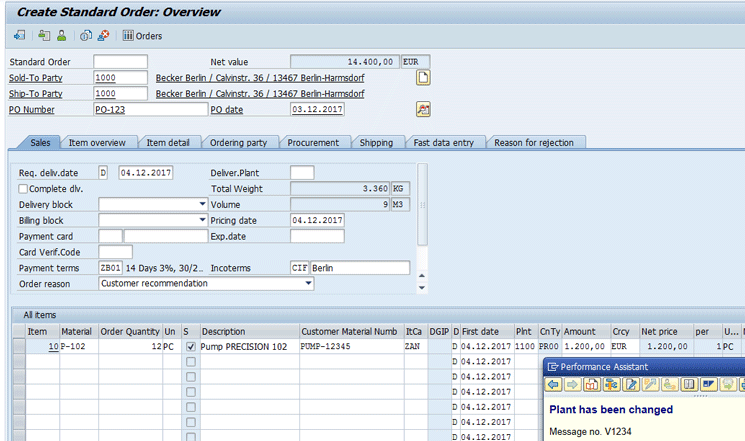
Figure 10
Indication that the plant has been changed
At this stage, click the availability check icon to go back to the screen in
Figure 7 and click the enter icon beside the confirmed quantity. The system issues the information message shown in
Figure 11.

Figure 11
Confirmation of the availability check
Then click the save icon to save the sales order. The system then issues the sales order document number as shown in the
Figure 12.

Figure 12
Message about the creation of the sales order document number
In general, the system provides a delivery proposal (partial deliveries according to availability) or it proposes a complete delivery when all the stock is available. To interpret the situation, you can use the stock requirement list for material P-102 and plant 1000. To complete this step, use transaction code MD04 or follow menu path ECC Logistics > Production > MRP > Evaluations > Stock/Requirements List.
Create an Outbound Delivery
In this step, the warehouse organization creates an outbound delivery for the configurable products. To complete this step, execute transaction code VA02 or follow menu path Logistics > Sales and Distribution > Sales > Order > Change. In the screen that opens (not shown), enter the Sales Order Document Number and press Enter. The system then displays the screen in Figure 13.
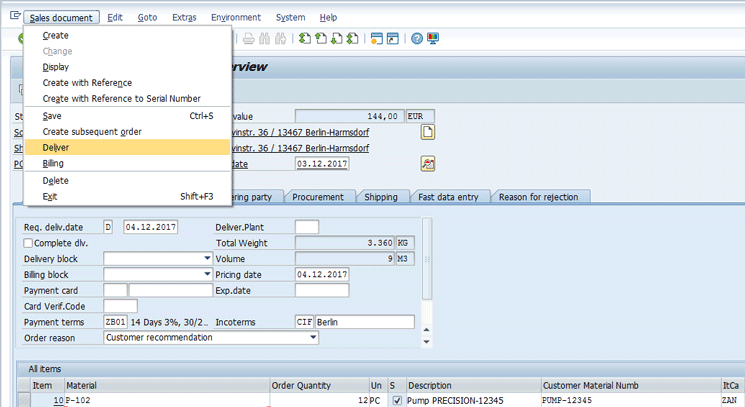
Figure 13
Create an outbound delivery with reference to the sales order (triggering option)
At this stage, follow menu path Sales document > Deliver. In the screen that the system opens (not shown) follow menu path Environment > Availability. The system displays the screen in the Figure 14. Click the Scope of check button to view the details of the ATP and scope of check in the pop-up screen.

Figure 14
Display the scope of check for ATP in the outbound delivery
Now click the back icon in Figure 14 to return to the previous screen (Figure 13) Check your data and click the save icon to save the delivery. The system then generates the delivery document number shown in Figure 15.
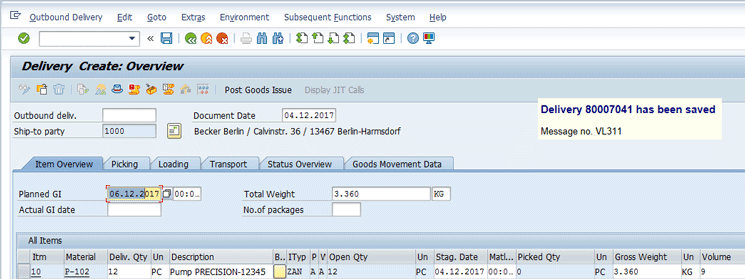
Figure 15
Generate the delivery document number
Perform Picking and Post Goods Issue
In this step, the warehouse organization performs the picking and post the goods issue. The goods issue can be done with reference to the outbound delivery by executing transaction code VL02N or following menu path Logistics > Logistics Execution > Outbound Process > Goods Issue for Outbound Delivery > Post Goods Issue > Outbound Delivery Single Document. In the screen that the system opens (Figure 16), enter the number of outbound delivery document in the Oubound deliv. field and press Enter.
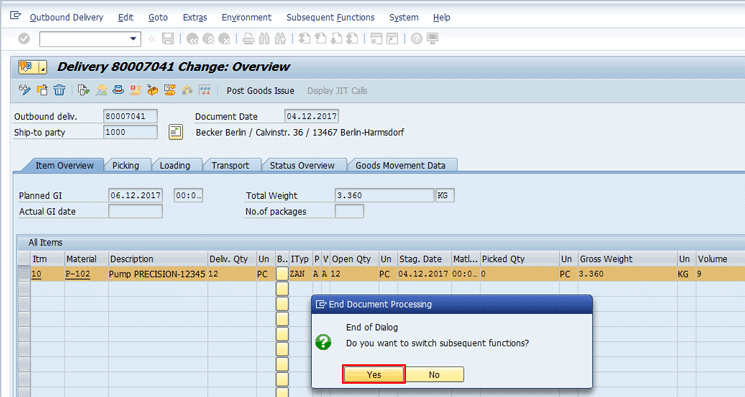
Figure 16
Create a transfer order for picking
At this stage, follow menu path Subsequent Functions > Create Transfer Order. The system displays the pop-up screen shown in Figure 16.
After you click the Yes button in Figure 16, you can view the details to create a transfer order in the SAP Warehouse Management module to perform the picking activities (Figure 17).
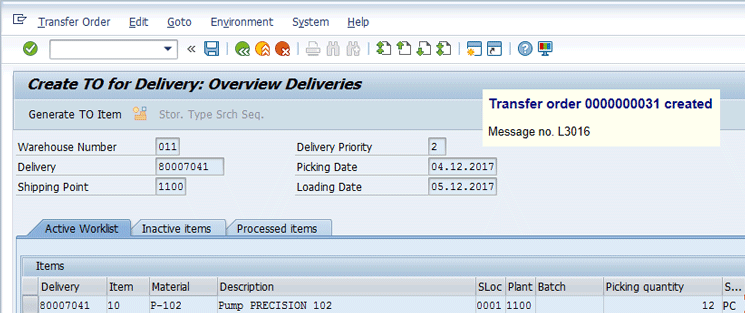
Figure 17
The transfer order number for picking
If you click the back icon (the arrow beside the save icon) in Figure 17, the system opens the screen in Figure 18. At this stage, you can click the Post Goods Issue button to post the goods issue.The system then shows an information message that the delivery has been saved.

Figure 18
Confirmation of the goods issue posting
Post the Billing
In this step, the accounts receivable organization performs the billing posting in the sales and distribution module considering the outbound delivery processed for the configurable product.
The posting can be done by executing transaction code VF01 or following menu path Logistics > Sales and Distribution > Billing > Billing Document > Create. After entering the outbound delivery document created for a configurable product, press Enter. The system then displays the screen shown in
Figure 19.

Figure 19
Select the line item and click the condition icon
In
Figure 19, select the line item and click the condition icon (highlighted in
Figure 19). The sytem then displays the details shown in
Figure 20. Note the condition’s components retrieved from the sales order and then click the save icon to post the document. The system provides the billing document number as specified in
Figure 20.

Figure 20
Verify price conditions in the billing line item and generate the invoice number
Display the Sales Document History
This step is optional and it is reported just to show that the complete sales cycle has been performed successfully, apart from the final customer’s payment. To display the sales document history created for your configurable products, execute transaction code VA03 or follow menu path Logistics > Sales and Distribution > Sales > Order > Display. In the initial screen that appears (not shown), enter the sales order document number and click the display document flow icon. The system then displays the details shown in
Figure 21.
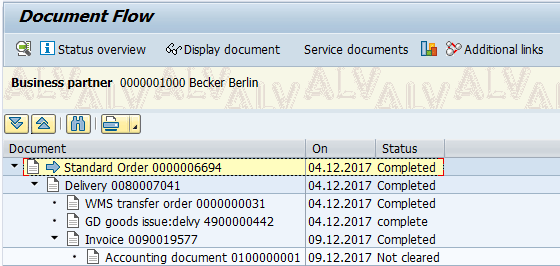
Figure 21
Display the sales order document history
Note
Transaction code CO09 is the only suitable transaction code to check the availability situation. In transaction codes MD04 and MMBE the scope of check is not considered, so it does not provide you the information on what stocks, receipts and issues are considered during the ATP check.
Customizing - Availability Check
In customizing, you determine whether an availability check is to be carried out against the ATP quantity or against planning. The check against product allocations is controlled in the material master and elsewhere in the system.
There are three types of availability checks available in SAP SD:
- Check on the basis of the ATP quantities
- Check against product allocation
- Check against planning
The following SD-specific control features need to be maintained in customizing:
Availability Checking Group
The availability checking group controls whether the system is to create individual or collective requirements in sales and shipping processing. In addition, a material block for the availability check with transfer of requirements can be set here.
The checking group can also be used to deactivate the availability check. This option was created especially for the assembly order so that when the bill of material is exploded in the assembly order, the individual components, if necessary, can be classified as noncritical parts as far as procurement is concerned.
The checking group specifies in combination with the checking rule the scope of the availability check. It is proposed in the material master record, MRP3 View, on the basis of the material type and the plant, and copied into the sales and distribution documents.
The checking group is a two-digit code defined in IMG using transaction code OVZ2 or following menu path SAP Customizing Implementation Guide > Sales and Distribution > Basic Functions > Availability Check and Transfer of Requirements > Availability Check > Availability Check with ATP Logic or Against Planning > Define Checking Groups (
Figure 22).

Figure 22
Define the availability checking group
In my example, use the entry Z1, but you can also use SAP standard checking groups of 01 for summarized requirements or 02 for daily requirements. The columns TotalSales and TotDlvReqs are options whereby you can configure a checking rule to sum up requirements to post to material requirements planning (MRP) either individually or by day or week.
In the Block QtyRq column, you set this block if you want several users to be able to process the material simultaneously in different transactions without blocking each other. In the No check column you can select the check boxes when you want a material to not be relevant for an ATP check.
In the Accumul. (availability check with cumulative confirmed quantities) column, you manage the problems that may occur if committed quantities are not cumulated. Sales orders can only reduce ATP quantities whose date lies before the delivery date. In such cases, the system does not take the committed quantity of already created sales orders into account. If receipts were displaced or reduced in the past, it is possible that the ATP quantity of the receipt that lies before a sales order is now too small to cover this sales order quantity although it has already been completely confirmed. That’s why SAP suggests to work with the cumulation of the requirement quantities when creating sales orders and with the cumulation of the confirmed quantities when changing sales orders.
Checking Rule
You use the checking rule to control the scope of the availability check for each transaction in SAP SD. You also specify whether the check should be carried out including or excluding replenishment lead time. The individual checking rules define by transaction, which kinds of stocks and inward or outward movement (receipts and issues) of goods should be taken into account for the availability check. The Checking Rule is a two-digit number that along with the checking group, the checking rule specifies the final procedure for checking.
To create a new entry, follow menu path SAP Customizing Implementation Guide > Production > Sales & Operations Planning (SOP) > Master Data > Assignment of Validation Rules to Key Figures > Maintain Checking Rules for Availability Check (
Figure 23). Populate the fields as shown in
Figure 23.

Figure 23
Define a checking rule
Define a Material Block for Other Users
The Block checkbox is an indicator that enables you to block the particular material from being checked for availability if it is already being checked at the same time by other users. To create a new entry, follow IMG menu path SAP Customizing Implementation Guide > Sales and Distribution > Basic Functions > Availability Check and Transfer of Requirements > Availability Check > Availability Check with ATP Logic or Against Planning > Define Material Block For Other Users (
Figure 24). For my example use the availability checking group ZE for sales orders and ZF for delivery.
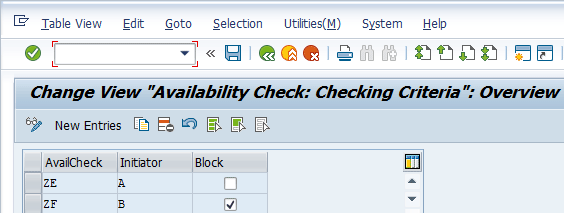
Figure 24
Define block indicators for availability checking groups
Define the Default Value for Checking Groups
If no entry exists for the checking group in the material master record, you can set a default value per material type and plant. To define such a default, follow IMG menu path SAP Customizing Implementation Guide > Sales and Distribution > Basic Functions > Availability Check and Transfer of Requirements > Availability Check > Availability Check with ATP Logic or Against Planning > Define Checking Groups Default Value (
Figure 25). For my example use the availability checking group Z1 for material type FERT and plant 1000.
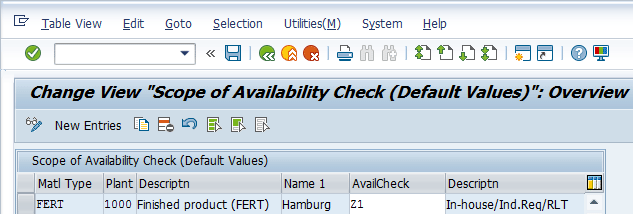
Figure 25
Define the default value for checking groups
Controlling the Availability Check Control
In this section, you tell the system what stock is on hand and what inward and outward movements of stock it must take into account when performing the availability check. These settings are based on the checking group that is assigned to the material master record and the checking rule that is predefined and assigned to the SD transaction. The carry-out control for the availability check must be maintained for both the sales order and delivery.
To carry out control for an availability check, use transaction code OVZ9 or follow menu path SAP Customizing Implementation Guide > Sales and Distribution > Basic Functions > Availability Check and Transfer of Requirements > Availability Check > Availability Check with ATP Logic or Against Planning > Carry Out Control For Availability Check. In the screen the system displays (
Figure 26), you can assign an apoprpriate availibility group to the checking rule for order and delivery processing.
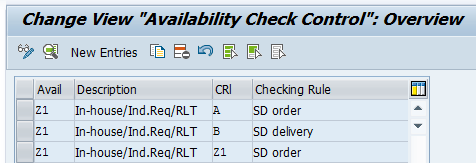
Figure 26
Define availability check control
After you double-click the first line item shown in Figure 26, you can specify the following details in Figure 27.

Figure 27
Define details for availability check Z1 and checkling rule A
Now double-click the first line item shown in the Figure 26 again to specify the following details in Figure 28.

Figure 28
Define details for availability check Z1 and checking rule B
Scope of Availability Check (Default Values)
In this IMG activity, you define the checking group that the system proposes when you create a new material master record. You can overwrite the default value for the checking group in the material master record. You can carry out this step through the IMG menu path SAP Customizing Implementation Guide > Sales and Distribution > Basic Functions > Availability Check and Transfer of Requirements > Availability Check > Availability Check with ATP Logic or Against Planning > Define Checking Groups Default Value (
Figure 29).

Figure 29
Define the scope of availability check (default values)
Define Procedure for Each Schedule Line Category
In this IMG step, you specify for the respective schedule line categories of the sales documents whether an availability check or transfer of requirements should be carried out. These configurations are only relevant for the sales documents. To carry out this step follow IMG menu path SAP Customizing Implementation Guide > Sales and Distribution > Basic Functions > Availability Check and Transfer of Requirements > Availability Check > Availability Check with ATP Logic or Against Planning > Define Procedure for Each Schedule Line Category (
Figure 30). In this screen, you can assign an apoprpriate Availibility Group to the Checking Rule for order and delivery processing.

Figure 30
Define scope of availability check (default values)
Define Item Category Groups
The item category group is using to group together different material types for item category determination from the SD view. In this IMG step, you specify for each delivery item category if the availability check is active or not. To complete this step follow IMG menu path SAP Customizing Implementation Guide > Sales and Distribution > Sales > Sales Documents > Sales Document Item > Define Item Category Groups (
Figure 31). In this screen enter the value ZA03 and give it a description. Click the save icon to save you entry.

Figure 31
Define the item category group
Assign Item Category Group
The item category needs to be assigned to the sales order type and item category group to be defaulted in the sales order line item. In this IMG step, you specify for each delivery item category if the availability check is active or not. To complete this step follow IMG menu path SAP Customizing Implementation Guide > Sales and Distribution > Sales > Sales Documents > Sales Document Item > Assign Item Categories. This path takes you to the screen in
Figure 32. In this screen enter values in the fields shown in
Figure 32.
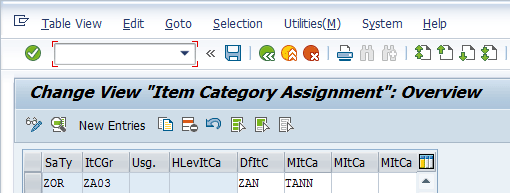
Figure 32
Assign an item category to a sales order type and item category group
Determine a Procedure for Each Delivery Item Category
The delivery item category can be used to control whether an availability check takes place in deliveries. In this IMG step, you specify for each delivery item category if the availability check is active or not. To complete this step follow IMG menu path SAP Customizing Implementation Guide > Sales and Distribution > Basic Functions > Availability Check and Transfer of Requirements > Availability Check > Availability Check with ATP Logic or Against Planning > Determine Procedure For Each Delivery Item Category (
Figure 33). In this screen, you can assign an appropriate availibility group to checking rule for order and delivery processing.

Figure 33
Assign an availability check for each delivery item category
Maintain Schedule Line Categories
In the schedule line category, you need to maintain the relevance for ATP check for sales. The indicator is determined as a proposal in conjunction with the respective requirements type. It can be changed in individual shipping transactions. You set an indicator for maintaining the requirements type. For my example you can decide whether you require an availability check for the relevant transaction. You can complete this step by using IMG transaction code VOV6 or following IMG menu path SAP Customizing Implementation Guide > Sales and Distribution > Sales > Sales Documents > Schedule Lines > Define Schedule Line Categories. In the initial screen that the system opens (not shown), click the New Entries button. The system then displays the screen shown in
Figure 34. In this screen enter you schedule line category in the Sched.line cat field along with a description. In the Transaction Flow section, make sure that the Availability check box is selected. (The other fields, such as the ones in the Business Data section contain default settings, and the check boxes in the Transaction flow section are selected by default.
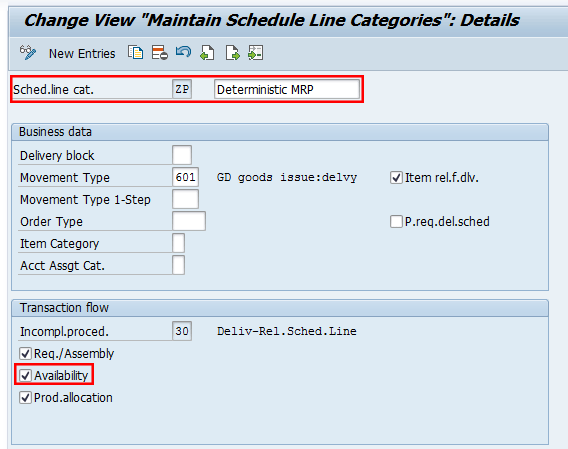
Figure 34
Maintain a schedule line category
The Checking Rule for Updating Backorders
The checking rule specifies for the individual applications the checking rule according to which the availability check is carried out. To configure this setting follow IMG menu path SAP Customizing Implementation Guide > Sales and Distribution > Basic Functions > Availability Check and Transfer of Requirements > Availability Check > Availability Check with ATP Logic or Against Planning > Checking Rule For Updating Backorders (
Figure 35). In my example you need to enter the checking rule for each plant. Populate the fields shown in
Figure 35.

Figure 35
Enter details for the checking rule for updating backorders
Note
The checking rule entered here is used in production planning. During backorder processing, performed via transaction code CO06 and the availability overview (transaction code CO09), I recommend that you make sure that you are not using any checking rules that deviate from the SD configurations (checking rule A for orders and checking rule B for deliveries).
Customizing – Transfer of Requirements (TOR)
An availability check can only be carried out if the following prerequisites have been fulfilled:
- The control elements described above for the availability check must be maintained in Customizing for sales and the relevant assignments made to the sales transactions.
- The availability check must be switched on at the requirements class level, as shown in Figure 36, and — for the availability check in the sales documents — at schedule line category level as shown in the Figure 34
- A requirements type must exist by which the requirements class can be found
- A plant must be defined. It can either be proposed from the customer or material master record or can be entered manually in the document.
- A checking group must be defined in the material master record on the Sales/plant data screen in the Availability check field.

Figure 36
Define the requirement class
The main configuration steps for the TOR are the following:
- Use standard 041 requirements class or copy and rename it. Use the indicators to select if this requirements class must carry out an availability check and/or a transfer of requirement (TOR).
- Define the requirements types. A requirements type is allocated to a single requirements class and not vice versa. It is based on the item category and the MRP type of the material.
- Assign the requirements type to the relevant item category in the sales order and the MRP type found on the material master record.
- You can select an alternative search strategy where you assign the requirements type to item category and MRP type. You can select the source as 0, 1, or 2. (1 = item type and MRP type strategy).
- The TOR and availability check can be selected or de-selected at the schedule line category level.
- Block qty confirmation in delivery blocks. This is used to block the reservation of the TOR from MRP.
- Maintain requirements for TOR. Requirements can be used to determine that the TOR to MRP is not carried out unless a number of conditions are met.
Requirements Class
The requirements class contains all control features for planning such as relevance for planning, requirements planning strategy, and requirements consumption strategy. In addition, it is specified at a global level whether an availability check is to take place for the material in the sales and distribution documents on the basis of the ATP quantity (ATP = available to promise) and whether requirements are to be passed on. A finer degree of control can be obtained for sales documents using the schedule line category. Replenishment lead time is only included in the check performed on the basis of the ATP quantity.
The requirement class can be maintained either using transaction code OVGZ or following IMG menu path SAP Customizing Implementation Guide > Sales and Distribution > Basic Functions > Availability Check and Transfer of Requirements > Transfer of Requirements > Define Requirements Classes (
Figure 36). For my example, populate the fields shown in
Figure 36.
Requirements Type
The various requirements are identified by their requirements type. The requirements type refers to the requirements class and its control features. It is assigned to requirement class. The requirements type can be maintained either using transaction code OVZH or following IMG menu path SAP Customizing Implementation Guide > Sales and Distribution > Basic Functions > Availability Check and Transfer of Requirements > Transfer of Requirements > Define Requirements type (
Figure 37).

Figure 37
Define the requirements type
If you don’t have special requirements, you can also use the following standard antry to manage requiremenst for sales orders and deliveries.
A line item in the sales order creates a schedule line. The schedule lines in the sales order transfer the requirements through to MRP. You can select the documents on which you want the TOR to happen. For example, not for quotations.
The TOR aims to ensure the ordered materials are available for the requested delivery date. The TOR can be set for individual or for collective requirements (materials master sales/plant view) and it is dependent on the following data:
- The requirements type, requirements class, checking group and schedule line category.
- The requirements type and class are determined in the strategy group (material master MRP3)
For the TOR to be carried out, a few criteria need to be met:
- Plant assigned to line item level, schedule line category should be switched on at TOR,
- TOR must be switched on at the requirements class level, checking group must be defined and allocated to the material master record (sales/plant view in the availability check field).
- The requirements class is the controlling factor for the availability check and the TOR for all sales and distribution document types.
Availability and TOR by Requirement
In this IMG activity you define for each requirements class whether an availability check and/or transfer or requirements should be carried out. This setting can be performed either using transaction code OVZ0 or following IMG menu path SAP Customizing Implementation Guide > Sales and Distribution > Basic Functions > Availability Check and Transfer of Requirements > Transfer of Requirements > Define Procedure by Requirements Class (
Figure 38). If you don’t have special requirements, you can also use the following standard entry to manage requirements for sales orders and deliveries as shown in
Figure 38.

Figure 38
Availability and TOR by requirement type
Default Values for Availability Check for Sales Area
In this IMG step, you specify the default value for Availability check rule for your relevant sales areas. To complete this step follow IMG menu path SAP Customizing Implementation Guide > Sales and Distribution > Basic Functions > Availability Check and Transfer of Requirements > Availability Check > Availability Check with ATP Logic or Against Planning > Define Default Settings. In this screen, you can assign an appropriate availability check rule for you sales areas for order and delivery processing using one of the seven standard values available in the picking list shown in the
Figure 39.
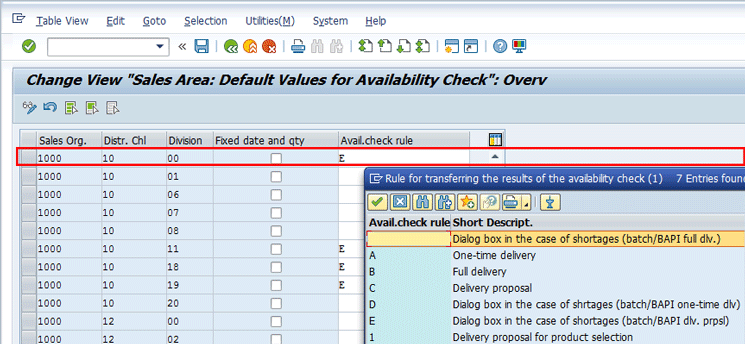
Figure 39
Define default values for availability check for sales areas

Gaetano Altavilla
Dr. Gaetano Altavilla is a senior SAP practice manager. His focus is on pre-sales, delivery of SAP application solutions for large international corporations, and SAP knowledge management in Europe, the Middle East, and Africa (EMEA).
In his 18 years of SAP application experience working for many multinational companies, such as Procter & Gamble and Hewlett-Packard, he has covered a wide range of ERP logistic areas, focusing on the MM, WM, SD, LES, PP, PP-PI, PLM (QM, PM, PS) modules, as welll as CRM (TFM), SRM (EBP), SCM (SAP APO), and MES (ME) components.
Dr. Altavilla holds a degree with first-class honors in mathematics from the University of Naples and is certified in many SAP modules: SAP Logistics Bootcamp, SAP MM, SD, LE (SHP/WM/LE), PP, PLM (PM, QM, PS), SRM, CRM, SCM (APO), SCM (TM), FI, CO, and Solution Manager. He also has experience in ABAP/4 and application link enabling (ALE) and IDocs. He has participated in numerous industry conferences, such as the SAP Skills Conference in Walldorf at SAP SE.
You may contact the author at
Gaetano_altavilla@hotmail.com.
If you have comments about this article or publication, or would like to submit an article idea, please contact the
editor.


