Learn how to make adjustments to the Create Sales Order transaction (transaction code VA01) using SAP Screen Personas 3.0. See how SAP Screen Personas 3.0 helps make the process of inputting values for a point of sale (POS) order faster and more intuitive than completing this process in a standard SAP system
Key Concept
The point of sale (POS) is the time and place where a retail transaction is completed. The Create Sales Order transaction in SAP ERP does not make it easy to use touch operations (i.e., a touch screen). It does not provide you with images and buttons for fast, easy creation of a POS.
SAP Screen Personas 3.0 allows productivity through personalization via a simple drag-and-drop approach to modify many common SAP GUI screens to make them more usable as well as more visually appealing. The main goal is to make sales through a screen that is friendly and simple and that with few process steps or clicks, allows touch screen interaction.
SAP Screen Personas 3.0 allows adjustments to SAP transactions, seeking to bring them into a simple and effective style. SAP Screen Personas 3.0 requires installation by a technology team. Use this link to review the requirements and installation processes: https://websmp208.sap-ag.de/~sapidb/012002523100013158972014E.
SAP Screen Personas 3.0 is suitable for processes in SAP settings for desktop use. (Other tools such as SAP Fiori are based on multiplatform use: desktop, mobile, or tablet.)
It is feasible to set the screen for the Create Sales Order transaction (transaction code VA01) so that it can be used as a point of sales (POS). A weakness of the Create Sales Order transaction is that it is not easy to be used as a POS because multiple steps are required to incorporate a material or service for sale. I show you how to develop these screens using SAP Screen Personas 3.0 providing reduced training and support costs with simple, role-based screens that speed ramp-up and minimize user errors. You can also increase compliance and data quality by making it easier to enter information into your system of record.
I make adjustments through SAP Screen Personas 3.0 that are based on the Create Sales Order transaction (transaction code VA01). The first changes are based on the initial screen that appears after you execute transaction code VA01 where the Class Sales Order is selected. Figure 1 shows the initial design screen for SAP Screen Personas 3.0.
Figure 1 shows a demo image for the transaction code VA01 (Create Sales Order) showing what you can perform using Screen Personas 3.0 in an SAP transaction.

Figure 1
The initial SAP Screen Personas screen for the Create Sales Order transaction
After you select the Order Type (by clicking buttons that replace the traditional Order Type field), you move to the next screen in which you incorporate the values ??Customer, Material, and Quantity.
In Figure 2, you see the prototype of the screen Create Sales Order transaction screen (transaction code VA01) after selection of the Order Type. It is divided into three main areas: Customer data, Item, and Total (net value).

Figure 2
Screen proposal sales order with SAP Screen Personas 3.0
Figures 1 and 2 show the settings that you need to use in the Create Sales Order transaction (transaction code VA01).
In the following four steps I describe how to transform the Create Sales Order transaction (transaction code VA01) in SAP sales and distribution (SD) to a more suitable design for use as a POS. You make modifications to the screens with the solution SAP Screen Personas 3.0.
Step 1. Record the Script to Start the Create Sales Order Transaction
To record the script to create a sales order, execute transaction code VA01. In the initial screen that the SAP system displays, click the screen personas icon  to create a variant configuration. Click the plus sign to display the New Flavor pop-up screen (Figure 3). In the Name field enter the name of your custom screen (in my example it is ZVA01_001) and then enter a description in the Description field (in my example, it is VA01 PoS V1).
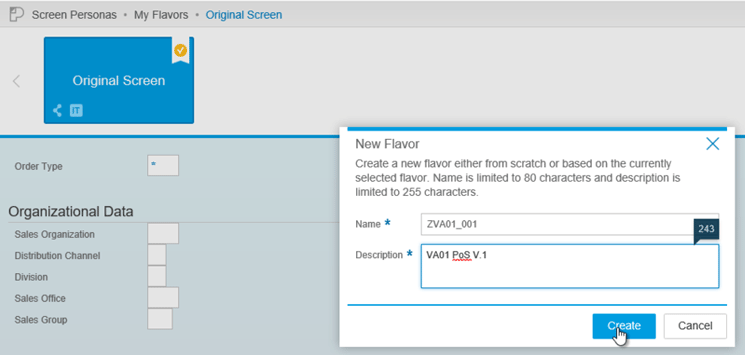
Figure 3
Enter values in the New Flavor pop-up screen in SAP Screen Personas 3.0
Now click the Create button. A new screen appears with screen editing tools at the top. Click the X in the upper right corner of the screen to exit this screen. Click the screen personas icon above the question mark icon in the menu bar at the top of this screen. Select the tile for the custom screen that you want to create (in my example it is ZVA01_001) and then click the Scripting button.
Click the create new script icon and then in the field that appears below this icon enter the script name (ZV01_ORDER_01). Now click the blue checkmark icon and then click the Start Recording button. This option enables you to record the sequence of steps that you need to execute. Now in the Order Type field, enter OR for order and click the Sales Organization field. This action displays a pop-up screen in which you select Sales Org 001. This action adds the value 0001 to the Sales Organization field. Repeat this process for the Distribution Channel and Division fields. After you select 01 from the Dchl (distribution channel) column and Product Division 01 for the division field, click the enter icon.
In the refreshed screen that appears, click the Stop recording button. This action displays the Unsaved Data pop-up screen. Click the Yes button to save your data. This script will be used later in actions or events in buttons that you click.
Step 2. Configure Settings in the Initial Screen of the Create Sales Order Transaction
At this stage you hide several fields and sections that you will not use in the design of your purchase order. To complete this step, click the Hide button. First, hide the Organizational Data section. Select the Organizational Data section and then press Enter. Now hide the Standard Order field by selecting Standard Order and then clicking the Hide button. Repeat this process to hide the Order Type field. Note that the Hide button appears where these fields are now hidden.
Select the Create with Reference button and drag it from the left side of the screen to the right side. Select the Sales button and drag it and drop it from the left side of the screen to the right side. Position the Sales button to the left of the Create with Reference button. Hide the remaining buttons (Item overview and Ordering party) by selecting the row in which these buttons appear and then clicking the Hide button. Copy the enter icon (the green checkmark) from the left side of the screen to the right and then copy the search bar from the left side of the screen to the right.
Now you are ready to add a background image to the screen. To complete this step, click the Assign Background button. In the pop-up screen that appears, click the Upload Image button. In the next pop-up screen, click the Browse File button and browse for the image you are using for the background. Select this image and then click the Upload Image button. Now click the Unassign Image button and then click the Insert Image button. Hide the title area by selecting the title row (Create Sales Order: Initial Screen) and then clicking the Hide button. The action extends the background wallpaper image in your screen.
The next step is to move the location of the existing fields. Move the enter icon and the search bar so that they both appear below the Help menu option. Finally, you create multiple buttons such as a Script Button (Figure 4). To create a Script Button, click the Insert menu option and then click the Script Button. In the Script Button pop-up screen, enter a name in the Label field (for my example, enter Sales Order 1) and then click the Done button. You now see Sales Order 1 appear as a field on your screen. Select this field, expand it, and then position it on the left side of your screen. Select the Sales Order 1 field and click the Home button. Click the Assign Icon button. In the pop-up screen that appears, assign the appropriate icon and then click the Done button.
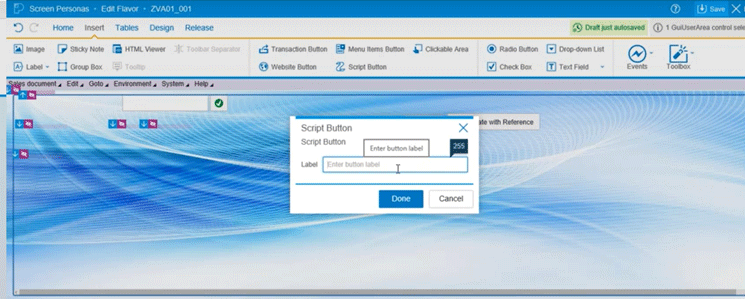
Figure 4
Insert the Script Button
Click the Insert menu option and then click the Group Box button. In the pop-up screen that appears, enter a name in the Caption field (for my example, enter Report). Click the Done button. Now highlight the Report section and move it to the right side of your screen. Drag and drop the Sales and Create with Reference fields into the Report section.
Now click the Transaction Button. Populate the Label and Code fields. For my example, enter Customer in the Label field and XD03 in the Code field and then click the Done button.
The Customer field now appears on the left side of your screen. Drag it to the Report section on the right side of your screen and position it below the Create with Reference field. The Report section now includes the Sales field at the top with the Create with Reference field stacked below it. The Customer field is below the Create Reference field.
Click the Transaction button again. In the Label field this time enter List Invoice and in the Code field enter VF05N. After you click the Done button, the List Invoice field appears at the top of the Report section. Select the List Invoice field and drag it below the Customer field.
Click the Menu Items button. In the Label field of the screen that appears, enter Exit. In the Menu Item field, enter select System/Log Off from the drop-down list of options and click the Done button.
The Exit field appears on the left side of the screen. Drag it to the right side of the screen and position it below the List Invoice field.
Click the Insert menu button and click the Events button. Click the Script Events button and then select Click from the drop-down list of options. The name ZVA01_001 appears in a box to the right of the Type to search field beside the onClick option. Move ZVA01_001 into the search to type field.
Step 3. Adjust the Create Sales Order Screen
At this stage, you make adjustments in the Create Sales Order screen. To start, continue the changes on My Flavors: ZVA01_001 located at the top of the Screen Personas solution. Select My Flavor. (My Flavor is used for variants that are made to the SAP Screen Personas 3.0 layout.) Click the pencil icon  to modify the flavor. The first change in the Create Standard Order screen is that you do not use the tabs. In the Sales document screen hide the Item Overview, Item Detail, Ordering Party, Procurement, Shipping, and Reason for rejection tabs. Click the title of each tab and select the following tabs: Tab: Sales, Tab: Item, Tab: Details, Tab: Ordering Party, Tab: Procurement, Tab: Shipping, and Tab: Reason for Rejection. Click the Hide button on the top bar. This hides the selected tabs (Figure 5).
Perform the action again to hide other fields and buttons that you do not want to use. Select each field you want to hide and then click it. Click the Hide button on the top toolbar. The fields I selected to hide are Ship to Party, PO Date, the details header icon  , and the create icon
  as shown in Figure 5.
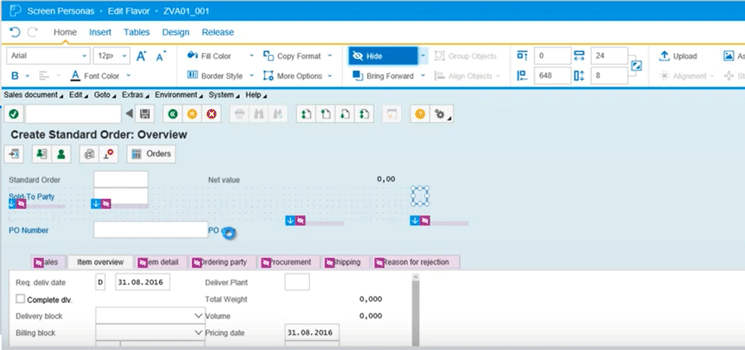
Figure 5
Hide tabs in the Create Sales Order transaction
You can improve the visualization of important fields such as Net value. I want to increase the size of the Net value field and its title. Select the Net value field. In the Home section of the toolbar use the options Fonts and Size of Fonts. In my example make the size of these fields 32px.
With the Hide button you can hide buttons at the top of the screen such as Orders and Sold To Party. Do not hide the Cancel, Return, Exit, and Save buttons.
In the toolbar, the Menu Items button allows you to enter a button with one of the menu options of the transaction VA01 Create Sales Order. First, you enter a new button with the name SAVE. In the Label area place the description SAVE. In the Menu Item field enter Sales DocumentCreate. Drag and drop the button to the right top. Increase its size. With the cursor, you are in the corner of the button. Drag to increase its size.
With the Fill Color button located on the toolbar of Screen Personas 3.0, you can add a color to the SAVE button. After you click the Fill Color button, a color palette is issued. Select the color Green to place your SAVE button.
You enter an additional button. Name it EXIT. The input method is similar to the steps executed with the SAVE button, except that in the Menu Item field, I entered Sales DocumentExit, and the color option red.
Step 4. Incorporate the Material and Services Buttons
At this stage, you incorporate buttons that allow for the quick selection of materials or services. The goal is to get a result like the one presented in Figure 6.

Figure 6
Incorporate buttons to select materials or services
As in the previous steps, change My Flavor: ZVA01_001. Move the SAVE and EXIT buttons to the left area of ??the screen. Then move the Net Value field to the left. Then these key parameters of the document will be in a highly visible area.
In the Sales tab, select multiple fields at once. (You select several fields to hide in the Sales tab.)
Click the SAP Screen Personas icon. In the screen that appears, adjust the flavor called ZVA01_001 by selecting it and clicking the edit icon.
To create more space, move the SAVE and EXIT buttons to the right side of the screen. Now increase the size of the box that contains the Net Value fields. Move the Net value field to the right side of the screen.
Hide the fields in the Sales tab and hide the block. The space you created on the screen can now be used for additional buttons that you may create later. Click the Exit button to save your changes.
Now populate the fields to create a standard sales order for the recording of a Button script. For my example, enter 1000000 in the Sold-To_Party field and 123 in the PO Number field. Click the SAP Screen Personas icon to record these changes for flavor ZVA01_001. In the screen that the system displays, click the Scripting button.
Click the up arrow icon and then click the create icon. In the field beside this icon enter a name for the new recording script (in my example it is ZSD_INSERT_MATERIAL). Click the blue check mark to the right of this field.
To add data for Material and Quantity to the recording, click the Start Recording button and then click the create item icon  .
.
Now you complete a sequence of steps to enter a new item in your sales order. Populate the Material and Order Quantity fields (for my example, enter 101000015 and 1, respectively). Note that the other fields (Description, ItCa, First Date) autopopulate after data is entered in the Material field. Click the Stop Recording button and then click the icon to save all your script changes.
You need to continue to modify flavor ZVA01_001. Select this flavor and click the edit icon. In the menu of the screen that appears, click Insert and then click the Script Button. In the Script Button pop-up screen, enter a name for the script button in the Label field (for my example, enter Material KIT A1). Click the Done button.
Note that Material KIT A1 button appears on the screen near the header. Move this button to the blank section of the screen and click the Assign icon button to assign an icon to this button. In the pop-up screen, select an icon, choose where it should be positioned (e.g., Left of Label), and click the Done button.
To script an event for this button, click Event and then click Script Events. Note that ZSD_INSERT_MATERIAL appears to the left of onClick. Select ZSD_INSERT_MATERIAL to enter it in the field to right of of onClick.
You can create many buttons with each having its own recording script. Highlight the Material KIT A1 button, click Toolbox, and click Clone Control. This action creates a duplicate button. You can create scripts for each button and repeat this step until you end up with a catalog of buttons.
You can insert custom colors to each button by highlighting the button, clicking Fill Color, and choosing a color from the menu.You can also hide some fields that you don't need.
You can increase the font size, specifically for the Customer field, by clicking the A option in the home menu and increasing or decreasing the font.
Now that you have recorded your design, you are ready to test it. Click the Exit button. For my example, you cycle from the start of the Create Sales Order transaction (transaction code VA01). In the screen that appears, enter the customer code (in my example, it is 1000000). Select any of the buttons on the lower section of the screen to enter material and quantity. Your test indicates that you have recorded your sales document, so click the SAVE button. The system displays a message that Standard Order 1 has been saved.
Diony J. Ruiz R.
Diony J. Ruiz R. is an SAP architect and senior consultant at Group Intellego. He has 12 years’ experience in SAP Sales and Distribution and SCE (Supply Chain Execution), Logistic Execution (LE), transportation, and warehouse management picking. He has additional knowledge in SAP MM (Materials Management).
He has worked in industries such as manufacturing, pharmaceuticals, logistics, third-party logistics distribution, services, public government, chemical, maritime and customs, metallurgy, automotive, and mining industries.
His roles have included SAP Consultant Specialist, Project Leader, and Area Leader.
He is an SAP Certified Professional.
You may contact the author at dionyruiz@gmail.com.
If you have comments about this article or publication, or would like to submit an article idea, please contact the editor.