Audit-proof your daily user management with SAP GRC Access Control’s Compliant User Provisioning capability. Learn about its main features and see an example of how to set it up for requesting, approving, and providing access to your business target systems.
Key Concept
Auto-provisioning refers to the automatic creation or change of user IDs and their access privileges in diverse target systems. A central system component (e.g., Compliant User Provisioning) triggers the actions.
Compliant User Provisioning (CUP) streamlines your user management processes and at the same time helps you stay compliant with regulations such as Sarbanes-Oxley. The automated workflow helps you avoid risks such as segregation of duties (SoD) violations. It also keeps records of access approvals so that you can create reports for management and auditors.
SAP GRC Access Control prevents access and authorization risks in cross-enterprise systems through its four main product capabilities: CUP, Risk Analysis and Remediation (RAR), Enterprise Role Management (ERM), and Superuser Privilege Management (SPM). These product capabilities allow for definition, detection, and remediation of SoD and critical access risks, compliant user provisioning, and enterprise role management as well as audit-proof management of super or emergency users, respectively.
After an overview of the main concepts of the CUP application, I’ll summarize the required steps to initialize the application after its installation. Finally, I’ll show you a simple example of a three-step workflow in CUP.
CUP Main Features
CUP comes with the following main functionalities:
- Workflow engine
- Risk analysis, mitigation, and simulation during request approval
- Auto-provisioning to SAP and non-SAP systems
- Integration with identity management solutions
- Password self-service
- User access review
- SoD review
- Audit trail
- Analytical reports
Workflow Engine
The central piece of CUP’s functionality is a workflow engine for approval workflows that are used in the context of access requests. The workflows are also shared by other SAP GRC Access Control 5.3 product capabilities for approvals of changes to risks and mitigation controls, their assignments in RAR, or role approvals in ERM. However, I’m focusing on approval workflows for access requests.
Each workflow consists of the following elements: an initiator, one or multiple approval stages, and a workflow path defined by both an initiator and a sequential order of the approval stages (
Figure 1). You can create multiple workflow paths for different structures and use them in parallel. You use initiators to determine the appropriate workflow path for a specific request based on values of request attributes such as department, location, or request type. These attributes are customizable and selected by the requester in the request form that is sent with the request. You only need multiple workflow paths and more than one initiator if you need your requests to go through structurally different paths.
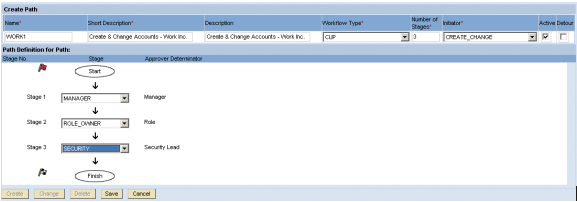
Figure 1
Workflow path WORK1 consisting of the initiator CREATE_CHANGE and the three approval stages MANAGER, ROLE_OWNER, and SECURITY
Workflow paths are structurally different if they come with either a different number or order of approval stages or contain entirely different approval stages. If you want to use two structurally different workflow paths for your requests depending on the values of one or multiple request attributes, then you need to assign these values to two distinct initiators. You also must ensure that each possible selection of request attributes matches exactly one initiator (i.e., initiators may not overlap with respect to the attribute values assigned to them). This ensures that each request always triggers a workflow and that each request always matches a unique path. A typical example is employing a simplified approval workflow with fewer approval stages for requests of request type Unlock Account than for New Account.
You always have to select an approver determinator in CUP when defining an approval stage. The approver determinator establishes the responsible approver for the stage. The following options are available when selecting an approver determinator:
- Security or IT department lead
- Point of contact (POC)
- Application approver
- Business process owner (BPO)
- Role
- Manager
- Super access owner
- Super access coordinator
- Custom approver determinator (CAD)
The first four approver determinators in the above list are maintained in terms of approver user IDs during the customizing of CUP. POC, application approver, and BPOs are defined per functional area, application, and business process, respectively. These are also defined during CUP customizing. The approver determinator role refers to owners that you can assign to each role available in CUP for selection in access requests. If a request contains multiple roles with different owners, the request is split and sent to the inboxes of these role owners. Manager refers to a line manager of the user stated in the request.
CUP can retrieve this information automatically from an SAP ERP HCM system or an LDAP directory, or the requester can maintain it manually in the request page. Of course, the last option is not very reliable. Super access owners and coordinators are only used in the context of requesting Firefighter IDs in SPM through CUP and are beyond the scope of this article. CADs provide a way to relate values of request attributes with approvers. Based on the values the requester selects in the request form, the CAD evaluates the responsible approver and routes the request to his or her inbox for approval.
By default, the request form comes with a number of fields for request attributes (
Figure 2). Some of them are mandatory by default, such as Request Type, Priority, Application, Last Name, User ID, and E-mail address. Others are optional, including Department, Location, and SNC Name. You can customize the request form in two ways.
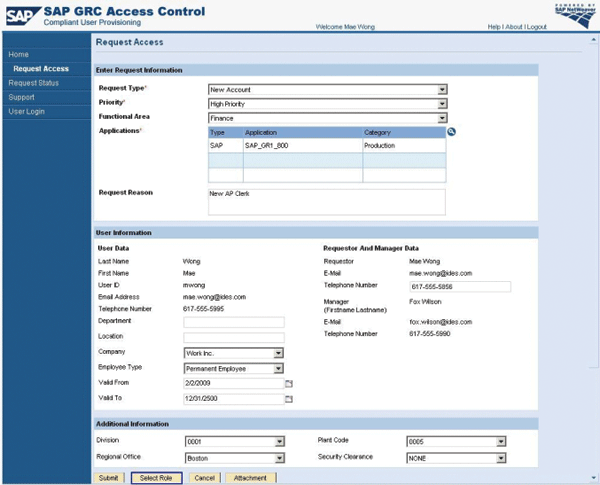
Figure 2
Default request form with four custom fields appearing in the Additional Information section
For one, you can add custom fields that you can later use to define initiators and CADs. Alternatively, you can manipulate the appearance of the existing fields and determine whether they are mandatory, editable, or visible, and then assign default values. This allows for simplifying the request form and increasing usability of CUP considerably.
Figure 3 displays an example for a simplified request form.
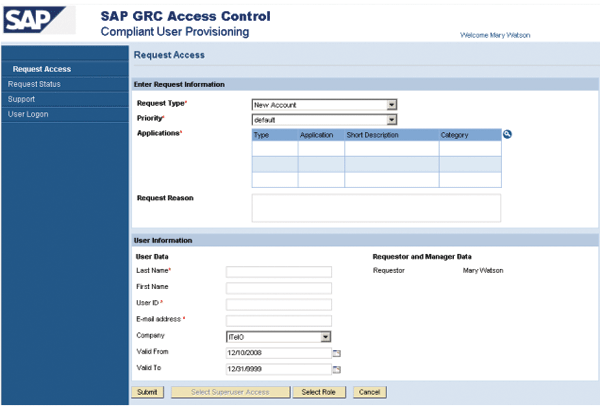
Figure 3
Example for a simplified request form
CUP can send email notifications to all stakeholders involved in the workflow: user, requester, manager, and other approvers. If a user exists in one or multiple systems, then the email to the affected user can also contain a link allowing one-time access to the initial password. You can suppress this link if you have a single sign-on environment in which passwords aren’t needed.
In CUP, you can configure which stakeholder receives an email notification as a reminder or upon events such as request submission, approval, rejection, closure, or escalation (which takes place if no approval or rejection occurs at a given approval stage within a configurable number of days).
In addition to the email notification, the system can react in the case of an escalation in one of the following ways: no action at all, forward the request to next approval stage, forward to an alternate approver defined with the approver determinator, or forward to the administrator, whose contact information must be maintained in CUP customizing. Approvers can always avoid escalations during their absences using the approver delegation feature.
CUP’s workflow engine also comes with advanced features such as detour workflows, forked workflows, and escape routes. You use these features to handle requests that fulfill specific conditions or trap into exceptions (e.g., a stage is approved by role owner, but no role owner is defined so CUP doesn’t know where to send the request):
- Detour workflows. These are alternative paths through which you can route a request starting from a specific stage in the presence or absence of a certain condition, such as SoD Violations Detected or Roles with No Role Approver.
- Forked workflows. These are available only when separating workflows by SAP and workflows by non-SAP applications. A forked workflow has a single initiator but two distinct paths. The decision point for a fork is the initiator that calls the workflow. The decision itself is based on whether the requested access is for an SAP application or for a non-SAP application. If the approval process for a user request is the same for access to SAP applications as it is for non-SAP applications, there is no reason to use a forked workflow to manage the request.
- Escape route. You can globally define an escape routein CUP to route requests to handle one of the following exceptions: No approver found at the first stage, no approver found at a later stage, and auto-provisioning failed. For example, you can route the request directly to a security administrator to analyze the situation further.
Risk Analysis, Mitigation, and Simulation During Request Approval
Another key feature of CUP is the availability of risk analysis, mitigation control assignment, and a simulation feature allowing the approver to perform a what-if analysis before making the decision to, for instance, reject or replace roles within the request. Technically, these features are taken from RAR and consumed per Web service call. It is also configurable if requests may be approved despite SoD violations.
Auto-Provisioning to SAP and Non-SAP Systems
CUP comes with the ability to auto-provision to the SAP system (including SAP NetWeaver Portal) and non-SAP business applications as stated in SAP Note 1076755. You can use auto-provisioning in combination with SAP Central User Administration (CUA). The system supports multiple CUAs, and you can also provision to SAP back-end systems that aren’t connected to any CUA. A field mapping feature allows for the mapping of CUP standard or custom fields to fields specific to the target back-end system (SAP or non-SAP) for correct provisioning of all user attributes.
Integration with Identity Management Solutions
CUP also integrates with SAP NetWeaver Identity Management and other third-party identity management (IDM) solutions and can add Sarbanes-Oxley compliance to these IDM solutions. Technically, this works via a number of Web services that these solutions can consume for risk analysis, request submission to CUP, retrieval of status, or audit trail information. For more information on this topic, refer to chapter 7 in the standard GRC Access Control 5.3 Configuration Guide accessible via
https://websmp105.sap-ag.de/~sapidb/011000358700001913042008E/AC53_Config_Nov_2008.pdf.
Password Self-Service
The password self-service allows end users to reset their passwords in SAP back-end systems without having the SAP help desk or the SAP security group involved. When a user enters a request for a password reset, CUP validates the identity of the user in one of the following ways:
- Challenge response: The user must answer multiple previously registered secret questions
- SAP ERP HCM authentication: The user must provide personnel information that is validated against the employee data in SAP ERP HCM
- PeopleSoft HR authentication: The user must provide personnel information that is validated against the employee data in PeopleSoft HR module
After the system verifies the user, it resets the passwords and sends an email to the user based on the email address configured for that user.
User Access Review
CUP also comes with features to reassess the access already granted to your user population on a regular basis. This is an important requirement often raised by auditors because circumstances under which access was granted may change and users may shift their responsibilities over time. Deprovisioning is a well-known concern among auditors. CUP offers the User Access Review (UAR) and the SoD Review for this purpose.
UAR supports internal compliance teams during annual or semi-annual user access reviews. CUP generates reports and sends them to business managers to review their direct reports’ access to business applications. The managers need to approve or trigger removal of roles assigned to their direct reports. This decision is facilitated by role usage information, which states how many times a role was used by a given user during the review period. If the manager selects some roles for removal, then a detour workflow is engaged and the system sends a request with the selected roles to the security team for final approval and automated role deprovisioning. UAR also supports a variation of the same scenario in which the review is performed by role owners rather than by the line managers.
SoD Review
The SoD Review supports the regular review of SoD violation and the reaffirmation of mitigation controls. In many organizations, the SoD review process is done with a decentralized approach by line managers in the respective business areas. The SoD Review generates a report of SoD violations found at direct reports and sends it as a request to the inbox of the responsible line manager. The manager either triggers removal of at least one of the conflicting functions causing the SoD violation or assigns a mitigation control report to mitigate the risk. He is supported in his decision making by a usage counter for each one of the conflicting functions. This helps identify functions that are less frequently used by the affected user for removal.
After the review, the manager submits the request, which the system sends to the security stage. The security team responsible analyzes what needs to be removed from the back-end system and takes the appropriate action. Note that the deprovisioning of functions can’t happen automatically, because multiple functions may be contained in a single role assigned to the affected user. Therefore, the security team must make more complex decisions. It needs to decide whether to replace role assignments of the affected user with other roles that do not contain the conflicting functions and even apply changes to the role concept in the back-end systems. The SoD Review also supports a variant of the same scenario in which the review is performed by the risk owners defined in RAR rather than by the line managers.
Audit Trail
CUP contains a detailed audit trail displaying all actions taken and all requests that were created in CUP over time. This ensures end-to-end auditability along the entire access approval and provisioning process. You can search for access requests by applying a long list of search fields, including all custom fields, and then display the audit trail of the selected request (
Figure 4). A change log to track changes in CUP customizing and workflow settings is also available in CUP.
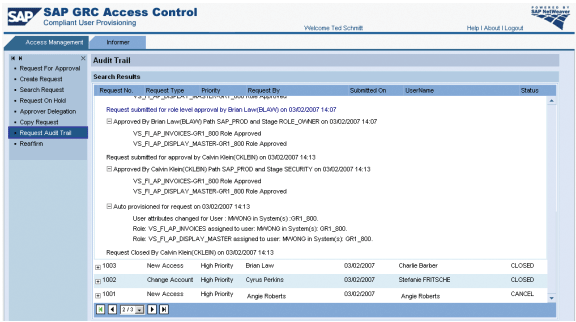
Figure 4
Request audit trail
Analytical Reports
CUP comes with a number of analytical reports:
- Service Level for Requests: Enables you to analyze requests based on service levels defined in CUP customizing
- Requests with Conflicts and Mitigations
- Requests by Roles and Role Approvers
- List Roles and Role Approver
- Requests by PD/Structural Profiles
- Approver Delegation: Enables you to search for configured delegation
- SoD Review History: Provides the history of actions performed on SoD review tasks, including mitigation reaffirmation
- User Access Review History
- User Review Status: Provides the request status for SoD review and UAR
CUP also summarizes all requests created in pie and bar charts that allow for filtering and detailed drill-down analysis. The following chart views are available:
- Access requests: Displayed by request type and status, such as approved, rejected, canceled, open, and hold
- Risk violations: Requests with no violations, violations, and mitigations are displayed in a pie chart. The violations are displayed by criticality high, medium, and low in a pie chart.
- Provisioning: Roles and user provisioned or deprovisioned
- Service level: Request count by year and month and service-level violations
Note
My overview does not contain all CUP features. A complete list of new features coming with the latest release is available in the SAP GRC release notes, which you can access via
https://service.sap.com/releasenotes.
CUP Post-Installation Tasks
After software installation, you need to apply a number of post-installation steps to initialize CUP so you can start building workflows. I will summarize these steps assuming that you are logged on to CUP as an administrator user. For more details, refer to SAP standard documentation or the eLearning available in SDN at
https://www.sdn.sap.com/irj/sdn/go/portal/prtroot/docs/library/uuid/101c5684-5b59-2b10-538c-fbd473f952d7.
Step 1. Upload roles and create an administrator user for CUP. With the installation .zip file comes the file ae_ume_roles.txt. It contains three UME roles: AEADMIN (CUP administrator role), AESecurity (role for security team members), and AEApprover (required for all users approving requests in CUP). These roles represent the starting point for your security concept for CUP. Log on to UME, import the text file, create a user, and assign the first of the above-listed roles.
Step 2. Upload initial data into CUP. The software comes with three .xml files called AE_init_clean_and_insert_data.xml, AE_init_append_data.xml, and AE_init_append_data_ForSODUARReview.xml. You only need the last file if you intend to use UAR or SoD Review. Navigate to Configuration > Initial System Data and upload the first file. Make sure you check the Clean and Insert option and, in the other two files, the Append option.
Step 3. Follow menu path Configuration > Connectors > Create, and create system connectors to all the back-end systems to which you want to provision — as well as to the directory servers you want to use as user data sources. If the manager information is to be retrieved from an SAP ERP HCM system, select the HR manager path in the connector page. If the manager information is to be retrieved from a directory, map the CUP manager field to the manager attribute of your directory in menu path Configuration > Field Mapping > LDAP Mapping.
Step 4. Configure a search data source for searching users and a user details data source to retrieve user attribute data, such as telephone number or location. Navigate to Configuration > User Data Source and select from the various options, such as UME, SAP, SAPEP, LDAP, or ORAAPPS. LDAP is common because the corporate directory often contains the most complete and up-to-date user attribute data.
Step 5. Optionally, configure an authentication system for requester authentication. Approvers always have to authenticate to log on to CUP. Requester authentication is recommended but optional. Navigate to Configuration > Authentication. Similar options as in step 4 are available. Select one of them. If the User Management Engine (UME) of your SAP NetWeaver application server is connected to your corporate directory, it might be a good choice.
Step 6. Configure an SMTP server for email notifications in Configuration > Workflow > SMTP Server.
Step 7. Configure risk analysis. Risk analysis in CUP is consumed as an RAR Web service. Therefore you have to provide in Configuration > Risk Analysis the corresponding universal link identifier (URI) for this Web service and a user with a password in RAR who has the required permissions in RAR to execute risk analysis. The risk analysis is always executed against the default rule set defined in RAR and always includes risks of all criticality levels.
Step 8. Configure mitigation. Similar to risk analysis in CUP, the ability to assign mitigation controls during request approval is consumed as a number of RAR Web services. Navigate to Configuration > Mitigation and enter URIs of the mitigation Web service, risk search, org. rule search, and function search Web services. In the same screen, you can select a check box to allow approvers to approve access requests despite conflicts found during risk analysis.
Step 9. Configure the miscellaneous page. Navigate to Configuration > Miscellaneous. In the upper section of this page, select the default language in CUP and the log level ERROR, unless you are troubleshooting. In the lower section of the page, activate the workflow types you want to use. This includes User Access Review, SoD Review, Role Reaffirmation, and approval workflows that are triggered by other product capabilities, such as risk approval, mitigation control approval, mitigation assignment approval (all triggered by RAR), and role approval (triggered by ERM).
Step 10. Define a number range. All requests in CUP are numbered. You need to create a number range in Configuration > Number Ranges and activate it.
Step 11. Create role attributes. Before you can create or import into CUP roles to be available for selection in access requests, you need to create role attributes you want to assign later to your roles. Well-defined attributes can tremendously help your requesters choose the right roles in their access request and can also be used in CADs. Navigate to Configuration > Attributes and create the following role attributes: company of role, functional area of role, application area of role, business process including business process owner (BPO) user IDs, and business subprocess. Optionally, you can also define approvers for combinations of the two attributes in the Functional Area and Company screen.
Step 12. Create or import roles into CUP. All roles that end users later need available for selection in access requests must be previously created or imported into CUP. If you are using ERM on the same SAP NetWeaver application server, you can also synchronize the roles with ERM. You can perform role import by directly reading from the back-end systems or via an Excel spreadsheet. For the latter method, you can download a template from Configuration > Roles > Import Roles. Importing via spreadsheet also allows for easy assignment of role attributes created in step 11 to your roles in Excel prior to the role import.
Note
Some more advanced features for managing roles are available in CUP. Check SAP standard documentation for default roles configuration and role mapping.
Example Best Practice Workflow
Let’s set up an example workflow in CUP. A common approval workflow for access requests comes with three approval stages (
Figure 5). The first approver is usually the line manager of the requester. Then the role approvers of the selected roles approve their roles contained in the request. If the request contains multiple roles with different role approvers, the request splits accordingly. After approval of all affected role approvers, the request is sent to IT security for final approval, which triggers auto-provisioning of the request to the back-end systems.

Figure 5
Example workflow with three stages: Manager, role owner, and IT security approval
You need to use the workflow for the access request of types New Account and Change Account, which belong to the company Work Inc. This means you need to create the following workflow elements:
- An initiator triggering the workflow for request type New Account or Change Account and company Work Inc.
- A workflow stage with approver determinator Manager
- A workflow stage with approver determinator Role
- A workflow stage with approver determinator Security Lead
- A workflow path containing all above workflow elements.
To create the initiator, navigate to Configuration > Workflow > Initiator and create an initiator as shown in
Figure 6. Provide a name, short description, and a description for the initiator. Select workflow type CUP from the drop-down list. Then select the request attributes, for which the initiator triggers a workflow. In this example, these are either request type New Account or Change Account and company Work Inc.
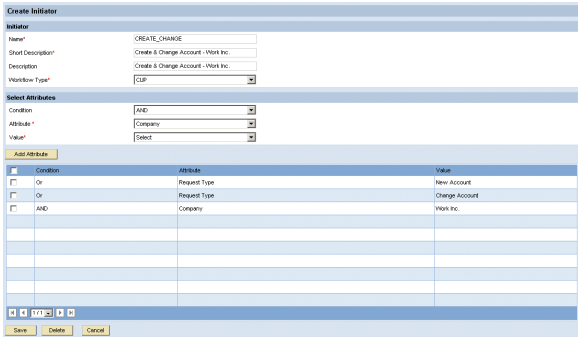
Figure 6
Create an initiator triggering a workflow
Then create the first stage for manager approval as shown in
Figure 7. Navigate to Configuration > Workflow > Stage. Enter a name, short description, and a description for the stage. Then select Manager as approver determinator. You can skip the optional settings for escalations and turn to Notification Configuration. In this example, I decided to send notification emails to the affected user, manager, and requester in the case of request approval and rejection in this stage. You can design the content of the email in the HTML Editor using the Email Arguments drop-down list to use formula parameters to specify attributes such as the user, request number, and type.
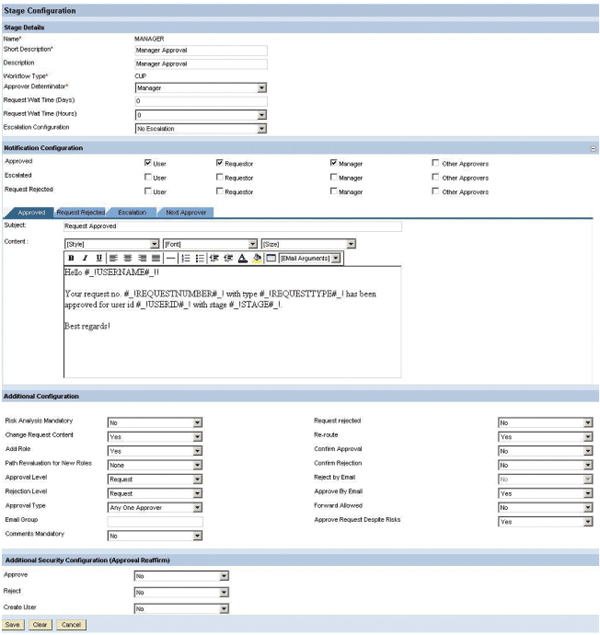
Figure 7
Approval stage for manager approval
Continue with the settings in Additional Configuration and Additional Security Configuration (Approval Reaffirm). For the sake of brevity, I won’t explain them all completely and refer to the SAP standard documentation. Here are a few comments:
- Risk Analysis Mandatory: Means that approver is obliged to use the risk analysis prior to request approval
- Change Request Content:Allows approvers to delete roles from a request
- Add role: Allows approvers to add or replace roles in a request
- Approval and Rejection Level: Determines whether approvers have the authorization to approve or reject the entire request or just on the role level. Our manager and security approval stage should have the first option selected, while the role owner approval stage should have the second one.
Continue with the creation of the second and third approval stages for role owners and IT security. Select as approver determinator Role and Security Lead, respectively.
Now you are ready to create the workflow path that links the initiator and the three stages together. Navigate to Configuration > Workflow > Path and create the path as shown in
Figure 1.
Finally, you need to activate auto-provisioning in Configuration > Workflow > Auto Provisioning as shown in
Figure 8. I activated it globally and selected the option to Create If User Does Not Exist.
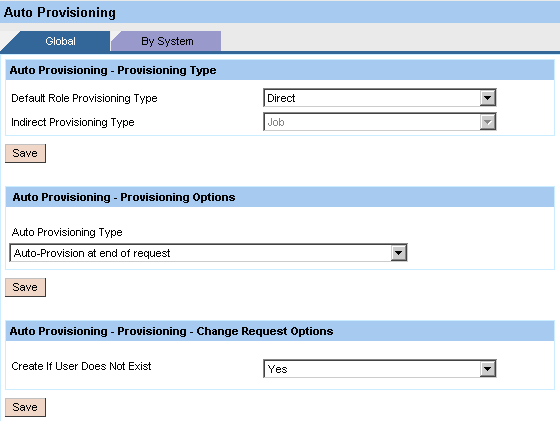
Figure 8
Auto-provisioning has been activated globally (e.g., for all connected systems)
This completes the configuration of a simple workflow with three stages. Of course, you could add features to the workflow such as an escape route or a detour workflow to handle exceptional situations — for example, when the manager attribute in the directory is not maintained or no role approver is assigned to the selected roles. It is also possible to provision user defaults such as default language, date format, or printer settings in the SAP back-end systems.
Request and Approve Access with the Example Workflow
Now Mae Wong (
Figure 5) can safely create a request for her new account (
Figure 2), select some roles (
Figure 9), and submit the request. The role attributes help Mae identify the roles she needs to do her work in the SAP system.
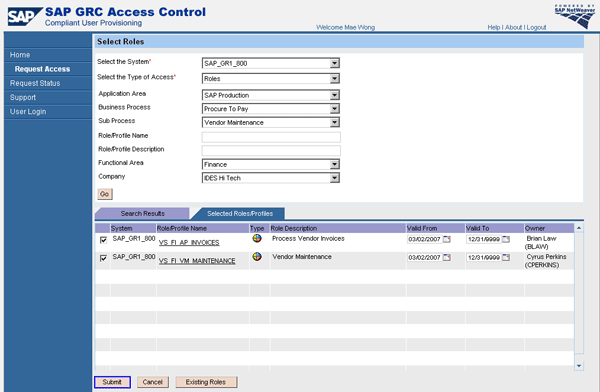
Figure 9
Mae Wong’s selection of roles in her access for a new account
After submission, Mae’s manager Fox Wilson receives an email notification and accesses his inbox to check Mae’s request for approval. Clicking on the Risk Analysis button tells him that Mae’s role selection comes with risk violations, but which role should he delete from the request to remediate? Fox chooses a role and clicks the Simulate button to analyze whether the risk violations would disappear if he deleted the role from the request (
Figure 10). Alternatively, Fox could also click the Mitigate button to assign a mitigation control report to mitigate the risk. Finally, he approves the request.
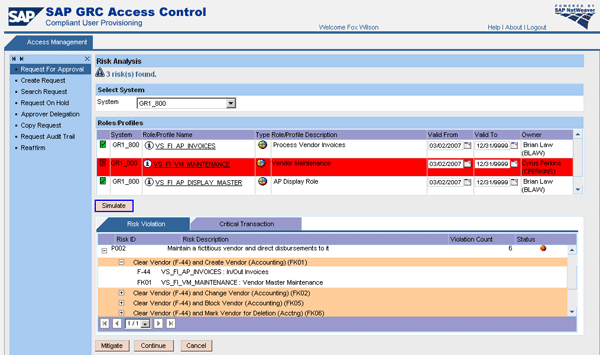
Figure 10
Mae’s manager Fox Wilson selects one role and simulates how its removal would affect the risk analysis
The request reaches the second stage and appears in the inbox of the role approver, Brian Law, for the remaining two roles. After his approval, the request moves on to the last stage. After IT security approval, the request is auto-provisioned, Mae’s user is automatically created in the SAP back-end systems, and the two remaining roles are assigned (
Figure 11). An email containing a link for one-time access to the initial password is sent to Mae. The request is closed, but its audit trail remains available.
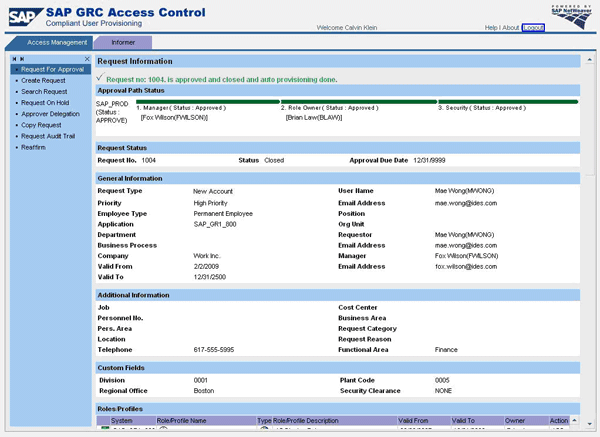
Figure 11
Approval of IT security in last approval stage triggers auto-provisioning of the request to the affected back-end systems
Frank Rambo, PhD
Frank Rambo, PhD, is managing a team within SAP’s Customer Solution Adoption (CSA) organization working with customers in the SAP analytics area with the objective to drive adoption of new, innovative solutions. Prior to this position, he worked eight years for SAP Germany as a senior consultant focusing on SAP security and identity management. Before he joined SAP in 1999, Frank worked as a physicist in an international research team. He lives in Hamburg, Germany.
You may contact the author at
frank.rambo@sap.com.
If you have comments about this article or publication, or would like to submit an article idea, please contact the
editor.


