SAP Professional Journal
Learn how to minimize multiple access requests by configuring SAP Access Control so that you can manually provision access for non-SAP applications.
Key Concept
Transaction code SPRO is used for setting up SAP Access Control configuration settings. You execute SPRO to integrate non-SAP Remote Function Call (RFC) connections with the logical file path and the physical file name in SAP Access Control.
Automated provisioning of SAP access is one of the core functionalities of SAP Access Control 10.0. However, manual provisioning of non-SAP access can be enabled in SAP Access Control 10.0 without any integration with SAP or non-SAP identity management solutions. The manual provisioning feature enables tracking of approvals for non-SAP application access requests, leading to compliance with enterprise-wide access request processes.
To configure SAP Access Control 10.0 to enable the manual provisioning process for non-SAP applications, you need to complete three steps:
- Configure file path settings
- Configure SPRO settings
- Set up the role upload process
Configure File Path Settings
Synchronizing non-SAP roles into SAP Access Control 10.0 is a key task in enabling manual provisioning. To load non-SAP roles to SAP Access Control, upload files are leveraged. Execute transaction code FILE to define parameters as part of a one-time set-up task.
The first step is to set up the logical file path to define the file names and the file path that are required for uploading the data into the SAP GRC system. Log on to the SAP GRC system and execute transaction code FILE. After you click the Logical file Path Definition folder, the screen displays a list of all the existing file names (
Figure 1). To create a new file name, click the New Entries button and enter the file path technical name and a description. Use the SAP custom naming convention Z to define role, role-action, and role-action permission files.
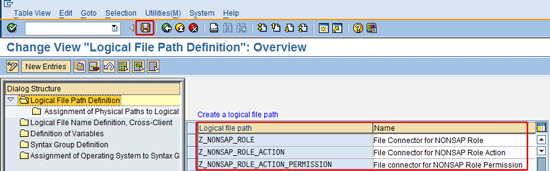
Figure 1
Logical file paths
After you create a logical file path, the next step is to assign the physical path and file name. Select the logical file path Z_NONSAP_ROLE, click the subfolder Assignment of Physical Paths to Logical path, and click the New Entries button. The system displays a screen like the one shown in
Figure 2. In the Syntax group field enter UNIX, and in the Physical path field, enter /usr/sap/GRC/NONSAP/<FILENAME>. Click the save icon to save the Physical Path details.
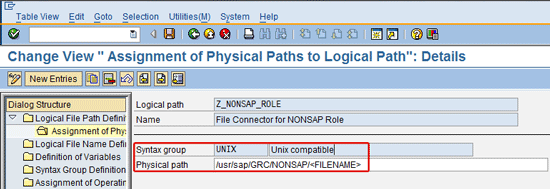
Figure 2
A logical file path for a role
The physical path is the directory location in the GRC application server in which the physical files are uploaded.
For physical file location, make sure the directory exists in the OS level and then use transaction code AL11 for adding the directory in the application server. In general, access for setting up a directory in servers is restricted to a Basis administrator; therefore, coordinate with your Basis team to set up the physical file location on the GRC server.
For defining the Physical path for the role action file, select the Logical File Path Definition folder and enter the logical file path Z_NONSAP_ROLE_ACTION. Click the subfolder Assignment of Physical Paths to Logical path (
Figure 3). Click the New Entries button. In the screen shown in
Figure 3, enter UNIX in the Syntax group field and /usr/sap/GRC/NONSAP/<FILENAME> in the Physical path field. Click the save icon.
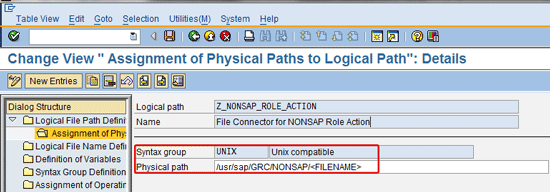
Figure 3
The logical file path for the role action file
Repeat the process described above to assign a physical path and file name for the logical file path Z_NONSAP_ROLE_ACTION_PERMISSION. In the screen shown in
Figure 4, enter UNIX in the Syntax group field and /usr/sap/GRC/NONSAP/<FILENAME> in the Physical path field. Click the save icon to save the configuration.
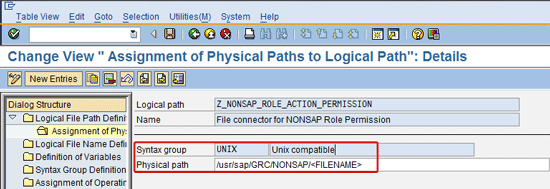
Figure 4
The logical file path for role action permission
After you define the logical file paths, the next step is to define the logical file name. Execute transaction code FILE, select the Logical File Name Definition folder and click the New Entries button. To add the role logical file, populate the following fields as shown in
Figure 5 and then click the save icon to save the entries:
- Logical file:Z_NONSAP_ROLE
- Name:File Connector to NONSAP role
- Physical file: LEGACY_ROLE.txt
- Data format:ASC
- Logical Path:Z_NONSAP_ROLE
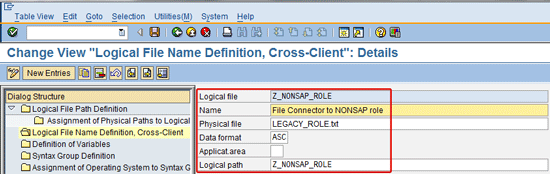
Figure 5
The logical file name for the role
Now select the Logical File Name Definition folder and click the New Entries button. To map the role action logical file to the physical file, populate the following fields as shown in
Figure 6 and then click the save icon to save the entries:
- Logical file: Z_NONSAP_ROLE_ACTION
- Name: File Connector to NONSAP Role Action
- Physical file: LEGACY_ROLE_ACTION.txt
- Data format: ASC
- Logical path: Z_NONSAP_ROLE_ACTION
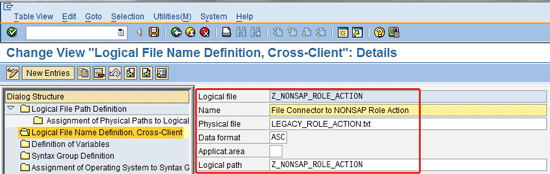
Figure 6
The logical file name for role action
Again, select the Logical File Name Definition folder and click the New Entries button. To map the role permission logical file to the physical file, populate the following fields as shown in
Figure 7 and then click the save icon to save the entries:
- Logical file: Z_NONSAP_ROLE_ACTION_PERMISSION
- Name: File connector to NONSAP Role Permission
- Physical file: LEGACY_ROLE_PERMISSION.txt
- Data format: ASC
- Logical path: Z_NONSAP_ROLE_ACTION_PERMISSION
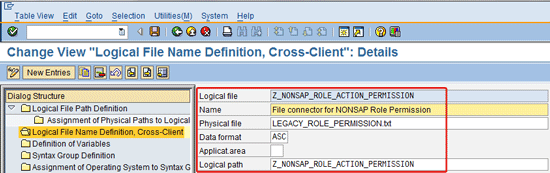
Figure 7
The logical file name for role action permission
Configure SPRO Settings
Now I describe the steps required to integrate non-SAP Remote Function Call (RFC) connections with the logical file path and the file name.
Define an RFC connection. An RFC connection is required for setting up a FILE connector in the GRC system. The RFC connection setup is defined for a non-ABAP system. Execute transaction code SM59. In the screen that appears, click the create icon and enter the RFC destination as NONSAP in the RFC Destination field. Enter L in the Connection Type field and add GRC10 connector for NONSAP as the description (
Figure 8) and then click the save icon to save the entries. As a best practice to secure the system connection, maintain the RFC user and password.
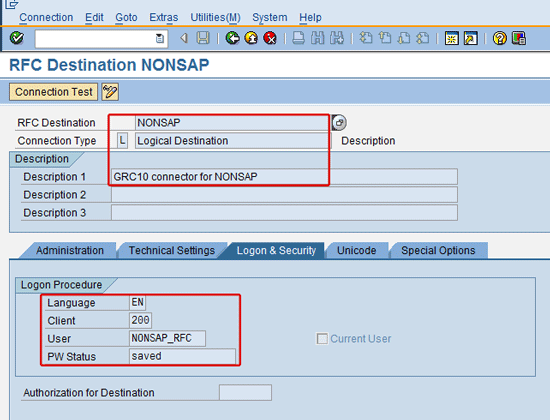
Figure 8
Create an RFC
After you set up a non-SAP system RFC, follow the regular procedure of the initial configuration steps that are required for setting up a connector, connector settings, and mapping actions.
To set up a connector, execute transaction code SPRO and follow menu path Governance, Risk and Compliance > Common Component Settings > Integration Framework > Maintain Connectors and Connection Types. In the screen that appears, double-click the Define Connectors folder and then click the New Entries button (
Figure 9).
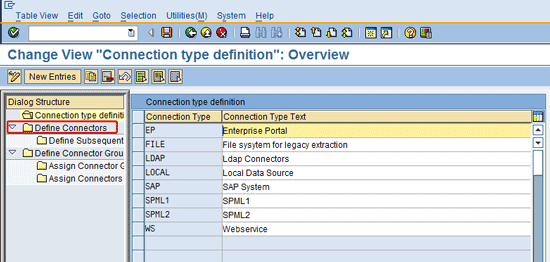
Figure 9
Set up a connector
In the next screen you add the NONSAP connector. Populate the following fields as shown in
Figure 10 and then click the save icon to save the entries:
- Target Connector: NONSAP
- Connection Type: FILE
- Source Connector: NONSAP
- Logical Port: NONSAP
Max No. of BG WP: 2 (This value depends on the number of background work processes defined in your GRC system. In my example it is 2.)
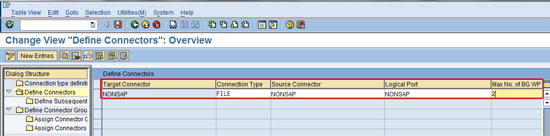
Figure 10
Define a connector
After you define the NONSAP connector, the next step is to map it to the File connector group. This step is required for grouping the non-SAP systems and mapping actions. In the screen shown in
Figure 10, double-click the Select Define Connector Group folder and click the New Entries button. Populate the following fields as shown in
Figure 11 and then click the save icon:
- Connector Group: Z_NONSAP
- Connector Group Text: NONSAP
- Con. Type (Connection Type): FILE
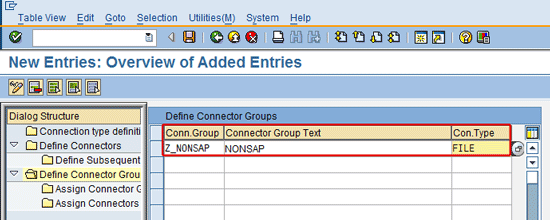
Figure 11
Define a connector group
To map the NONSAP connector to the newly created group, select the Assign Connectors to Connector Groups subfolder and then click the New Entries button (
Figure 12). Click the row under Target Connector and then press the F4 key. The screen displays a list of connector values. Choose the NONSAP connector and press Enter to populate the connection type. Click the save icon to save the entries.
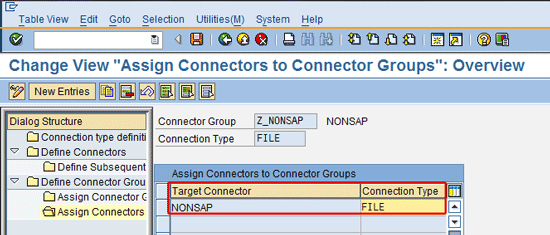
Figure 12
Assign a connector to a connector group
To map actions for the NONSAP connector, execute transaction code SPRO and follow menu path Governance, Risk and Compliance > Access Control > Maintain Mapping for Actions and Connector Groups. In the screen that appears, double-click the Assign default connector to connector group folder and then select click the New Entries button. Populate the following fields as shown in
Figure 13:
- Conn Group: Z_NONSAP
- Action: 0003 (authorization maintenance)
- Target Connector: NONSAP
- Default: Check this box as a default (If there are multiple systems associated with the connector group, only one connector can be marked as default.)
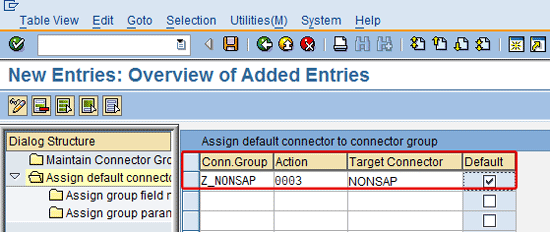
Figure 13
Map an action
Define the file path. In the connection settings, integrate the File path and file name definition.First, maintain an authorization integration scenario for the NONSAP connector. Execute transaction code SPRO and follow menu path Governance Risk and Compliance > Common Component settings > Integration Framework > Maintain connection settings. The screen displays a separate window with a list of integration scenario options. Select AUTH integration scenario, double-click the Scenario - Connector link folder, and click the New Entries button. Click the row under Target Connector and press the F4 key. The screen now displays a list of connector values. Choose the NONSAP connector and press Enter to populate the connection type and text. Click the save button to save the entries. Enter NONSAP as the Target connector and click the save icon to save your entries (
Figure 14).
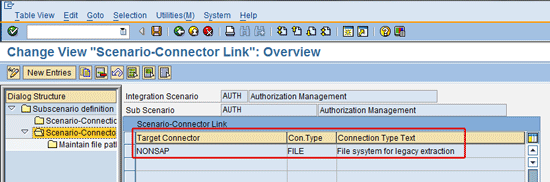
Figure 14
The Integration Scenario-Connector Link
After you set up the integration scenario, select the NONSAP connector entry and double-click the subfolder Maintain file paths for logical connector. Click the New Entries button. Enter details in the File Path, File ID, and Field Sep. columns as shown in
Figure 15.
The File Path and File ID are preconfigured in the transaction code FILE, so the same details are leveraged for integrating the files with the NONSAP connector as defined in
Figure 15. Click the save icon to save your entries.
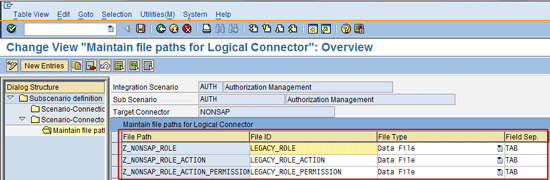
Figure 15
Maintain file paths under Maintain connection settings
Define provisioning settings. The provisioning scenario that you intend to leverage is manual provisioning. Therefore, you must enable the configuration setting for the respective non-SAP RFC connector. Execute transaction code SPRO and follow menu path Governance Risk and Compliance > Access Control > User Provisioning > Maintain System Provisioning. In this screen, click the Maintain System Provisioning folder and click the New Entries button. Enter NONSAP in the Target Connector field. In the Auto Provisioning field, click the icon to display a list of options available. Choose Manual provisioning from this list. In the Role Provisioning Ty field, click the icon to display a list of options available. Choose Direct from this list (
Figure 16). Click the save icon.
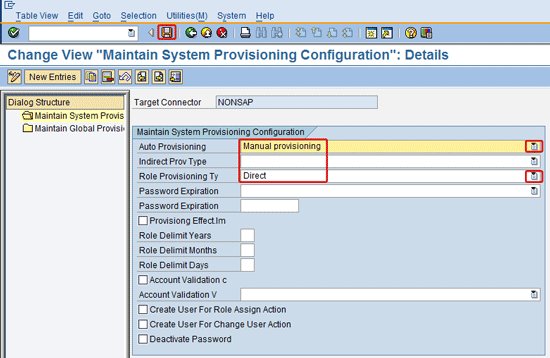
Figure 16
System provisioning settings
Set Up the Role Upload Process
In order for the role to be available during access request submission, roles need to be uploaded to SAP Access Control system using the role import procedure. Files required for uploading the role information are manually defined using Excel and saved locally on to the computer (laptop or desktop). Therefore, I use the desktop option to upload the non-SAP roles.
Define upload files. To create an upload file, define a role file using the following fields in Excel:
- In the Role name field, enter the technical name of the role (e.g., PA_APAC GRP_1000).
- In the Role description field enter a short description to identify the role functionality (e.g., Profit Analyzer – Profit Center).
- In the Language field, enter EN (EN means English)
Save the Excel file you created as a text file (tab delimited) with encoding UTF-8. The role file-naming convention should be aligned with the role physical file name defined in the transaction code FILE (refer back to
Figure 5), Therefore, the file name used is LEGACY_ROLE (
Figure 17).
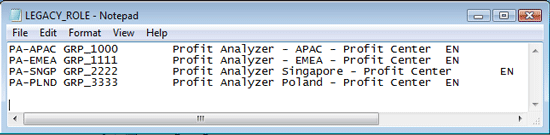
Figure 17
A role file
To define a role action file, use the following fields in Excel:
- Role name: Enter the technical name of the role (e.g., PA_APAC GRP_1000)
- Transaction code: Enter the technical name of the transaction code associated to the role (e.g., DUMMY).
To upload the role information, you use a role action based on the application functionality appropriate action codes that need to be used. Save this file as a text file (tab delimited) with encoding UTF-8. The role action file naming convention should be aligned with the role action physical file name defined in the transaction code FILE (refer back to
Figure 6). Therefore, the file name used is LEGACY_ROLE_ACTION (
Figure 18).
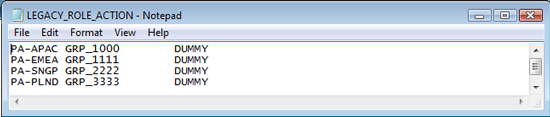
Figure 18
A role action file
To define a role permission file, use the following fields in Excel:
- Role name: The Technical name of the role (e.g., PA_APAC GRP_1000)
- Permission: The transaction code with an associated permission field that is required to be used (e.g., DUMMY||ACTVT)
- Value From: Transaction activity value (03 is referred as display)
- Value To: Transaction activity value (* is referred as full access)
To upload the role information based on the application functionality, the appropriate actions and values are required to be used; if any values are not applicable, they can be left blank.
Save this file as a text file (tab delimited) with encoding UTF-8. The role permission file naming convention should be aligned with the role permission physical file name defined in the transaction code FILE (refer back to
Figure 6). Therefore, the file name used is LEGACY_ROLE_PERMISSION (
Figure 19).
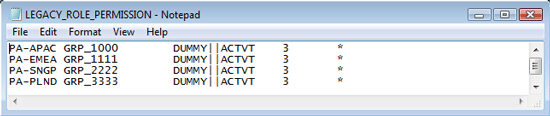
Figure 19
A role permission file
Upload the files. After you create the files, the next step is to upload the files to the file server. Coordinate with your Basis team for uploading the files to the server. Execute transaction code AL11 to verify files are uploaded to the server. After you execute AL11, a list of all SAP directories is displayed. From that list select the NONSAP directory (confirm with your Basis team for the name of the directory). After you double-click the directory name, the screen shown in
Figure 20 appears.
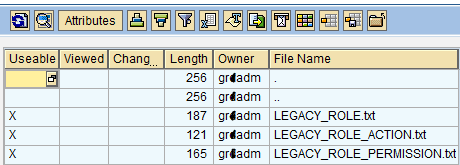
Figure 20
A list of files uploaded to the server
After you upload the files to the server, you need to schedule the repository sync job. Execute transaction code GRAC_REP_OBJ_SYNC. In the screen that appears, input NONSAP in the Connector field and select the Full Sync Mode radio button. Because in this example I am executing this job for role sync only, I uncheck the User checkbox and execute the program (
Figure 21). Click the execute icon to run the program. When you schedule the sync job for first time for the NONSAP connector, always select Full Sync Mode.

Figure 21
Repository object sync
After you execute the sync job, use transaction code SE16/SE17 to review table GRACRLCONN to validate the non-SAP role names (
Figure 22).
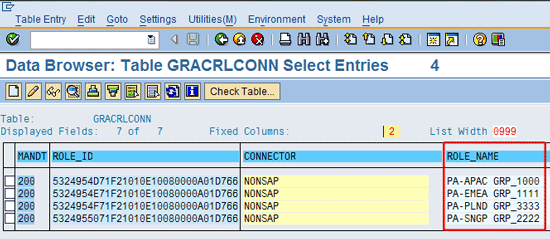
Figure 22
Table GRACRLCONN
The role import process. Leverage the SAP PFCG role template available on the role import screen.
Execute transaction code NWBC and follow menu path Access Management > Role Mass Maintenance > Role Import. As shown in
Figure 23, click the link in the Templates section to download the attribute file template. Use this template as a resource for defining the role import file.
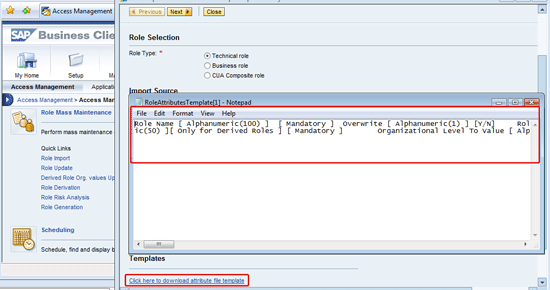
Figure 23
Role import
The fields that are designated as mandatory (e.g., Role Name, Role Type, Business Process Name, Subprocess Name, Project/Release Name) in the template file (
Figure 24) need to be defined in the upload file.
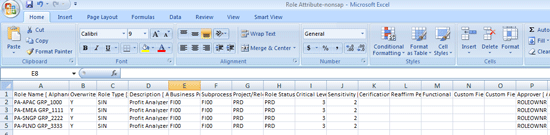
Figure 24
Role upload Excel file
Create the file in Excel format and once the applicable fields are filled in, save the file as text file (tab delimited) as shown in
Figure 25. If any field is not applicable, it can be left blank as shown in
Figure 24 (e.g., columns K-O).

Figure 25
Role upload text file
Execute transaction code NWBC and follow menu path Access Management > Role Mass Maintenance > Role Import. During the upload process, you want the application type to be Legacy System and the landscape to be NONSAP (this is a custom-defined name maintained in connector settings). You select these role import settings in the Definition Criteria section of the screen, shown in
Figure 26.
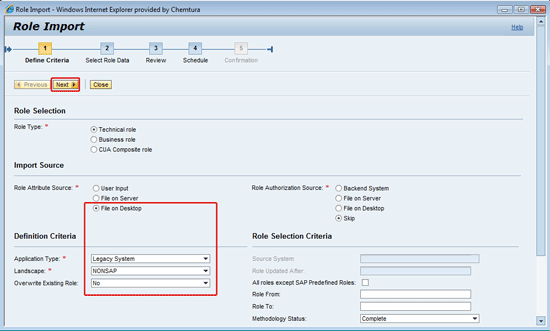
Figure 26
Role import settings
After you define the criteria for the role import, click the Next button to browse the Select Role Data screen. In this screen choose the file source by clicking the Browse button as shown in
Figure 27. The file source is your local desktop location where your file is saved.

Figure 27
Select role data
After you select the file source, click the Next button to view the review screen. You may preview roles that you intend to upload by choosing the Preview all roles radio button and then clicking the Show Preview button (
Figure 28). In this step you can validate whether all the roles defined in the load file are listed in the review screen or not.
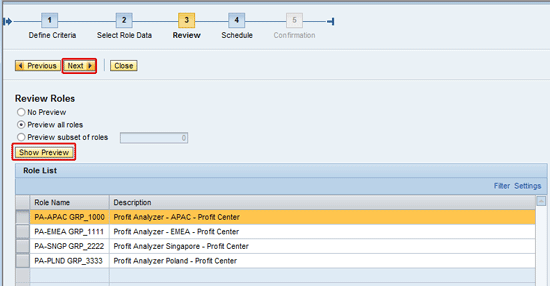
Figure 28
Review roles
After reviewing the roles select the Next button to view the schedule screen. In this screen you have options to choose either foreground or background for scheduling the load job. Based on the number of roles that I use in this example, I choose the Foreground option for scheduling the job (
Figure 29). If you intend to load mass roles, then background is preferable. After you select the scheduling options, click the Submit button. The load job runs, and after it is completed, the confirmation page is displayed.
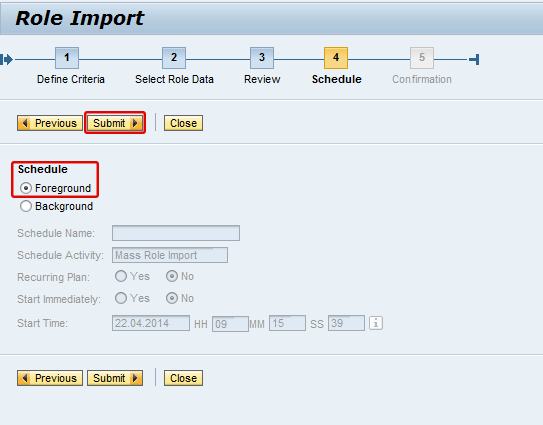
Figure 29
Schedule the job
After you execute steps from 1 (Define Criteria), 2 (Select Role Data), 3 (Review), and 4 (Schedule), the confirmation screen displays the role import status (
Figure 30).
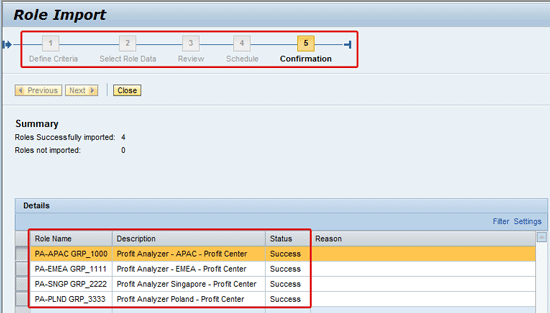
Figure 30
Role import status
After you follow these steps above, the non-SAP roles are now available for selection in the access request screen. Log on to the GRC system using SAP Access Control end user logon URL, which takes you to the end user home page. Follow menu path Access Request Creation > Access Requests to open the access request page.
In the Access Request page click the User Access tab and click the Add button and choose role option from the list of options. After the Select Roles screen displays as shown in
Figure 31, select the system and the applicable role information. In my example I chose NONSAP for the system and then pressed the Search button to view the roles available. Based on the access requirement, users can now select appropriate nonSAP roles for submitting the access request.
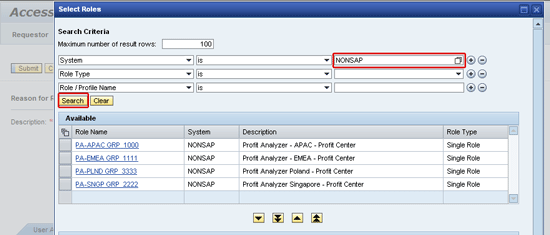
Figure 31
Access request role selection
After you submit the access request for a NONSAP system, the Provision Manually button appears on the Access Request approval screen (
Figure 32). This is an indicator for the manual provisioning setting. After all the required approvals (manager and role owner) are received, the request is routed to the security stage. In the security stage, the respective system administrator is required to create the user and assign the roles manually.
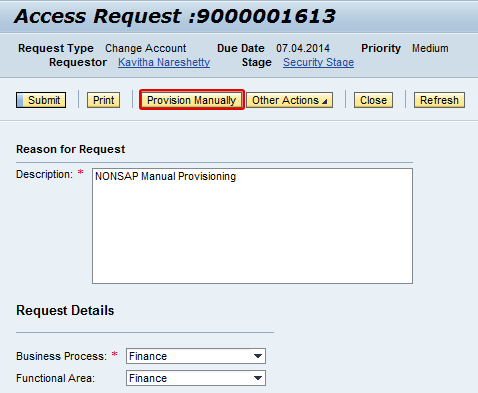
Figure 32
Access request approval screen security stage
Kavitha Nareshetty
Kavitha Nareshetty is a subject matter expert in implementing security solutions in ECC, BW, Business Objects, GRC, HANA, HR, Portal, and Audit Controls. She has extensive experience in all facets of designing, building, testing, implementing, and supporting complex security architecture within SAP systems. She has worked on implementing security solutions at various industry verticals. She holds a Stanford Certified Project Manager credential from Stanford University.
You may contact the author at
kavitha.nareshetty@capgemini.com.
If you have comments about this article or publication, or would like to submit an article idea, please contact the
editor.