Manager
SAP Solution Manager 7.0 lacks the ability to compare projects to solutions. Leveraging the download capability of transaction SOLAR_EVAL reports and Microsoft Excel, you can identify changes made in a solution since the deployment of a project. Discover how to use Excel to fill in the gaps for the compare and adjust capabilities of SAP Solution Manager 7.0 relative to solutions.
Key Concept
Using Excel as an aid for the compare and adjust capabilities of SAP Solution Manager 7.0 allows you to identify changes that have occurred in a solution since the original go-live. The technique is currently the only way to do so, but it’s systematic and repeatable.
Within a very short time after go-live, a deployed solution begins to change due to ongoing maintenance, business process enhancements, and application of notes and patches. Before long, the solution begins to be considerably different from the project that was used to originally deploy it. By using transaction SOLAR_EVAL in conjunction with Microsoft Excel, you can identify what changes have occurred in the solution relative to the originating project.
I’ll describe how to perform the necessary analysis in Excel to identify what changes have occurred and determine the appropriate actions for your organization regarding whether or not you want to incorporate changes in the source projects. This article is based on the SAP Solution Manager procedures described in my article “Sync Your Global Template with Your Productive System for Better ALM.” I’ll explore how to:
- Extract solution content to Excel
- Extract project content to Excel
- Perform the analysis in Excel
Much of the content in the first two sections is also featured in my other article, but I’m including it in this one as well for ease of use. If you’ve already read that article, you can skip to the “Perform the Analysis in Excel” section.
Extract Solution Content to Excel
To identify changes to the solution relative to the global template you can download SOLAR_EVAL reports for the solution and projects into Excel and use the Excel function VLOOKUP() as well as other data processing and sorting techniques to identify changes. For this example, the solution was created from a project and then subsequently changed.
Note
You can only do comparisons on transactions and documents in SAP Solution Manager prior to version 7.1.
Use transaction SOLAR_EVAL. To get everything possible, you’ll need to run and download both the Transactions and Documentation reports under the Solution section (Figure 1).

Figure 1
Transaction SOLAR_EVAL main screen with the Project section collapsed to show options for the Solution reporting
Now let’s look at how to run and download the information for the documentation. Repeat the process for the Transactions. Figure 2 shows the selection options to get the Business Process Hierarchy (BPH) in its entirety with all the documentation displayed on the report. Set the inputs as shown in Figure 2 and click the execute icon.

Figure 2
Select Display Completely so the entire BPH will be included in the report and not just the nodes with documentation assigned
When the report is displayed, click the expand all icon  to review the report content (Figure 3). After reviewing the list, click the export to Excel icon
  to save the list to an .XLS file.

Figure 3
Solution documentation list for all nodes in the solution with or without documentation
Note that the report layout must match what is shown in Figure 4. If your report layout does not match, click the  portion of the select layout icon
  and select Change Layout (Figure 5) so that you can make the changes.

Figure 4
What your report should include
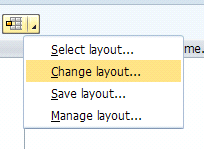
Figure 5
How to change the layout
Repeat the process above for the transactions, and save to an Excel sheet.
Extract Content from a Project to Excel
Next, run the transaction SOLAR_EVAL report via Configuration > Assignments > Cross Tab Analysis for the project you wish to compare to the solution (Figure 6). In this example, the solution was built from project IBMJUMP30. Figure 7 shows the input parameters for the SOLAR_EVAL report that you’ll use to generate the .XLS file for comparison to the solution .XLS sheets. Note that the Documentation and Transactions check boxes are selected.

Figure 6
Cross Tab Analysis for the configuration phase

Figure 7
Transaction SOLAR_EVAL configuration assignments Cross Tab Analysis selection screen for project IBMJUMP30
Since the SOLAR_EVAL reports in SAP Solution Manager 7.0 can only generate lists for documents and transaction codes for a solution, it doesn’t make much sense to clutter the project report with the other options from the cross tab analysis.
Figure 8 shows the list expanded fully. Click the export to Excel icon to export the list to an Excel sheet.

Figure 8
IBMJUMP30 project with transactions and documentation listed for all nodes
Perform the Analysis in Excel
Now comes the real work. You need to combine the data from the documentation and transaction spreadsheets created from the solution reports with the list created for the project report. This makes it easier to do comparisons with VLOOKUP() and other Excel functions.
For this exercise, I created three spreadsheets (which are available as downloads at the bottom of this article) named as follows:
- SOL_JUMPSTART_DOCS.xls: Solution report with all BPH nodes and documents
- SOL_JUMPSTART_TCODES.xls: Solution report with all BPH nodes and transactions
- PRJ_JUMPSTART_TCODES_DOC.xls: Project report with all BPH nodes with both transactions and documents
To begin the analysis, combine the three sheets into one called SOL_PRJ_COMPARE_JUMPSTART.xls (Figure 9). This allows you to have all the data from the different SOLAR_EVAL reports in a single Excel workbook so you can use it like a database. I start with the project sheet and add the contents from the two solution sheets as worksheets on separate tabs. This allows me to do comparisons within the same worksheet.

Figure 9
Solution and project reports combined into a single worksheet
Next, insert a column on each tab called ConCat (short for concatenate). Make sure you insert it in column B.
Use the concatenate formula to combine the contents of each cell in a single row into a single cell. Use the following concatenate formulas listed in Table 1. Enter the formula from the table into the ConCat column, row 2 and copy to all rows below in column ConCat. This allows you to use VLOOKUP() to quickly identify differences.

Table 1
Concatenate formulas for sheets with the solution content for documents and transactions
On the project sheet (PRJ_JUMPSTART_TCODES_DOC), add four additional columns starting in column B, to store the concatenate and VLOOKUP() formulas that will be used to alert for changes. Label them Delta Doc, Delta T-Code, ConCat DOC, and ConCat T-Code, respectively. Enter the formulas into these columns (repeating for every row) as indicated in Table 2.

Table 2
Formulas for the PRJ_JUMPSTART_TCODES_DOC new fields
Once you have the concatenate formula in the spreadsheets, sort each sheet by the ConCat column. Don’t worry about losing hierarchical relationships — VLOOKUP() needs to search against an alphabetically sorted list. Figure 10 shows the sort parameters to be used on all three sheets. Be sure to select the Header row radio button to exclude the headers from the sort.

Figure 10
Sort parameters for all sheets
After you finish all the sorts, be sure to recalculate your sheet by pressing F9. Figures 11, 12, and 13 show the sheets with the new columns added and the formulas in place. Note the X in certain cells of sheet PRJ_JUMPSTART_TCODES_DOC in Figure 11. An X in the Delta DOC column means there is a difference between the project and the solution for a document on that BPH node. Likewise, an X in the Delta T-Code column means there is a difference in the transaction code assignments on that BPH node.

Figure 11
Project sheet with new columns for lookups and ConCat references
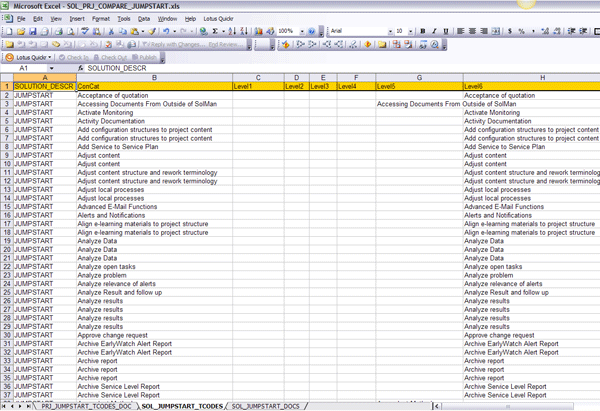
Figure 12
SOL_JUMPSTART_TCODES shows the solution with transaction codes from transaction SOLAR_EVAL with ConCat inserted

Figure 13
SOL_JUMPSTART_DOCS shows the solution with documents from transaction SOLAR_EVAL with the new column ConCat inserted
False Positives
Since the structure of a project and a solution vary slightly, some BPH nodes don’t match, even though they don’t represent a change in the business process. For example, in the project sheet, there is an X on the row for Configuration. This is due to the fact that the Configuration node does not appear on the transaction SOLAR_EVAL report when reporting on documents in a solution (Figure 14).

Figure 14
A Delta Doc false positive because transaction SOLAR_EVAL does not list the Configuration BPH node when performing the document report on a solution
While this procedure isn’t foolproof, it does help narrow the search significantly when trying to identify changes to a solution relative to a project. The reconciliation of all structure, document, and transaction changes is still a manual process in SAP Solution Manager 7.0. This procedure helps you target your reconciliation efforts to only the changed areas rather than performing a reconciliation on every node.
D. Russell Sloan
D. Russell Sloan is a specialist in project and program governance for IBM. He focuses on the use of SAP Solution Manager for global rollout projects for IBM’s largest customers, having worked with SAP software since 1996. Russell has degrees in accounting and information systems and has been a team and project leader for SAP projects for more than 14 years. He has been developing and deploying software systems for over 30 years.
You may contact the author at solmanruss@gmail.com.
If you have comments about this article or publication, or would like to submit an article idea, please contact the editor.