Learn how to use SAP BusinessObjects Cloud (formerly SAP Cloud for Analytics) to leverage your own corporate information, and create a variety of different visualizations of your data. Get step-by-step instructions for how to upload information, fine-tune the generated model, and then use the information as part of a visual story, which you can then share with other users.
Key Concept
SAP BusinessObjects Cloud’s focus is on providing business users with an environment that allows them to create their own visualizations and visual stories, and share them with colleagues and team members, without having to rely on the IT department.
In my first article in this series, “An Introduction to SAP BusinessObjects Cloud (Part 1),” I provided a review on the data-connectivity options offered by SAP BusinessObjects Cloud (formerly SAP Cloud for Analytics) as well as its most important capabilities, such as data exploration, data visualizations, stories, and the ability to share and collaborate with team members. In this second article about SAP BusinessObjects Cloud, I show how you can quickly set up a new data model based on existing information, and then use the information to create a new visualization and share that with your colleagues.
First, I cover the steps for uploading data and generating a model. Then I show how you can make changes to and enhance the generated data model (in this example, how to add hierarchies). Finally, I explain how to create a visual story and share it with other team members or colleagues.
How to Upload Data and Generate a Data Model
In this example, I first show you how to upload the data that you would like to use, and then how to fine-tune the generated model that was created based on your own data. SAP BusinessObjects Cloud allows you to manually create a new data model from scratch, or you can have SAP BusinessObjects Cloud generate a model based on data that you provide. If you use the second option (generating the model based on the data), some basic information—such as the data type—becomes part of the generated model. In this example, I automatically generate a basic model based on actual data, and then fine-tune the generated model. For this scenario, I use a spreadsheet with the structure as shown in Figure 1.
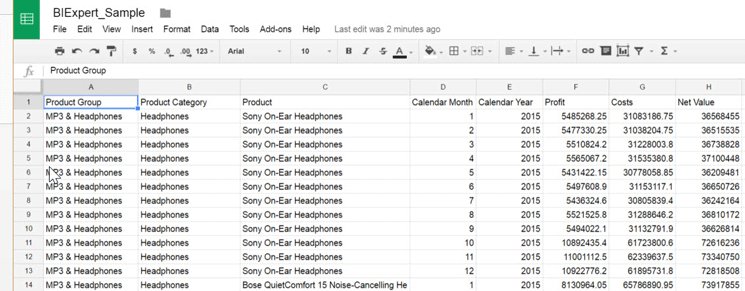
Figure 1
Example spreadsheet with data
The sample dataset has five dimensions—Product Group, Product Category, Product, Calendar Month, and Calendar Year—and three measures: Profit, Costs, and Net Value.
Once SAP BusinessObjects Cloud has been started and you have logged on with your credentials, follow these eight steps to upload the information and fine-tune the generated model.
1. In SAP BusinessObjects Cloud, select Modeler (Figure 2).

Figure 2
Select the Modeler option from the SAP BusinessObjects Cloud menu
2. On the right side of the ribbon (of the screen that opens), click the + (plus-sign icon) to start the process of creating a new model (Figure 3).
Figure 3
Start creating a new model
3. This opens a new screen (Figure 4) that asks you which approach you want to use to create your new model. In this example, choose the Import a Sheet from Google Drive option.
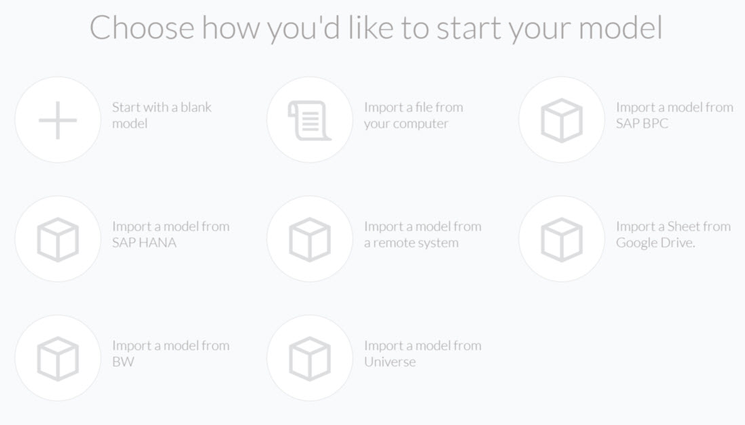
Figure 4
Select which option to use to generate your model
4. In the screen that opens (Figure 5) select the desired spreadsheet from your Google Drive account (you may provide a new name and description for the model that will be generated). After assigning the data source, click the Import button.
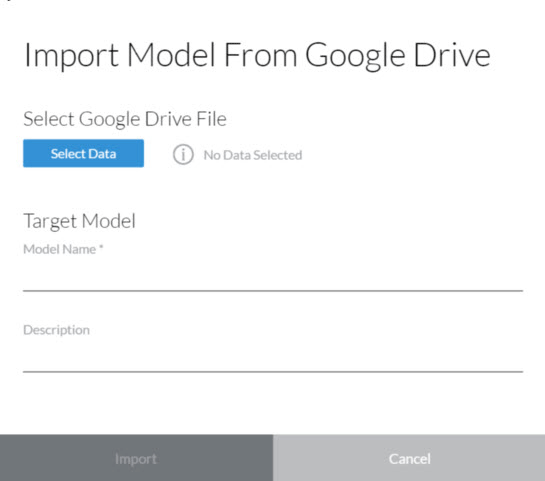
Figure 5
Import the spreadsheet with the data
5. This opens a screen with a DataView of your newly imported data and data model (Figure 6). One of the first items you will notice is that some of the column headers—representing the dimension and key figure names—have been generated with unique numbers added to them (for example, Product_Group_9997, Product_Category_9997, and so on, boxed in red in Figure 6). If you so desire, you can change these and provide your preferred dimension and key figure names. To do this, simply double-click the column header name and, in the dialog that opens (not shown), make the necessary changes.
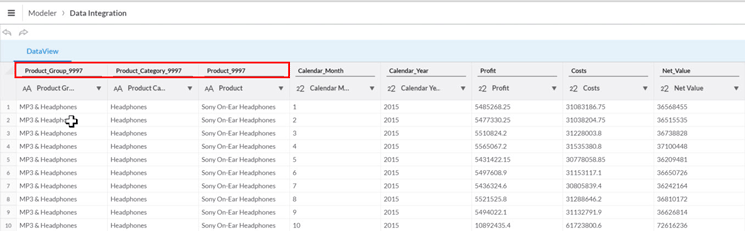
Figure 6
DataView of new data and data model
6. Next you need to ensure that the dimension and key figure details have been interpreted correctly based on the data you uploaded. Click the left Product_Group column header in Figure 6. This expands the screen on the right where you can now see the details for this Product Group column, as shown in Figure 7.
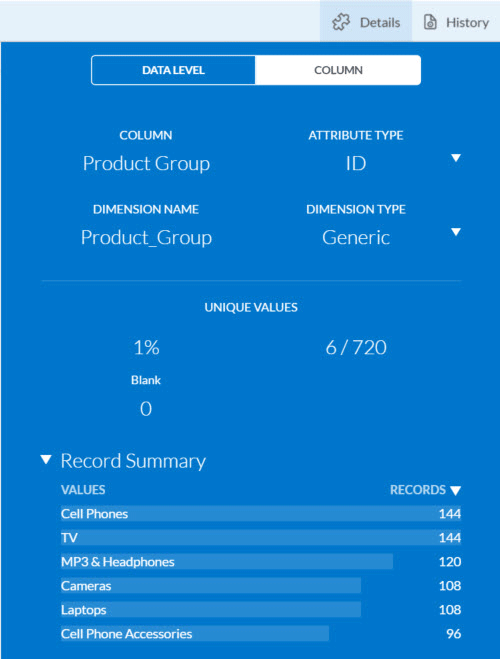
Figure 7
The Product_Group’s dimension details
For the Attribute Type, you have the following options:
- ID: This is the Attribute Type you assign to all those dimensions that need to be available as separate dimensions in the model.
- Description: Used to configure a column in your data model as a description to another dimension; for example, a Customer Name for a Customer ID.
- Hierarchy: Used to assign a column in the model to another dimension as a Parent column of a hierarchy.
- Property: Used to assign a column from your model to another dimension as an attribute.
- Key Figure: This is the Attribute Type you use for your key figures and measures.
For the Dimension Type, you have the following options:
- Generic: This type is a general dimension type; some typical examples are items such as Product, Customer, Region, and Sales Person.
- Account: This dimension type is used for the different accounts and automatically comes with attributes, such as the account type.
- Organization: This dimension type is optional and is meant for elements such as a Cost Center, Profit Center, or an Organizational Unit in your data model.
- Version: This dimension type allows you to set up the version—such as Actual and Budget—as part of your data model.
- Time: This dimension type allows you to configure a time-based dimension and to configure the value type, such as MMYYYY (for example, 042016 as the value for April 2016).
In this example, complete the configuration with these details:
- For all the dimension columns—Product Group, Product Category, Product Name, Calendar Month, Calendar Year—set the Attribute Type to ID and the Dimension Type to Generic.
- For the three measure-based columns—Profit, Costs, and Net Value—set the Attribute Type to the Key Figure option (not shown) and ensure that the number format option matches the data in the source.
Now you might ask yourself why the column Calendar Month and Calendar Year are not configured as time dimensions. Currently (as of May 2016), SAP BusinessObjects Cloud only allows a one time-based dimension per model and the time-based dimension requires unique values. In this example, the data contains information across all 12 months and multiple years, so both dimensions—Calendar Month and Calendar Year—do not provide unique values; therefore, they cannot be configured as time-based dimensions.
7. In addition to the option to configure the Attribute and Dimension Types, you can also perform a set of actions for each of the columns in your data source. These options are shown in the drop-down in Figure 8.

Figure 8
Action menu options
You have the option to combine columns or split a single column into two columns, and you can make sure the data type is set correctly by changing it to a number, text, or another data type.
8. Once you’ve made your action-menu settings, click the Create Model button (on the bottom of the screen, not shown). This creates and saves the model to your SAP BusinessObjects Cloud account. At the same time, it also imports the data into the model, and you are now able to use this model to visualize data (e.g., create visualizations).
After the model is created, you can always go back to the definition of the dimensions, if you have to revise the model, via the Modeler menu, and select your newly created model to revise it.
How to Enrich Models with Hierarchies
In these next steps, I show how to use the newly created model and enrich it with a hierarchy. In this example, there are three dimensions: Product, Product Category, and Product Group. I show you the steps to display them in the form of a hierarchy in a chart.
1. In SAP BusinessObjects Cloud, again select the Modeler option from the menu (Figure 2) and, in the screen that opens (not shown) select the newly created model.
2. In the screen that opens (Figure 9) select the dimension Product in the toolbar. This opens the ID column on the left, where you can see the product ID column header (ID).

Figure 9
Dimension Product
4. On the ribbon on the top right, click the plus-sign icon (Figure 10). This opens a menu on the bottom; select the Add Hierarchy option. A new column is added to the dimension Product.
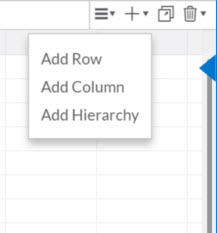
Figure 10
Add a hierarchy
5. Next, you want to enter Parent as the header for another new column. Using the same steps, make this change (Figure 11).
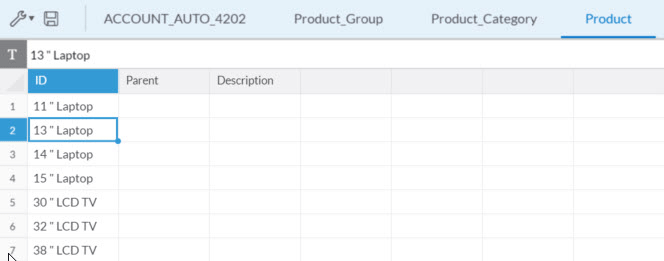
Figure 11
Add a Parent column
6. After the new Parent column has been added to the Product dimension, the next step is to add all the values for the Parent ID into the table. Simply copy and paste these values from the original source to the newly created Parent Colum in the table (Figure 12). After the Parent ID values are added to the Parent column, you also need to add those Parent IDs into the actual Product ID columns, so that the IDs exists as part of the hierarchy.

Figure 12
The Parent/Child hierarchy
7. Copy and paste the unique values of the parent IDs into the product ID column (on the left of Figure 12). Once you’ve pasted in the parent IDs, click the save icon (in the ribbon on the top left) to save your changes. The new hierarchy should appear on the right side of your screen, as shown in Figure 13.
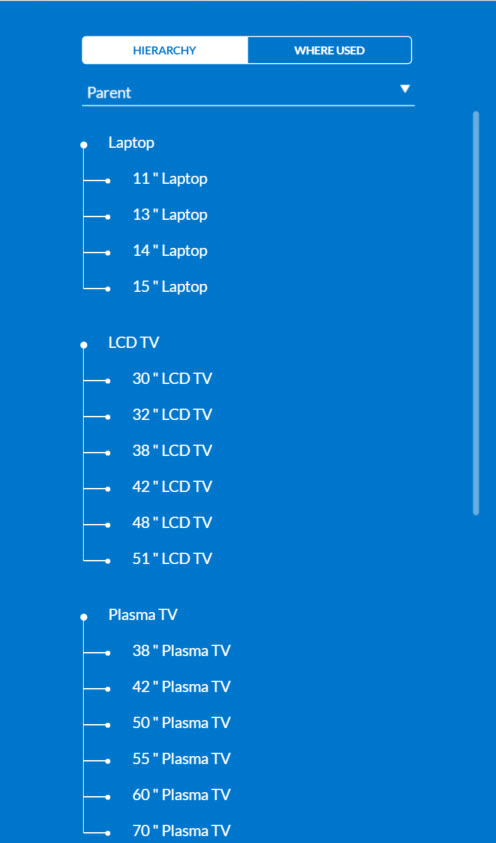
Figure 13
New hierarchy with parent values
8. To complete this example, repeat these steps, but this time assign the values from the Product Group as the Parent IDs to the values from the Product Category. Once you’ve completed this step, you have a hierarchy with three levels in total.
At this point, you have created the data model, configured the details of the model, loaded the data, and added the hierarchies. The next step is to create the visual story, which is based on this newly created dataset.
How to Create Visualizations of the Information (Stories)
Here I show how to create the visualizations and combine them into a story.
1. Select the Stories option from the SAP BusinessObjects Cloud menu. In the screen that opens (not shown) click the plus-sign icon (+) on the right side of the ribbon.
2. This opens a screen (not shown) that asks for a Title and Description for your new story. Enter the appropriate details, and click the Create button. In the screen that opens (Figure 14) you choose how you would like to start your story. In this example scenario, you already have the data model, so choose the Add Canvas option.
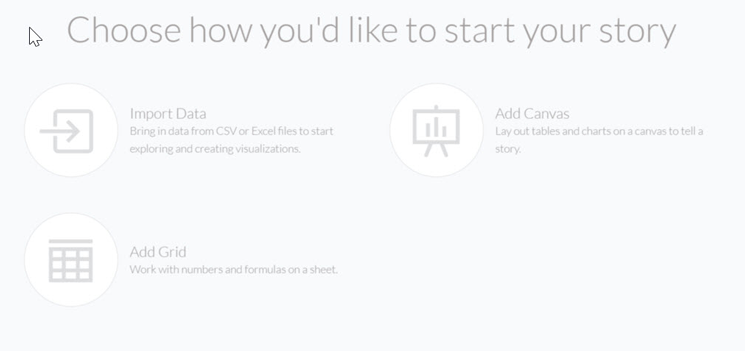
Figure 14
Start your story
3. Again, in the screen that opens (Figure 15), click the plus-sign icon. This opens a drop-down menu with the list of visualization options.

Figure 15
Add visualizations to your story
4. In this example, select the Chart option first. A screen opens (Figure 16) where you are asked if you want to import a new file, link the chart to a file in Google Drive, or use an existing model. In this example, select the Existing Model radio button and select the model you want to use from the Name field drop-down options. (In this case, the model you created earlier in this article.) Then click the OK button.
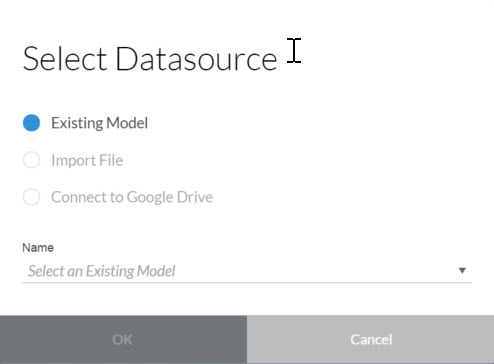
Figure 16
Select an existing model as your data source
5. This opens a screen with an empty chart container (Figure 17). Here you can configure the details for your new chart.
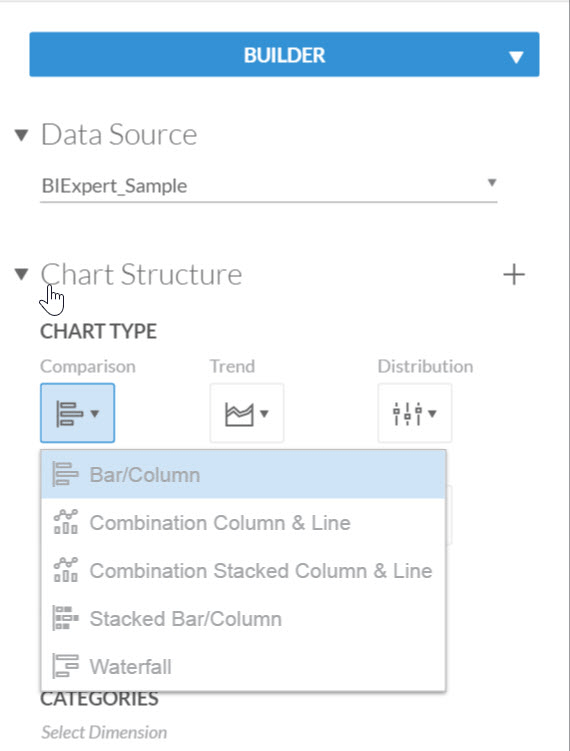
Figure 17
Configure the details for a new chart visualization
6. On the right, under Chart TYPE (Figure 17), set the chart type to bar chart. Click the down arrow in the box under Comparison, and select Bar Chart from the drop-down list that opens. Then select the Profit measure for the Axis 1 property, as shown in Figure 18.
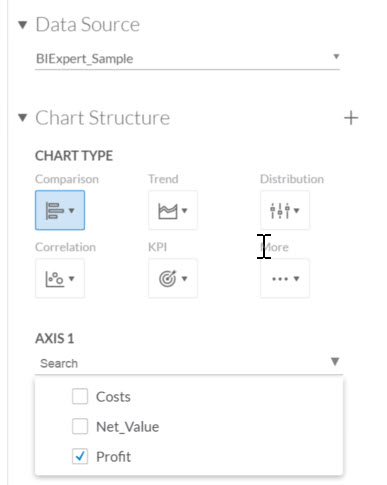
Figure 18
Select Profit for the measure dimension
7. Next, for the CATEGORIES, select the Product dimension (which is the dimension that you previously configured with the hierarchy), as shown in Figure 19. As soon as the Product dimension is added, notice the chart is not displaying the actual product members. Instead it is showing the top level of the hierarchy—in this example, the profit for laptops.
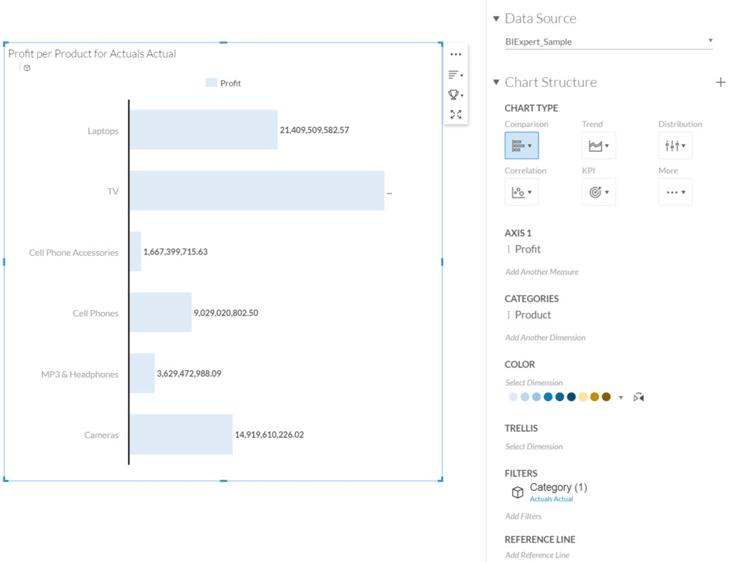
Figure 19
Add categories
8. Select one of the members of the Product dimension displayed in the chart—in this case TV (Figure 20). Once you select it, you are presented with several menu options. For example, looking from left to right, you can use the first symbol to filter the selected member and the second symbol to exclude the selected member. The third icon allows you to drill down to the next level of the hierarchy, and the fourth symbol allows you to break the axis scaling for charts with very large values. In this example, click the third icon to drill down.
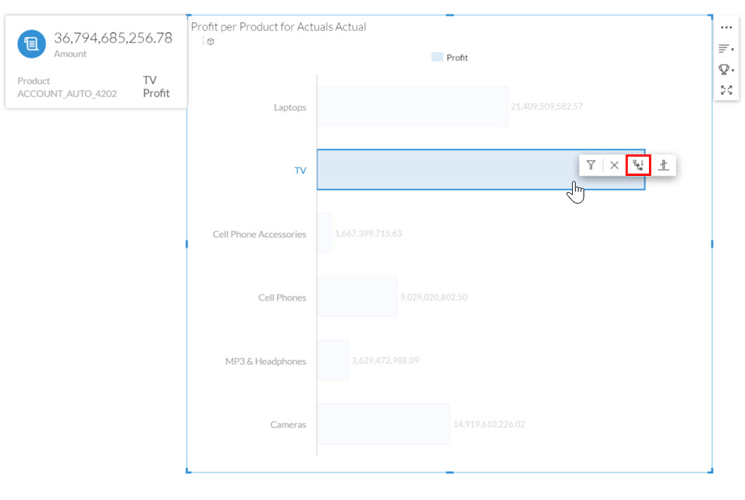
Figure 20
The options for filtering the data
9. You are presented with the next level in the hierarchy (Figure 21). When you select a member of the hierarchy notice that the third icon—the drill-down option—is still there, but you now also have a new fourth icon, which offers the option to drill up (both icons are boxed in red in the figure). You can use the drill-up option to go back to the top-level entries of the hierarchy.
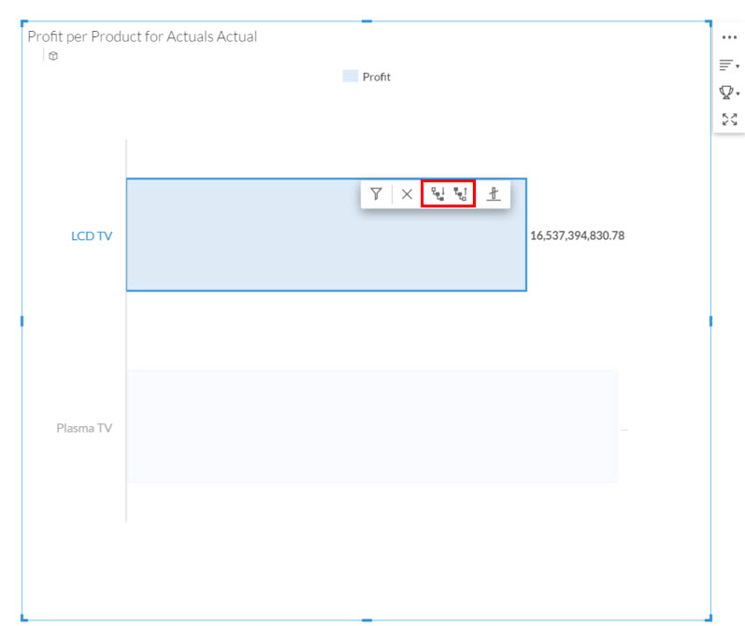
Figure 21
A new option to drill up is added
10. In addition to these context-menu options, the chart also provides options for sorting the information (Figure 22) and for ranking the information interactively (Figure 23).

Figure 22
The different options for sorting the data
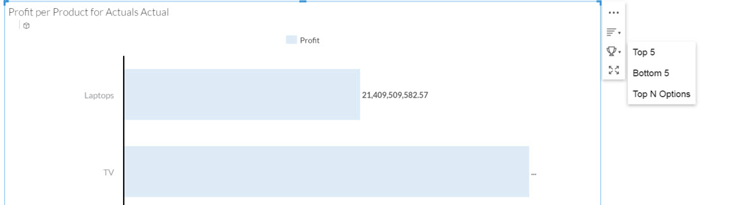
Figure 23
The ranking options for the data
11. As part of the chart’s properties there are some additional options available (Figure 24). These include the option to define a color based on the dimension member or to define a trellis.

Figure 24
The chart’s properties’ options
The COLOR option allows you to assign a color scheme to a dimension. A good example of this functionality is using different colors for the Actual and Forecast numbers in a chart that shows Revenue over a 12-month period. The TRELLIS option allows you to quickly generate the chart for several members of a dimension. For example, you can generate the chart for each month in the data set by setting dimension Month as the value for the option TRELLIS (Figure 25).

Figure 25
The chart data is displayed using the TRELLIS option
12. In this step, I show how to add an additional reference line to the chart. A reference line is helpful in a situation where you want to highlight a target value and show which areas are above or below this target value. Click the Reference Line button to add it (Figure 26).
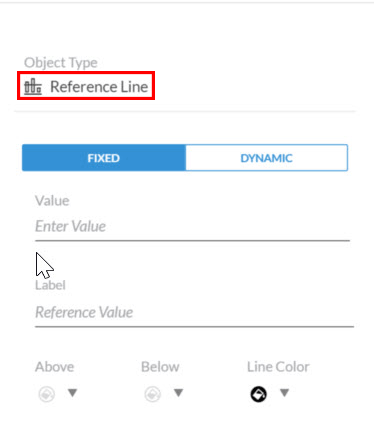
Figure 26
Add a reference line
This expands the screen at the bottom and gives you the option to make the reference line fixed or dynamic (Figure 27). The FIXED option allows you to enter a fixed value as the value for the reference line and the DYNAMIC option allows you to use values from your data source; for example, to use the average of all revenue values as the value for the reference line. In this example, select the Dynamic option. Once you select it, you have the option to choose the Measure and Aggregation levels and define the color coding.
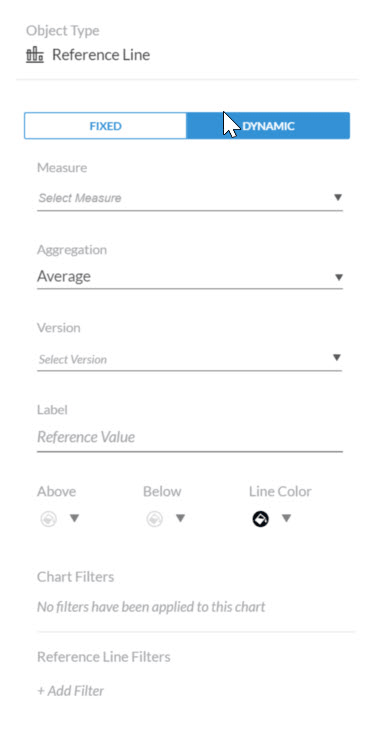
Figure 27
Select the dynamic reference-line option
In this example, select Profit as the Measure property and set Aggregation to Average. Then configure the area above the reference line with the color green and the area below the reference line with orange, and confirm your changes by clicking the OK button. The result is displayed in Figure 28.
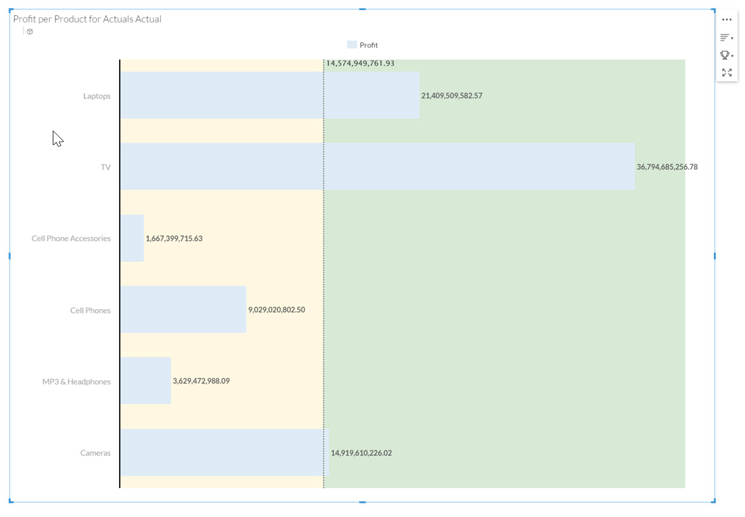
Figure 28
The chart with a dynamic reference line
At this point, you have seen how to create a chart showing the profit along the product hierarchy, along with an additional visual hint (in the form of a reference line for the average profit value across all products). In this next step, I show how you can provide additional options for the user to quickly filter the information shown in the chart.
13. Click the plus sign on the left side of the toolbar and this time select the Input Control option (Figure 15).
14. This opens a screen (not shown) that allows you to select the dimension that is used for the Input Control. In this example, select the Calendar Month. In the screen that opens (Figure 29), you can configure which members should be shown and which should be excluded. In addition, Input Control allows you to choose Single Selection or Multiple Selections.
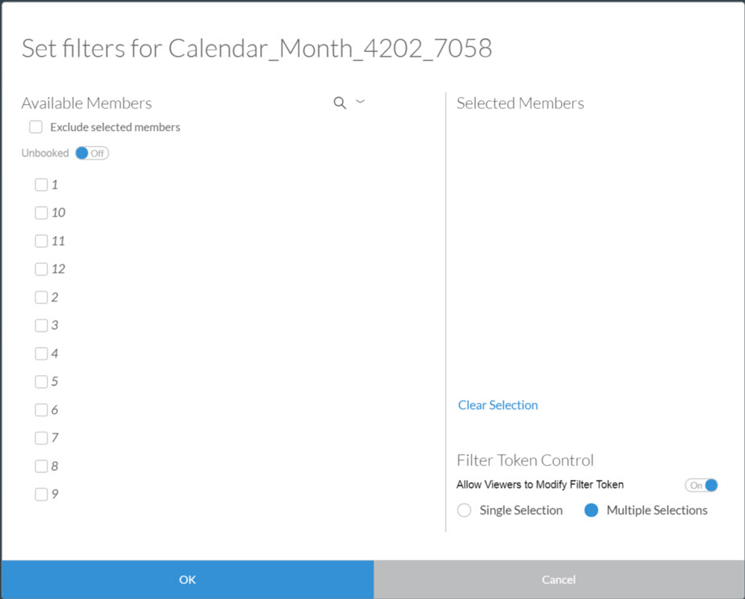
Figure 29
Select the Input Control details
In this example, include all 12 months and allow a Single Selection. Once you’ve made your selections, click the OK button to save them. Now you should have an Input Control as part of your overall story that allows the user to select a Calendar Month for the chart and be able to place the Input Control anywhere on the canvas. Save your story by clicking the save icon.
15. When you want to share your story with other SAP BusinessObjects Cloud users, simply select the highlighted collaboration/share icon in the toolbar in Figure 30 and select the Share option.
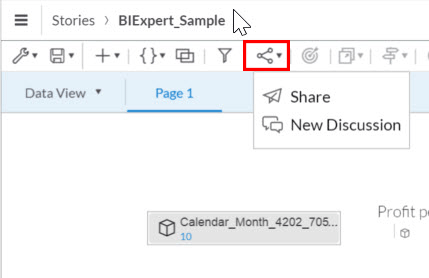
Figure 30
Select the Share option to share your story with other SAP BusinessObjects Cloud users
The Share option allows you to configure a list of users who are then able to access your story within SAP BusinessObjects Cloud (Figure 31).
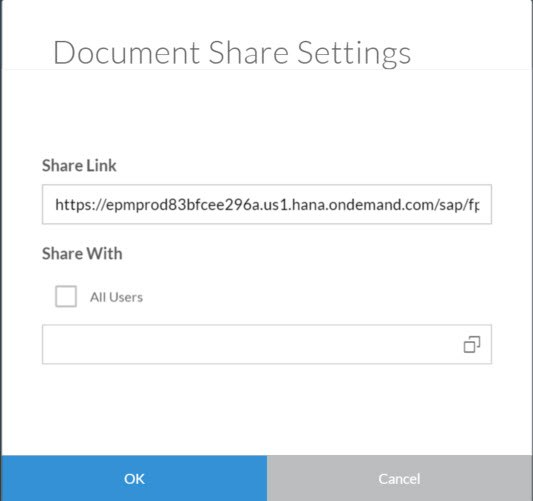
Figure 31
Share your story
If you want to share a story outside of SAP BusinessObjects Cloud or with users who do not have an account for SAP BusinessObjects Cloud, you can use the Save menu option and export your story to a PDF file.
Product Roadmap Disclaimer
The descriptions in this article of future functionality are the author’s interpretation of the publicly available product integration roadmap. These items are subject to change at any time without any notice, and the author is not providing any warranty on these statements.

Ingo Hilgefort
Ingo Hilgefort started his career in 1999 with Seagate Software/Crystal Decisions as a trainer and consultant. He moved to Walldorf for Crystal Decisions at the end of 2000, and worked with the SAP NetWeaver BW development team integrating Crystal Reports with SAP NetWeaver BW. He then relocated to Vancouver in 2004, and worked as a product manager/program manager (in engineering) on the integration of BusinessObjects products with SAP products. Ingo's focus is now on the integration of the SAP BusinessObjects BI suite with SAP landscapes, such as SAP BW and SAP BW on SAP HANA, focusing on end-to-end integration scenarios. In addition to his experience as a product manager and in his engineering roles, Ingo has been involved in architecting and delivering deployments of SAP BusinessObjects software in combination with SAP software for a number of global customers, and has been recognized by the SAP Community as an SAP Mentor for SAP BusinessObjects- and SAP integration-related topics. Currently, Ingo is the Vice President of Product Management and Product Strategy at Visual BI Solutions, working on extensions to SAP’s product offering such as SAP BusinessObjects Design Studio and SAP Lumira. You may follow him on Twitter at @ihilgefort.
You may contact the author at Ingo@visualbi.com.
If you have comments about this article or publication, or would like to submit an article idea, please contact the editor.