Learn how to implement rules-based available-to-promise (ATP) in a consolidation scenario including the use of multi-level ATP.
Key Concept
Fixed pegging is the process of establishing the relationship of a receipt document to the requirement document it fulfills. This linkage is not broken when receipts or requirements are rescheduled in time or through a planning run. This is different from dynamic pegging, a relationship that is determined between the receipt and the requirement regarding its placement in terms of time. Dynamic pegging is a LiveCache function that is changed dynamically, as the name suggests, based on how the receipts and requirements are placed. However, fixed pegging relationships do not undergo such a change.
When sales orders are received at a location from which the products are shipped and not necessarily stocked, the use of rules-based available-to-promise (ATP) along with the consolidation location can enable the order promising based on availability of inventory at an alternate location. It also can trigger the movement of product from the alternate location to the location from where the product is shipped.
Consolidation functionality enables the movement of products from the manufacturing locations to the consolidation location. The products often do not exist in the finished form at the manufacturing location, but need to be finished from an intermediate product. The inclusion of multi-level ATP enables the business process of just-in-time manufacturing (JIT) so that the final finishing operation does not need to be completed until a sales order is received. This is especially true when there are multiple packaging variants that can be ordered by customers, and it is difficult to forecast the packaging variants accurately. By delaying the finishing operation, an organization can reduce the inventory carrying costs and not end up with a package inventory for which there is no demand.
I describe a step-by-step approach on how to set up such a complex environment inside SAP Advanced Planning and Optimization (APO) based on my implementation experience in the chemical industry. Navigating this complexity is a challenge for anyone involved in a project in this area because it requires a number of key configuration and master data elements to be set up correctly. I help you grasp the essential elements on the setup of such an environment. Although complex, the setup of such an environment adds a lot of value to the supply chain by enabling accurate order promising, automating the movement of product from the location where it is available to the location where it is desired, and enabling a JIT process that reduces inventory carrying costs.
Note
Multi-level ATP is part of the overall global ATP functionality. ATP is a generic term to describe the process of checking availability for a sales order and ensuring that promises are made to the customer on a sales order. Global ATP is the functionality that resides within APO that does the order promising; however, it is more advanced than the functionality inside SAP ERP Central Component (ECC) that is simply called ATP.
The Consolidation Scenario
In an export scenario in which products are shipped in containers across the ocean, the products are usually consolidated near a port location to be shipped to the customer. In some chemical industries, the consolidation locations perform some value-added packaging operations in addition to receiving some of the products shipped from other manufacturing locations.
In manufacturing locations, the same bulk can be packaged in many different containers and packages. This last step of packaging is typically performed only when the sales order is received. The product is then moved to the consolidation location for shipment. I describe how the use of global ATP (global ATP) in this scenario enables the movement of product to the consolidation location. I also cover the last step in the manufacturing process.
I cover some key configuration steps, such as the correct planning procedure, check instructions, rule sequence, and the associated master data for integrated rules, product master, and condition tables.
Note
I assume that the readers of this article understand the basic settings of ATP.
The Supply Chain Model
Figure 1 is a simplified view of the supply chain model. The manufacturing plants produce the bulk product that might be sold directly to customers within the country. In addition to the bulk being sold through the domestic channel, it is also packaged at the manufacturing plant for export sales. The packaged product is moved to the containerizing plant, put into containers, moved to the port location, and shipped to the export customers in containers.

Figure 1
A simplified view of the supply chain model
The packaging operation at the manufacturing location does not have a long lead time. There are numerous packaging variants (such as cans or drums) that are packaged from the bulk product. It does not make sense to stock the packages in advance of receiving a sales order because the packaging mix is hard to forecast. An incorrect forecast could result in potentially making the wrong inventory of the packaging variant. Therefore, the final packaging order is essentially a make-to-order operation. In the supply chain model described, there are two manufacturing plants involved that make different packaged products coming from distinct bulk product manufactured at these locations.
Planning versus Execution
Although the forecast for packages is created at the containerizing plant, this creates a demand for the packages back at the manufacturing plant because the manufacturing plant is defined as the source for the packages at the containerizing plant. The planned order for the packages drives the dependent demand for the bulk. However, these planned orders (Supply Network Planning [SNP] planned orders) are not converted to production orders, and the product is not moved to the containerizing plant unless it is in response to a specific sales order. Sales orders for exports are placed at the containerizing plant with the movement from containerizing plant to the port and then to the destination port and finally to the customers modeled as transportation legs in the shipment.
The APO Process
When sales orders are placed at the containerizing plant, the sales order availability check process checks for product availability at the consolidation location first. If there is no availability, it checks for inventory at the packaging plant. If inventory exists at the manufacturing plant, the system creates a Stock Transfer Request (STR) to move the product from the manufacturing plant to the containerizing plant. If there is no existing inventory for the package, the system creates a planned order as well through the multi-level ATP check.
Although there may be partial availability of the package and the bulk, the system does ensure that there is only a single STR created (and not multiple) to move the product from the manufacturing plant to the containerizing plant.
Fixed Pegging at Document Creation
In this section I describe the end result in APO after executing the ATP check inside ECC for a sales order (successfully to get a confirmation) and then saving the sales order. A fixed pegging relationship is established between the sales order, the STR, and the planned order created. To view this fixed pegging relationship, execute transaction code SAPAPO/RRP3 (Product View) or follow menu path APO Main menu > Production Planning > Interactive Production Planning > Product View. In the screen that appears (not shown) select a customer requirement and click the order context icon.
In the next screen (Figure 2) you can view the fixed relationship between the sales order requirement and the corresponding purchase requisition and a planned order. This is a view in APO of what happens after the availability check is done on a sales order and the sales order is saved in ECC.
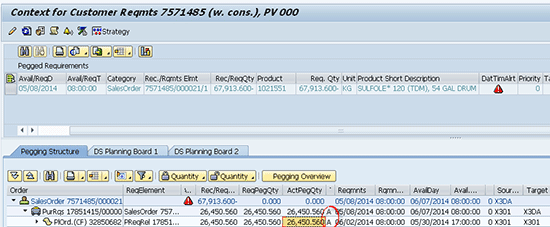
Figure 2
The fixed pegging relationship
Note that this fixed pegging relationship is not established manually, but automatically after the ATP check is performed and the sales order is saved in the ECC system. This fixed pegging can be retained in the execution cycle between the three documents involved in this process. The planned order is converted to a production order and finally confirmed. Stock is then created for the finished goods. The STR is converted to a stock transport order (STO), delivery created, goods issued at the manufacturing plant, and goods received at the containerizing plant. Delivery is also created for the sales order and subsequently a goods issue movement is performed on the delivery.
Fixed pegging is still retained in the entire document cycle that I described earlier. The fixed pegging is between the sales order to the STR and the planned order; the fixed pegging also is between the sales order and the STO and the production order once the STR is converted to an STO or a planned order is converted to a production order. Figure 3 is a short illustration of the fixed pegging as the products go through the document lifecycle (the arrows indicate the direction of fixed pegging).

Figure 3
Fixed pegging during the product lifecycle
In the next section I describe the various configuration steps and master data settings that enable this consolidation functionality in a rules-based ATP environment along with multi-level ATP check functionality. I discuss three areas:
- General settings for global ATP
- Production Planning/Detailed Scheduling (PP/DS) settings
- Rules-based ATP settings
General Settings for Global ATP
The ATP group defines the behavior of a product in an ATP check, and in conjunction with the business event, defines the scope of check. To define an ATP group, execute transaction code SPRO in APO and follow menu path Advanced Planning and Optimization > Global Available-to-Promise (Global ATP) > Product Availability Check > ATP Group.
In the screen that appears (Figure 4), enter a new value (e.g., Y3) in the ATP Group field. In the Maintain ATP Group section enter GATP w/STR (global ATP with an STR) in the Txt for ATP grp field. SAP recommends that you select the following option in the Cumulation field: 1 Cumulation of Confirmed Quantity When Creating and Changing. If you don’t select this option, it could result in overconfirmation. Also, the cumulative ATP should only be reduced by the confirmed quantity, not just the requirement quantity of the sales order. Therefore, the confirmed quantity is selected and not the requirement quantity. In the Response field select 1 Output of Information and select Conservative in the Bucket Logic field. Click the save icon to save your entry.

Figure 4
ATP group definition of Y3
After you save the entries you made in Figure 4, enter a new value (e.g., Y4) in the ATP Group field of the screen shown in Figure 5. In the Txt for ATP grp field enter GATP w/PlndOrd. Make the same selections for Cumulation, Response, and Bucket Logic that you made in Figure 4 and click the save icon to save your entries.

Figure 5
ATP group definition of Y4
Now assign the ATP group in the Product Master tab for the containerizing and manufacturing plants. To assign the ATP group in the Product Master for the containerizing plant, execute transaction code /n/sapapo/mat1. In the screen that appears (Figure 6) click the pencil icon to go to the change mode for the Product Master. Click the ATP tab and update the ATP Group field as Y3. Click the save icon.

Figure 6
View of the ATP tab of the Product Master at X3DA (containerizing plant)
Note
The definitions of the ATP groups Y3 and Y4 are similar; however, they differ in their scope of check. I describe these differences in the “ATP Check Control” section.
To assign the ATP group in the Product Master tab for the manufacturing plant, go to the change mode, click the ATP tab and update the ATP group as Y4 (Figure 7). Click the save icon.

Figure 7
View of the ATP Tab of the Product Master @X3DA (containerizing plant)
ATP Check Control
The ATP group, in conjunction with the business event, defines the check control. To define the setting for ATP check control, execute transaction code SPRO and follow menu path Advanced Planning and Optimization > Global Available-to-Promise (Global ATP) > Product Availability Check > Maintain Check Control.
In the business scenario, no confirmation was desired outside the checking horizon, so in the ATP Check Control Display View screen, the field Consider CH is defined as E End of Check Without Confirmation at Checking Horizon (Figure 8).

Figure 8
View of the ATP Check Control
Leave the other fields with the same default settings that appear on the screen. Now in the same screen with the Y3 ATP group and business event as A, select the ATP Check Control Scope of Check folder (circle highlighted in Figure 8). Double-click it to open the screen shown in Figure 9.

Figure 9
Scope of check at the containerizing plant X3DA
Click the New Entries button to add categories such as BI (Stock transport order) or EQ (Replenishment delivery) in which to add the categories relevant from the scope of check. After the new entries are added, click the save the icon. The settings for Y4 ATP group and Business event A are also done the same way.
Reason for a Difference in the ATP Group
Although the definitions and general settings for ATP check control are the same for Y3 and Y4, they differ in the scope of check (therefore, it is necessary to define two different ATP groups at the two plants).
At the manufacturing plant, the multi-level ATP check creates planned orders for the packages that should be included in the scope of check, but that is not required at the containerizing plant. Also, there could be some instances in which planned orders that planners create ahead of time need to be considered from an ATP standpoint. That is why ATP categories such as AI (Planned Order), AJ (Planned Order firmed, unconfirmed), AK (Planned Order not firmed, confirmed), and AL (Planned order confirmed, firmed) are considered in the scope of check at the manufacturing plant, but are not included in the categorizing plant.
These codes correspond to the different categories of planned orders that are relevant from an ATP standpoint (Figure 10). Figures 9 and 10 illustrate the difference between the scope of the check for the two ATP groups with the highlighted categories that are present at the manufacturing plant, but are not present at the containerizing plant. In Figure 10 you enter the ATP categories such as AC, AD, and AL that are part of the scope of the check.

Figure 10
Scope of check at the containering plant X3DA
Check Mode
Check mode definition also defines the ATP behavior of the Item. It defines whether the sales order requirement consumes the forecast of the item or not. The Production Type in the Check Mode Definition defines whether the multi-level ATP check is triggered or not. During a multi-level ATP check, an ATP tree structure is created that represents the multi-level BOM and the substitutions that resulted from a rule evaluation. The receipt elements are created during a later conversion of the ATP tree structure in PPDS.
To define a check mode, execute transaction code SPRO and follow menu path Spro > Advanced Planning and Optimization > Global Available-to-Promise (Global ATP) > General settings > Maintain Check Mode or through the transaction code /n/sapapo/ATPC06 In the screen that appears (Figure 11) define check mode Z13. Click the save icon to save your data.

Figure 11
Check mode definition Z13
Note
The check mode is automatically derived from the requirement type corresponding to the Planning Strategy settings defined in the Product master. I do not cover the integration aspect of the requirement type definition and the configuration of the strategy settings in ECC configuration and the assignment in the material master as it is beyond the scope of this article.
Now define check mode Z14 (Figure 12). Note that the check modes Z13 and Z14 are similar in their definition; however, they differ in the check instructions configuration settings. The Check Mode is then assigned in the Product master as shown in Figures 6 and 7.

Figure 12
Check mode definition Z14
Check Instructions
To check your instructions, follow menu path SPRO > Advanced Planning and Optimization > Global Available-to-Promise (Global ATP) > General settings > Maintain Check Instructions or alternatively execute transaction code /n/sapapo/ATPC07. This action brings up the screen as it appears in Figure 13.

Figure 13
Check instructions at the manufacturing plant X301, X317
The check mode and the business event define the sequence of checks of the basic methods such as the product availability check, product allocation check, and the forecast check. They define whether the rules-based ATP is valid or not and also define the settings for the multi-level ATP check.
Check Instructions at the Manufacturing Plant
The first basic check is performed for product allocations and the quantity confirmed from product allocations is passed to the product availability check. The Production Time field is selected with the value 1 After Executing the Product Availability Check, which means the production is only triggered for the balance of the quantity that cannot be confirmed through the product availability check. (However, the quantity is still confirmed from the product allocation check.)
Figure 13
The StartProduction field is selected as 1 Availability Check First, then Production, meaning that the quantity that can be confirmed before triggering the production is determined in the ATP check itself. A value of 2 (Production Directly) would mean that this quantity is determined as part of the PPDS heuristics run itself.
The settings for multi-level ATP check determine how the item behaves in a multi-level check. In my example, if the item cannot be confirmed based on the component availability, then the remaining requirement is left at the Header level itself. If you had selected the other, it would mean that the planned order would be created for the entire quantity irrespective of the component availability. (However, the planned order would not be confirmed fully.)
For the Conversion Mode –ATP TreeStrct, option C is selected because a single planned order should be created for the total confirmation date instead of multiple orders if the dates on which the component is available are staggered. The planned order is created for the date when the entire component quantity is available.
Also, the indicator for Re-create receipt elements is manually selected because for every ATP check you would want the receipt elements to be re-created in the ATP check. This ensures that the stock transfer requests and the planned orders are re-created to any changes in the sales order dates and quantity. This should be done in conjunction with the planning procedure settings that I describe later. After you configure these settings, click the save icon.
Check Instructions at the Containerizing Plant
To check instructions at the containerizing plant, execute transaction code /n/sapapo/ATPC07 or follow menu path SPRO > Advanced Planning and Optimization > Global Available-to-Promise (Global ATP) > General settings > Maintain Check Instructions. In the screen that appears (Figure 14), the rules-based ATP is selected by selecting the Activate RBA check box and selecting the Start immediat. check box so that the rules-based ATP is triggered immediately. Activation of the RBA is required because the location substitution is performed if the product is not available at the consolidation location.

Figure 14
Check instructions at the containerizing plant
PPDS Settings
Some PP/DS settings are also required to make multi-level and RBA scenarios work correctly. I describe these settings in this section.
Planning Procedure
Because the multi-level check is to be performed at the manufacturing plant when the package product is not available, and the fixed pegging is established between the documents created to the sales order, the right planning procedure should be assigned in the product master at the two locations. Execute transaction code /n/sapapo/mat1 or follow menu path APO> Master Data > Product Master.
In the screen that appears (Figure 15), the planning procedure assigned here is D in the product master. D indicates that the planning procedure is a multi-level check that allowsfor the product to be planned in a planning run. In the Product field enter the product name (e.g., 1021472) and enter a code for the Location (e.g., X301). Click the PP/DS tab. In this tab you find the field PP Plng Procedure. Click the icon to the right of this field and select Multilevel ATP Check with Planning Run from a drop-down list of options.

Figure 15
Assign the planning procedure to the product master
Configure the Planning Procedure
To configure a planning procedure, execute transaction code SPRO and follow menu path SAP Reference IMG > Advanced Planning and Optimization > Supply Chain Planning > Production Planning and Detailed Scheduling (PPDS) > Maintain Planning Procedures.
The standard planning procedure for the multi-level check is 5. However, this does not carry all the events for which a planning run should be triggered because this product could also be planned normally as part of the regular planning process. Therefore, a copy is made of the planning procedure 5, and all the events corresponding to the planning procedure 4 are added to this new planning procedure D (Figure 16).

Figure 16
Configure the planning procedure
In addition, the Create Fixed pegging relationship is selected to enable fixed pegging between the documents (Figure 17). In conjunction with the Re-create Receipt Elements that I described in the sections on checking instructions at the manufacturing plant and checking instructions at the containerizing plant (Figures 13 and 14), the fixed pegging ensures that these planned receipts are in sync with any ATP checks performed with the sales order changes.
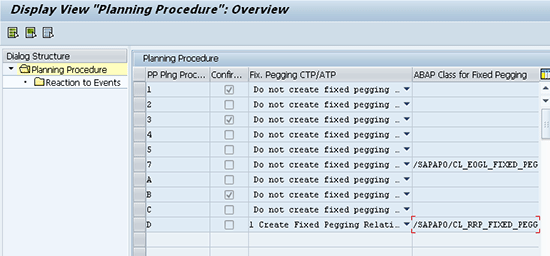
Figure 17
Reaction to events in the planning procedure
Enable Fixed Pegging at a Client or Product Level
To enable fixed pegging at the client or product level, execute transaction code SPRO and follow menu path SAP Reference IMG > Advanced Planning and Optimization > Supply Chain Planning > Production Planning and Detailed Scheduling(PPDS) > Global Settings > Maintain Global Parameters and Defaults.
To enable fixed pegging through the document changes (for example, conversion of an STR to an STO), the fixed pegging settings are activated at a product level or at a client level. This is done through the global settings for PP/DS in the Activate Fixed Pegging field. For my example, select 2 Fixed Pegging Active at Product Level (Figure 18). Note that there are some other settings required so that the fixed pegging is retained in the integration between ECC and APO through the document life cycle.

Figure 18
Definition of global parameters and defaults
Another field to note here is Sched Horizon for ATP Tree Structures. This is the time interval that defines the time horizon in which the ATP tree structure is automatically converted to planned receipts after the sales order is saved in a rules-based ATP scenario or through a multi-level ATP check. This is defined as 1000.00 days. This setting means that after you complete any sales order ATP check and save your data, the planned receipts are automatically created.
Note that with the fixed pegging being active at the product level based on the above configuration settings, the flag for the fixed pegging should be made active in the product master as well. To make this flag active, execute transaction code /n/sapapo/mat1 or follow menu path APO > Master Data >Product Master. In the screen that appears (Figure 19) enter 1021472 in the Product name field and X3DA in the Location field. Click the Demand tab and then open the sub-tab called Pegging in which you find the Fixed pegging field. Right-click this field, and in the pop-up screen that appears, select 1 (Fixed Pegging Is Active for Product) from the list of options. This value corresponds to fixed pegging is active at the product level. Click the green arrow icon.

Figure 19
Fixed pegging settings in the Product Location Master
Rules-Based ATP Settings
Based on the supply chain model, the products out of X3DA are sourced either out of X301 or X317. There are fewer products that are sourced out of X317 than X301. Therefore, there are two steps defined within the rule strategy. One is based on product and location that identifies only the rules for the few products that are sourced out of X317. The other is based on location alone, which is applicable for all the other products. If a match is found based on the product and location, then the condition type and subsequently the access sequence identify the table for rule determination. If a match is not found for the product and location, then the system determines the rule based on location alone.
The diagram shown in Figure 20 outlines the configuration and the master data that are required to support the rules-based availability check with the consolidation location . I describe the various steps in detail and explain how the settings fit together.

Figure 20
The rules-based ATP settings
Step 1. Define the Condition Table
To define the condition table, execute transaction code SPRO and follow menu path Advanced Planning and Optimization > Global Available-to-Promise (Global ATP) > Rules-Based Availability Check > Define Condition Table.
In the screen that appears, the fields are selected from the right-hand side (Field catalog) to define the two condition tables (e.g., 902 and 901). Table 902 is based on the Internal Location Name and Internal Product name (Figure 21), whereas Table 901 is based on the Internal Location Name (Figure 22).

Figure 21
Definition of the condition table 902

Figure 22
Definition of the condition table 901
Step 2. Maintain Access Sequence
To maintain an access sequence, execute transaction code SPRO and follow menu path Advanced Planning and Optimization > Global Available-to-Promise (Global ATP) > Rules-Based Availability Check > Maintain Access Sequences.
In the screen that appears, create an access sequence by entering Z001 in the field under the AcSq column (Figure 23). Under the Short Text column, define the access as Location and product/Location. Select the Access Sequences folder and double-click the Accesses folder.

Figure 23
Maintain access sequence
In the next screen (Figure 24) enter 10 and 20 in the fields under the Ac… (access number) column. In the fields under the T… (condition type) column enter 902 and 901. In the fields under the Short text column enter Location/Product and Location for access numbers 10 and 20, respectively. Note that in the Exclusive column, the indicator in the row for condition type 902 is checked. Therefore, if a record is found in the table 902 for the product and location in the sales order line item, then the next access number is not evaluated. The rule corresponding to the entry in the table is selected for the rules-based ATP check. Click the save icon to save the settings. Select the first access sequence (10) and then double-click the Fields folder.
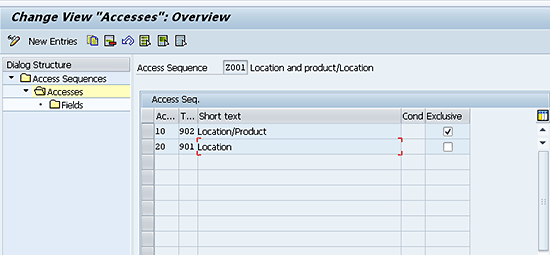
Figure 24
Maintain steps within access sequence
In the next screen (Figure 25) RULE_WERKS and RULE_MATNR appear by default based on the definition of the table 902 as shown in Figure 21. Note also that the following Condition fields are selected – RULE_WERKS and RULE_MATNR. The Access Type can be selected as Fixed Key or Free Key. Fixed key means that the values have to be specified for both the product and location field in the table 902. Free key values are optional in the rule determination.

Figure 25
Maintain fields for the access sequence
For access number 20 for condition table 901 (Figure 26), the field location is selected as RULE_WERKS again with the access type as Fixed Key. To get this field location to appear in the screen, select the second row in Figure 24 and then double-click the Fields folder. RULE_WERKS appears by default based on the definition of the table 901 in Figure 22.

Figure 26
Maintain fields within access number 20 in the Access Sequence
Step 3. Maintain Condition Types
To maintain the condition types, execute transaction code SPRO and follow menu path Advanced Planning and Optimization > Global Available-to-Promise (Global ATP) > Rules-Based Availability Check > Maintain Condition Types.
In the screen that appears (Figure 27), create a condition type by entering ZI01 in the field under the CType column. Assign condition type Z101 to the access sequence Z001(the field under the AcSq column) created in step 2.

Figure 27
Assign a Condition Type to the Access Sequence
Step 4. Maintain Rule Strategy
To maintain the rule strategy, execute transaction code SPRO and follow menu path Advanced Planning and Optimization > Global Available-to-Promise (Global ATP) > Rules-Based Availability Check > Maintain Rule Strategy.
In the screen that appears (Figure 28) specify the rule strategy type. Indicate whether the rule strategy type is inclusive or exclusive by selecting Exclusive or Inclusive from the drop-down list of options in the fields under the Rule Strat. Ty… column. The substitution list is included from a rules-based availability standpoint, whereas an exlcusive strategy would eliminate the substitutions that are determined based on the strategy.

Figure 28
Maintain a rule strategy
The rule strategy ZIN01 is defined as an inclusive rule strategy.
After you select the rule strategy, double-click the Control Data folder to define the condition type. In the next screen (Figure 29), create an entry with a Level of 10 and a condition type as ZI01 (the field under the CTyp column). In the Short Text field enter Loc/Loc and product. Click the save icon to save your entries.

Figure 29
Maintain control data for the rule strategy
Step 5. Create a Business Transaction
This step is in ECC. To create a business transaction, execute transaction code SPRO and follow menu path Sales and Distribution > Basic Functions > Availability Check and Transfer of Requirements > Availability Check > Rules-Based Availability Check > Define Business Transaction. In the screen that appears (
Figure 30), you define a business transaction that is then assigned to the sales document type in the next step. In my example, I entered ZSO, ZSPT, ZXPT in the BT (business transaction) column and entered descriptions in the fields under the Business transaction: Text column. Click the save icon to save your entries.

Figure 30
Maintain a business transaction in ECC
Step 6. Assign a Business Transaction to the Sales Document Type
To assign a business transaction to a sales document type, execute transaction code SPRO and follow menu path Sales and Distribution > Basic Functions > Availability Check and Transfer of Requirements > Availability Check > Rules-Based Availability Check > Assign Business Transaction to Sales document type. This action opens the screen shown in Figure 31.
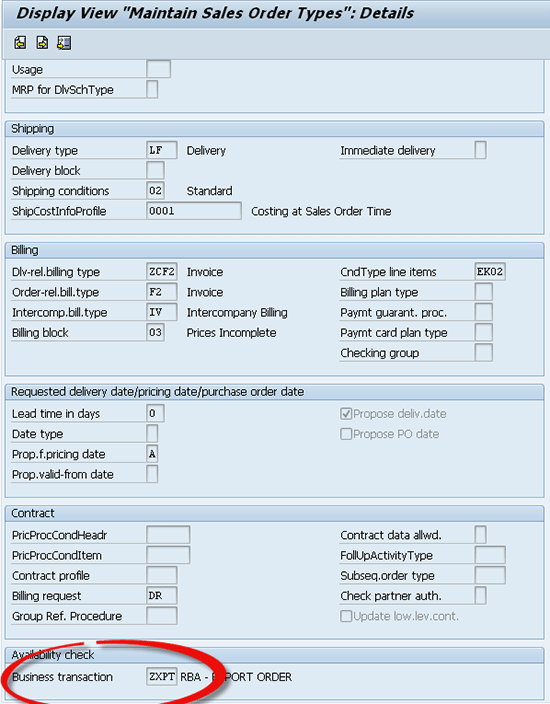
Figure 31
Assign a business transaction to a sales document type
This action means that only specific document types are relevant from a rules-based availability check point of view. The sales document type in ECC carries the business transaction based on which rules strategy sequence or rules strategy is assigned. This is assigned in the sales document type through the ECC configuration. Enter a value in the Business transaction field as it is relevant from a global ATP perspective. The other fields should already be populated based on the configuration of the sales order document type that is part of ECC configuration done for order processing. Click the save icon to save the settings.
Step 7. Assign Rule Strategy or Rule Strategy Sequence
In APO, to assign a rule strategy or a rule strategy sequence, execute transaction code SPRO and follow menu path SAP Reference IMG > Advanced Planning and Optimization > Global Available to Promise (Global ATP) > Rules-Based Availability Check > Assign Rule Strategy or Rule Strategy Sequence.
In the screen that appears (Figure 32), the following activation parameters are relevant for assigning the rules strategy or rule strategy sequence:

Figure 32
Assign rule strategy to technical parameters
Technical scenario (T..): A two-digit code that depicts the communication method that triggers a rules-based ATP check. Possible values are:
- AA: When triggered directly through an online ATP check in a sales order
- BB: When it is triggered through a Batch input
- DD: When through EDI
- EE: Through backorder processing
Business transaction (Bu…): Corresponds to the business transaction in step 5.
Action type (A..): Corresponds to the action triggering the ATP check whether it is a
create, change, or a copy of the sales order (A,B,C, respectively)
Rule strategy sequence (Rul…): A sequence of rule strategies (This fleft blank in my example)
Rule Strategy (Strat…): ZIN01
Handling of CP (calculation profiles): Controls the determination of the calculation profile when there are successive accesses used and each has a calculation profile associated with it. Substitute means the calculation profile of the current access is used and overwrites any from the previous access. Add means that the calculation profile settings are supplemented, not overwritten.
Preselection of Suitable Substitutions
In Figure 32, checking the indicator under the Preselectn (pre-selection) column allows a substitution list to be displayed. The user can select the most suitable substitution from the list of displayed substitutions. If this indicator is not selected, the list of suitable substitutions is not displayed. This setting should also be selected in the Check Instructions.
Because this is inactive in the Check Instructions (Figures 12 and13); the pre-selections are not visible in the ATP check.
Step 8. Definition of Integrated Rules X3INC08 and X3INC02
To define integrated rules X3INC08 and X3INC02 follow APO Main Menu > Master Data > Rule Maintenance > Integrated Rule Maintenance.
In the screen that appears (Figure 33) you define integrated rules X3INC08 and X3INC02. These integrated rules carry the rule that the original location in the sales order (X3DA) is to be substituted with if the sales order is either X301 or X317.

Figure 33
Maintain integrated rule X3INC02
Some key settings to be highlighted in the integrated rule are the fields Consolidation Location, which carries the value X3DA because the product has to be moved from the substitution location X301 or X317 back to the consolidation location X3DA. The other key setting is that Delivery D/TCorr in Cons. Loc is defined as Correlation. Correlation means that a common delivery date is determined for all the locations determined within the rules. This is valid when there is partial availability at the plant X3DA as well as the substitution location X301 or X317 there is a common delivery date determined for both X3DA as well as X301/X317 locations. The Loc. Determin Proced is defined as X3LOC2, which is defined to allow location X3DA to be substituted with X301.
Note
This correlation is in the context of the same line item within the sales order, not across line items in the sales order where there might be different rules determined for different sales order line items. Correlation across multiple line items was not attempted in the business context of this global ATP implementation. Read some pointers in my article, “Bring Deliveries Together with APO’s Correlation Functionality.”
The location determination procedure X3LOC2 is defined as X3DA to be substituted with X301 as shown in Figure 34.

Figure 34
Maintain location determination procedure X3LOC2
The integrated rule X3INC08 and location determination procedure X3LOC8 are defined the same way as integrated rules X3INC08 and X3INC02, except the substitution location is X317 (Figures 35 and 36).

Figure 35
Maintain integrated rule X3INC08

Figure 36
Maintain location determination procedure X3LOC8
Step 9. Assign Integrated Rules X3INC08 and X3INC02 to the Condition Table Records
To assign the integrated rules X3INC08 and X3INC02 to the condition table follow menu path APO Main Menu > Master Data > Rule Maintenance > Create Rule Determination.
In the screen that appears (Figure 37) enter ZI01 in the Condition Type field and press Enter. A pop-up screen appears with the two condition tables defined for Location/Product and Location. Select Location/Product and click the green arrow icon.

Figure 37
Maintain location determination procedure X3LOC2
First, select the Location/Product and define the record with the product as 1024534 and location as X3DA to read the integrated rule X3INC08 (Figure 38). This is one of the exception conditions that allows the substitution to take place from X317 instead of the default X301.

Figure 38
Maintain condition records for product and location (exception condition)
After you click the save icon, make the selection for location when creating rule determination and define the record as shown in Figure 39. This is the default rule where the substitution location is usually X301.

Figure 39
Maintain condition records for product and location (exception condition)
Rules-Based Summary
You have defined all the configuration settings, so now you are ready to see an example of how rules-based ATP with multi-level ATP check works. I create a sales order online with two line items at X3DA for products 1024534 (line item 10) as shown in Figure 40 and 1021551 (line item 20) as shown in Figure 41. The document type is ZXPT.

Figure 40
Sales order line item 10 using the product and location level search

Figure 41
Sales order line item 20 using the location level search
Because I use the technical scenario of AA (online ATP check that will be triggered), the business transaction is ZXPT (based on the sales document type as ZXPT as in Figure 31) and using action type as A (create mode of sales order) the rule strategy is determined as ZIN01 (Figure 32).
Now rule strategy ZIN01 calls out condition type ZI01 (Figure 29). Condition type ZI01 is assigned to access sequence Z001 (Figure 27) that says that a two-step search (Figure 23) should be made using a product location search and the second a location level search. For sales order line item 10, which is the product 1024534 , there is a match found per the condition record in Figure 38. It calls for a substitution with location X317 in case the product is not available at X3DA (Figure 40). Because a match is found, it does not move to the next step in the access sequence as the condition record is defined as Exclusive (Figure 24).
When the system goes through step 10 in the access sequence, there is no match found for sales order line item 20 for material 1021472. Therefore, it goes to step 20 where the match is found based on the location being X3DA and the substitution is done with the location X301 (Figure 41).
For both line items, the multi-level check is performed to check for the component availability because there is not enough package inventory to meet the complete sales order requirement.
To summarize, the use of rules-based ATP in a consolidation scenario coupled with the use of multi-level check can enable some of the more complex business processes to be enabled through the use of global ATP. Due consideration needs to be made to maintain the master data in an ongoing production environment so that some of these processes can run smoothly.
Ranjan Sinha
Ranjan Sinha is a senior managing consultant at IBM. He has vast experience implementing SAP APO functionality in various industries, including electronic and chemical.
You may contact the author at RSinha1152@yahoo.com.
If you have comments about this article or publication, or would like to submit an article idea, please contact the editor.