Manager
If you have a pure AS400 environment, it can often be difficult to find staff with skills to monitor the systems. Discover how, with a base set of commands, you can implement the Computer Center Management (CCMS) agent on your AS400 servers to push data to SAP Solution Manager for centralized monitoring — even if you know very little about the AS400 operating system.
Key Concept
The Computer Center Management System (CCMS) helps you monitor, configure, and control your SAP system. You can download CCMS agents from the SAP Service Marketplace. When installed on your AS400 servers, CCMS agents direct data to SAP Solution Manager for centralized monitoring. These agents enable you to monitor log files, operating system processes, and network data.
Centrally monitoring the SAP landscape is a great way to be proactive and prevent critical system crashes from occurring. AS400 skills are not widespread, so often central monitoring and alerting of satellite systems running on AS400 servers is neglected.
However, installing Computer Center Management System (CCMS) agents that direct data to your SAP Solution Manager system is not that difficult once you have a few skills in using AS400 commands. After you install the agents, the CCMS agent monitors the AS400 server and triggers alerts when a critical threshold is reached. An example of this, when configured, is a batch job that fails, such as a payroll job. The threshold is set on the satellite system and the agent sends a signal when that threshold is reached.
This article assumes that no Microsoft Windows Server interface is available; it is a pure AS400 system. AS400 experts will probably have their own way of doing this, but the example I use offers a solution for those with less expertise. Basic UNIX skills are a prerequisite.
The basic steps to installing and registering CCMS agents are as follows:
- Install the AS400 terminal on your desktop machine for access to the AS400 servers
- Test the Remote Function Call (RFC) connections to and from the satellite system using transaction SM59
- Create the csmconf file
- Register the CCMS agent by using the –R switch. Start it and check the result in transaction RZ21 in SAP Solution Manager.
- Check, start, and stop the CCMS agent
Note
For more information, see SAP Note 957455 (Correct release of the CCMS agents) and SAP Note 522878 (iSeries: Availability of CCMS Agents). You can also refer to the
CCMS Agents page in SAP Help.
Step 1. Install the AS400 terminal on your desktop machine for access to the AS400 servers. To access the operating system of an AS400 server, you need to use a terminal. A good option is to use the Mocha software available at
www.mochasoft.dk. The initial install of the Mocha terminal gives you a 30-day trial of free use. Thereafter, each use requires you to insert a generated code.
Figure 1 demonstrates what the Mocha terminal looks like once you have installed it and connected to the AS400 server. Note that the logon should be something like <SID>OFR, not the usual <SID>adm.

Figure 1
Example of Mocha TN5250 terminal
Step 2. Test the RFC connections to and from the satellite system using transaction SM59. Check to ensure that the networking to SAP Solution Manager is correctly set up. Before the CCMS agents are installed and registered on the AS400 operating system, make sure that the RFC settings from the SAP Solution Manager system to the satellite system are generated. Do this by logging onto the satellite SAP system and using transaction SM59. Look for the _BACK connections to SAP Solution Manager. If they exist, then test these _BACK connections in the normal way. If they do not exist, then you need to generate them from transaction SMSY in SAP Solution Manager.
Step 3. Create the csmconf file. Following SAP standard, create the file in the following directory location: /usr/sap/<SID>/DVEBMGS00/log/sapccm4x. Log on as <SID>OFR and issue the call pgm (qp2term) command to receive a UNIX prompt (
Figure 2).

Figure 2
Example of switching to a UNIX prompt
After you have executed this command, you see a $ in the top left corner and the cursor prompt in the bottom left. After you enter a UNIX command as per the command interface in
Figure 3, the command carries to the top of the screen below the $ sign, next to the > sign. The AS400 interprets the UNIX commands into AS400 commands and then executes them.

Figure 3
Example of the UNIX-like interface and command to make the sapccm4x directory
Try the harmless UNIX commands such as ls first to get the feel of it. Note that not all UNIX commands will work because the AS400 is restricted by the range of commands available to be interpreted from UNIX into AS400 commands.
Create the directory sapccm4x in /usr/sap/<SID>/DVEBMGS00/log using the mkdir command directly, such as:- mkdir /usr/sap/<SID>/DVEBMGS00/log/sapccm4x, or follow the cd and mkdir commands in the example in
Figure 3.
You check it by using the UNIX commands cd and ls. Then press F3 to leave the UNIX prompt and return to the AS400 command prompt. Use the command in
Figure 4 to create the csmconf file in the directory you just created, being careful to use the right <SID>: EDTF STMF('/usr/sap/<SID>/DVEBMGS00/log/sapccm4x/csmconf’).

Figure 4
Example of statement to edit the csmconf file
You are then presented with a simple editor. Position the cursor on the prefix to the line that you want to edit and press F1. You see a list of options that will help you understand how to use the editor. For instance, you can use the letter I to insert a line.
You are able to cut and paste with this editor, but be careful that you have sufficiently created lines (using the I command) before you paste. Use the function keys to save the csmconf file.
Figure 5 shows an example of the csmconf file. Note that the periods between the sections in the configuration file are significant. The sapccm4x agent expects a format for the config file during registration. If it is not correct, then registration fails. You may need to remove the # symbol for “load balancing” and or “group”, then give them values depending on your network configuration. The configuration file is used for both sapccmsr and sapccm4x agents.
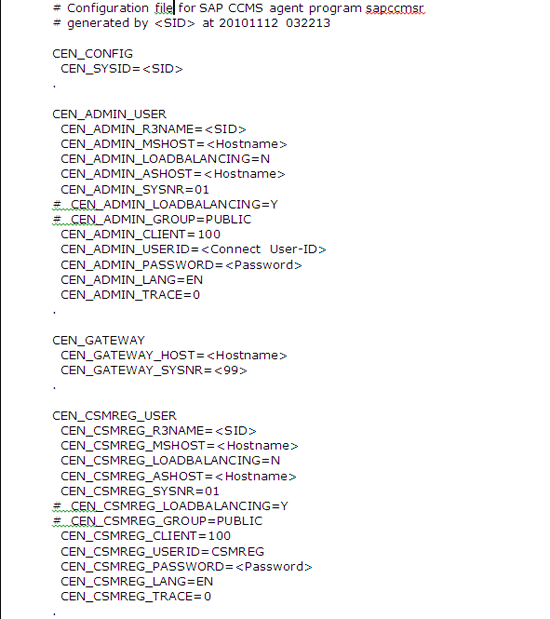
Figure 5
Example csmconf file
Step 4. Register the CCMS agent by using the –R switch. Start it and check the result in transaction RZ21 in SAP Solution Manager. The first step to registering the CCMS agent is finding where the sapccm4x executable is located. You use the path to this executable later. Use the command DSPLIBL to display the known libraries and to check that the executable sapccm4x is there.
Once you have created and saved the csmconf file, the next steps are:
- Call the sapccm4x agent from within the directory containing the csmconf file. Figure 6 demonstrates changing to the correct directory.
- Use the CALL PGM command with the correct path to the sapccm4x executable (for example SAP<SID>UC) and switches in order to register the sapccm4x agent.

Figure 6
Example of statement to change directories using the AS400 command prompt
Then, after you are in the /usr/sap/<SID>/DVEBMGS00/log/sapccm4x directory use the following command, taking care to insert all the single quotes where necessary:
CALL PGM(SAP<SID>UC/SAPCCM4X) PARM('-R' '-f ' csmconf 'pf=/usr/sap/<SID>/SYS/profile/<SID>_DVEBMGS00_<hostname>')
The command will run for some time — one to two minutes, depending on the network — but it should return to the prompt with a successful result. If it gives an error code, the most likely issue is that the network is causing a block. If this is the case, go back to transaction SM59 in SAP Solution Manager and check the _BACK connections to it. Ensure that all the parameters in your csmconf file match the _BACK connection parameters.
If you are only registering the CCMSR agent, then you would use the same command, but substitute SAPCCM4X with SAPCCMSR. You would use the ‘ –j2ee’ switch as well if you were monitoring the JAVA stack. Note that the SAPCCMSR agent monitors the Java stack, such as the Portal only. The SAPCCM4X agent only monitors the ABAP stack.
Step 5. Check, start, and stop the CCMS agent. Once the agent is registered successfully, you see it in the transaction RZ21 remote agent overview in SAP Solution Manager. To start the agent use the following commands:
CALL PGM(SAP<SID>UC/SAPCCM4X) PARM(‘-DCCMS’ 'pf=/usr/sap/<SID>/SYS/profile/<SID>_DVEBMGS00_<hostname>')
To stop the agent, you can replace the ‘-DCCMS’ with ‘-stop’. Note that the single quotation marks are significant. You must use them in the command. You can now check that the agent is online and available for setup for alerting in transaction RZ20 in SAP Solution Manager.
Jim Baxter
Jim Baxter is an independent SAP Basis consultant with a wide variety of experience in SAP Solution Manager setup and functionality. He is certified in the Implementation Tool and Root Cause Analysis and has worked on Service Desk setup for SAP value-added resellers.
You may contact the author at
jim.baxter@ulapha.co.za.
If you have comments about this article or publication, or would like to submit an article idea, please contact the
editor.