Learn to set up an easy process to remove data that is no longer needed from your SAP system. It keeps your system space free for new data and improves performance without the need to add system resources.
Key Concept
You use archiving objects to archive files. The archiving object provides the data structure and context. For example, archiving object SD_VBRK (a billing document) includes all the tables associated with the billing document, such as header, line, address, and document flow. Archiving objects form the data structure and context. Archiving objects for each application component are predefined in the system. They specify which master or transactional data to archive and how. An example of master data is customer and vendor information, which you need to archive for record purposes. Transactional data is more performance-intensive and includes inquiries, quotations, sales orders, deliveries, and billing documents.
As you might have noticed, plenty of
documentation on archiving is available.
This may make it hard to understand which
of the myriad procedures you should follow.
The steps below detail a simple way you
can set up and maintain an effective
archiving procedure for your SCM data.
The archiving procedure is divided into
three main steps: create the archive
files, store the archive files, and delete
the data from the database after it is
archived. Although this article focuses
on R/3, the methods described also apply
to mySAP ERP.
Prepare to Archive
Archiving uses objects in the R/3
system to archive files, which are
then stored in an archiving system
and retrieved as needed. Some common
archiving objects in a typical company
are SD_VBAK (sales
document), MM_MATBEL (materials
management: material documents), MM_EKKO (purchasing
document), and CHANGEDOC (change
documents). The customizing is a one-time
process, but the jobs are scheduled
based on the archive run.
The main archiving transaction, which
takes you to the archiving administration,
is SARA. Follow these
steps to use the transaction:
Step 1. Check for the archiving
session sequence. Before
you start archiving an object, check
the archiving session sequence for
that object. This helps you to understand
the document flow within your SAP
system and where this object falls
in the sequence. Before you can archive
and delete a material master record,
you must archive other objects (such
as purchasing documents) that refer
to this material. Network graphics
give you the view of such dependencies
between objects.
If a material master record cannot
be archived and deleted at a given
organizational level, the reason is
specified in the log (for example,
a purchase order exists for the material).
Take the example of the SD_VBRK (billing
document) archiving object. The objects
before that are RV_LIKP (deliveries), SD_VTTK (SD
transport), and so on. It is recommended
that you archive the object in sequence.
To plan your archiving based on how
objects follow the sequence in the
information flow, click on the network
graphics icon  , located on the left
side of the initial archiving screen
shown in Figure 1.
That takes you to Figure 2,
which shows the graphical representation
of the archive object dependencies
and the status of each object. It also
reveals if or when the object was last
archived.
, located on the left
side of the initial archiving screen
shown in Figure 1.
That takes you to Figure 2,
which shows the graphical representation
of the archive object dependencies
and the status of each object. It also
reveals if or when the object was last
archived.

Figure 1
Transaction code SARA (archive administration)
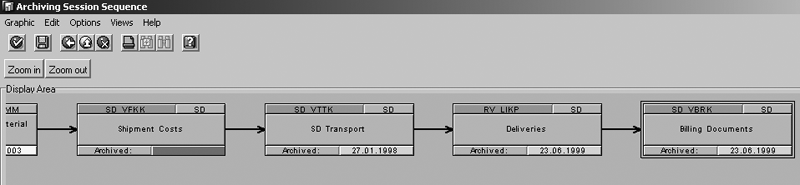
Figure 2
Check for the archiving session sequence (the sequence of the object, document flow within the process)
Step 2. Check for database
tables that will be archived against
this object. Click on the
Database Tables button shown in Figure
1. Figure 3 shows
the details of the tables behind
the object SD_VBRK.
You can view all the tables, or just
the tables with deletions.
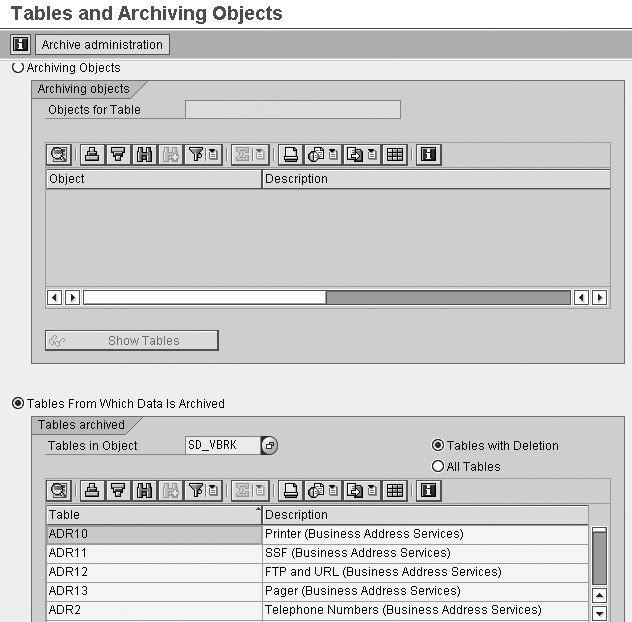
Figure 3
Check for tables associated with the archive object
Create the Archive
Files
Now that you know which tables are affected
and at what part of the process flow
you can archive the object, you are ready
to customize the setup for archiving
the object.
Step 1. Set up archiving
customizing. Use transaction SARA,
and then click on the Customizing button
shown in Figure 1. This brings up
a pop-up screen with the Customizing option
for data archiving (Figure
4). It has four main sections: Cross-Archiving
Object Customizing, Archiving Object-Specific
Customizing, Basis Customizing, and Application-Specific
Customizing. In the pop-up
screen, complete the steps for customizing,
which I'll describe.
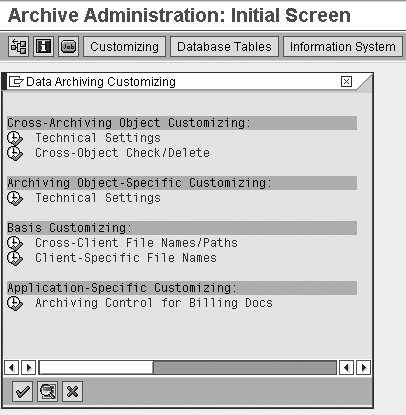
Figure 4
Complete customizing steps in the pop-up window
Clicking on Technical settings under Cross-Archiving
Object Customizing brings
you to the Change View "Cross-Object
Customizing Data Archiving":
Details screen shown in Figure
5. Accept all the defaults
and appropriate selections in the
area within any default selection
or values. You can review the defaults
and update them appropriately. For
example, you may want the system
to check for files in the file system
or for stored files, have the system
verify the archive file existence
before deleting, indicate the maximum
amount of data you can write to the
archive file, and give the name of
the server group name for a background
job.

Figure 5
Use this view to change customizing defaults
For the purposes of this article,
you can ignore the Cross-Object
Check/Delete reference
in Figure 4. Use that when you
would like to archive an object
in one client that in turn triggers
archiving in another client.
Use the green arrow button to
return to the customizing pop-up
window shown in Figure 4. Click
on Technical Settings under Cross-Archiving
Object Customizing.
Step 2. Set up the
production variant. You
can choose to set up a test
variant along with the production
variant. The test mode variant
does a simulated run and shows
the results. The production
variant does the actual write
job for archive. On the Change
View "Customizing View
for Archiving": Details screen
(Figure 6),
click on the Variant button
next to the Production
Mode Variant option.
This brings up the screen
shown in Figure 7.
Deselect Test Run if
it is a real production run
and save.
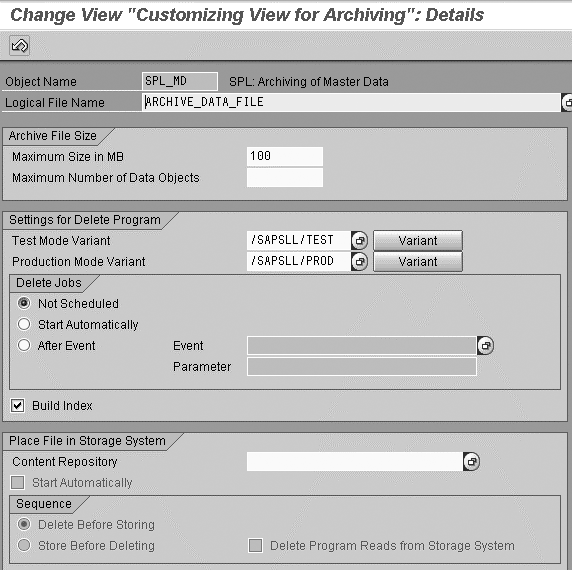
Figure 6
Click on the Variant button next to the icon for the Production Mode Variant option
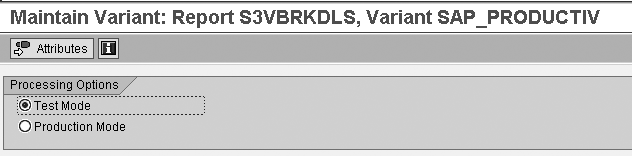
Figure 7
Deselect Test Mode if you plan to do a production run
Store the
Archive Files
Now that you have identified
the files to archive, you need
to identify the storage system
to which you are going to transfer
them. You can specify the external
storage system and, based on
the configuration in step 1
of archive file creation, the
system automatically transfers
the files to the subsystem.
You should link the external
storage system to the SAP system
for file transfer. If you haven't
specified the external storage
system, you can use the SAP
Content Management Infrastructure.
Step 1. Define the
logical file path in the Cross-Client
File Names/Paths. Archive
files are stored in the file
system under a physical path
and file name that is derived
from the user-defined logical
path or file name. In this
step, the user defines a platform-specific
physical path and name where
the archive files will be
stored. Find this under the Basic
Customizing section
in Figure 4. Click on Cross-Client
File Names/Paths to
get to the screen shown in Figure
8, where you configure
the file names and paths.
Go back and click on Client-Specific
File Names. Configure
the file names and file paths
in consultation with your
Basis team.
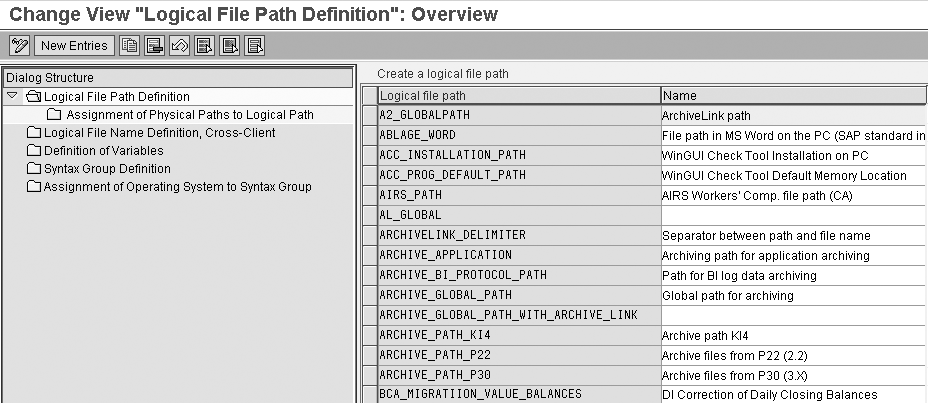
Figure 8
Cross-client file name and path configuration step details
Basic customizing for File
Names/Paths has two
options: Set it up with client-specific
settings, so that the file
names are only available for
the client you want to archive,
or make it client independent
(cross-client), as shown in
Figure 8. In this case, the
customizing for file name
and path are available across
all clients.
Step 2. Click on Archiving
Control for Billing Docs,
under the header Application
Specific Customizing (Figure
4). The screen in Figure
9 comes up. The settings
or the data seen in the figure
are default. You can keep
it as is or you can specify
other methods of archiving
documents — for example,
basing it on sales organization,
billing type, residence (number
of days from the date of creation
of that document to the date
of archive), or Check
acc. You can use
the standard 001 routine program
or a custom one within your
client. The * in the SOrg and BillT fields
denotes that the archive job
will archive the documents
for all sales organization
and billing types.
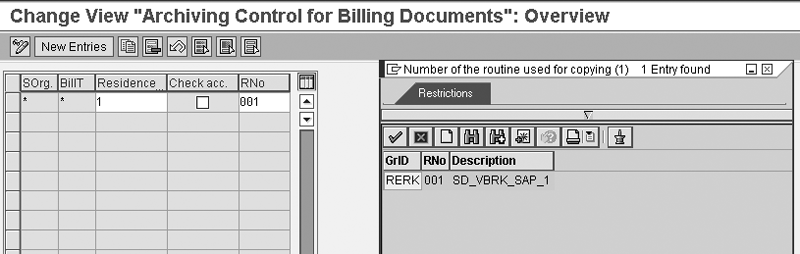
Figure 9
Document selection for archiving for billing documents
Step 3. Set up the
archiving jobs. Set
up the archiving job for the Write step.
The transaction SARA provides
the view of the steps involved
in archiving, as shown in
Figure 1. First, run the Write archive
job to extract the data from
the different tables in the
object into a file by clicking
on Write.
Before you can run the Write job,
set up a job variant. The variant
setup involves data selection.
Enter the archiving object SD_VBRK in
the screen in Figure 1 and click
on the Write button.
This brings up the screen where
you enter the variant name (Figure
10). Enter the name
of the variant that you want
to set up (TEST123 in
my example), then click on the Maintain button.
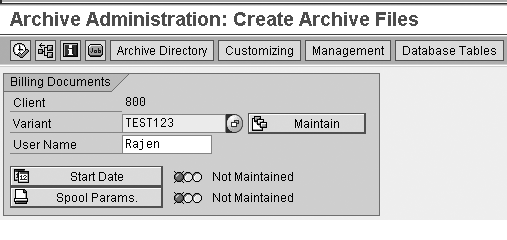
Figure 10
Create the job variant
Next, select the variant criteria.
The selection data shown in Figure
11 will be archived
(i.e., written to a file). Select
the document to archive by billing
document range or list in the BillDocs section.
Use the Restrictions section
to exclude other fields from
the selection. You can also
select a specific billing type
to archive or restrict the selection
on certain fields. Make sure
you select the Production
Mode. In Test
Mode, the job runs
successfully but does not create
any archive files. After you
have keyed in the selection,
click on the green back arrow
and then save to create the
variant. This brings you to
the screen shown in Figure
12.
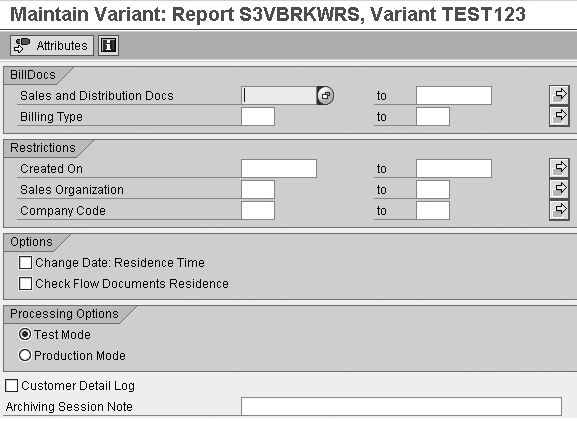
Figure 11
Select variant criteria click here for a larger version of this image
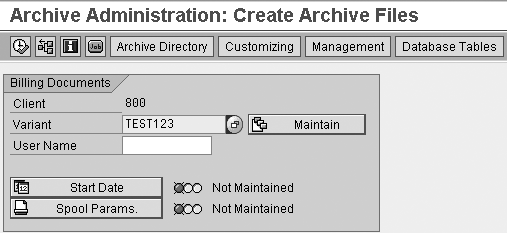
Figure 12
Set the start date and spool parameters
Now set the start date. In
the Archive Administration:
Create Archive Files screen
(Figure 12), click on the Start
Date button. On the
screen in Figure 13,
click on the Immediate button
and then click on the save icon.
This stipulates that your job
will be executed as soon as
you submit it.
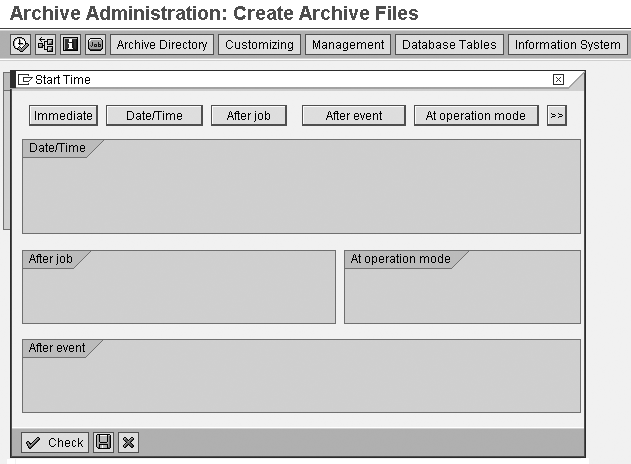
Figure 13
Set up the start time for the archive write job
Set the spool parameters.
Click on the Spool Params.
button from the Archive
Administration: Create Archive
Files screen in Figure
10. (Once you have set up that
start time and clicked on the
save icon in the pop-up window
shown in Figure 13, you are
taken back to the screen in
Figure 10.) On the next screen,
enter your Output Device,
select Print Immediately,
and select New Spool
Request. If you like,
you can also name your spool
file. Green lights next to the
buttons indicate that your Job
Start and Spool
Params. are set up.
Step 4. Execute your
job. Execute your
job from the initial administration
screen shown in Figure 12
by clicking on the execute
icon.
Step 5. Review the
output from your job as well
as the spool list.
Click on the job icon on the Archive
Administration: Create Archive
Files screen (Figure
14). This displays
the Job Overview screen
(Figure 15),
which allows you to display
each job as well as the associated
spool files.
Figure 14
Review the output of the job run on the archive administration screen
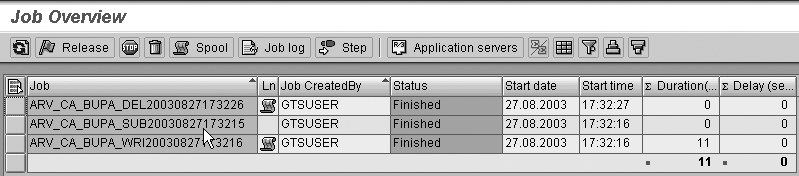
Figure 15
Review the job log from the Job Overview screen
Step 6. Review the
job log. Clicking
on the job icon in the above
step takes you to the list
of jobs with the status of
each (i.e., Finished for
a successful run or Cancelled for
a failed execution). Select
the job from the overview
screen and then click on the Job
log button. The job
log screen (Figure
16) shows the details
of the steps executed by the
job.
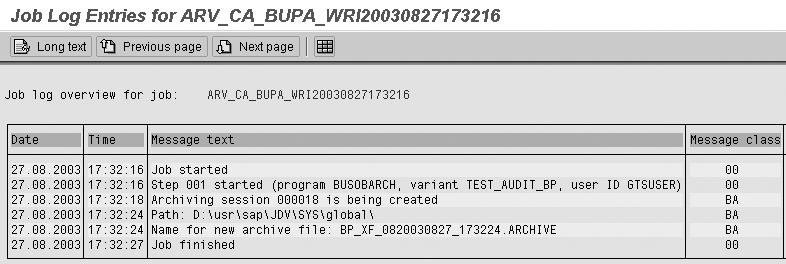
Figure 16
Job log shows you if your job completed successfully
Let's analyze the above
job steps. The screen says it
started the job at a specific
time. The next status is Step
001, when it started
the program with the variant
maintained (selected). Next
it created an archiving session.
Then it tried to place the file
in the path I maintained in Customizing,
with the archive file name mentioned
in the following step, and finally,
the step of Job finished.
Step 7. Review the
spool list. A spool
request is the document attached
to a job run containing application
data that you can send to
a printer or other output.
Spool file review gives you
a summary of the write job
execution. To review the spool
list, click on the Spool button
in the Job Overview screen
shown in Figure 15. The resulting
spool list screen shows your
output report. (Figure
17).
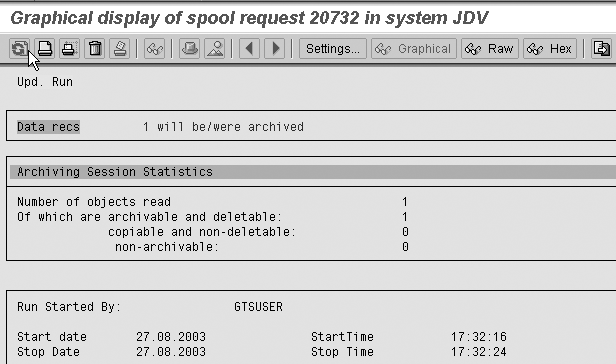
Figure 17
Review the spool list for output status
Delete the
Files from the Database
In the steps so far for the
archive write, you extracted
the data from the selected archive
object and stored it in the
archive system. Now you proceed
to the delete step, which lists
the data you just extracted
with the write job.
Step 1. Set up and
execute deletion jobs. Using
transaction SARA,
display the screen shown in
Figure 1. Enter the archive Object
Name and click on
the Delete button.
It takes you to the screen
you see in Figure
18, where you set
up the Archive Selection, Start
Date, and Spool
Parameters for the
delete job.
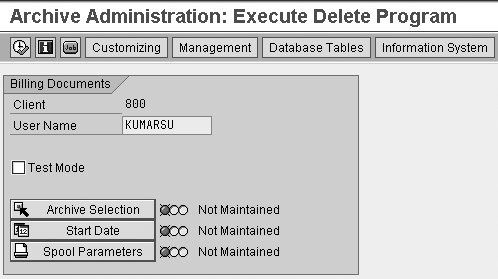
Figure 18
Set up the delete job
Step 2. Select the
archive file for deletion. Based
on your write job, the system
should provide a list of archive
files for deletion. Click
on the Archive Selection button.
This takes you to a pop-up
window, Archive Administration:
Execute Delete Program (Figure
19). Note the archive ID file 000021 with
the date stamp. This was created
after the write job ran. The
cross in the box indicates
that that the archived data
has been selected for deletion.
This brings up the data that
has been extracted by the
write job to make it available
for deletion. Select from
the list by placing an X in
the box as shown in Figure
19.
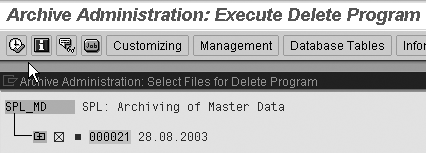
Figure 19
Select archived data (based on your write job) for deletion. Click on the green check icon to accept the selection. When you click on the save icon, it creates your variant.
Once you have selected the
archive object, click on the
continue icon to go back to
the Archive Administration:
Execute Delete Program (Figure
18). This step creates the variant
for the delete job run.
Step 3. Set the start
date. Click on the Start
Date button shown
in Figure 18. That brings
up a pop-up window with Start
Time (Figure
20). Click on the
appropriate button (Immediate for
scheduling the job immediately
or you can schedule it at
a later date and time) and
then click on the save icon.
The job is now set up to execute
as soon as you submit it.

Figure 20
Pop-up window for job run start-time setup
Step 4. Set the spool
parameters. Click
on Spool Params.
(Figure 14), and in the pop-up
window shown in Figure
21, enter your Output
Device, the Number of
copies for print
output, and the specific page
selection range.

Figure 21
Specify spool parameters (or background print parameters)
Step 5. Execute your
job. Click on the
execute icon. The system accepts
the data in the previous step
and takes you to the screen
shown in Figure 18. After
the data is maintained in Archive
Selection, Start
Date, and Spool
Parameters, the icon
should turn green. Red means
missing data.
Step 6. Review the
output from your job as well
as the spool list. Click
on the job icon on the Archive
Administration: Execute Delete
Program screen. This
displays the Job Overview screen,
which in turn allows you to
display each job as well as
the associated spool files.
You must review the job log
because the delete step is different
from the write job and you need
to ensure that it completed
successfully. Select the job
from the Job Overview screen
and then click on the Job
log button. Job log
entries appear.
Step 7. Review the
spool list. Click
on the spool button in the Job
Overview screen.
The resulting Spool list
screen shows your output report
online (Figure 22).
Select the spool to view.
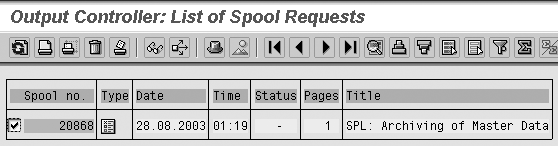
Figure 22
Spool selection of the delete job
When you click on the details,
you see a list similar to the
one shown in Figure
23. This screen details
the steps of the delete job.
It opens the archive file, reads
the data, deletes the selection,
and deletes the entries from
the table. With the delete job,
you have successfully removed
the data from your system. The
archive file you extracted based
on your write job is stored
and verified for future retrieval.
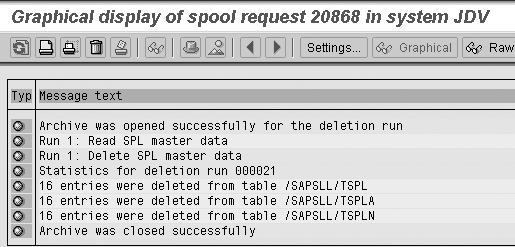
Figure 23
Spool detail
Read Archived
Data
Now that the data is archived,
you can read it from the system.
Data is read sequentially and
the information is displayed
in list form. You read archived
files through the Archive
Administration screen.
You can use the utility Read via
transaction SARA.
One of the prerequisites is
that the archive object being
read must have one read program
associated with it. The following
steps explain how to read the
archived data.
Note
The drop-down menu in the Read Program field in Figure 24 lists the read programs. If no read programs are delivered with the archive object, you can write your own list program, which reads from the archive data and lists views in whatever report format you prefer.
Step 1. Click on Read
in Figure 1, with the archive
object filled in. This
brings up the Archive
Administration: Run Read Program screen
(Figure 24).
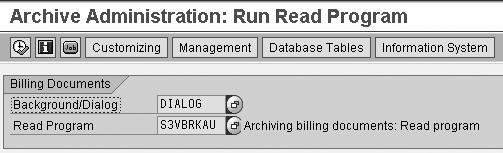
Figure 24
Initial screen for the Read program
Step 2. Specify in
the Background/ Dialog field
whether the analysis program
is to run in the background
(batch) or online (dialog). If
you select the batch option,
it prompts you with Archive
Selection, Start Date,
and Spool Parameters (Figure
25).
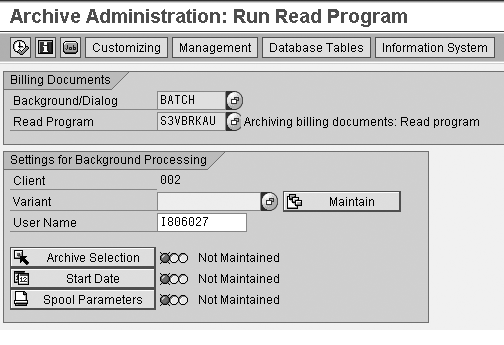
Figure 25
Batch run setup
As seen in the previous steps,
once the archive selection,
start date, and spool parameters
are filled in, you should see
a green light for the confirmation
of data maintenance.
Step 3. Within the
Read Program field, select
a read or analysis program
and click on the execute icon
 . The
management icon gives you
a view of archive sessions
that have been successfully
run in the past. It also lists
the invalid runs.
. The
management icon gives you
a view of archive sessions
that have been successfully
run in the past. It also lists
the invalid runs.
Rajen Iyer
Rajen Iyer is the cofounder and CTO at Krypt, Inc. Rajen has written several in-depth, best practice articles, white papers, patents, and best-selling books on SAP Logistics and SAP Global Trade Services, including Effective SAP SD and Implementing SAP BusinessObjects Global Trade Services. He is also an invited speaker at industry conferences.
You may contact the author at Rajen@kryptinc.com.
If you have comments about this article or publication, or would like to submit an article idea, please contact the editor.