Learn how to use SAP BusinessObjects Explorer to rapidly explore data in a highly graphical and intuitive format using views and view sets. The latest release of SAP BusinessObjects Explorer comes with two new components that greatly enhance the user’s ability to analyze and interact with data: exploration views and exploration view sets.
Key Concept
Two components have been introduced within SAP BusinessObjects Explorer 4.1 that greatly enhance the user’s ability to analyze and interact with data. These two components are exploration views and exploration view sets. An exploration view is a saved user customization of an information set. An exploration view set is a container of one or more exploration views that can be used to group exploration views together.
An exploration view is a saved exploration on an information space that can be used to expose and explore a specific part of the data within an Explorer information space. The exploration view usually represents a targeted part of an Explorer information space that is related to a specific business question. An exploration view set is a container of one or more exploration views that can be used to group exploration views together.
In this article, I describe the steps for creating and managing exploration views and view sets within SAP BusinessObjects Explorer 4.1. Before reading this article, readers should have some understanding of SAP BusinessObjects Explorer 4.1 and should understand what an Explorer information space is.
Intended Audience
This article is intended for SAP BusinessObjects developers, technical users, and administrators who are responsible for developing and managing SAP BusinessObjects Explorer 4.1 applications and for the configuration of Explorer 4.1 information spaces.
Connect to SAP BusinessObjects Explorer 4.1
In order to configure exploration view functionality in SAP BusinessObjects Explorer 4.1, you must have the following prerequisites in place:
- Access to the SAP BusinessObjects BI launch pad application
- Create and edit rights to the SAP BusinessObjects 4.1 Explorer application
- View rights to Explorer information spaces
An administrator of SAP BusinessObjects should be able to set these rights for any users of the system as needed. Once you have the required prerequisites in place, log on to the BI launch pad application using the URL for the BI launch pad application as shown in
Figure 1.
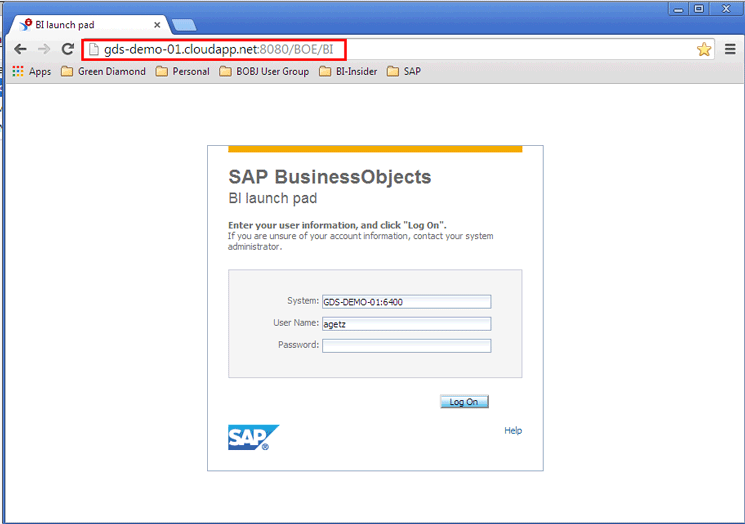
Figure 1
Open the BI launch pad application
In the screen that opens (not shown), click Applications > Explorer at the top of the screen or click the Explorer icon on the bottom right to connect to SAP BusinessObjects Explorer 4.1. This action opens the Home page of SAP BusinessObjects Explorer, where you take the next step.
After connecting to the BI launch pad application, click Applications > Explorer at the top of the screen or the Explorer button under My Applications (
Figure 2). This opens the SAP BusinessObjects Explorer Management home tab (
Figure 3), where you can create and manage information spaces and exploration view sets.

Figure 2
Open Explorer from the BI launch pad

Figure 3
Open the Home tab of the SAP BusinessObjects Explorer application
This Home tab has two subpage offerings: Information Spaces and Exploration View Sets (highlighted in
Figure 3).
View Existing Exploration View Sets
Click the Exploration View Sets link to see the existing exploration view sets (
Figure 4). To get the new list of available exploration view sets—for example, after any exploration view sets are created or changed—simply click the Refresh list button.
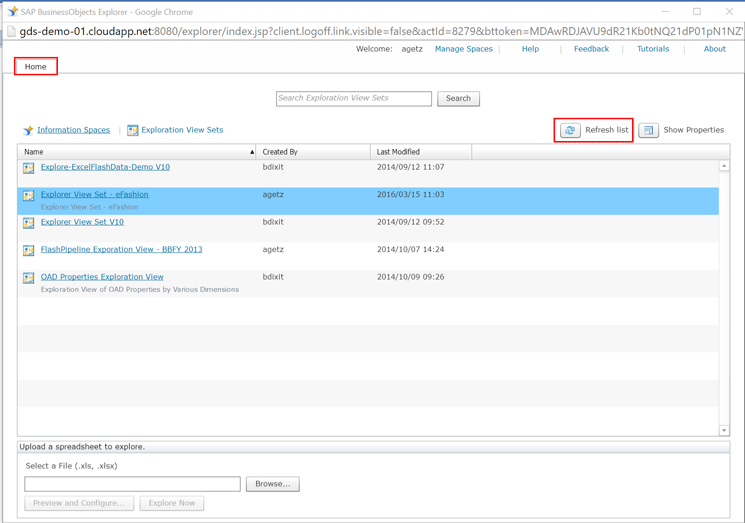
Figure 4
The Home tab of BusinessObjects Explorer 4.1
Double-click the Explorer View Set – eFashion option as shown in
Figure 4. This opens the view set in a new tab as shown in
Figure 5, with one visualization contained within it—in this case, a bar chart.

Figure 5
View the selected exploration view set with one visual component
On the top left side of the screen is the Visual elements pane where users can add graphical elements. This pane allows users to drag and drop new visual components (charts, tables, and lists) to the details pane (on the right, with the bar chart, in
Figure 6). This screenprint shows the exploration view set after a new visual element has been added, in this case, a table element. Since a chart element already existed in the Details pane, now two visualizations exist within the current exploration view (although it can contain more than two).
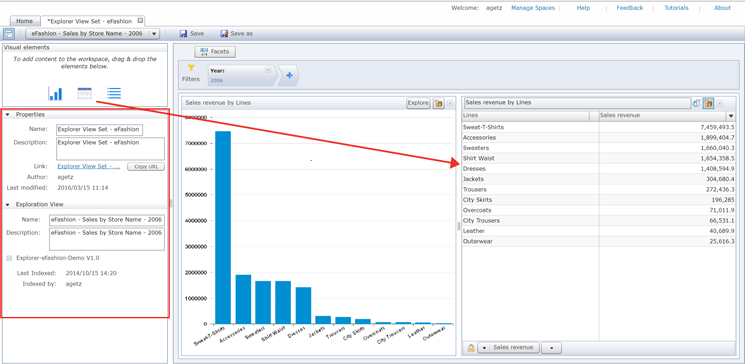
Figure 6
Add a visualization to the exploration view and update the properties of the exploration view set and view
On the left side is the Properties pane for the exploration view set (
Figure 6). Updatable Properties include the Name and Description of the exploration view set. The Link, Author, Last modified, Name, Last Indexed, and Indexed by fields are read-only properties and cannot be changed.
You can switch to another exploration view within the current exploration view set by selecting the Add Exploration View drop-down at the top of the screen (
Figure 7). Using this drop-down, you can also switch between existing exploration views, and create new and delete existing exploration views. The current exploration view is highlighted in blue by default.
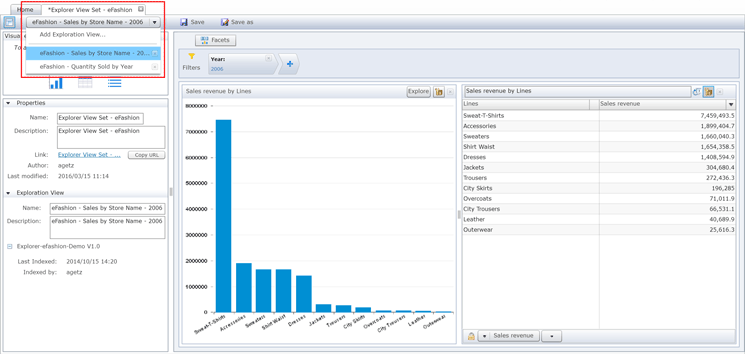
Figure 7
Switch to another exploration view within the current exploration view set
In this example, select the second exploration view listed, eFashion – Quantity Sold by Year. Once selected, the exploration view appears in the pane on the right (
Figure 8).
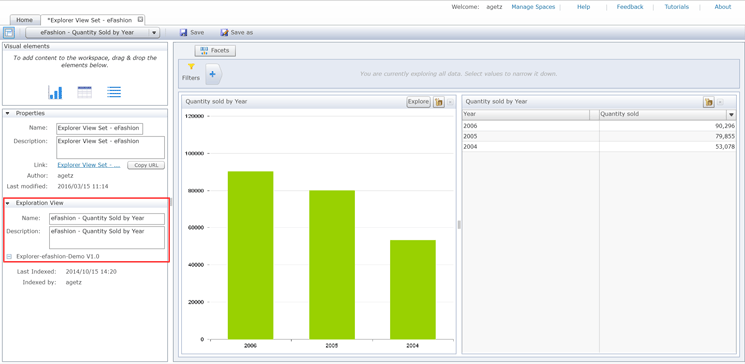
Figure 8
View another exploration view in the exploration view set
Create A New Exploration View Within An Existing Exploration View Set
As noted earlier, you also have the option, using the drop-down, to create a new exploration view. Select the Add Exploration View option and a pop-up window opens that asks on which existing information space the new exploration view should be based, as shown in
Figure 9.
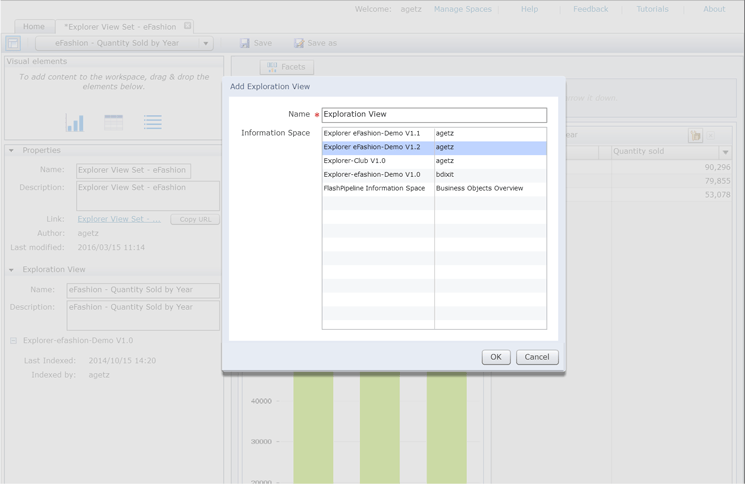
Figure 9
Select an existing information space for the new exploration view
Select the information space Explorer eFashion–Demo v1.2 and click the OK button. A new exploration view appears with the name Exploration View (
Figure 10).
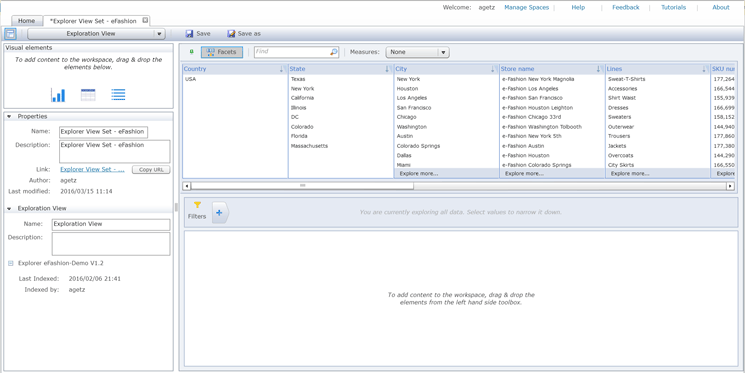
Figure 10
Create a new exploration view
Note
Exploration views can only be based on one information space. However, each of the exploration views within an exploration view set can be based on either the same or different information spaces.
The top right of the screen includes a view of the selected information space in a format identical to the typical use of Explorer. This part of the screen is known as a data explorer view. Visualizations within the entire exploration view are based on selections chosen from this data explorer view. In this case, let’s create an exploration view that filters on the state of Texas and city of Houston and displays the measure Quantity Sold.
Click the facet Texas in the State column and the value Houston in the City column (
Figure 10) in the data explorer view. Once selected, these two values now appear in the Filters section in the middle of the screen as shown in
Figure 11.
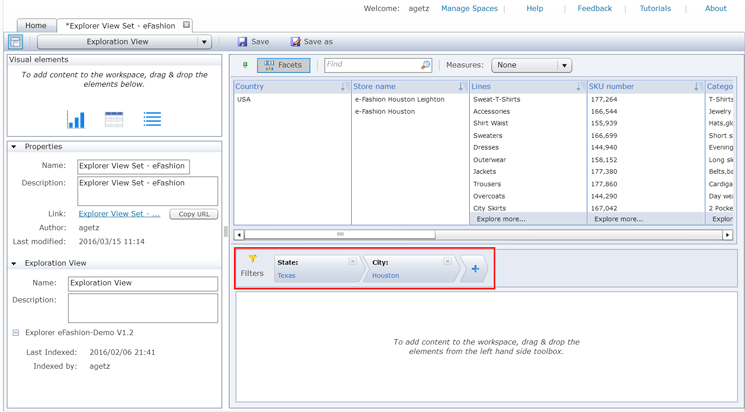
Figure 11
Add filters to a new exploration view
The next step is to change the measure for the entire exploration view. Select a measure from the measure drop-down at the top of the screen as shown in
Figure 12. In this case, you change the measure value from None to Quantity sold.

Figure 12
Change the current measure for the exploration view
Once this change has been made to the measure, numeric values appear within each of the facets within the data exploration view (
Figure 13). In this case, the numeric values are the Quantity Sold.
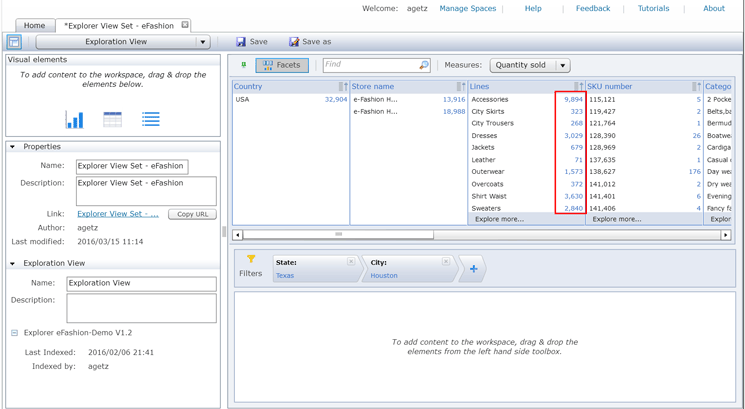
Figure 13
Show quantity sold values in the exploration view
The next step is to add a visualization to the exploration view—in this case, a bar chart. You can do this by dragging and dropping a visual element from the top left of the screen to the bottom right, as shown
Figure 14.

Figure 14
Add a bar chart to the new exploration view
In this step, change the bar chart to display Product Lines rather than Country. Select the drop-down at the bottom of the screen that currently has the value Country: First 12. From the drop-down options that appear (
Figure 15) change the selection to Lines. Then click the OK button.

Figure 15
Change the display facet for the bar chart
This updates the bar chart and displays the data by line rather than country (
Figure 16).

Figure 16
View the bar chart by lines rather than by country
Next, update the name and description of the new exploration view. The exploration view’s properties are shown on the left side of the screen (
Figure 17). In this case, the new exploration view is named eFashion – Quantity Sold for Houston, Texas.
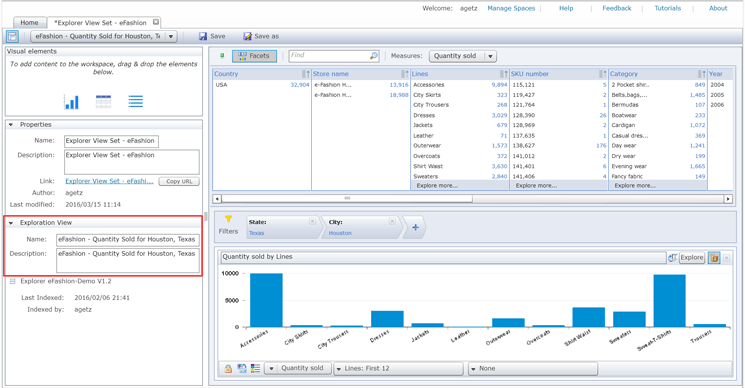
Figure 17
Update the name and description of the new exploration view
Since you are finished using this exploration view (e.g., the filters and a measure have been added to the exploration view), you can hide the data explorer view at the top of the screen. Click the Facets button and the data explorer is hidden (
Figure 18). The data exploration view can be made visible again by re-clicking the Facets button.

Figure 18
Click the Facets button to hide (or show) the data exploration view
Click the Save button at the top to save this new exploration view (
Figure 19)

Figure 19
Save the new exploration view
Create a New Exploration View Set
There are two ways to create a new exploration view set within SAP BusinessObjects Explorer 4.1.
The first way is to create a new exploration set from the Information Spaces sub-page on the Home Page of SAP BusinessObjects Explorer 4.1 (
Figure 20). Highlight the information space Explorer eFashion–Demo v1.2 and click the Show Properties button.

Figure 20
Display the properties of the selected information space
The properties of the highlighted information space appear in the panel on the right along with a Create View set button (
Figure 21.)

Figure 21
Display the properties of the information spaces along with the Create View set button
Click the Create View set button and a brand-new (blank) exploration view set appears (
Figure 22). You modify this exploration view set in the same manner as you did an existing exploration view set, as described earlier in this article.

Figure 22
The brand-new (blank) exploration view set, ready for modification
The second way to create a new exploration set is to do so directly from an existing information space. Back in the Information Spaces sub-page on the Home Page of SAP BusinessObjects Explorer 4.1 (
Figure 4), double-click the information space Explorer eFashion – Demo v1.2.
This opens the information space eFashion–Demo v1.2 in its own page, where it is now available for data exploration (
Figure 23). In this example, let’s add a filter for the state of New York and change the display to Categories. Click the States filter and select New York and the Category: Top 12 drop-down option, as shown in the screenprint.

Figure 23
Explore the data within an information space with a filter and change of display
Then select the Create View Set button, and a new exploration view appears with the new filter and display (
Figure 24).

Figure 24
A new exploration view set is created with a new filter and display
Adam Getz
Adam Getz currently serves as a Manager, Business Intelligence for CGI Federal. In this position, he is leading a large business intelligence and data warehousing implementation for a federal client. He is a thought leader in the field of information technology and an expert in the deployment of leading business intelligence, database management, and data integration products. He has presented at a variety of local, national, and international events, including the 2006 BusinessObjects International Conference, 2007 Oracle BIWA Summit, 2008 Oracle Open World, and 2010 and 2011 ASUG SAP BusinessObjects User Conferences. In addition, Adam is the creator and main author of
bi-insider.com, a website, portfolio, and blog that provides rich technical and functional content to business intelligence and data warehousing professionals. He has also published numerous technology white papers that have focused on various topics within business intelligence and data warehousing. Adam currently serves as the chairperson of the Washington DC Business Objects User Group.
You may contact the author at
adagetz@yahoo.com.
If you have comments about this article or publication, or would like to submit an article idea, please contact the
editor.


