Learn how to set up and configure the new (as of the August 2015 release) Contingent Workforce functionality in SuccessFactors Employee Central. Gain an overview of the process for handling the contingent workforce, and how to manage vendors and work orders, activate the Contingent Workforce management functionality, set up security roles, and access and understand the contingent worker wizard feature.
Key Concept
SAP acquired Fieldglass, a cloud-based vendor management system that helps organizations to manage and procure their flexible workers, including contingent workers, in March 2014. Fieldglass is the market leader in vendor management systems, and SAP acquired it to leverage Employee Central to enhance the Contingent Workforce management process.
To run their businesses in the most cost-effective way, many companies use contingent workers to complete their day-to-day business tasks. Contingent workers—also called freelancers, independent professionals, temporary contract workers, independent contractors, or consultants—work for an organization on a non-permanent basis. Many companies use a separate tool or system to manage these employees, excluding them from the regular employees HR system to avoid additional data maintenance or to protect data privacy.
SuccessFactors has added new features and functionalities to cater to these companies’ business process requirements. One new functionality added to SuccessFactors (as of the August 2015 release) is the Contingent Workforce management functionality. This functionality helps the companies manage their contingent workers in Employee Central. This functionality helps in managing these employees in one system with less maintenance cost. In Employee Central, you can have a separate process set up to make changes to the contingent workforce (additions, edits, and deletions) as well as to manage any vendors that supply contingent workers.
To configure and set up the Contingent Workforce process in SuccessFactors Employee Central to manage these kinds of workers, you need to follow these five steps:
- Activate and set up the contingent worker and People Profile
- Add events and event reasons for contingent workers
- Set up the groups and security roles for contingent workers
- Create the vendor and work order objects
- Set up the contingent worker wizard
I provide the details for each of these steps and explain the required configuration for managing the contingent worker process in Employee Central in the following sections.
Step 1. Activate and Set Up the Contingent Worker and People Profile
To access the Contingent Workforce functionality in the SuccessFactors Employee Central portal, you need to activate Contingent Workforce in the People Profile. This functionality is available under Recommended Upgrades in SuccessFactors. (New upgrades and functionalities can be added or any upgrades done using the Upgrade Center available in Employee Central’s Admin Center, instead of having to activate them from PROVISIONING.)
Go to Admin Center and click the Upgrade Center button (Figure 1).

Figure 1
Access the Upgrade Center from the Admin Center
This action opens the screen in Figure 2, showing the available upgrades for your system.

Figure 2
The available upgrades in the SuccessFactors Upgrade Center
After you click the Learn More & Upgrade Now link under the Recommended Upgrades in the People Profile (Figure 2), the screen in Figure 3 opens.
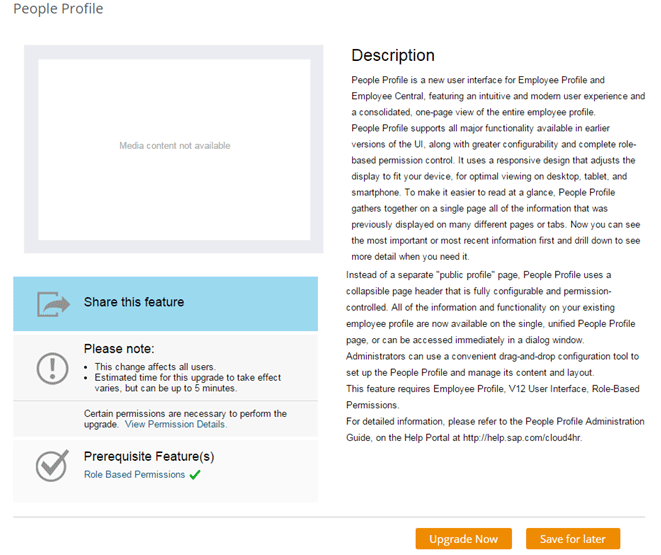
Figure 3
Access the People Profile Upgrade Page
Click the Upgrade Now button, which activates the People Profile functionality in Employee Central. Once the People Profile is activated, you see the Contingent Workforce upgrade under the Optional Upgrades column (Figure 4).
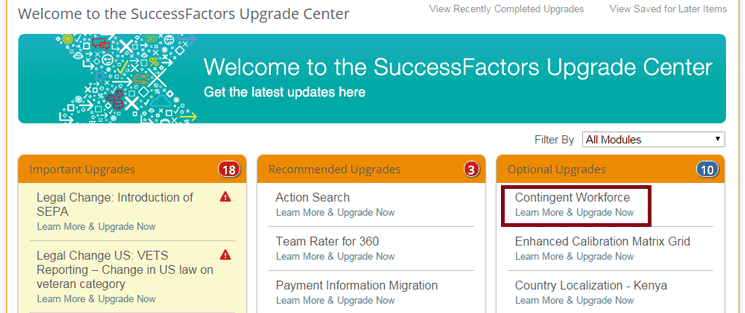
Figure 4
Activate the Contingent Workforce functionality
Click the Contingent Workforce Learn More & Upgrade Now link to upgrade the system.
Step 2. Add Events and Event Reasons for Contingent Workers
Once the Contingent Workforce functionality is activated in Employee Central, you need to add the event and event reasons for adding and terminating these workers’ employment information to the system. Events are added using picklists, but event reasons are added through Admin Center configuration. Picklist help is used to populate the values of the drop-down fields to be selected from the list. For additional information about the picklist functionality, refer to this HR Expert article, “Picklists Management and Cascading Picklists in SuccessFactors,” by Mohan Paul. [January 6, 2014]
Add Events to the Contingent Workforce Functionality
You need to export the existing picklists from the system, add the contingent-worker-related events, and then re-import the picklists back into the system to add new event entries.
Follow these steps: Download the picklists from the Employee Central system using menu path Admin Center > Company Settings > Picklist Management. In the screen that opens (Figure 5), select the Export all picklist(s) option (the Include System Generated Job Codes checkbox is selected by default) and click the Submit button. Once the picklists are exported, click the Download export button to download the picklists into the local system or computer. The picklists are then exported in comma-separated values (CSV) format.
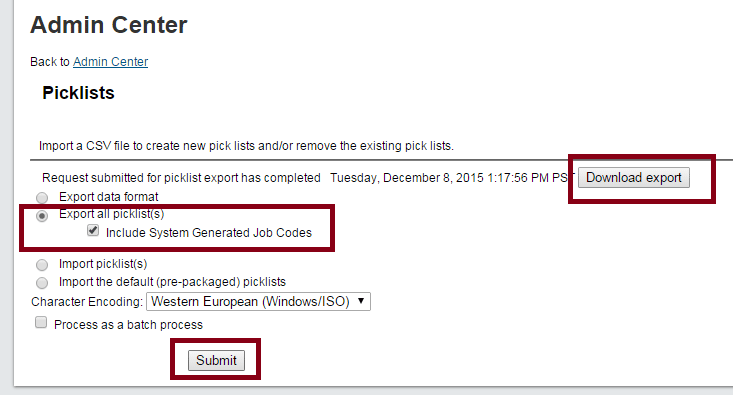
Figure 5
Export the picklists from the system
Open the picklist file that is stored on your system in CSV file format and add the start and end contingent worker events (Figure 6). Enter the values as shown in Figure 6 as the last row in the downloaded CSV file and save the file in CSV format before uploading it back into Employee Central. Then it’s ready to be imported into the system.

Figure 6
Add events in picklists using Picklist Management
Follow menu path Admin Center > Company Settings > Picklist Management. In the screen that opens (Figure 7), select the Import picklist(s) radio button and click the Choose File button to find the file stored in the local system (which is updated with the new events). Then click the Submit button to import the picklists.

Figure 7
Import the picklists
Once the file is imported, the new events are added to the system and are available to be added to the event reasons.
Add Event Reasons for Contingent Workers
The next step is to add the event reasons to support the imported events. To configure event reasons from the Admin Center, follow menu path Employee Files > Manage Organization, Pay and Job Structure > Create New > Event Reason (Figure 8).

Figure 8
Create a new event reason
In this case, you need to create two event reasons and attach them to their respective events (shown in Table 1). One is for mapping to the Contingent Workforce process to update when the contingent worker starts, and the other is for mapping when the assignment ends. In Figure 8, the fields in which you maintain the event reason code, event reason, and event are Event Reason ID, Event Reason Name, and Event, respectively.
Event reason code
|
Event reason
|
Employee status
|
Event |
SCWK
|
Start of contingency work
|
Active
|
Start contingency work |
SCWK
|
End of contingency work
|
Terminated
|
End contingency work |
Table 1
Contingent Workforce event reason mapping
Step 3. Set Up the Groups and Security Roles for Contingent Workers
In this two-step process, first you create the permission group and then you create a role and assign it to the newly created permission group.
Create Permission Groups
To differentiate between contingent workers and regular employees, create two security groups to group contingent and regular workers separately. To create the two new security groups, follow menu path Admin Center > Manage Employees > Set User Permissions > Manage Permission Groups, and the Manage Permission Groups screen opens (not shown). Click the Create New button to display the screen shown in Figure 9.
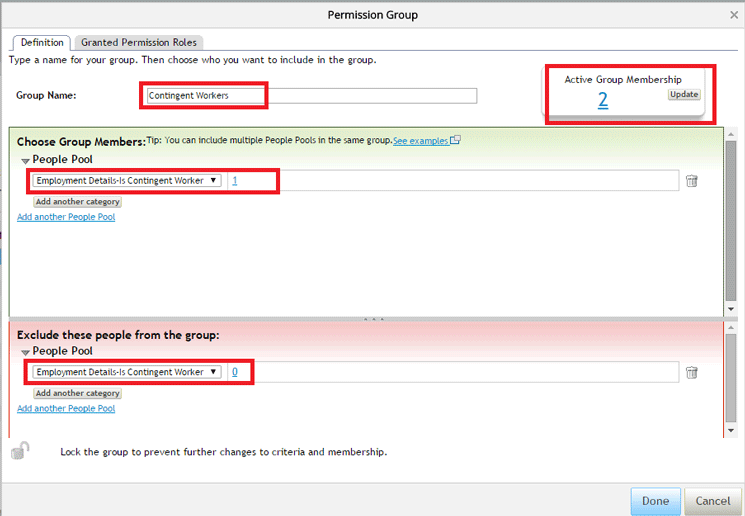
Figure 9
Create the new Contingent Workers' security group
First, you need to create the Group Name—in this example, Contingent Workers.
Assigning security attributes to employee groups helps define groups that carry the same attributes. In this example, the employees are grouped according to their Contingent Worker value. Workers who are contingent are grouped as Yes (1) and those who are not contingent workers are excluded (e.g., those who have the attribute No [0]).
The People Pool options help define the attributes for grouping employees. In this example, select the Employment Details–Is Contingent Worker grouping option under PeoplePool in the Choose Group Members section.
Tip!
If your system doesn’t show this field for grouping (e.g., the
Employment Details–Is Contingent Worker grouping option), you can add it
in the Succession Data Model under the dg-filter section of the XML
code. Refer to my
HR Expert article, “
Tips for Adding Additional Job Information Fields in the People Pool,”
for additional information on configuration. In this same way, you can
also create another group for regular employees to group non-contingent
workers.
Creating Permission Roles
Once the security groups are created, you need to create the security roles. (A role is a set of permissions assigned to a security group to control the access for a group of employees.) Follow menu path Admin Center > Manage Employees > Set User Permissions > Manage Permission Roles. In the screen that opens (Permission Role List, not shown) click the Create New button.
In the next screen that opens (Figure 10), you create a role for contingent workers by entering Contingent Worker in both the Role Name and Description fields. First, you need to select a Group to which you are creating or assigning this role; in this example, you are creating a Contingent Worker role that is assigned to the Contingent Group (created in Figure 9 in the previous step). In section 3, Grant this role to… (shown in Figure 10), you can add the Contingent Group to this role. To assign the view/edit permission for the fields of the various portlets, use the Permission… button in section 2, Permission settings. Providing access to the various fields in different portlets is based on your company’s security requirements.
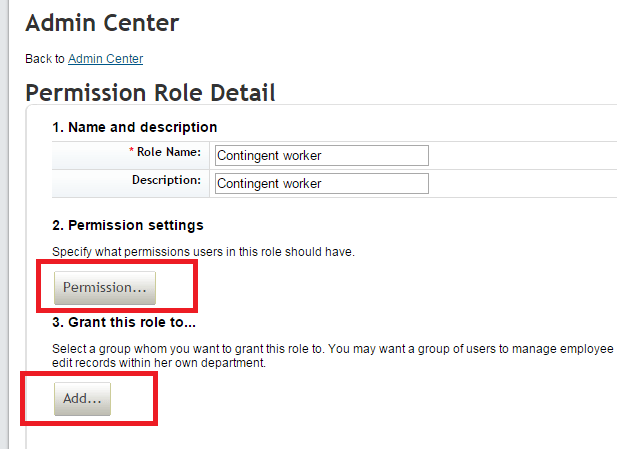
Figure 10
Create the security role
Once you’ve made your required entries, click the Add… button and the screen in Figure 11 opens. Here you select the Contingent workers group to which you want to assign the contingent workers role.

Figure 11
Add the security group to the security role
Based on the requirements, provide access for the fields (using the Permission… button) and click the Done button to save the Permission settings.
As per the integration to Fieldglass, Fieldglass needs the fields shown in Table 2 to be allowed for the contingent workers to maintain in different portlets.
Personal information
|
Employment information
|
Work order information
|
First name
|
Company
|
Vendor ID
|
Last name
|
Country
|
Work order ID
|
Preferred name
|
Business unit
|
Work order name
|
Email address
|
Division
|
Work order owner ID
|
|
Department
|
Work order start date
|
|
Location
|
Work order end date
|
| |
Cost center
|
|
| |
Supervisor
|
|
Table 2
Fields that are visible to contingent employees when logged on to Employee Central
Once logged on to Employee Central, contingent workers are able to view the fields listed in Table 2.
Step 4. Create the Vendor and Work Order Objects
In this step, you create the vendor and work order user interface (UI) screens to maintain the information about the vendors that provide the contingent workers and the work orders that are assigned to the contingent worker.
Creating the Vendor Metadata Framework Base Object
To create the new vendor base object, follow menu path Admin Center > Employee files > Manage Configuration UI, and click the Create New button in the screen that opens (Figure 12). This action expands the screen so that you can fill in the Id and Select Base Object fields.

Figure 12
Create the new configuration UI and the vendor information UI object with fields
In this case, enter the ID as VendorInformation, select VendorInfo from the Select Base Object field drop-down options, and the VendorInfo screen opens with the fields for the selected base object (the bottom of Figure 12). Here you may add new fields and remove unwanted fields. Once you’ve made your entries, click the Save button at the top right of the screen (next to the Export button). In this example, you are storing the vendor information fields shown in Figure 12.
Once the vendor information UI screen is saved, users are able to enter the vendor information by following menu path Admin Center > Employee Files > Manage Data > Create New > Vendor Info. In the screen that opens (Figure 13), you store the data for vendor XYZ for this example. To save your entries, click the Save button (not shown).

Figure 13
The new vendor information screen
Create the Work Order Metadata Framework Base Object
Similarly, the work order Metadata Framework base object can be created by following menu path Admin Center > Employee files > Manage Configuration UI. In the screen that opens (not shown), click the Create New button. The screen in Figure 14 opens in which you enter the work order ID in the Id field and choose a base object from the drop-down list in the Select Base Object field.

Figure 14
Create the Work Order portlet
Here you can add new fields and remove unwanted fields from the work order screen, then click the Save button to save your changes.
Providing Access to the Work Order Base Object
After you create the Work Order portlet, you need to provide access for the respective roles or persons to access this portlet. First, you need to set up the permissions using role-based permission. Follow menu path Admin Center > Manage Employees > Set User Permissions > Manage Permission Roles (Figure 15).

Figure 15
Permission settings for the Work Order portlet
In the Admin Center screen (in the back of Figure 15), select the role to which the Work Order portlet access is to be provided, and then click the Permission… button. In the Permission settings pop-up screen, click the Miscellaneous Permissions link on the left and then, in the screen that opens on the right, select the level of permission to be provided for the role selected (as shown in Figure 15). In this example, for the role, you allow all levels of access to the Work Order portlet. Once you’ve made your entries, click the Done button to save your changes.
Adding the Work Order Portlet to the People Profile
The final step for creating the work order is to set up the Work Order portlet under the People Profile pages. This allows the user to view the available work order information for contingent workers.
You create the Work Order portlet for creating new contingent workers in a similar manner as you created the work order in the previous steps. Follow menu path Admin Center > Employee files > Manage Configuration UI. In the screen that opens (Figure 16), click the Create New button. In the screen that opens at the bottom of the figure, enter a name in the Id field (e.g., WorkOrderPortletForAddNewCWF) and select a base object (e.g., WorkOrder) from the drop-down list in the Select Base Object field.
Click the Save button to create the new Work Order portlet.

Figure 16
Create the Work Order portlet for adding new work orders
In the next step, you need to assign this Work Order portlet to the People Profile to view or maintain the work order information for the contingent workers. To access the People Profile configuration, follow menu path Admin Center > Employee Files > Configure People Profile.
This opens the screen in Figure 17 in which you configure the portlet under the Configure People Profile section. This screen contains all the standard portlets available for Employee Central and also offers the option to add custom portlets to be displayed under the People Profile using custom blocks. In this example, you put the Work Order below the Employment Details section. In Figure 17, under Available Blocks, look for the Custom Block section (this is in the screen shown in Figure 17, but is not visible in this view). Select the Live Profile MDF Information block as shown in the figure. Then drag and drop it to the left to the section that reads Place block here where you want to this portlet to be shown on the screen.
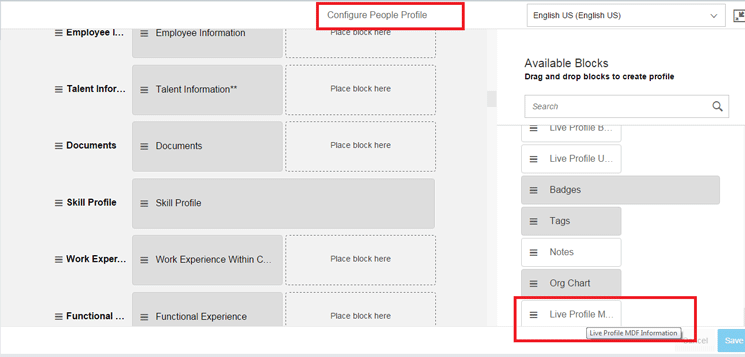
Figure 17
Configure the People Profile
Once you drag and drop the Live Profile MDF Information selection, select WorkOrderInfo from the drop-down options in the MDF Screen ID field, enter the Subsection Title as WorkOrderInfo, and click the Save button (Figure 18). The work order information now appears in the People Profile for the user to enter or view (Figure 19).
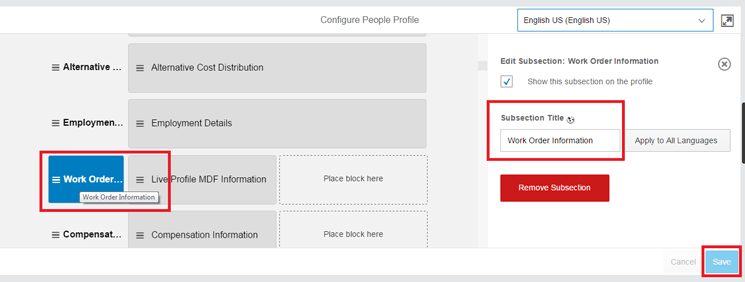
Figure 18
Add a subsection title to the portlet
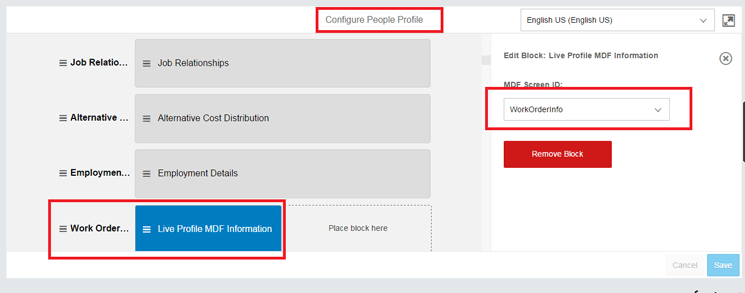
Figure 19
Set up the Work Order portlet in the People Profile
Once this configuration is completed using the role-based permission, access to the Work Order portlet is provided for all the roles that need access to this portlet, including the contingent worker role that is used in this article.
As shown in Figure 20, you assign the view permission for work order view from Miscellaneous Permissions for the contingent worker role. Contingent workers are not allowed to make any changes to their work orders—work orders for them are managed by the respective people in the company—therefore, they are only provided with a data view option for their role. This is achieved by selecting only the View Current and View History options for the Contingent role as shown in Figure 20.

Figure 20
Assign view access for the Work Order portlet
Once the Work Order portlet is created, you can enter the work order for the contingent workers as shown in Figure 21. In this example, you are creating a work order for a Data Load Consultant role that is filled by a contingent worker for a period starting from 01/15/2016 to 12/31/2016, with Terrell White as the manager. This contingent worker is supplied by the XYZ Corporation (vendor).
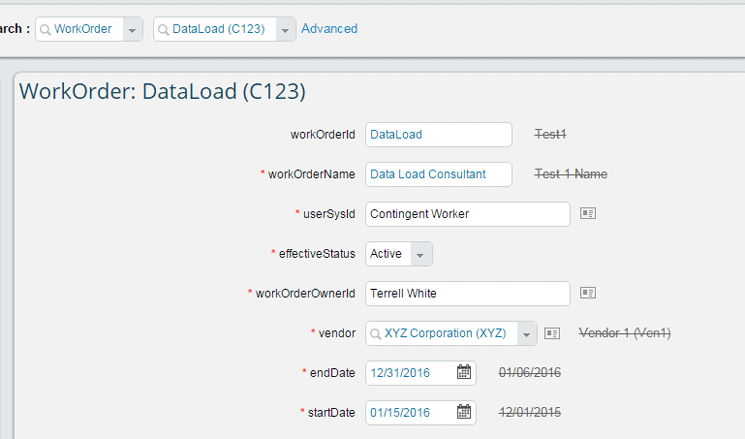
Figure 21
Create a work order for a contingent worker
Once the work order is created, this information is stored on the Work Order portlet and is displayed on the Contingent Worker’s profile as shown in Figure 22.
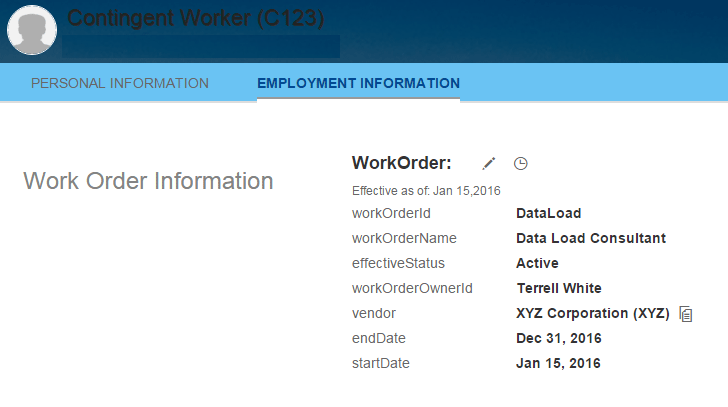
Figure 22
The Work Order portlet for contingent worker records
Step 5. Set Up the Contingent Worker Wizard
There are two ways of loading contingent workers into the Employee Central instance. One of the options is to use the load programs to load the employees’ files with the import employee data section in a sequence. The second method is to use the Add Contingent Worker option, which is the same as the traditional way of adding regular employees when performing the New Hire event in Employee Central (e.g., using the Add New Employee functionality).
To access the Add Contingent Worker link from Admin Center, you need to provide access to this link for the role. Follow menu path Admin Center > Manage Employees > Set User Permissions > Manage Permission Roles, and in the screen that opens (not shown), select the role to which the add contingent worker access needs to be provided. Once the role is selected from the Permission Role list, select the Add Contingent worker check box in the Manage User section of Permission settings as shown in Figure 23. Then click the Done button to save your settings.
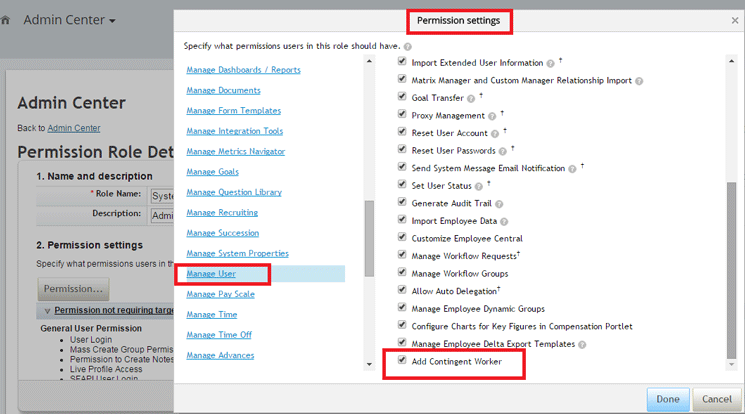
Figure 23
Provide access to the wizard
Once access is provided, you can access the contingent worker wizard by following menu path Admin Center > Manage employees > Update User Information > Add Contingent Worker (Figure 24).
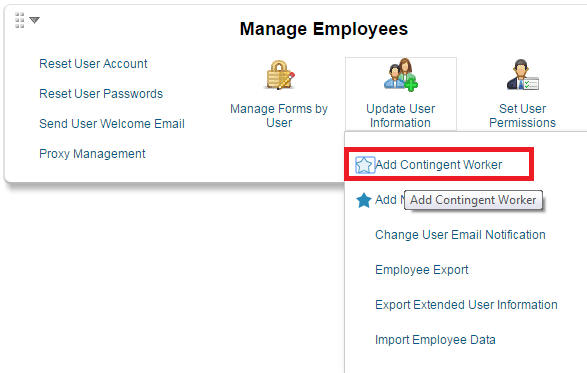
Figure 24
Add the Contingent Worker wizard
Once you click the Add Contingent Worker link, you are brought to the Add Contingent Worker screen (Figure 25) in which you can start the process of adding the workers into the Employee Central system. You need to add all of the contingent worker’s relevant information to the Identity Information, Personal Information, Contingent Worker Assignment Information, and Work Order information portlets. After you make your required changes, click the Submit button.

Figure 25
Add contingent workers using the wizard
Figure 26 shows what the Contingent Worker profile looks like in Employee Center once the contingent worker is added.

Figure 26
The new contingent worker profile
All contingent workers are labeled as such at the top of their profile above their names.
Manjunath Bannur
Manjunath Bannur has been in the IT industry for over 13 years working in various areas of HR, including SAP ERP HCM (for 7 years) and now SuccessFactors Employee Central. He is experienced in implementing SAP ERP HCM and Employee Central globally.
You may contact the author at mbannur@gmail.com.
If you have comments about this article or publication, or would like to submit an article idea, please contact the editor.


