Learn how to use the SAP Design Studio software development kit (SDK) to implement maps and other custom objects. Use HTML, Cascading Style Sheets (CSS), and JavaScript as well as the SAP UI5 library to develop the most useful functionality for your Design Studio applications.
Key Concept
The software development kit, or SDK, is a tool used to create custom components for SAP BusinessObjects Design Studio using HTML, Cascading Style Sheets (CSS), or JavaScript. This tool allows nearly any object imaginable to be developed and used within your Design Studio applications.
This BusinessObjects tool gives developers the ability to incorporate almost any custom code into their application, offering nearly endless possibilities. Using the SAP UI5 library, anyone can create basic components to enhance an application. With the JQuery backbone, the SDK can handle any HTML, Cascading Style Sheet (CSS), or JavaScript, allowing for more complex objects. Developers who create applications in Design Studio must understand extensions and be able to create them in order to give the users the most beneficial functionality without solely relying on the components immediately available to them within the tool.
Introduction to the SDK Environment
To develop an SDK component, you can use any XML and JavaScript editor. However, it is strongly recommended by SAP that you use the Eclipse integrated development environment (IDE) for Java Platform Enterprise Edition (EE) Developers. This tool provides the best functionality, and SAP’s SDK guides are tailored for the use of the Eclipse IDE. Once you have downloaded and launched the application (Eclipse, in our example), you are asked to select a workspace. If you do not have a workspace already set up, create a new folder to store all your components (
Figure 1).
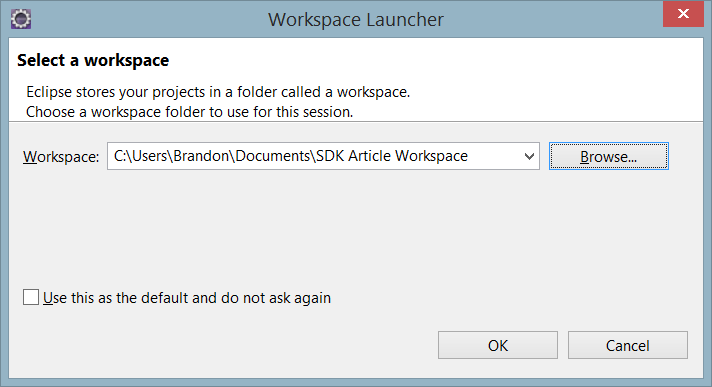
Figure 1
Select a workspace from the pop-up that displays when Eclipse is launched
Note
Before beginning to work with new components, it is recommended that you first download the sample components found here:
help.sap.com/boad.
Figure 2)
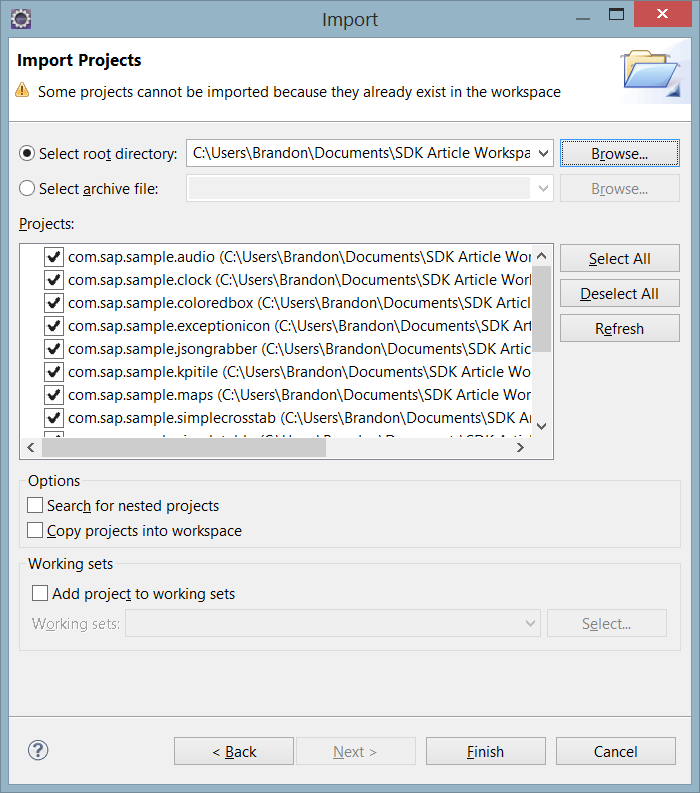
Figure 2
Add existing projects to your workspace
In order for the Eclipse environment to recognize the syntax of the projects and launch components, you must go to Preferences (not shown) and change two properties. First, you add an XML Catalog using the File System. This catalog, sdk.xsd, can be found in your workspace. Also, under Plug-in Development, you set the Target Platform to any one of the Design Studio definitions located in the list. Now that your Preferences are set, navigate to the Clean option in the Project menu and run the program. With all projects clean, you no longer see a red x next to your components in
Figure 3 (as shown on the left of the figure). This means that Eclipse now recognizes the syntax used for the SDK and can now run the projects without flagging errors.
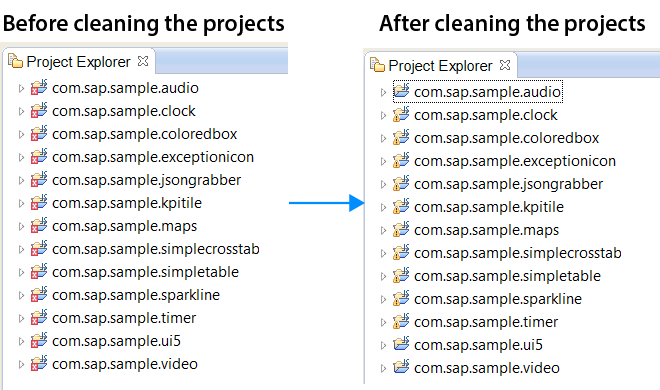
Figure 3
The Project Explorer lists before and after cleaning
Now you launch Design Studio by clicking the Play button in Eclipse (not shown). The Design Studio that is launched is merely a test environment that allows you to make sure the components work properly before publishing and installing them. To create your own component, you can copy an existing project in your workspace and give it a simple name that is descriptive. The simplest component to use as a template is the coloredbox. (The next part of this article delves more into how you can use the SAP UI5 library to create a simple print button.) As shown in
Figure 4, the example Project name is com.sdk.printbutton. Then click the OK button.
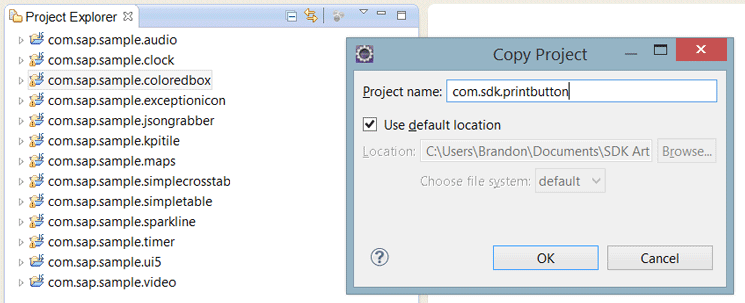
Figure 4
Copy the coloredbox project and rename it com.sdk.printbutton
Using the SAP UI5 Library
Before coding your new extension, you must change some settings in order for your application to take the new name. In your manifest, change the ID to match the name of the project. We also encourage you to change the name and vendor under the General Information section. By changing these values, you are better able to keep track of which components you have created. An example of what yours would look like is shown in
Figure 5. You must also change these same properties in the contribution.xml file to match the information entered in the manifest.
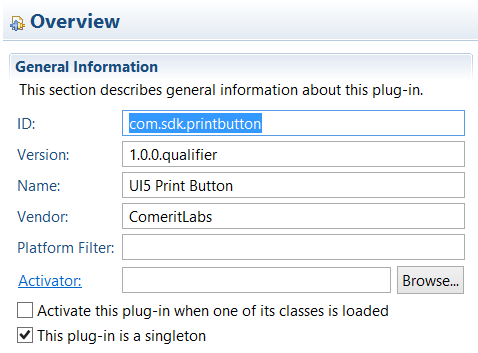
Figure 5
Change the ID, Name, and Vendor in the contribution.xml file to match the MANIFEST.MF file
In the contribution.xml file, you must also change the ID and title of your component. The ID is important because it is used to declare the subclasses in your JavaScript code. The title is a user-friendly name that is shown in the component panel in Design Studio. An example of the contribution.xml file is shown in
Figure 6.
Figure 6 Change the ID and title for the extension and the component in the contribution.xml file to match the MANIFEST.MF file
The final alteration that needs to be done to the code is the same in three files: the contribution.ztl, additional_properties_sheet.js, and component.js files. Each of these files starts with a subclass to initialize the component. The first parameter is the name of the project as well as the ID of the component. The changes are shown in
Figure 7. In this example, change the code in the top of
Figure 7 (“com.sap.sample.coloredbox.ColoredBox”) to the code shown at the bottom (“com.sdk.printbutton.PrintButton”).

Figure 7
Change the subclass parameter from com.sap.sample.coloredbox.ColoredBox to com.sdk.printbutton.PrintButton
With the base framework of the project completed, the component can now be coded. The SAP UI Development Toolkit for HTML5, or SAP UI5, provides objects that can be used to organize and enhance your applications. There are four main control libraries that can be used, as follows:
- sap.ui.core
- sap.ui.commons
- sap.ui.table
- sap.ui.ux3
Each of these libraries has objects that can be pulled into your application by simple instantiation of objects or by using the shorthand JSON notation. The button that you are creating is taken from the commons library. In your component.js file, remove all the code except for the subclass, the variable, and a blank init function.
Figure 8 shows what your JavaScript file should look like.

Figure 8
The component.js file with only the subclass, the that variable, and a blank init function
Inside the init function, assign a variable with the JSON object. The code is shown in
Figure 9.

Figure 9
Code for constructing a new button
Within the constructor, set four properties and one event. The first property is text, which is the display text for the button. Since this is a print button, set it to Print. The second property is the tooltip that is shown when the user hovers over the button. For this button, assign the tooltip with the string “Print the Application”. The last two are width and height. You want this property to be dynamic so when the width and height are changed in Design Studio, the button reflects that size change. In order to do this, you need getter functions. For now, assign the width property to this.getWidth() and the height to this.getHeight(). Lastly, set the press function, which is called when the button is clicked. For this event, set it to function() {that.printApplication();} which will be coded later. Your constructor should now look like
Figure 10.

Figure 10
The properties and event are set for the button
For the button to actually show on the canvas in Design Studio, you need to use the _printButton.placeAt function. The code for this is shown in
Figure 11.

Now code the getWidth, getHeight, and printApplication functions.
Figure 12 shows all the code for these functions.
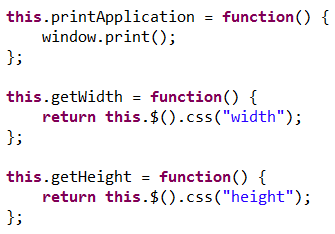
Figure 12
The printApplication, getWidth, and getHeight functions
Now the button is ready to be tested. As you can see in
Figure 13, the button has been dragged onto the canvas and works properly.
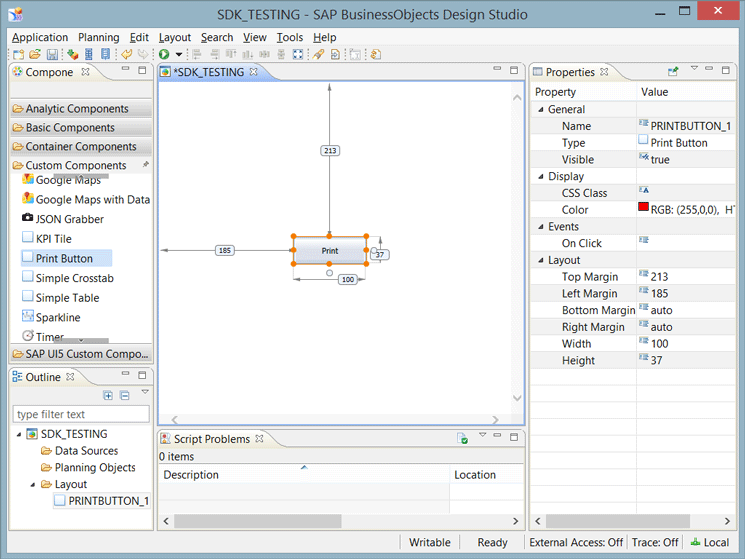
Figure 13
The print button in Design Studio
With the basics of developing a component covered, now let’s look into implementing a data-bound map into Design Studio using the SDK.
Developing a Data-Bound Map Component
You can use a large variety of mapping applications on the web inside the SDK. SAP already provides integration with Google Maps with the sample extensions. In some cases, though, Google Maps is too much for an application. Some projects just focus on certain areas of the world, such as the United States. We have developed an application using a map created by Flashmaps called jQueryMaps. This map allows users to click any state within the United States and the application drills down to the county level. This map, though, was only developed to handle flat files, JSON or csv, or MySQL data. Design Studio produces its datasets to JSON notation but does not produce a flat file. First, let’s look at implementing the map as an extension, then retrieving the data to be read, and then displaying it in the map.
Each map comes with configuration files in order for the map to work properly. All files should be copied into the res folder. Any file that needs to run once the application has loaded should be placed in the contribution.xml file as jsInclude or cssInclude element tags. The source code of the contribution file for this map can be viewed in
Figure 14.

Figure 14
Contribution.xml source code for the map component
The jqmMapMgmt.js file is used to load the map and the data. Since this map is developed to use JSON flat files, the data needs to be pulled using an extractor. You can use the JSON Grabber, included in the sample components, to perform this task. For the data, only include the relevant data for the map. In this case, you only want to show the state and county level, including two measures, percent penetration and potential unserved.

Figure 15
Edit the initial view of the query in Design Studio
Once you have the initial view of the data source set inside of Design Studio, add it to the JSON Grabber component. Then run your application and copy all the data from the Data Run-Time text box (
Figure 16).
Figure 16 shows the component and the data that needs to be copied.
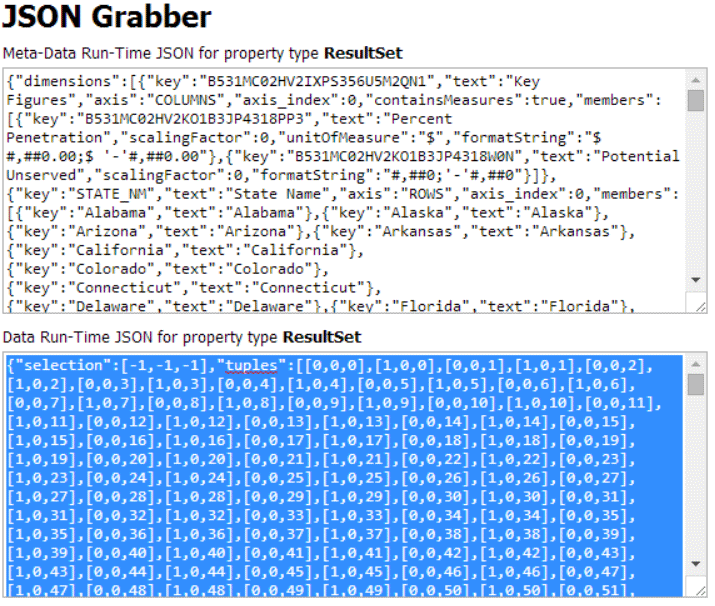
Figure 16
Use the JSON Grabber to retrieve the Data Run-Time JSON for the ResultSet property
Once the code is copied, place the JSON component in the data folder. The map should already be coded to work with the data.json file but, if it’s not, set the jsonFileData variable in the jqmMapMgmt.js file to the name of the data file.
To retrieve the data from the flat file, a jQuery ajax call is made. The URL must be set according to the project name, as shown in
Figure 17. A reference to any file in the project must begin with zen/mimes/sdk_include/, followed by the name of the project, then the location of the files such as res/jquerymaps/data/. Since the jqmMapMgmt javascript file is used to load all other files, changing the links becomes relatively easy.

Figure 17
Create the ajax and set the URL parameter
This project has seven links that must be updated, six of which are located in the main file. In that same function where the data is loaded, there is a switch statement with two cases, one for the state and one for the county. The first case needs to be set to the technical name of your state dimension. The second case must be set to the technical name of your county dimension. Once these settings are changed, you must return to the component.js file to initialize the component.
Most jQuery maps are designed to run on a web page as HTML code. This map needs a few HTML container elements before it can be displayed. The simplest way to do this is by using the HTML function from jQuery. The code for this map is shown in
Figure 18.

Figure 18
Basic HTML container elements used to create a placeholder for the map
Once all this code is in place, you can run the application and see what the map looks like. If everything has been done right, the map should load and look something like
Figure 19. If you want to make changes to the colors and ranges of values shown in the chart, the legend.xml file contains all the ranges for the state and county levels and the hexadecimal values for each range.
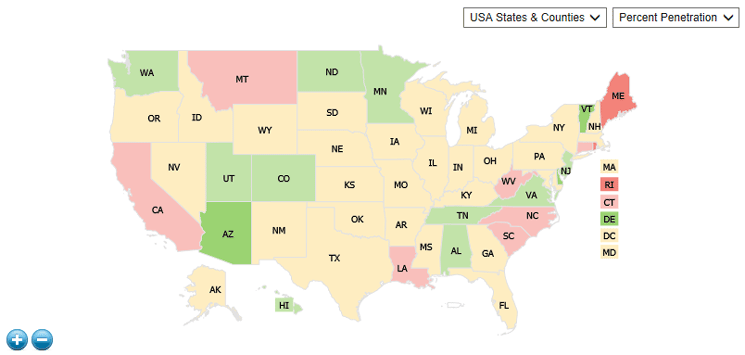
Figure 19
Jquery map in Design Studio
To update the data, you must republish the extension and reinstall the plug-in into Design Studio. This is a very menial task that may need to be done quite frequently. To make better use of this map and to automate the update of data, you can use functionality provided by SAP and JavaScript to connect to a live query. In the contribution.xml file, the component tag has a data-bound property that can be set to true or false. By adding the property (as shown in
Figure 20), the data-binding option becomes available in Design Studio for the map. This alone, though, does not tie the live data to the component.
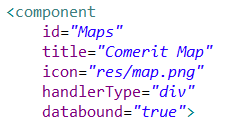
Figure 20
Set the data-bound property to true in the contribution.xml file
To begin, create a global variable in the jqmMapMgmt file to store your JSON data, and set it initially to null. By doing this, you allow the map to load the data you have stored in the flat file, if there is no query attached to the map. This adds flexibility to the map, allowing it to still work well even without the live connection. Continuing in the same file, check the global variable to see if any data is stored. The code shown in
Figure 21 should be placed directly below the ajax call created in
Figure 17.

Figure 21
Check if the global variable contains any JSON data
To pull the data and assign it to the global variable, you need to create a function in the component.js file (
Figure 22). When data is assigned to a component or any property is changed, a function is called. These standard functions can be rewritten in the component JavaScript file. To retrieve the full dataset, the SDK uses the dataResultSet function. Here a parameter is passed, the data or null, and you must check to see if it’s defined. If it is, you can store that value in the global variable.
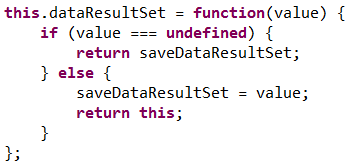
Figure 22
Retrieve the data and store the JSON in the global variable
Before this can fully work, though, you need to tell the map to reload. Using the afterUpdate function, you can take any call that is located in a document-ready function in the jqmMapMgmt file and use it every time a change is made to the map, including the binding of a data source. Now you can launch the application, assign a query to the map, and see the map update to reflect the live data.
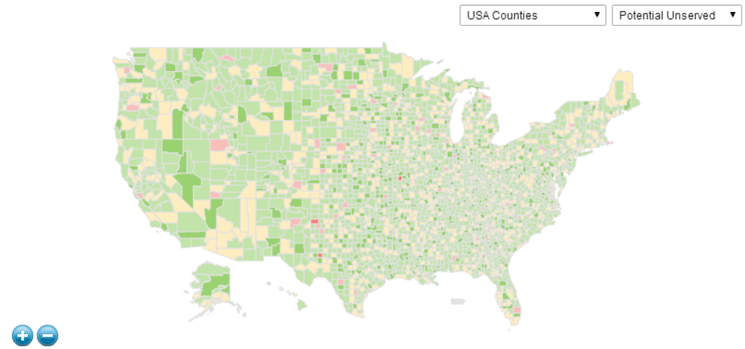
Figure 23
View the data-bound map at the county level
The map can be customized even further to provide filtering capabilities, enhanced drill-down functionality, and personalized aesthetics to make a map that is suited to your needs. The SDK is a tool that can be used to develop complex applications to satisfy any requirement.

Dr. Bjarne Berg
Dr. Bjarne Berg is a Principal and the Tax Data Analytics and Business Intelligence Leader in Tax Technology Compliance (TTC) at PricewaterhouseCoopers (PwC), LLP. He is responsible for analytics and go-to-market strategy. Dr. Berg is an internationally recognized expert in BI and a frequent speaker at major BI and SAP conferences world-wide, with over 20 years of experience in consulting. He regularly publishes articles in international BI journals and has written five books on business intelligence, analytics, and SAP HANA. Dr. Berg attended the Norwegian Military Academy, and served as an officer in the armed forces. He holds a BS in Finance from Appalachian State University, an MBA in Finance from East Carolina University, a Doctorate in Information Systems from the University of Sarasota, and a Ph.D. in IT from the University of North Carolina.
You may contact the author at
bjarne.berg@pwc.com.
If you have comments about this article or publication, or would like to submit an article idea, please contact the
editor.

Brandon Lucaciu
Brandon Lucaciu has been employed by
COMERIT, Inc., as an SAP BI Associate for nearly three years, and has extensive knowledge of numerous BusinessObjects tools such as Design Studio, Dashboards, Analysis, and Web Intelligence. Brandon is also experienced in developing web applications and SDK components for Design Studio using HTML5 and JavaScript.
You may contact the author at
brandonl@comerit.com.
If you have comments about this article or publication, or would like to submit an article idea, please contact the
editor.


