Learn how to create a Web service in an SAP system and then publish and use it.
Key Concept
A Web service is a method of communication between two electronic devices over the Internet. It has an interface described in a machine-processable format — specifically the Web Services Description Language (WSDL). Other systems interact with the Web service in a manner prescribed by its description using SOAP messages, typically conveyed using HTTP with an XML serialization in conjunction with other Web-related standards. There are many Web services already available on the Internet; for example, to get the weather for a particular city or to check stock exchange data.
SAP systems contain a lot of data, and it is now more common for companies to look for ways to access that data from other legacy systems or mobile devices. Access to the data should be done in a structured and secure manner. Using a Web service is one such method for getting data from SAP systems.
This article shows you how to create a function module and create a Web service from it. Then I show you how to consume the Web service with a third-party tool (SOAPUI) and how to call the Web service from an Android application. In my example scenario I am using some standard function modules in SAP to retrieve airline flight information based on a carrier ID (LH).
Note
The functionality discussed in this article is available from SAP ERP Central Component (SAP ECC) version 5.0.
Create the Function Module
The first step for creating a function module is to start transaction code SE37 and enter the name of the function module (Figure 1).

Figure 1
Create the function module, the first step
Click the Create button, fill in the Function group field (ztbr) and the Short text field (Retrieve all flights), and click the Save button (Figure 2). Function groups either are already available in your system or they have to be created. When creating a function group, you have to provide a package. This package is already available in the system.

Figure 2
Create the function module, the second step
A function module or Web service retrieves data from the SAP system and sends it to the consumer. In the function module, these are called import and export parameters. When you click the Save button (Figure 2), the next screen shows the Import tab of the function module (Figure 3). Here you enter the import parameters for the function module or Web service. In this example, I use CARRID for the Parameter Name with S_CARR_ID as the Associated Type. Make sure you set a checkmark in the Pass Value column.

Figure 3
Create import parameters
Next click the Tables tab; this is an export parameter. Here you declare a table structure that holds the selected flights that are returned to the consumer (Figure 4).
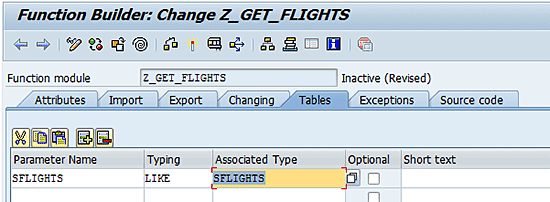
Figure 4
Create a table parameter
Next, you have to write code to retrieve all the flights that match the import parameter CARRID. To write the code, click the Source code tab (Figure 5).

Figure 5
Create source code
You can see that this function module imports CARRID and exports table SFLIGHTS. You have to write code to get all flights that match the import parameter CARRID, and put those in the table SFLIGHTS, which is returned to the consumer. That’s it for creating a function module. All you have to do now is click the save icon  to save the new function module, and then click the activate icon
  .
.
When saving the function module, you have to create a transport request. To do this, first put the transport name (SFLIGHTS) in the Short Description field (Figure 6) and click the save icon.
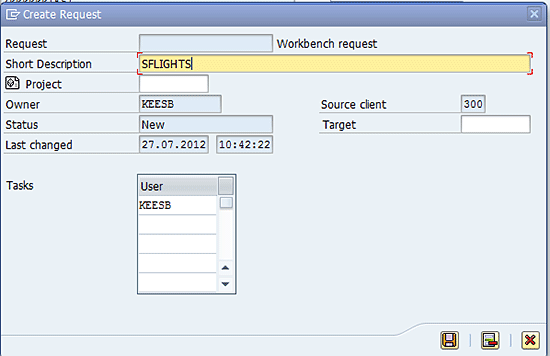
Figure 6
Create a transport request
Next, a request is provided (Figure 7). Write down the request number as you need it later on when you create the Web service. Click the enter icon  and the request is saved (Figure 7).

Figure 7
Save the transport request
Next, click the activate button to activate the function module. Now you can test the function module by pressing F8. In the resulting screen (Figure 8), enter LH in the CARRID field and click the execute icon  .
.
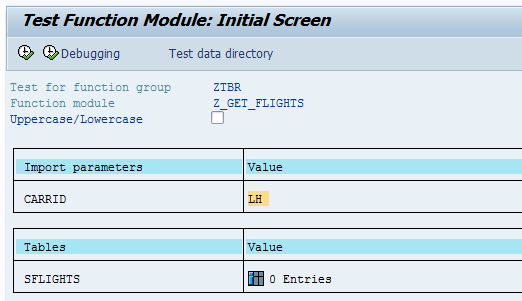
Figure 8
Test the function module, first step
The function module retrieves all the flights with the parameter CARRID LH and returns them in a table (Figure 9).

Figure 9
Test the function module, second step
In Figure 9 you see that the table has 5 Entries. Click the table icon  to see the results (Figure 10).

Figure 10
Test the function module, third step
Create a Web Service
Now that you have confirmed that the function module you created works, the next step is to convert the function module into a Web service. To do this, start transaction code SE80. In the drop-down field in Figure 11, select Function Group, and then in the next field select the name of the function group you selected earlier, in this case, ZTBR. Press Enter.
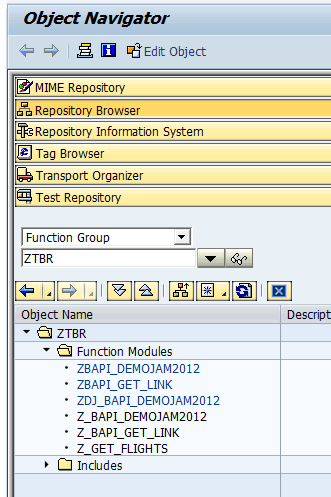
Figure 11
Select the function group
You find your function module, Z_GET_FLIGHTS, in the Function Modules folder. To call the function module from outside the SAP system, you have to change the processing type from a normal function module to a remote-enabled module. Double-click Z_GET_FLIGHTS and select the Attributes tab. In the Attributes tab screen (Figure 12), select the Remote-Enabled Module radio button.

Figure 12
Set the module processing type to remote-enabled
Save the function module and activate it as you did before (Figure 12, not shown in this view). Right-click Z_GET_FLIGHTS, and in the pop-up screen that appears, select Create > Enterprise Service (Figure 13).
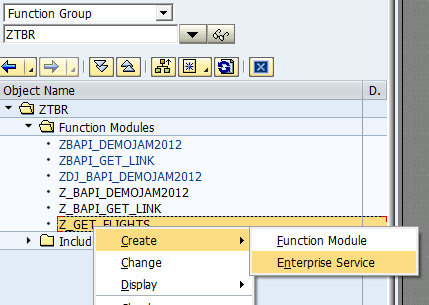
Figure 13
Create Web service, first step
Next, you see a wizard, which guides you through the process of creating a Web service.
In the screen displayed in Figure 14, enter the name of the Web service (Z_GET_FLIGHTS) in the Service Definition field and a Short Description name (Retrieve all flights), and click the Continue button.

Figure 14
Create a Web service, second step
In the next screen (Figure 15), enter the name of your function module (Z_GET_FLIGHTS), select the Map Name check box, and click the Continue button.
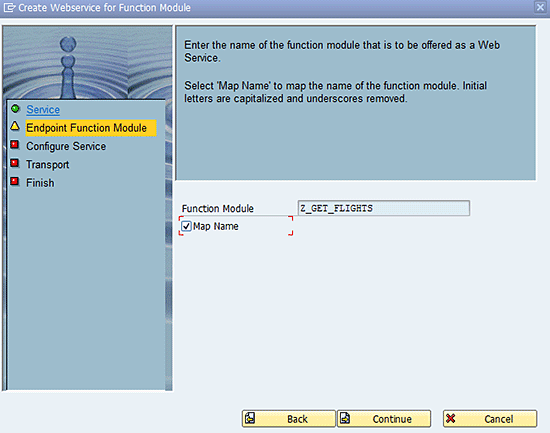
Figure 15
Create a Web service, third step
In the screen in Figure 16, you have to choose a security profile. Enter PRF_DT_IF_SEC_LOW in the Profile field. When consuming the Web service, you have to provide your username and password to get access to the Web service, which I discuss later in this article. Click the Continue button to go to the next screen (Figure 17).
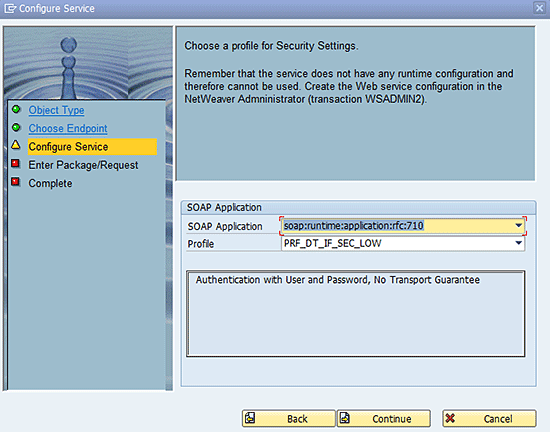
Figure 16
Create a Web service, fourth step
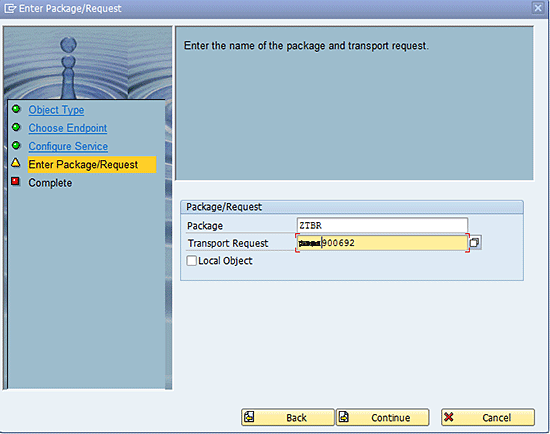
Figure 17
Create a Web service, fifth step
Provide the package from Figures 2 and the transport request number from Figure 7.
Click the Continue button to go to the last step. In the resulting screen (Figure 18), the wizard shows you some information about how to take the next step to create the Web service Z_GET_FLIGHTS. After you have read it, click the Complete option on the left, which results in the screen in Figure 19. To save and activate the created Web service, click the save icon and then the activate icon.
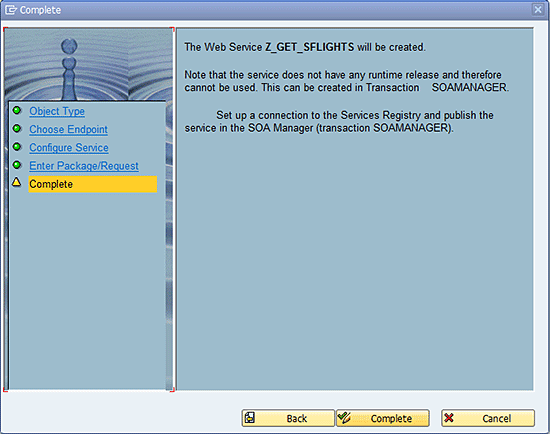
Figure 18
Create a Web service, sixth step
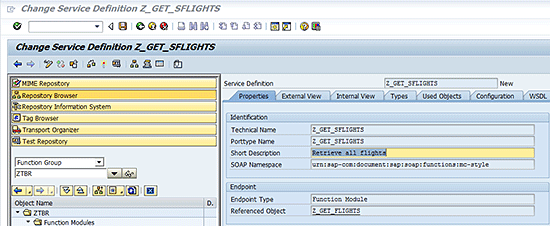
Figure 19
Save and activate the Web service
Start transaction code SOAMANAGER, select the Service Administration tab, and then select the Single Service Configuration option (Figure 20). This takes you to the screen in Figure 21.

Figure 20
Transaction code SOAMANAGER

Figure 21
Search the Web service
Under the Search tab, select Service in the Search by field, enter z_get_sflights in the Search Pattern field and click the Go button.
Figure 22 shows the program search results. Click Z_GET_SFLIGHTS in the External Name column and click the Apply Selection button.

Figure 22
Selection of the Web service
The details of the service definition appear in Figure 23. Click the Configurations tab and then the Create Endpoint button. This results in the screen shown in Figure 24.
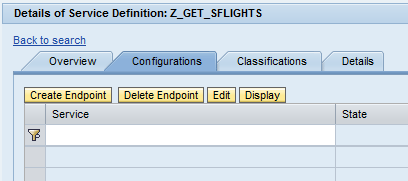
Figure 23
Create an endpoint
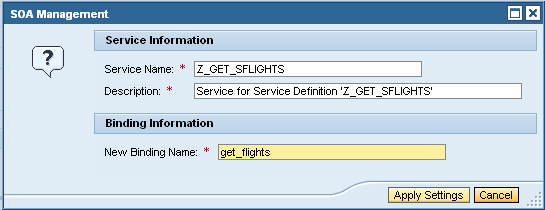
Figure 24
Apply settings
In the screen in Figure 24, you can leave the selections as they are or you have the option to change the descriptions. When you are done, click the Apply Settings button to apply your settings.
In the screen that appears in Figure 25, a new section is added to the bottom of the screen, Authentication Settings. Select the User ID/Password check box and click the Save button.

Figure 25
Save the Web service
The Web service is now created and is accessible from outside of the SAP system.
How to Consume the Web Service with SOAPUI
In this next step, I show you how to consume the Web service with SOAPUI. This is a free, third-party tool that you can download here: https://www.eviware.com/. There are other third-party tools like SOAPUI that are also available for your use.
Before I show you how to use SOAPUI, however, you have to get the WSDL URL from the service. The service screen has three sections:
- Search results (Figure 26)
- Details of service definition: Z_GET_SFLIGHTS (Figure 27)
- Configuration of Web service Z_GET_SFLIGHTS (Figure 28)

Figure 26
Search results

Figure 27
Service definition details

Figure 28
Web service total screen configuration
Select the Overview tab (Figure 27), and then select the Display selected Binding’s or Service’s WSDL URL option. The WSDL URL for Binding box appears at the bottom of the screen (Figure 29) with the URL in the box.

Figure 29
URL WSDL
Highlight and copy the URL from this box and start SOAPUI (which is already installed on your computer). Search for the link in All Programs or on your desktop and follow menu path File > New soapUi Project, and the next screen (Figure 30) is displayed. Enter a name for your project (e.g., SFLIGHTS) and paste the URL you copied into the Initial WSDL/WADL: field. Leave all the other check boxes set on their initial values, and click the OK button.

Figure 30
Create a new SOAPUI project
In the screen that appears (Figure 31), provide your username and password to get access to the SAP system, then click the OK button again.

Figure 31
Provide a username and password
Your project is successfully created and you find it listed on the left side of the screen (Figure 32).

Figure 32
A newly created project
Click Request 1 under the Projects node SFLIGHTS > get_sflights > ZGetFlights. On the left bottom of the same screen, enter your username and password (Figure 33).

Figure 33
Fill in a username and password
In the screen to the right, put LH between <Carrid> and </Carrid> near the top and delete all the question marks between the tags under <Sflights> (Figure 34).

Figure 34
Fill in LH and delete question marks
Then click the submit icon  . Your results appear on the right side of the screen (Figure 35).

Figure 35
Web service results
Accessing the Web Service
Now that your Web service works, how can you access the Web service in a productive situation? I’m going to show you an Android application for getting the flight information. The Android program is written in Eclipse. I am assuming that for this application, you know about this program and are able to read and write Java code.
In the manifest.xml, you need to set permission to access the Internet. The code to do this is shown in Figure 36.

Figure 36
Java code for permission to access Internet
I created a class XMLParser.java that gets the data from the Web service (Figure 37).

Figure 37
Java code to retrieve Web service data
This is the important part. The HttpPost string is the one you see in the SOAPUI request 1 screen (Figure 38): POST https://xxxxxxxxx.gen.cms.local:8002/sap/bc/srt/rfc/sap/z_get_sflights/300/z_get_sflights/get_sflights"); String authentication = android.util.Base64.encodeToString(cred.getBytes(), android.util.Base64.NO_WRAP). .

Figure 38
HttpPost string
To get the POST header and body, go to SOAPUI and click the Raw tab on the left side of the screen of Request 1 (Figure 39).

Figure 39
Get the POST header and body
The information from the Raw tab is used in the method header (Figure 40).

Figure 40
Method header information
At last you come to the main activity, which calls the xmlparser (Figure 41).

Figure 41
Main activity code
Kees Bond
Kees Bond is a senior HCM consultant and ABAP consultant with 17 years of experience with SAP. He followed an HBO education in Amsterdam and lives in the Netherlands.
He started his SAP career in the first Dutch hospital to implement SAP. He was responsible for the implementation of the HCM module components PA, OM, time, and payroll. Currently, Kees is working as a principal consultant for CIBER Netherlands BV.
You may contact the author at kees.bond@ciber.nl.
If you have comments about this article or publication, or would like to submit an article idea, please contact the editor.


