Discover how to handle various error scenarios while developing composite applications in SAP Manufacturing Integration and Intelligence (SAP MII). Learn the new exception handling and transaction handling techniques in SAP MII.
Key Concept
Exception handling and SQL transaction support are two techniques that are part of the newer versions of SAP Manufacturing Integration and Intelligence (MII). You can use these techniques not only to handle errors but also to make sure that your business logic or transaction is fail-safe.
Evolution of Error-Handling Mechanisms in SAP MII
The two most common use cases for SAP Manufacturing Integration and Intelligence (SAP MII) are integration scenarios and UI development. In both of these use cases, proper error handling is of the utmost importance. For example, for an interface transferring data across multiple disparate systems, it is necessary to log data that fails to transfer over from one system to another so that this data can be reviewed, errors can be corrected, and this data can be transferred again to the target system. With regard to UIs, proper error handling can ensure a better user experience by providing informative messages if the user incorrectly inputs data that causes the system to fail to process the data.
Designing fail-safe SAP MII transactions and applications has often been a challenge to MII developers. Prior to SAP MII 12.1, the only way to check if there was an exception in an SAP MII Business Logic Services (BLS) transaction was to add conditional action blocks and check whether the previous action succeeded. Logic could then be executed or bypassed on the basis of the success of the previous check. However, not every scenario can be handled just with conditional action blocks. For example, a logic error such as division by zero can occur anywhere and may cause the transaction to terminate prematurely if assigned to a link of an action block.
Note
At various points in this article, I refer to versions in which a certain technique or functionality was added to SAP MII. SAP MII 15.0 is the latest version of SAP MII, but some of the features that I describe were introduced in SAP MII versions 12.1, 12.2, or 14.0.
-
Exception handling and SQL transaction support action blocks: Exception handling was introduced in SAP MII 12.2, and transaction support was introduced in SAP MII 14.0. These two blocks enable you to not only catch and throw errors but also handle multiple database create, read, update, and delete (CRUD) operations in a single SQL transaction.
-
BLS debugger: The introduction of a BLS debugger in SAP MII 12.2 enhanced the capability of the developer to effectively debug a transaction.
-
Data buffer: This longstanding feature of SAP MII ensures guaranteed delivery of messages when the target system is down, but it does come with its sets of limitations that sometimes need to be handled by creating a custom solution.
-
BLS performance monitoring: SAP MII 12.1 also introduced the LogStatisticsToDB flag that provides a lot of insight into the performance of a BLS transaction.
-
Creating fail-safe BLS transactions
-
Debugging BLS transactions with the SAP MII debugger
-
Guaranteed Delivery concepts in SAP MII
-
Performance monitoring of BLS transactions
Creating Fail-Safe BLS Transactions
Exception Handling in BLS Transactions
Exception handling is the process of responding to exceptions, which by their definition, are anomalous conditions that occur within code or logic. They might need special handling because they often tend to change the course of the execution of the logic. Exception handling is done by preserving the state of the current execution and switching to an exception handler specially written to handle such a situation. Depending on whether it is possible to recover from the exception, the execution may or may not switch back to the original location at which the exception occurred and continue with the flow of logic. For example, a division by zero error might be recoverable, whereas an out-of-memory or Java heap space issue might not be.
To help you understand how exceptions in SAP MII work, I explain how to create a simple transaction as shown in Figure 1.

Figure 1
BLS transaction for understanding exception handling
In this transaction Tracer_1 and Tracer_2 trace out a simple message when executed. However, the AssignCharToFloat Assignment action block tries to assign a character value Hello to a Local variable DivValue of the type Float. Because a string cannot be implicitly converted to a floating point value, this gives rise to an exception. Now look at the output of the transaction when executed in Figure 2.

Figure 2
Output of the transaction shown in Figure 1
The Exception Enabler Action Block
The transaction shown in Figure 3 loops over a list variable called NumberList and tries to iterate over the list and assign the value to a local variable FloatValue of the type float. There is a tracer PrintCurrentValue that prints out the value being iterated upon before assigning it to FloatValue. The tracer PrintFloatValue then prints out the value of FloatValue after it has been assigned. This use case is similar to the one discussed before in which you need to assign all the values to a Local variable and print out the values that throw an error.

Figure 3
Transaction for looping and assigning values to a local variable
Figure 4 shows the output of the transaction shown in Figure 3. Note that it behaves exactly as I described earlier when the transaction tries to assign the value three to FloatValue.

Figure 4
Output of the transaction shown in Figure 3
Now modify this transaction using the Exception Enabler action block so that it iterates through all the values without stopping at an exception, assigns the values that can be assigned to FloatValue, and prints the values that cannot be assigned separately as an error. Figure 5 shows the modified transaction.
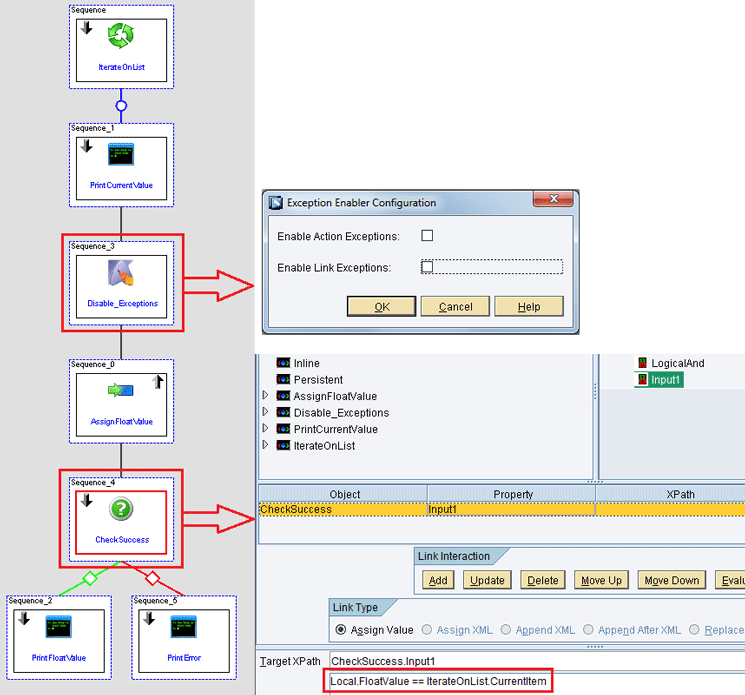
Figure 5
Modified version of the transaction shown in Figure 3
As shown in Figure 5, I have added an Exception Enabler action block (Disable_Exceptions) . To set configuration options for this block, right-click the Disable_Exceptions block. This action opens the Exception Enabler Configuration screen. Note that in this screen, I have unchecked both the Enable Action Exceptions and the Enable Link Exceptions check boxes. This prevents the transaction from throwing an exception that would stop further processing of the transaction if either an action block or a link assignment encounters an exception condition in a logical position that occurs after the Exception Enabler action block position.
I have also put in an a Conditional action block (CheckSuccess) that checks whether the current value of the local variable FloatValue is equal to the value of the current item in the list being iterated upon. This is an indirect check to see if the assignment was successful. The action block PrintError prints the value in the list that caused the error. But why can’t you just check the Success property of the AssignFloatValue action block to see whether the link assignment was a success or failure? The answer lies in the output of the transaction shown in Figure 6.

Figure 6
Output of transaction shown in Figure 5
Figure 7 shows a slightly modified version of the transaction shown in Figure 1 to illustrate the concept.

Figure 7
A modified version of the transaction shown in Figure 1
Here, you disable exceptions before the AssignCharToFloat action block so that the logic flows over to the Tracer_2, but enable exceptions again before the AssignCharToFloatAgain action block so that the transaction raises an exception and control never flows to the Tracer_3. The output of the transaction shown in Figure 8 confirms this.

Figure 8
Output of the transaction shown in Figure 7
The Catch Action Block
The Catch action block is only invoked when an exception has been raised in a transaction. The Catch action block has two legs, the yellow colored Exception leg and the Finally leg as shown in Figure 9.
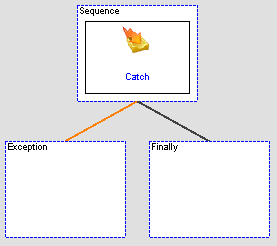
Figure 9
The Catch action block with the Exception and the Finally legs
The Exception leg is only executed if the Catch action block is encountered when an exception has been raised in the transaction. The Finally leg is always executed irrespective of the Exception leg. The Finally leg is generally used to either clean up in case an exception occurs or to otherwise execute logic that was skipped when the transaction encountered the exception.
When a transaction is in a state of exception, the execution of all other action blocks is skipped until a Catch action block is encountered or the transaction ends. Once a Catch action block is encountered, the transaction is reverted back to its normal state and continues execution of any action blocks following the Catch action block. If no other exception happens after that, all Exception legs of subsequent Catch action blocks and the action blocks below them are ignored with the exception of the Finally leg. It is also important to note here that if a transaction never enters a state of exception, all logic under the Exception leg of the Catch action blocks is ignored but not the Finally leg.
To understand how the Catch action block works, look at Figure 10, which depicts a modified version of the transaction shown in Figure 1.
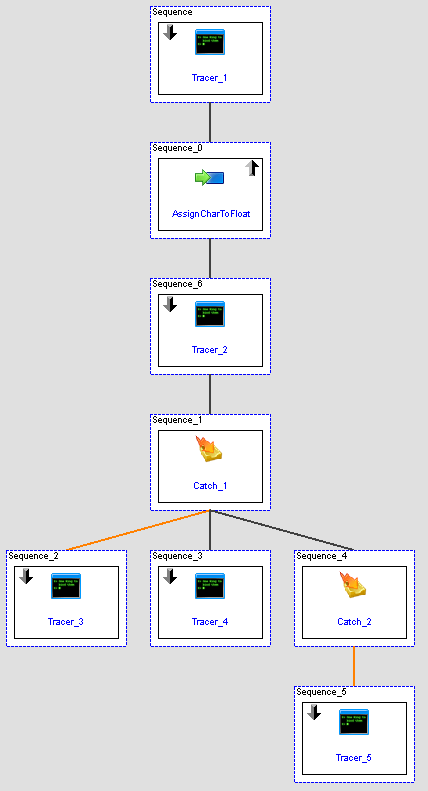
Figure 10
A modified version of the transaction shown in Figure 1 with Catch action blocks
In this transaction when the AssignCharToFloat action block throws an exception, the logic flows directly to Catch_1 skipping Tracer_2. Because an exception has been caught, Tracer_3 is executed followed by Tracer_4. The exception is reset once it encounters a Catch action block and no further exception occurs. Therefore, the Catch_2 action block and the subsequent Tracer_5 are ignored and not executed. The output of the transaction shown in Figure 10 confirms this (Figure 11).

Figure 11
Output of the transaction shown in Figure 10
Now look at a little more complicated use of the Catch action block. For this example, I use a modified version of the transaction shown in Figure 5. In this case the transaction has been modified to utilize the Catch action block instead of the Conditional action block, essentially leading to a more elegant implementation with same results. The resultant transaction is shown in Figure 12.
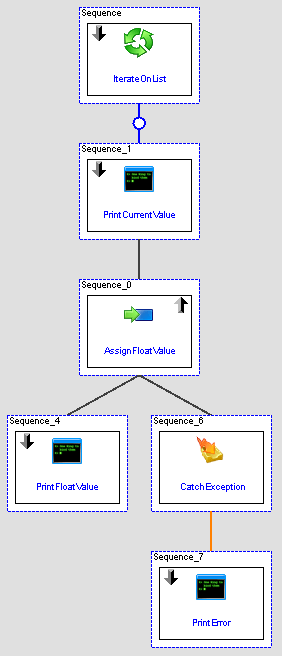
Figure 12
Logic depicted in the transaction of Figure 5 implemented with the Catch action block
In this transaction the control does not flow to the CatchException action block until an exception is encountered. Then the exception is traced by the PrintError action block and the execution continues for the next iteration of the loop. The output of the transaction shown in Figure 12 confirms this (Figure 13).

Figure 13
Output of the transaction shown in Figure 12
The Throw Action Block
The Throw action block is the simplest of all action blocks. It lets you raise a custom error that causes the transaction to enter a state of exception. A custom error message can also be specified that can be caught and displayed by the Catch action block. This is most useful for handling business logic or data errors that are not considered as an exception in SAP MII. For example, A call to BAPI_MATERIAL_GET_DETAIL to fetch details of an existing material in ECC might be successfully executed, but return a message in the BAPI Return table that the material does not exist. In such a case, the raise exception action block can be used to raise a custom exception and handle the same in a Catch action block. Figure 14 shows an example transaction for the Throw action block.

Figure 14
Transaction to demonstrate the use of the Throw action block
In the transaction above, the IterateOnMaterials action block loops on the different material numbers stored in a list with one of the materials, SomeMaterial, being nonexistent. BAPI_MATERIAL_GET_DETAIL is subsequently called and the Throw_Exception action block is conditionally enabled if an error message is found in the BAPI Return table. The Throw_Exception action block in that case raises an exception with the error message found in the BAPI Return table. This is then trapped by the CatchException action block and traced out in the PrintErrorMsg action block. If no exception is encountered, the flow continues to the MaterialDesc action block that prints the description of the material and skips the subsequent CatchException action block. The output of the transaction is shown in Figure 15.

Figure 15
Output of the transaction shown in Figure 14
SQL Transaction Support Action Blocks
-
SQL Transaction Begin
-
SQL Transaction Commit
-
SQL Transaction Rollback
-
SQL Transaction End
The standard SQL Query action block has been modified to work with the SQL Transaction Support action blocks. It is also important to note here that the standard MDO Query action block also works fine with the SQL Transaction Support action blocks. To understand how the SQL Transaction Support action blocks would work, look at the transaction shown in Figure 16.
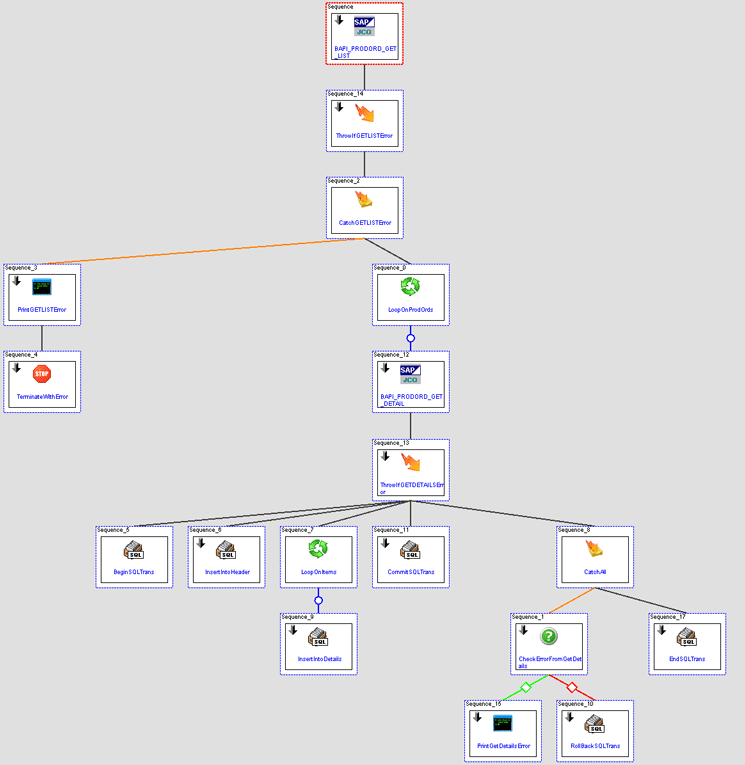
Figure 16
Implementing SQL transaction handling in a BLS transaction
ThrowIfGETLISTError throws an error in case there is a business error returned by BAPI_PRODORD_GET_LIST in its Return table. Any exception thrown by BAPI_PRODORD_GET_LIST along with the ones thrown by ThrowIfGETLISTError are trapped by CatchGETLISTError. Because these are irrecoverable errors, you log them via PrintGETLISTError followed by a TerminateWithError action blocks, which halts the execution of the transaction. If the call to BAPI_PRODORD_GET_LIST is successful, then you loop on the list of production orders returned and call BAPI_PRODORD_GET_DETAILS for each set of results. These results are then inserted as a single row in the header table and as multiple rows in the details table. These inserts take place within a SQL transaction initiated by the action block BeginSQLTrans.
Any technical exception thrown by BAPI_PRODORD_GET_DETAILS or any business error returned in its return table and thrown by ThrowIfGETDETAILSError is caught by the CatchAll action block. The CatchAll action block also catches any error thrown by any of the Insert statements for the InsertIntoHeader and InsertIntoDetails action block. The conditional action block CheckErrorFromGetDetails checks whether the error is from BAPI_PRODORD_GET_DETAILS and logs it. In case the error is from any one of the SQL insert statements, the SQL transaction started by the BeginSQLTrans is rolled back by the RollBackSQLTrans.
This ensures the all-or-none approach of a SQL transaction in which partial records are not inserted at all, and in case of a failure, all records in the details table and their corresponding entry in the header table are summarily rolled back. If no exceptions occur, then the SQL transaction is committed for this production order by CommitSQLTrans. The SQL transaction is then ended by the EndSQLTrans action block in the Finally leg of the CatchAll action block. Irrespective of a commit or a rollback, the LoopOnProdOrds action block proceeds to the next record.
The most important point to note in the entire transaction above is that a very important step needs to be configured to ensure the insert statements invoked by the InsertIntoHeader and the InsertIntoDetails action blocks are actually a part of the SQL transaction initiated by the BeginSQLTrans action block. This is done by mapping the SQLTransaction link of the BeginSQLTrans action block to the SQLTransaction link of the InsertIntoHeader and the InsertIntoDetails action blocks. This mapping is shown in Figure 17. It is also important to map the SQLTransaction link of the BeginSQLTrans action block to the SQLTransaction link of the CommitSQLTrans, RollBackSQLTrans, and the EndSQLTrans action blocks to ensure proper SQL transaction handling.

Figure 17
Mapping the SQLTransaction property of BeginSQLTrans action to that of the InsertIntoHeader action block
Debugging BLS Transactions with the SAP MII Debugger
-
Create, edit and delete breakpoints in a transaction
-
View the properties and variables of any executed or the currently executing action block and add them for monitoring to a watch list
-
Modify link variables and configuration of an action block mid execution
I now explain how to use the features of the debugger mentioned above to debug a BLS transaction. To illustrate this I reuse the transaction shown in Figure 5. If you remember, this transaction was used to show how the Exception Enabler action block disables exceptions to prevent termination when the transaction tries to assign a string value to a float variable. Start by assigning a Breakpoint to the CheckSuccess action block. There are four ways you can add a breakpoint (Figure 18):
-
Always: The breakpoint is activated in all circumstances. This option should be used as a blanket option in the initial phases of a debugging. For example, in the example above, it breaks the execution of the transaction at every value iterated by the IterateOnList until the erroneous value is detected.
-
Disabled: The breakpoint is never activated. This option should be used to temporarily disable a breakpoint.
-
On True: The breakpoint is only activated when the value of the expression specified is True. For example, in this particular case, you define the expression Local.FloatValue != IterateOnList.CurrentItem, which evaluates to true if the assignment of the current value being looped on by IterateOnList to the Local variable FloatValue fails. Thus, the transaction only pauses on debug in case of a failure of this condition. This is generally used in an advanced stage while debugging when the user is pretty close to discovering the issue plaguing the transaction.
- On Change: The breakpoint is activated whenever the value of the expression changes. This is generally used in advanced stages of debugging when users suspect that a particular expression is causing an issue with the transaction and they want the transaction to pause when the value of the expression changes so that they can investigate the issue further.
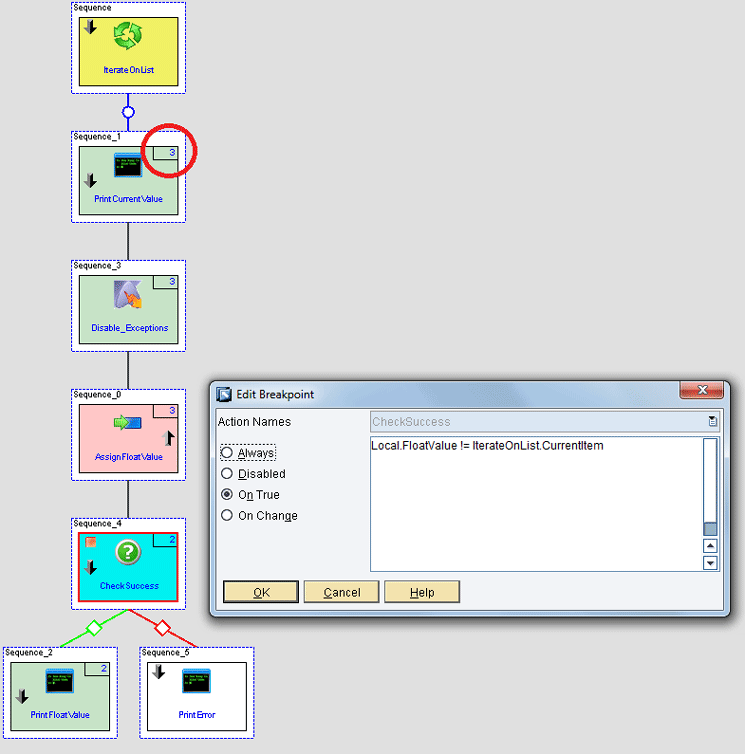
Figure 18
Editing a breakpoint in a paused transaction
In Figure 18, notice how the action blocks are color coded during debugging of a transaction. Action blocks are color coded depending on the state of the execution that action block is currently in. The color codes and their significance are:
-
Yellow: The action block is currently being processed.
-
Green: The action block was successfully executed and evaluated to true.
-
Red: The action block was successfully executed and evaluated to false.
- Blue: The transaction is currently paused in that action block because the breakpoint has been triggered.
-
White: The action block has not yet been executed.
-
Orange: The action block executed and threw an exception.
-
Gray: The action block was skipped and not executed.
Now look at the state of the transaction when the transaction is halted at a breakpoint during execution. To make the job of debugging a transaction easier, five different tabs at the bottom of the transaction pop up in debugging mode providing a variety of information (Figure 19):
-
Breakpoints: A list of breakpoints defined in the transaction. You add, edit, or delete them from this screen.
-
Variables: All variables valid within the current scope of execution are displayed in this tab. You can edit the values of the variables from this screen, shown in Figure 19, which in turn affects future executions of the action block. You can also add or remove a variable to the Watch List from here.
-
Watch List: The Watch List tab is your self-curated list of variables on which you want to keep a close eye. The value of these variables changes on the screen as and when the execution of the transaction proceeds. This screen also lets you edit or delete the variables that have been added to the Watch List. Figure 20 displays the Watch List screen with the IterateOnList.CurrentItem added to the list.
-
Links: The Links screen displays the incoming and outgoing links of the action block at which the transaction is paused at that moment because of a breakpoint. The links expressions defined can be evaluated to their current value as per the state of execution of the transaction.Transaction Debug: This is a very simple screen and is essentially the same as the output window of any transaction execution with logging mode switched to the DEBUG mode.
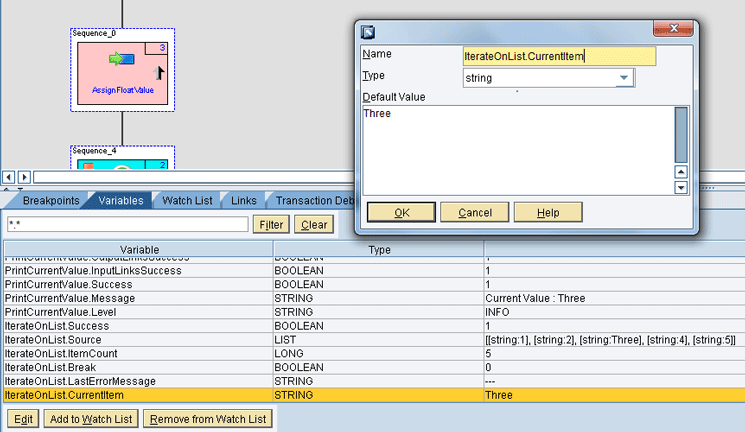
Figure 19
The variables screen and the edit variable value pop-up screen

Figure 20
The Watch List screen
Although the debugging features of SAP MII make it relatively easier for new users of the technology to debug complex transactions, it does have a few shortcomings:
-
You cannot add breakpoints or start debugging a transaction if you have not saved it first.
-
If there is a transaction call within a transaction, and the called transaction has breakpoints associated with it, they do not activate. Thus, the debugging features miss out on Step Into, Step Out, and Step Over debug commands.
-
The Watch List accepts only variables and cannot evaluate expressions.
Guaranteed Delivery Concepts in SAP MII
SAP MII Data Buffer
SAP MII provides a very rudimentary framework to ensure guaranteed delivery of data in case of a connection failure called data buffer. A data buffer can store requests to external systems that have failed due to a connectivity issue and can retry the request at regular intervals. Connectivity issues can be caused for quite a few reasons, including the target system being down for maintenance, network problems affecting connectivity, and incorrect configuration of target system properties such as IP address, ports, or the URL. However, incorrect authentication data does not cause a connectivity error, and in such cases, the request is not stored in the data buffer. Data buffering is supported by data connectors, query templates, and action blocks in SAP MII. Table 1 is a comprehensive list of these components.
| Data connectors |
Query templates |
Action blocks |
MDO connector
|
Alarm Query
|
SAP Java Resource Adapter (JRA) Function Call
|
| KPI |
OLAP Query |
SAP Java Connector (JCo) Execute Queue |
| Plant Connectivity (PCo) |
SQL Query |
SAP JCo Function |
| OLEDB |
Tag Query |
SAP JCo Interface |
| AlarmSuite |
|
HTTP Post |
| Universal Data |
|
Web Service |
| OLAP |
|
HTTP XI |
| Internet Database Connectivity (IDBC) |
|
Web Service XI |
| Xacute |
|
|
| InSQL |
|
|
| IP21 |
|
|
| Open |
|
|
| Catalog |
|
|
Table 1
Data connectors, query templates, and action blocks that support data buffering
The properties governing the life cycle of a data buffer entry are:
-
DaysRetention: The maximum number of days the data buffer entry is retained by the system.
-
MaxRetryCount: The maximum number of times a request can be resubmitted.
-
RetryInterval: The interval in milliseconds between consecutive retries of the data buffer job. The scheduler typically adds a minute to this time.
They can be set independently for each action block or data server that supports data buffering. Figure 21 shows the configuration option for the IDBC connector, whereas Figures 22 and 23 show the options to enable data buffering for the SAP JCo Interface action block and the SQL Query Template, respectively. Note that for the SAP JCo Interface action block Asynchronous Processing or Asynchronous Processing on Error needs to be selected as the processing type for the action block to be buffered on error.

Figure 21
IDBC Connector configuration for data buffering

Figure 22
SAP JCo Interface action block configuration for data buffering
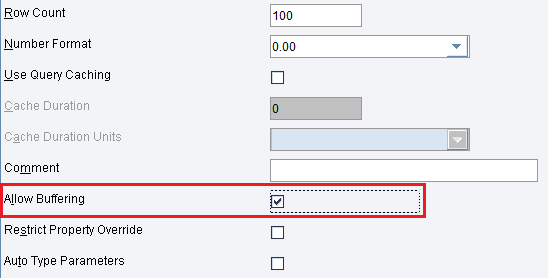
Figure 23
SQL Query Template configuration for data buffering
SAP MII also provides a screen for displaying all the data buffer jobs and the entries contained in them from a screen that can be accessed by following menu path Data Services > Data Buffer. Figure 24 shows the details of the Data Buffer Jobs screen.
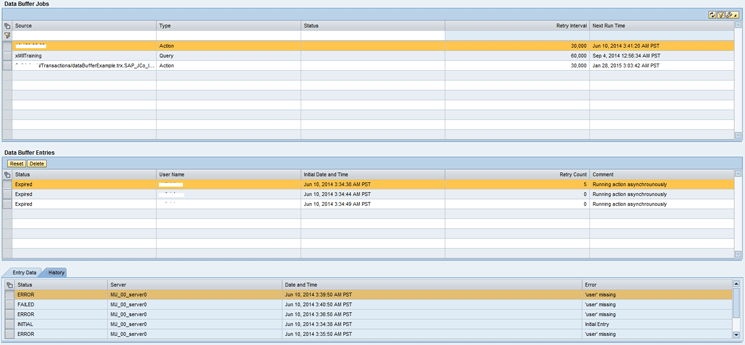
Figure 24
The Data Buffer Jobs screen in SAP MII
Status
|
Description |
| Initial |
A new entry in the job or that the status for the job has been reset |
| Error |
The entry was retried and failed due to communication error. However, the maximum number of retries has not yet been reached for this entry. |
| Resubmitted |
The entry is currently being processed by the data buffer. |
| Completed with Errors |
The request went through to the target server but encountered an exception while executing generally due to a misconfiguration of the action block or query. An entry with this status will not be retried since this is not a communication error. |
| Failed |
The entry could not succeed in establishing a network connection with the target server and has been retried for the maximum number of times as defined by the MaxRetryCount parameter in the configuration. |
| Expired |
The number of days that an entry could be retained in the data buffer defined by the DaysRetention property has passed and the entry will no longer be retried. |
Table 2
Statuses for data buffer entries
Table 3 lists the statuses for data buffer jobs.
| Status |
Description
|
| Waiting |
The job or at least one entry in the job is waiting to be processed. |
| Scheduled |
The job has been submitted for reprocessing but the processing of the entries has not started yet. |
| Processing |
The job and its entries are currently being processed. On a successful execution of all the entries in the job, it is successfully deleted. |
Table 3
Statuses of data buffer jobs
Limitations of the SAP MII Data Buffer and Possible Custom Solutions
The SAP MII data buffer works well in theory if there is a communication error that needs to be retried. The best benefit is that the user does not have to customize any functionality for a simple business use case. However, there are some limitations of the data buffer for practical use in more complex scenarios. Two of these shortcomings are that the data buffer does not allow any post processing and the data buffer does not provide you with a way to handle business errors.
When an action block or query is being buffered, in the entire BLS transaction that contains it only that particular action block or query is buffered with the value of its input and output links. The entire transaction is never buffered for obvious reasons and this presents you with the following question: What happens if you need to do some post processing in the transaction depending on the output or success or failure of the query or action block?
Unfortunately, such a scenario is rather common and not handled by the data buffer feature. Therefore, if you are using data buffering, you need to make sure that the query or action block being buffered is the last executable piece of your transaction. If it is not and due to a communication error the action or query is buffered, the logic following the action block being buffered is never executed in the event of a successful processing of the buffered action or query.
With regard to the data buffer’s second shortcoming, consider a scenario in which you are trying to mark a material as deleted in ECC with the standard BAPI_MATERIAL_DELETE. If you pass an incorrect material number to the BAPI, the system returns the following error message in the return table: The material <incorrect material> does not exist or is not activated. This is a business error and needs to be handled in any transaction that encounters one. A possible solution is to log the error in a database or display an error message to the end user depending on the business case. If an SAP JCo interface action block with a call to this BAPI enters the data buffer and later encounters the same error, there is no way to know that such an error has occurred.
As far as the data buffer is concerned, a successful call to the target system was made and the BAPI was executed. Because there was no connectivity error, all went well. The fact that there is no post processing available as discussed in the previous point makes this error difficult to trap. To make matters worse, because this is considered a successful execution of the data buffer entry, the job is deleted from the data buffer and is not visible on the screen, leading to confusion as the end user thinks that the material was deleted as there was no error message. However, the user never gets to know that maybe he had mistyped the material number on the screen and the number he did want to delete still exists in the ECC system.
In light of these shortcomings, you often need to create a custom solution that takes care of the guaranteed messaging scenario in case of a complicated implementation project. While discussing the details of creating such a solution could be addressed in another article, I provide you with a high-level overview of what it might take to create such a solution. The heart of this solution is the buffer itself — ideally a database, although messaging queues can also be used as an alternative.
Therefore, the logic would be to design two major components of the solution: The Data Buffer Entry Mechanism and the scheduled Data Buffer Retry Job. It is important to decouple the logic prior to the actual call to be buffered from the post processing logic to achieve the scenario discussed above in separate transactions to achieve this scenario. The working of the solution is simple. The Data Buffer Entry Mechanism provides a wrapper that detects if the action block that needs to be buffered has failed to successfully make a call to the target system through exception handling.
In such a case the Data Buffer Entry Mechanism stores the input parameters and the type of the action that needs to be buffered along with the path of a transaction that can serve as a callback in a database. The scheduled Data Buffer Retry Job would then systematically go through the stored entries of the same database and execute the required action block according to its type after populating the input parameters stored. The Job would then pass on the output of the action block call, in case of a success, as the input parameters to the transaction specified as the callback after looking it up by the path stored along with the buffer entry in the database. In case of a failure the retry job would log the result in the table and move on to the next entry to retry the failed entry on its successive runs.
Performance Monitoring of BLS Transactions
SAP MII BLS transactions are not created with code in the true sense of the word as they use a model-driven development framework to create the business logic. This is both a boon and curse because while it becomes easier for new entrants to create transactions and get started with the technology, the unavailability of a granular code level control means it becomes difficult to create a transaction that performs well. While this is mostly a non-issue for simple use cases, it becomes more prevalent for more complicated transaction logic that queries and writes to multiple sources of data and manipulates huge XML structures.
Performance monitoring services were introduced with Support Package 6 of SAP MII version 12.1. A new mode called LogStatisticsToDB was added to the Runner service to log transaction statistics to the database and another mode Stats was added to the BLSManager service to read the same statistics from the database in a presentable format to the developer. Using these services is not straightforward and there are no user interfaces either in the administration screen or the SAP MII Workbench. Calls to these services are done purely from a web browser or a custom tool made using these services.
Figure 25 demonstrates how the performance monitoring services of SAP MII can be used.
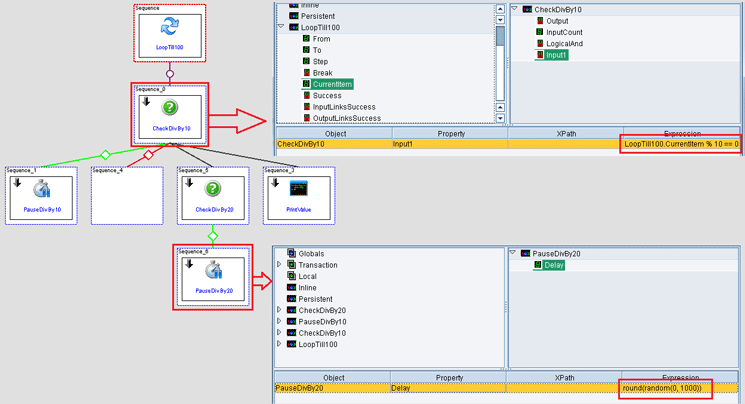
Figure 25
Transaction to demonstrate SAP MII performance monitoring services
The logic of the transaction is simple. It loops through numbers from one to 100 using the For Next Loop action block LoopTill100 and prints them out using a Tracer action block PrintValue. To introduce some bottlenecks in this transaction, I have put in two Conditional action blocks (CheckDivBy10 and CheckDivBy20) to check whether the number currently being iterated upon is divisible by either 10 or 20, respectively. I use the modulo operator (%) to achieve the logic mentioned above.
The modulo operator always returns the remainder after dividing one number by another. If the remainder is zero, I know that the dividend is completely divisible by the divisor. If a number is divisible by either 10 or 20, I introduce a random delay from anywhere between 0 to 1,000 milliseconds in the transaction execution by using the Pause action blocks PauseDivBy10 and PauseDivby20, respectively. Because there are 10 numbers between 1 and 100 that are divisible by 10 and five that are divisible by 25, the transaction should pause for a random amount of time between 0 to 1000 milliseconds every time each number is encountered to a total of 15 times.
Figure 26
Figure 26
Output of the call to the Runner service with the LogStatisticsToDB parameter

Figure 27
Statistics for the execution of the transaction displayed by the Stats mode
The Stats mode provides a detailed analysis of the execution of a transaction, including the path of the transaction, the action block name, the link that was executed, the minimum, maximum, and average times of execution of the action block in milliseconds, and the number of times the transaction was executed. The results are sorted by the execution time of an action block in descending order.
From Figure 27 you can deduce that execution of the action block PauseDivBy10 took the most time with an average of 577, a minimum of 77, and a maximum of 926 milliseconds. It was also executed a total of 10 times. This action block is followed by the action block PauseDivBy20, which was executed five times with an average of 519, a minimum of 147, and a maximum of 812 milliseconds. The execution of the rest of the action blocks was nearly instantaneous or extremely low to measure.
For example, you can see from the statistics in Figure 27 that the CheckDivBy10, CheckDivBy20, and the PrintValue action blocks display a maximum, minimum, and average values of zero. These action blocks also were executed as many as 100 times. Now that the problematic action blocks taking the maximum amount of time in the execution of the transaction have been identified as a bottleneck, you can take steps to suitably tune and optimize the transaction.
Abesh Bhattacharjee
Abesh Bhattacharjee is a senior solution architect at Fujitsu America Inc. He has more than 12 years of experience in IT, with more than nine years in SAP manufacturing specializing in SAP Manufacturing Integration and Intelligence (SAP MII). He is the coauthor of the first ever book on SAP MII: Implementing and Configuring SAP MII and is recognized as a hands-on expert in SAP MII.
Abesh has a successful and proven track record of developing and managing top-class teams who are best in the business, developing solution assets, defining solution architectures, conducting blueprinting workshops, creating technical designs, delivering comprehensive technical training sessions, and leading various implementation projects globally. He was an active SAP Mentor from 2008 to 2014.
You may contact the author at aabesh@gmail.com.
If you have comments about this article or publication, or would like to submit an article idea, please contact the editor.


