See how to set up controlled batch jobs for SAP BusinessObjects Planning and Consolidation, version for the Microsoft platform, with any corporate scheduling tool. This allows you to load end-to-end data from SAP NetWeaver BW to SAP BusinessObjects Planning and Consolidation and vice versa. Follow the steps for creating a batch file on the SAP BusinessObjects Planning and Consolidation application server to execute the scheduled SQL Server Integration Services package on the SAP BusinessObjects Planning and Consolidation data manager.
Key Concept
SAP BusinessObjects Planning and Consolidation, version for Microsoft, accepts data only in flat file format. SQL Server Integration Services (SSIS) packages are used to accept data from the file, transform the data into the desired format, and execute the SAP BusinessObjects Planning and Consolidation-specific tasks that load the data into SAP BusinessObjects Planning and Consolidation and perform tasks such as dimension processing and optimization.
For companies implementing SAP BusinessObjects Planning and Consolidation 5.1 or 7.0, version for the Microsoft platform, several challenges are involved with setting up job scheduling and integrating SAP BusinessObjects Planning and Consolidation with the rest of the enterprise reporting landscape. While the Microsoft version provides a time-based job scheduling interface for SQL Server Integration Services (SSIS) packages through data manager, most companies typically schedule extraction, transformation, and loading (ETL) jobs using third-party scheduling tools that do not provide an easy interface with SAP BusinessObjects Planning and Consolidation, version for the Microsoft platform.
When loading data into SAP BusinessObjects Planning and Consolidation, version for the Microsoft platform, you need to execute SSIS packages within the data manager, using standard SAP BusinessObjects Planning and Consolidation functionality, such as validating input records, logging reject records, and capturing the data load history. However, to have controlled scheduling and to integrate the SAP BusinessObjects Planning and Consolidation jobs into the overall enterprise-wide ETL schedule, it is beneficial to be able to trigger SSIS packages using any other scheduling tool and still have them execute within the data manager.
I present an easy-to-implement process for executing SSIS packages with a third-party enterprise scheduling tool. This process enables you to create a batch script on the SAP BusinessObjects Planning and Consolidation application server that can trigger the scheduled SSIS packages. The script also gets the return codes based on the execution status of the jobs and passes them on to the enterprise scheduling tool. When you pass the necessary parameters to it, only a single batch script is needed for triggering all the SSIS packages in an entire SAP BusinessObjects Planning and Consolidation environment.
Note
SAP BusinessObjects Planning and Consolidation 7.0, version for SAP NetWeaver, is fully integrated with SAP NetWeaver BW. You can use process chains to load the data. This article applies only to the Microsoft version.
Figure 1 shows the end-to-end control flow from scheduling a job in a third-party application to executing an SSIS package in the SAP BusinessObjects Planning and Consolidation data manager and receiving the return code (SSIS package execution status) from the third-party application.

Figure 1
End-to-end control flow
The steps below describe how to create and schedule an SSIS package within SAP BusinessObjects Planning and Consolidation, set up a batch script on the application server, and execute it through an enterprise scheduling tool. The batch script can be triggered from any scheduling tool that is capable of passing parameters and executing OS level scripts. All SAP BusinessObjects Planning and Consolidation log files are placed into the standard SAP BusinessObjects Planning and Consolidation folders.
Step 1. Create a Package
Once the SSIS package is created and is ready to be executed in SAP BusinessObjects Planning and Consolidation, it should be added to the data manager through the eData menu within SAP BusinessObjects Planning and Consolidation, version for Microsoft. Note that the SSIS package should be placed in the predefined file path on the file share folder to add it to the data manager.
Select Organize Package List… from the eData menu. Right-click and select Add Package from the context menu on the right screen. Select the appropriate SSIS package from the list (Figure 2). Fill out the description and click the Add button (Figure 3). Then save the changes by clicking the Add button to add the new package to the data manager (Figure 4).

Figure 2
Select the SSIS package
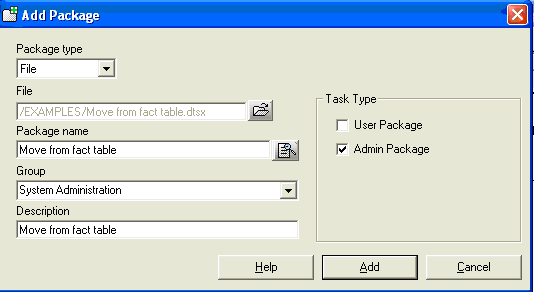
Figure 3
Enter a description
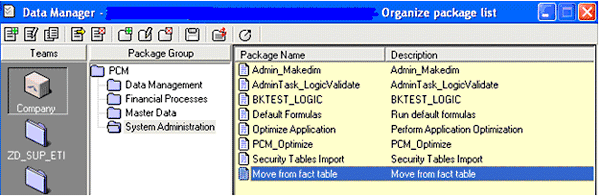
Figure 4
Save the changes
Step 2. Schedule the SSIS Package
To execute the SSIS package within the SAP BusinessObjects Planning and Consolidation environment, you must schedule it with the Enable Schedule option turned off. This prepares the package to be run from a background job but prevents it from being executed based on the default time settings.
Note
As a best practice, do not connect to the server through a load balancer if your company is using a multi-server environment. Always connect directly to the scheduling server while scheduling a job.
Select Run a data management package from the action pane (Figure 5). In the data manager screen, select the package that you want to schedule and then select the Schedule (Figure 6). Then click the Next button.

Figure 5
Click Run a data management package under the Manage Data Options section

Figure 6
Select the Schedule radio button
Fill out the schedule name and description. For consistency, it is best to use the same name as the package. Deselect the Enable Schedule check box (Figure 7). Click the Finish button to successfully schedule the package.

Figure 7
Finish scheduling the package
Step 3. Check the Schedule Status
Select View schedule status from the Manage Data Options section in the SAP BusinessObjects Planning and Consolidation Excel interface to see the package schedule status (Figure 8). Note that the Status should be set to Not Scheduled in the Package Scheduler Status window. Also, note the job name because you will need it later.
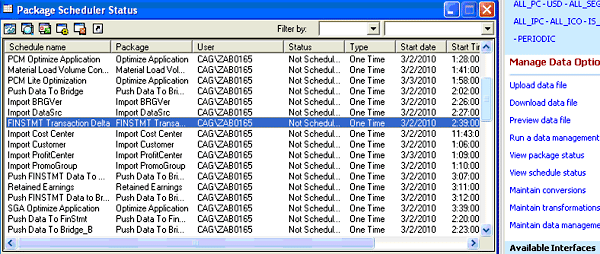
Figure 8
Set the schedule status
Step 4. Check the Scheduled Tasks on the Application Server
Log in to the SAP BusinessObjects Planning and Consolidation application server and check the scheduled tasks to see which parameters are required for executing the background job that was created when the SSIS package was scheduled. Note that the parameters are the same for all packages, but the values differ based on the SSIS package.
From your desktop, follow menu path Start > Programs > Accessories > System Tools > Scheduled Tasks. Find the corresponding job name noted in step 3 (e.g., DM_FPR_DEV_PCM_6.job) and right-click it. Select Properties from the context menu to see the executable command and the required parameters (Figure 9). Make a note of the job name and parameters as you will need these for the third-party application later.
Note
When a package is scheduled, the data manager actually executes OSoftSchedulingDMLauncher.exe on the server with predefined parameters.

Figure 9
List of scheduled tasks
Step 5. Create a Batch Script and Place It on the Application Server
Log in to the application server using the remote desktop connection, and create the script BPCDataLoad.bat in the sacabpcprodscripts folder. The batch script has two steps:
- Execute OSoftSchedulingDMLauncher.exe that in turn triggers the SSIS package in the data manager.
- Execute a SQL command to read a table on the SAP BusinessObjects Planning and Consolidation database for converting the package execution status into the return code that is passed back to the scheduling tool (Figure 10).
This command includes these parameter details:
USERID: <Any ID that has access to the data manager>
APPSET: <Appset name>
APPLICATION: <Application name>
SCHEDJOB: <Job name from step 3>
DATABASE: <Database name>
JOBNAME: <Job name in single quotes from step 3>
Step 6. Set Up an Enterprise Scheduling Job to Execute the SSIS Package
Within the scheduling tool, you need to create a job to trigger the batch script by passing all the above parameters to the batch script. The job status is visible in the scheduling tool as well as in the SAP BusinessObjects Planning and Consolidation data manager to better monitor the data loads. Here are the important parameters that need to be provided in setting up the scheduling tool job.
Job Name is a user-defined name. Provide the script name that was created on the application server and the location in the General tab (Figure 11). Then, in the Execution tab, provide the server name (Figure 12). Provide the parameter values in the Set tab (Figure 13).

Figure 11
Enter a user-defined name

Figure 12
Enter the server name

Figure 13
Provide the parameter values
By following these steps and providing the corresponding parameters in the scheduling tool job, you can trigger any number of SSIS packages from the enterprise scheduling tool with a single batch script.
Step 7. Execute the Job and Check the Status in Both Systems
Execute the job to run the script that in turn triggers the SSIS package on the SAP BusinessObjects Planning and Consolidation application server. The job status is visible in both the scheduling tool and the SAP BusinessObjects Planning and Consolidation data manager. While the job is running, the job status is yellow in my example scheduling tool and the package status in SAP BusinessObjects Planning and Consolidation data manager is seen as progressing.
Upon successful completion of the SSIS package in SAP BusinessObjects Planning and Consolidation, the package status in the data manager changes to either Completed if successful or Warning if there are any rejected records in the input file. The corresponding scheduling tool job status changes to green.
If the SSIS package fails in SAP BusinessObjects Planning and Consolidation, the package status in the data manager changes to Error and the corresponding scheduling tool job status changes to red (Figure 14).
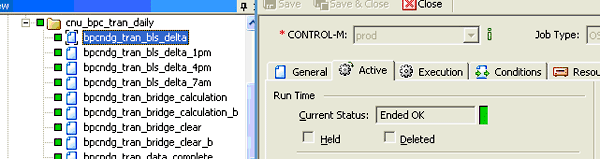
Figure 14
Current status of the job
Select Manage Data > View package status in SAP BusinessObjects Planning and Consolidation to see the SSIS package status in the data manager (Figure 15).

Figure 15
View the package status
Karunakar Gillella
Karunakar Gillella has around 10 years of experience in IT, with more than six years in SAP NetWeaver BW. He has extensively worked in leading and implementing the business critical projects in both SAP and non-SAP data warehousing areas. He has extensive knowledge in implementing the planning applications in SAP BusinessObjects Planning and Consolidation, version for Microsoft, and integrating data loads between SAP BusinessObjects Planning and Consolidation and SAP. He also worked on implementing the enterprise reporting solutions with SAP BusinessObjects and other BOE tools.
If you have comments about this article or publication, or would like to submit an article idea, please contact the editor.